
Popular categories
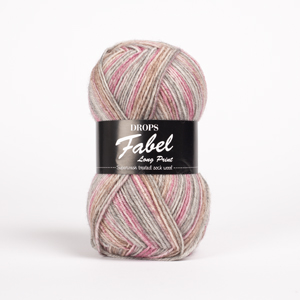
Looking for a yarn?
























Comments / Questions (61)
 Karen wrote:
Hi I thought at first that the sleeve cuffs were meant to be folded over, but now I’m not sure. Are they folded over in the pattern pictures please?
16.10.2026 - 21:04DROPS Design answered:
Dear Karen, the sleeve cuffs are not folded over; you work the Stripe pattern over the first 8cm of the sleeve, at the cuff, which is why it has a different pattern in the picture. Then work the rest of the sleeve in Rose Mist. Happy knitting!
18.10.2026 - 19:11
Karen Blake wrote:
In response to my comment on 14th September -and your reply -the increases you suggested made quite a stepped edge. The recommended cast off on the right front (not knitting the last stitch and making that the first one cast off) gives a fairly smooth edge so the two sides aren’t the same. I’ve redone the left front, using a provisional cast off in the section between the short rows and the front, so that I could use the same cast off method on both front edges
03.10.2026 - 14:23
Karen Blake wrote:
A question about the stepped edge at the front necklines. In May 202 you suggested not knitting the last stitch of the row before the cast offs, and then slipping this over, to give a smoother edge. What’s is the equivalent for the increases on at the left front, to make it look the same? Thanks
14.09.2026 - 01:25DROPS Design answered:
Dear Mrs Blake, you can use this technique to cast on the stitches on the side - your yarn store might have another technique for smoother increase they will be able to share with you even per mail or telephone. Happy knitting!
14.09.2026 - 16:40
 Silvia Frenz wrote:
Ist es richtig, daß man für das Vorderteil genau so viel Maschen anschlägt wie beim Rückenteil? Danke für die Antwort
09.08.2026 - 14:12DROPS Design answered:
Liebe Frau Franz, ja beim rechten Vorderteil braucht man soviel Maschen wie beim Rückenteil da der Anfang auch bei der Seite ist, beim linken Vorderteil beginnt man aber bei der Blende, deshalb braucht man weniger Maschen. Viel Spaß beim Stricken!
10.08.2026 - 08:36
Christine wrote:
Should both front sections of this pattern match up completely? Should I have the same number of ridges on each side or is one side wider than the other to allow for overlap when buttoned up? Thank you.
28.06.2026 - 15:14DROPS Design answered:
Hi Christine, Both front pieces should be the same width and length. Regards, Drops Team.
29.06.2026 - 05:06
Anna wrote:
Hallo, warum fängt man die Vorderteile von verschiedenen Seiten an? Spricht etwas dagegen beide Teile von der Seite anzufangen? Und noch eine Frage zur Maßskizze: wofür ist das zweite Maß von unten? Ist das für die Vorderteile? Sind sie schmaler als die Hälfte des Rückenteils?
19.01.2026 - 13:11DROPS Design answered:
Liebe Anna, die Anleitung wurde so geschrieben, es kann einfacher sein, die Anleitung so zu folgen, so sind die verkürzten Reihen richtig gestrickt, sowie die Streifen. Die kürzere Maß unten ist ja für die Vorderteile, die sind ja schmaler, siehe 2. Foto. Viel Spaß beim Stricken!
20.01.2026 - 09:13
 Connie wrote:
Jeg har med succes brugt German Short Rows i vendingerne for at undgå huller. Der er få en smule lange masker, men de kan sagtens rettes med en hæklenål, hvis de ikke forsvinder efter Blokning :)
24.07.2025 - 18:08
Gertrud wrote:
Ich habe den Pullover mit anderen Farben gestrickt. Die Anleitung ist gut .
24.06.2025 - 12:11
 Engel wrote:
Ik ben net begonnen met het achterpand en heb de steken voor het armsgat opgezet. In het patroon staat: brei ribbelsteek over alle steken tot een hoogte van 12 cm. Moet ik nu meten vanaf de opzetrand in het begin of vanaf de opzetrand van het armsgat?
06.04.2025 - 11:39DROPS Design answered:
Dag Engel,
Dit is vanaf het armsgat, dus vanaf dat je alle steken op de naald hebt en niet meer verder hoeft te meerderen voor het armsgat. De 12 cm is de schouderbreedte.
09.04.2025 - 10:55
 Jos wrote:
Bonjour je ne métrise pas votre modèle. Est-ce que je commence à lire le patron à partir du devant droit, ensuite ce serait le dos pour terminer par le devant gauche. Est-ce que j’ai bien compris? Sinon expliquer moi comment faire. Mer Merci
31.10.2023 - 18:22DROPS Design answered:
Bonjour Mme Jos, vous tricotez chaque pièce dans le sens de la longueur en commençant par le dos, à partir du côté gauche vers le côté droit (le côté gauche, vu sur l'endroit est le bas de la veste), puis vous tricotez le devant droit en commençant par le côté vers la bordure devant et vous tricotez ensuite le devant gauche en commençant à partir de la bordure devant vers le côté (cf flèches dans le schéma); Bon tricot!
01.11.2023 - 14:56
|
|
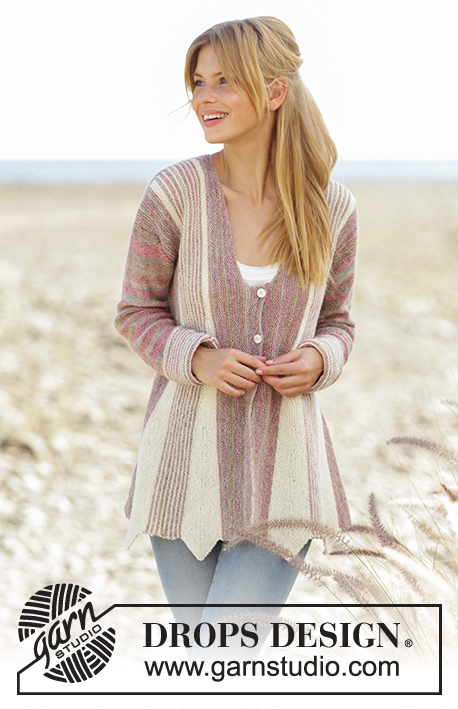
Rays of Spring#raysofspringcardigan |
|
 |
 |
Knitted jacket in Garter stitch with short rows and stripes in DROPS Fabel. Sizes S - XXXL.
DROPS 178-26 |
|
|
KNITTING TIP: Garter stitch is quite elastic and the garment will stretch when worn, both in width and length, and will be larger than the measurements show. Possibly choose a size smaller than you usually use. RIDGE/GARTER STITCH (is worked back and forth): 1 ridge = Work 2 rows knit. MEASURING TIP: Measure from the cast-on edge. Measure under the armhole, where the piece is narrowest. SHORT ROWS: The short rows are always worked with off white and in ridges. 1 repeat of short rows is 1 ridge across all the stitches in the piece, 9 ridges with short rows, 1 ridge over all the stitches, 9 ridges with short rows and 1 ridge over all the stitches. Insert 1 marker thread in the 86th stitch from the right side. Change to off white, continue to work short rows as follows (row 1 = from the right side): ROW 1: Knit all the stitches = 143-148-152-157-161-166 stitches. ROW 2: Knit all the stitches. ROW 3: Knit 86 stitches. ROW 4: Turn and work back by knitting 85 stitches, knit 2 stitches in the last stitch. ROW 5: Knit 77 stitches. ROW 6: Turn and work back by knitting 76 stitches, knit 2 stitches in the last stitch. Continue with short rows and garter stitch, turn 10 stitches earlier on each row from the right side and increase 1 stitch at the end of each row from the wrong side. Continue in this way until you have knitted 14 stitches before turning, turn and knit 2 stitches in the last stitch. There are now 9 ridges with short rows. Work 2 rows across all the stitches on the needle. Continue to work as follows – from the right side: ROW 1: Knit 2 together (= 1 stitch on the needle), knit 13. ROW 2: Turn and knit back. ROW 3: Knit 2 together (= 1 stitch on the needle), knit 22. ROW 4: Turn and knit back. ROW 5: Knit 2 together (= 1 stitch on the needle), knit 31. ROW 6: Turn and knit back. Continue with short rows and garter stitch, turn 10 stitches closer to the stitch with the marker thread each time you turn and knit 2 together at the beginning of each row on the right side. Continue in this way until you have worked 86 stitches before turning, turn and work to end of row. Knit 1 row from the right side and knit 1 row from the wrong side = 143-148-152-157-161-166 stitches on the needle. In the left side of the piece/on the shoulder of the jacket: 1 repeat with short rows = 3 ridges in off white. STRIPES: * Work 1 ridge (= 2 rows) with rose mist, work 1 ridge (= 2 rows) with off white *, repeat from *-*. The stripes are worked between repeats with short rows on back and front piecses. The sides and front bands are worked in rose mist. STRIPES SLEEVE: * Work 1 ridge (= 2 rows) with off white, 1 ridge (= 2 rows) with rose mist *, repeat from *-* for 8 cm. The rest of the sleeve is worked in stocking stitch with the wrong side out with rose mist (= purl from right side and knit from wrong side). ---------------------------------------------------------- BACK PIECE: The piece is worked back and forth on the circular needle. Work in GARTER STITCH = knit all rows. Cast on and work from the left-hand side, see the arrows in the sketch for the direction of work. READ KNITTING TIP! Loosely cast on 102-104-106-109-111-113 stitches with circular needle size 3.5 mm and rose mist. Work 5-11-13-15-19-21 rows (row 1 = from the wrong side). REMEMBER THE KNITTING TENSION! At the end of the next row (= from the right side) cast on 3 new stitches for the armhole. Continue to cast on 3 new stitches at the end of every 6th row: 0-0-1-2-4-5 times = 105-107-112-118-126-131 stitches. At the end of the next row from the right side cast on 38-41-40-39-35-35 new stitches = 143-148-152-157-161-166 stitches. Continue to work garter stitch across all stitches until the piece measures 9-10-11-12-14-16 cm (adjust so that the next row is worked from the right side). Continue to work 1 repeat with SHORT ROWS – see description above – with off white. Continue working with STRIPES - see description above, across all stitches until the piece measures 17-19-21-23-26-28 cm – READ MEASURING TIP. Now cast off 5 stitches at the beginning of the next row from the wrong side for the neck = 138-143-147-152-156-161 stitches. Continue working garter stitch across all stitches until the piece measures 20-22-24-26-30-32 cm (adjust so that the next row is worked from the right side). Work 1 repeat with short rows with off white. Continue with stripes and garter stitch until the piece measures 25-27-29-31-36-38 cm. Now cast on 5 stitches at the end of the next row from the right side = 143-148-152-157-161-166 stitches. Continue back and forth across all the stitches until the piece measures 32-35-38-41-47-49 cm (adjust so that the next row is worked from the right side). Work 1 repeat with short rows with off white. Finish the piece in garter stitch and rose mist. Work until the piece measures approx. 40-43-45-47-52-54 cm. Now cast off 38-41-40-39-35-35 stitches at the beginning of the next row from the wrong side for the armhole = 105-107-112-118-126-131 stitches. On the next row from the wrong side cast off 3 stitches at the beginning of the row. Continue to cast off at the beginning of every 6th row: 3 stitches 0-0-1-2-4-5 times = 102-104-106-109-111-113 stitches. Work back and forth until the piece measures 42-46-50-54-62-66 cm. Loosely cast off. RIGHT FRONT PIECE: Cast on and work from the side towards mid front. See the arrows in the sketch for the direction to work in. Loosely cast on 102-104-106-109-111-113 stitches with circular needle size 3.5 mm and rose mist. Continue to work and increase for the armhole as for the back piece = 143-148-152-157-161-166 stitches. When the piece measures 6-7-8-9-12-14 cm (adjust so that the next row is worked from the right side) work 1 repeat with short rows with off white. Continue to work in garter stitch and stripes across all stitches. When the piece measures 13-15-17-17-19-21 cm – READ MEASURING TIP - (adjust so that the next row is worked from the right side) work 1 repeat with short rows with off white. Continue to work garter stitch with rose mist. Work until the piece measures 3-3-3-5-6-6 cm after the last short row (the piece now measures a total of approx. 17-19-21-23-26-28 cm). Now cast off for the neck at the beginning of every row from the wrong side: 9-9-11-9-11-8 stitches 1 time, 5 stitches 7 times and 2 stitches 1-1-1-2-2-4 times = 97-102-104-109-111-115 stitches. Work 5 rows back and forth across all the stitches with rose mist. Now cast off for buttonholes, work as follows from the right side: Work 56-61-63-68-70-74 stitches, * knit 2 together, make 1 yarn over, work 16 stitches *, repeat from *-* in total 2 times, knit 2 together, make 1 yarn over, work the last 3 stitches = 3 buttonholes. Work 5 rows back and forth across all the stitches with rose mist. Loosely cast off. LEFT FRONT PIECE: Cast on and work from mid front towards the side. Loosely cast on 97-102-104-109-111-115 stitches with circular needle size 3.5 mm and rose mist. Work 11 rows (row 1 = from right side) back and forth across all stitches. Then continue to increase for the neck at the end of every row from the right side: 2 stitches 1-1-1-2-2-4 times, 5 stitches 7 times and 9-9-11-9-11-8 stitches 1 time = 143-148-152-157-161-166 stitches. Continue back and forth across all stitches until the piece measures approx. 10-10-10-12-13-14 cm (adjust so that the next row is worked from the right side). Work 1 repeat with short rows and off white. Continue working in garter stitch and stripes back and forth across all stitches until the piece measures approx. 17-18-19-20-20-21 cm (adjust so that the next row is worked from the right side). Work 1 repeat with short rows with off white. Continue to work garter stitch with rose mist. AT THE SAME TIME when the piece measures 4-4-3-2-2-2 cm after the last short row cast off the first 38-41-40-39-35-35 stitches from the wrong side for the armhole. On the next row from the wrong side cast off 3 stitches at the beginning of the row. Continue to cast off at the beginning of every 6th row: 3 stitches 0-0-1-2-4-5 times = 102-104-106-109-111-113 stitches. Continue back and forth across all stitches until the piece measures 6-7-8-9-12-14 cm after the last short row. Loosely cast off. SLEEVE: The sleeve is worked back and forth on the circular needle. Loosely cast on 48-50-52-54-56-58 stitches (including 1 edge stitch in each side) with circular needle size 3.5 mm and rose mist. Work in GARTER STITCH and STRIPES SLEEVE – see description above. When the piece measures 5-5-5-5-5-8 cm increase 1 stitch in each side. Continue the increases every 3-2½-2-1½-1½-1 cm in total 12-14-16-19-20-22 times = 72-78-84-92-96-102 stitches. AT THE SAME TIME when the piece measures 8 cm continue working with rose mist and stocking stitch with the wrong side out. When the piece measures 41-41-40-40-38-37 cm cast off 3 stitches in each side for the sleeve cap. NOTE! Shorter measurements in the larger sizes due to a longer sleeve cap and broader shoulder measurements. Continue to cast off for the sleeve cap at the beginning of each row in the side as follows: 2 stitches 2-2-2-2-1-0 times and 1 stitch 10-12-14-15-24-28 times. Then cast off 2 stitches in each side until the piece measures 47-48-48-49-49-50 cm. Now cast off 3 stitches in each side 1 time. Cast off the remaining stitches, when the piece measures approx. 48-49-49-50-50-51 cm. ASSEMBLY: Sew the shoulder seams. Sew in the sleeves. Sew the sleeve and side seams in one go inside the 1 edge stitch. Sew the buttons on the left front piece. |
|
 |
|
Have you finished this pattern?Tag your pictures with #dropspattern #raysofspringcardigan or submit them to the #dropsfan gallery. Do you need help with this pattern?You'll find 10 tutorial videos, a Comments/Questions area and more by visiting the pattern on garnstudio.com. © 1982-2026 DROPS Design A/S. We reserve all rights. This document, including all its sub-sections, has copyrights. Read more about what you can do with our patterns at the bottom of each pattern on our site. |
|






With over 40 years in knitting and crochet design, DROPS Design offers one of the most extensive collections of free patterns on the internet - translated to 17 languages. As of today we count 333 catalogues and 12532 patterns translated into English (UK/cm). 12532
We work hard to bring you the best knitting and crochet have to offer, inspiration and advice as well as great quality yarns at incredible prices! Would you like to use our patterns for other than personal use? You can read what you are allowed to do in the Copyright text at the bottom of all our patterns. Happy crafting!
Post a comment to pattern DROPS 178-26
We would love to hear what you have to say about this pattern!
If you want to leave a question, please make sure you select the correct category in the form below, to speed up the answering process. Required fields are marked *.