
Popular categories
Looking for a yarn?


|
|
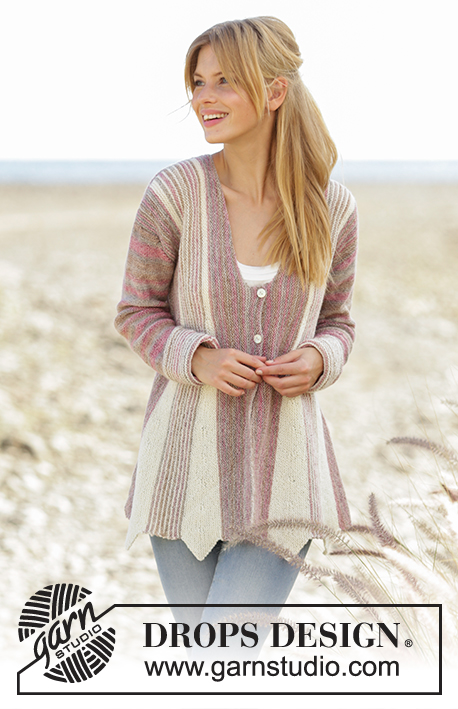
Rays of Spring |
|
 |
 |
Knitted jacket in Garter stitch with short rows and stripes in DROPS Fabel. Sizes S - XXXL.
DROPS 178-26 |
|
|
KNITTING TIP: Garter stitch is quite elastic and the garment will stretch when worn, both in width and length, and will be larger than the measurements show. Possibly choose a size smaller than you usually use. RIDGE/GARTER STITCH (is worked back and forth): 1 ridge = Work 2 rows knit. MEASURING TIP: Measure from the cast-on edge. Measure under the armhole, where the piece is narrowest. SHORT ROWS: The short rows are always worked with off white and in ridges. 1 repeat of short rows is 1 ridge across all the stitches in the piece, 9 ridges with short rows, 1 ridge over all the stitches, 9 ridges with short rows and 1 ridge over all the stitches. Insert 1 marker thread in the 86th stitch from the right side. Change to off white, continue to work short rows as follows (row 1 = from the right side): ROW 1: Knit all the stitches = 143-148-152-157-161-166 stitches. ROW 2: Knit all the stitches. ROW 3: Knit 86 stitches. ROW 4: Turn and work back by knitting 85 stitches, knit 2 stitches in the last stitch. ROW 5: Knit 77 stitches. ROW 6: Turn and work back by knitting 76 stitches, knit 2 stitches in the last stitch. Continue with short rows and garter stitch, turn 10 stitches earlier on each row from the right side and increase 1 stitch at the end of each row from the wrong side. Continue in this way until you have knitted 14 stitches before turning, turn and knit 2 stitches in the last stitch. There are now 9 ridges with short rows. Work 2 rows across all the stitches on the needle. Continue to work as follows – from the right side: ROW 1: Knit 2 together (= 1 stitch on the needle), knit 13. ROW 2: Turn and knit back. ROW 3: Knit 2 together (= 1 stitch on the needle), knit 22. ROW 4: Turn and knit back. ROW 5: Knit 2 together (= 1 stitch on the needle), knit 31. ROW 6: Turn and knit back. Continue with short rows and garter stitch, turn 10 stitches closer to the stitch with the marker thread each time you turn and knit 2 together at the beginning of each row on the right side. Continue in this way until you have worked 86 stitches before turning, turn and work to end of row. Knit 1 row from the right side and knit 1 row from the wrong side = 143-148-152-157-161-166 stitches on the needle. In the left side of the piece/on the shoulder of the jacket: 1 repeat with short rows = 3 ridges in off white. STRIPES: * Work 1 ridge (= 2 rows) with rose mist, work 1 ridge (= 2 rows) with off white *, repeat from *-*. The stripes are worked between repeats with short rows on back and front piecses. The sides and front bands are worked in rose mist. STRIPES SLEEVE: * Work 1 ridge (= 2 rows) with off white, 1 ridge (= 2 rows) with rose mist *, repeat from *-* for 8 cm / 3⅛". The rest of the sleeve is worked in stockinette stitch with the wrong side out with rose mist (= purl from right side and knit from wrong side). ---------------------------------------------------------- BACK PIECE: The piece is worked back and forth on the circular needle. Work in GARTER STITCH = knit all rows. Cast on and work from the left-hand side, see the arrows in the sketch for the direction of work. READ KNITTING TIP! Loosely cast on 102-104-106-109-111-113 stitches with circular needle size 3.5 mm / US 4 and rose mist. Work 5-11-13-15-19-21 rows (row 1 = from the wrong side). REMEMBER THE GAUGE! At the end of the next row (= from the right side) cast on 3 new stitches for the armhole. Continue to cast on 3 new stitches at the end of every 6th row: 0-0-1-2-4-5 times = 105-107-112-118-126-131 stitches. At the end of the next row from the right side cast on 38-41-40-39-35-35 new stitches = 143-148-152-157-161-166 stitches. Continue to work garter stitch across all stitches until the piece measures 9-10-11-12-14-16 cm / 3½"-4"-4½"-4¾"-5½"-6¼" (adjust so that the next row is worked from the right side). Continue to work 1 repeat with SHORT ROWS – see description above – with off white. Continue working with STRIPES - see description above, across all stitches until the piece measures 17-19-21-23-26-28 cm / 6¾"-7½"-8¼"-9"-10¼"-11" – READ MEASURING TIP. Now bind off 5 stitches at the beginning of the next row from the wrong side for the neck = 138-143-147-152-156-161 stitches. Continue working garter stitch across all stitches until the piece measures 20-22-24-26-30-32 cm / 8"-8¾"-9½"-10¼"-11¾"-12½" (adjust so that the next row is worked from the right side). Work 1 repeat with short rows with off white. Continue with stripes and garter stitch until the piece measures 25-27-29-31-36-38 cm / 9¾"-10½"-11½"-12¼"-14¼"-15". Now cast on 5 stitches at the end of the next row from the right side = 143-148-152-157-161-166 stitches. Continue back and forth across all the stitches until the piece measures 32-35-38-41-47-49 cm / 12½"-13¾"-15"-16"-18½"-19¼" (adjust so that the next row is worked from the right side). Work 1 repeat with short rows with off white. Finish the piece in garter stitch and rose mist. Work until the piece measures approx. 40-43-45-47-52-54 cm / 15¾"-17"-17¾"-18½"-20½"-21¼". Now bind off 38-41-40-39-35-35 stitches at the beginning of the next row from the wrong side for the armhole = 105-107-112-118-126-131 stitches. On the next row from the wrong side bind off 3 stitches at the beginning of the row. Continue to bind off at the beginning of every 6th row: 3 stitches 0-0-1-2-4-5 times = 102-104-106-109-111-113 stitches. Work back and forth until the piece measures 42-46-50-54-62-66 cm / 16½"-18"-19¾"-21¼"-24½"-26". Loosely bind off. RIGHT FRONT PIECE: Cast on and work from the side towards mid front. See the arrows in the sketch for the direction to work in. Loosely cast on 102-104-106-109-111-113 stitches with circular needle size 3.5 mm / US 4 and rose mist. Continue to work and increase for the armhole as for the back piece = 143-148-152-157-161-166 stitches. When the piece measures 6-7-8-9-12-14 cm / 2⅜"-2¾"-3½"-4¾"-5½" (adjust so that the next row is worked from the right side) work 1 repeat with short rows with off white. Continue to work in garter stitch and stripes across all stitches. When the piece measures 13-15-17-17-19-21 cm / 5"-6"-6¾"-6¾"-7½"-8¼" – READ MEASURING TIP - (adjust so that the next row is worked from the right side) work 1 repeat with short rows with off white. Continue to work garter stitch with rose mist. Work until the piece measures 3-3-3-5-6-6 cm / 1"-1"-1"-2"-2½"-2½" after the last short row (the piece now measures a total of approx. 17-19-21-23-26-28 cm / 6¾"-7½"-8¼"-9"-10¼"-11"). Now bind off for the neck at the beginning of every row from the wrong side: 9-9-11-9-11-8 stitches 1 time, 5 stitches 7 times and 2 stitches 1-1-1-2-2-4 times = 97-102-104-109-111-115 sts. Work 5 rows back and forth across all the stitches with rose mist. Now bind off for buttonholes, work as follows from the right side: Work 56-61-63-68-70-74 stitches, * knit 2 together, make 1 yarn over, work 16 stitches *, repeat from *-* in total 2 times, knit 2 together, make 1 yarn over, work the last 3 stitches = 3 buttonholes. Work 5 rows back and forth across all the stitches with rose mist. Loosely bind off. LEFT FRONT PIECE: Cast on and work from mid front towards the side. Loosely cast on 97-102-104-109-111-115 stitches with circular needle size 3.5 mm / US 4 and rose mist. Work 11 rows (row 1 = from right side) back and forth across all stitches. Then continue to increase for the neck at the end of every row from the right side: 2 stitches 1-1-1-2-2-4 times, 5 stitches 7 times and 9-9-11-9-11-8 stitches 1 time = 143-148-152-157-161-166 stitches. Continue back and forth across all stitches until the piece measures approx. 10-10-10-12-13-14 cm / 4"-4-"4"-4¾"-5"-5½" (adjust so that the next row is worked from the right side). Work 1 repeat with short rows and off white. Continue working in garter stitch and stripes back and forth across all stitches until the piece measures approx. 17-18-19-20-20-21 cm / 6¾"-7"-7½"-8"-8"-8¼" (adjust so that the next row is worked from the right side). Work 1 repeat with short rows with off white. Continue to work garter stitch with rose mist. AT THE SAME TIME when the piece measures 4-4-3-2-2-2 cm / 1½"-1½"-1"-¾"-¾"-¾" after the last short row bind off the first 38-41-40-39-35-35 stitches from the wrong side for the armhole. On the next row from the wrong side bind off 3 stitches at the beginning of the row. Continue to bind off at the beginning of every 6th row: 3 stitches 0-0-1-2-4-5 times = 102-104-106-109-111-113 stitches. Continue back and forth across all stitches until the piece measures 6-7-8-9-12-14 cm / 2⅜"-2¾"-3⅛"-3½"-4¾"-5½" after the last short row. Loosely bind off. SLEEVE: The sleeve is worked back and forth on the circular needle. Loosely cast on 48-50-52-54-56-58 stitches (including 1 edge stitch in each side) with circular needle size 3.5 mm / US 4 and rose mist. Work in GARTER STITCH and STRIPES SLEEVE – see description above. When the piece measures 5-5-5-5-5-8 cm / 2"-2"-2"-2"-2"-3" increase 1 stitch in each side. Continue the increases every 3-2½-2-1½-1½-1 cm / 1⅛"-⅞"-¾"-½"-½"-⅜" in total 12-14-16-19-20-22 times = 72-78-84-92-96-102 stitches. AT THE SAME TIME when the piece measures 8 cm / 3⅛" continue working with rose mist and stockinette stitch with the wrong side out. When the piece measures 41-41-40-40-38-37 cm / 16"-16"-15¾"-15¾"-15"-14½" bind off 3 stitches in each side for the sleeve cap. NOTE! Shorter measurements in the larger sizes due to a longer sleeve cap and broader shoulder measurements. Continue to bind off for the sleeve cap at the beginning of each row in the side as follows: 2 stitches 2-2-2-2-1-0 times and 1 stitch 10-12-14-15-24-28 times. Then bind off 2 stitches in each side until the piece measures 47-48-48-49-49-50 cm / 18½"-19"-19"-19¼"-19¼"-19¾". Now bind off 3 stitches in each side 1 time. Bind off the remaining stitches, when the piece measures approx. 48-49-49-50-50-51 cm / 19"-19¼"-19¼"-19¾"-19¾"-20". ASSEMBLY: Sew the shoulder seams. Sew in the sleeves. Sew the sleeve and side seams in one go inside the 1 edge stitch. Sew the buttons on the left front piece. |
|

|
|
|
Have you made this or any other of our designs? Tag your pictures in social media with #dropsdesign so we can see them! Do you need help with this pattern?You'll find tutorial videos, a Comments/Questions area and more by visiting the pattern on garnstudio.com. © 1982-2024 DROPS Design A/S. We reserve all rights. This document, including all its sub-sections, has copyrights. Read more about what you can do with our patterns at the bottom of each pattern on our site. |
|


With over 40 years in knitting and crochet design, DROPS Design offers one of the most extensive collections of free patterns on the internet - translated to 17 languages. As of today we count 304 catalogs and 11422 patterns - 11417 of which are translated into English (US/in).
We work hard to bring you the best knitting and crochet have to offer, inspiration and advice as well as great quality yarns at incredible prices! Would you like to use our patterns for other than personal use? You can read what you are allowed to do in the Copyright text at the bottom of all our patterns. Happy crafting!
Comments / Questions (52)
Bonjour je ne métrise pas votre modèle. Est-ce que je commence à lire le patron à partir du devant droit, ensuite ce serait le dos pour terminer par le devant gauche. Est-ce que j’ai bien compris? Sinon expliquer moi comment faire. Mer Merci
31.10.2023 - 18:22DROPS Design answered:
Bonjour Mme Jos, vous tricotez chaque pièce dans le sens de la longueur en commençant par le dos, à partir du côté gauche vers le côté droit (le côté gauche, vu sur l'endroit est le bas de la veste), puis vous tricotez le devant droit en commençant par le côté vers la bordure devant et vous tricotez ensuite le devant gauche en commençant à partir de la bordure devant vers le côté (cf flèches dans le schéma); Bon tricot!
01.11.2023 - 14:56Bonjour, j'ai un souci dans la maîtrise des rangs raccourcis. Après chaque rang tourné, faut-il faire un rang ou deux sur toutes les mailles et quelle maille faut-il tricoter deux fois ? Merci pour votre lumière. Cordialement
09.05.2023 - 12:32DROPS Design answered:
Bonjour Mme Lacaille, après le rang 6, tournez et tricotez les 68 premières mailles, tournez et tricotez ces 68 m en augmentant 1 m, puis tricotez 10 m en moins au rang suivant = 58 m; puis augmentez 1 m à la fin du rang suivant = 59 m, continuez ainsi, (sur l'endroit, vous tricotez 10 m en moins en remontant vers le haut de la veste; sur l'envers, vous augmentez 1 maille pour former la pointe en bas) jusqu'à ce que vous ayez tricoté 14 m sur l'envers + 1 augmentation = 15 m. Bon tricot!
09.05.2023 - 16:33Jeg er simpelthen gået i stå allerede lige efter der er slået masker op i ærmegabet. Her står at man skal fortsætte til arbejdet måler (mener det er 14 cm til den str jeg arbejder med) men umiddelbart giver det altså ikke mening når jeg kigger på trøjen... Skal de 14 cm ikke være efter der er slået de nye masker op? Ellers får jeg kun nogle få cm skulder før jeg skal til at starte på kilen...
05.04.2023 - 13:56DROPS Design answered:
Hej Jeanette, jeg kan ikke finde hvor du er i opskriften. Skriv hvor du er, og hvilken størrelse og hvad du ikke forstår, så skal vi se på det?
13.04.2023 - 12:25Jeg skal lukke af for 3 masker i hver side af pinden. Jeg ved godt hvordan jeg gør det i begyndelsen af pinden, men hvordan gør jeg det sidst på pinden?
02.04.2023 - 21:16DROPS Design answered:
Hej Mette, du lukker kun af i starten af hver pind :)
13.04.2023 - 11:34Liebes Drops Team,\r\n\r\nganz lieben Dank für die schnelle Antwort, Problem gelöst, Brett vorm Kopf beseitigt! :) LG, Kristin Wingender
07.12.2022 - 11:54Ich stricke aktuell an diesem wunderschönen Modell. Schön wäre es, wenn in der Anleitung bei den verkürzten Reihen direkt die Variante mit Umschlag hingewiesen würde, denn die Löcher, die sich ohne Umschlag bilden, entstehen erst mit den Rückreihen und man fragt sich so lange, ob man selbst was falsch macht und sich immer wieder mit Blick in die Anleitung versichert, dass das nicht der Fall ist und einem nurnoch bleibt, es vorn mit Umschlag zu versuchen und die hinten zu vernähen.
07.12.2022 - 07:35Liebes Drops-Team, wenn ich der Anleitung für den rechten Ärmel folge (Rückenteil ist fertig), ergibt sich das Problem, dass ich bei Größe M nach sieben Zentimetern den ersten Rapport in Natur stricken soll. Da lande ich aber gleichzeitig bei der letzten Zunahme (+38 M) für den Armausschnitt. Das kann ich zwar machen, aber stimmen dann die restlichen Maßangaben, sodass in der Breite alles zusammen passt? LG, Kristin Wingender
07.12.2022 - 07:26DROPS Design answered:
Liebe Frau Wingender, ich misverstehe vielleicht Ihre Frage aber das rechte Vorderteil stricken Sie ab die Seite bis zur vorderen Mitte (Blende), so stricken Sie am Anfang genau wie beim Rückenteil : 11 Reihen dann für die Armausschnitt 3 neue Maschen 1 Mal und 38 Maschen 1 Mal anschlagen. Weiterstricken bis die Arbeit 7 cm misst dann die ersten verkürzten Reihen stricken. Viel Spaß beim stricken!
07.12.2022 - 08:30Bonjour, j'ai un souci avec les manches : en taille L on doit rabattre 3+(2*2)+(14*1)+2 = 23 mailles tous les 2 rangs, diminutions qui se font donc sur 2*(1+2+14+1) = 36 rangs. Or en jersey, 36 rangs correspondent à environ 12cm. Par conséquent comment peut on avoir un ouvrage de 40cm avant de commencer les diminutions, et de 48cm à la fin (mesures indiquées dans vos explications).? On a forcément au moins 12cm d'écart entre les 2, et pas 8... Ou est l'erreur ? Merci !
14.09.2022 - 19:08Bonjour, Merci pour vos beaux modèles. Je les découvre et c'est ma 1ère réalisation DROPS. Ma question porte sur l'emmanchure du dos en taille S. J'ai monté les 3 mailles en fin de rang 6, et je ne suis pas certaine de bien comprendre à quel rang monter les 38 mailles additionnelles suivantes. Est-ce au rang 8 ou serait-ce au rang 6+(5x6) = 36 ? Merci par avance de votre réponse !
18.08.2022 - 07:11DROPS Design answered:
Bonjour Magali et merci, vous augmentez ici pour l'emmanchure, en fin de rang sur l'endroit à chaque fois: 1 x 3 m en fin de rang sur l'endroit puis, en taille S, 38 mailles à la fin du rang suivant sur l'endroit (vous n'augmentez pas tous les 6 rangs en taille S) (= 41 mailles pour l'emmanchure). Bon tricot!
18.08.2022 - 09:23Lurer på hvor mange cm det skal være med striper på bakstykke, står bare gjenta fra * - * men ikke hvir langt
10.05.2022 - 21:19DROPS Design answered:
Hej Stine, antal cm står nede i selve opskriften: Fortsett videre med striper og riller til arbeidet måler 25-27-29-31-36-38 cm. :)
11.05.2022 - 08:02