
Popular categories
Looking for a yarn?


Comments / Questions (15)
![]() Véronique wrote:
Véronique wrote:
Bonjour, j ai déjà tricoté le dos, arrivée aux épaules si je continue le devant de haut en bas mon motif va être à l envers par rapport à l arrière ou il y a quelque chose que je n ai pas compris ?
15.02.2026 - 18:53DROPS Design answered:
Bonjour Véronique, le motif continue effectivement simplement tout du long, du bas du dos au bas des devants, mais il ne sera pas à l'envers, vous le continuez simplement comme vous l'avez fait auparavant. Bon crochet!
17.02.2026 - 14:39
![]() Maria Vermeulen wrote:
Maria Vermeulen wrote:
Bij het patroon A2 de eerste toer met stokjes even een vraag of de drie stokjes aan elkaar gehaakt moeten worden.
22.07.2024 - 22:54DROPS Design answered:
Dag Maria,
Nee, de drie stokjes worden niet aan elkaar gehaakt, anders had er wel gestaan je 3 stokjes samen moet haken.
24.07.2024 - 16:28
![]() Ksrin wrote:
Ksrin wrote:
Ik ben met de voorkant bezig. Heb de linker en rechterkraag tegelijk gehaakt en merk nu dat het rechter voorpand met mouw ongeveer 38 cm breed wordt en het linker voorpand 60 cm, ook zit de hals opening niet in het midden. Maat s/m Partoonbeschrijving gebruikt ik. Klopt dat verschil in afmeting of doe ik iets verkeerd?
04.05.2023 - 11:48DROPS Design answered:
Dag Ksrin,
Nee, het rechter en linker voorpand zou wel hetzelfde moeten zijn qua breedte en de hals hoort in het midden te zitten. Vermoedelijk heb je ergens iets verkeerd gedaan.
08.05.2023 - 21:13
![]() Mira wrote:
Mira wrote:
After 25 chain for sleeve, it says RS sc across, as diagram, end row 25 ch for other sleeve. Then turn continue RS. If you turn you are then on WS , how can you be on RS 2 rows in a row?
31.08.2020 - 06:29DROPS Design answered:
Dear Mira, there is a mistake in the English pattern, this next row (after the 25 chains) should be worked from WS and not from RS. It will be fixed asap. Thank you! Happy crocheting!
31.08.2020 - 10:19
![]() Mira Goetsch wrote:
Mira Goetsch wrote:
Are the reducing DC's and DTR's the same as dc and tr together? Skipping stitches, keeping them on the hook so they are only 1 stitch for the next row to go into?
10.08.2020 - 00:03DROPS Design answered:
Dear Mrs Goetsch, in this pattern you don't work dc nor dtr together, to decrerase stitches skip sts just as shown in diagram. Happy crocheting!
10.08.2020 - 09:47
![]() Annelies wrote:
Annelies wrote:
Ik had 2 dagen geleden een vraag over de kraag. als antwoordt kreeg ik dat je de kraag los gehaakt wordt een aan het einde eraan gehaakt. Maar in het patroon staat dat je hem met de voorkant mee haakt. Nu snap ik er nog mínder van. De foto bij het patroon valt het haar van mevrouw over de kraag. Hebben jullie misschien nog andere foto's?
28.10.2019 - 21:59DROPS Design answered:
Dag Annelies,
Klopt, je haakt eerst een losse kraag en daarna haak je deze samen met de panden zoals beschreven in de tekst. Helaas zijn er geen andere foto's.
29.10.2019 - 09:39
![]() Annelies wrote:
Annelies wrote:
Goedeavond, Ik heb het vest gehaakt maar kom er niet uit met de kraag. Hebben jullie een plaatje of duidelijke uitleg hoe dat moet?
26.10.2019 - 19:18DROPS Design answered:
Dag Annelies,
De kraag wordt los van het kledingstuk gehaakt en aan het einde eraan genaaid. Je zet eerst het aantal lossen (behorende bij je maat) op en dan haak je 1 stokje in de 4e losse vanaf de haaknaald, dit is het 2e stokje (De eerste 3 lossen vervangen het eerste stokje). Daarna vervolg je de beschrijving.
27.10.2019 - 16:00
![]() Florence Viollette wrote:
Florence Viollette wrote:
Je ne comprends pas comment faire le col de ce modèle !
14.04.2018 - 13:16DROPS Design answered:
Bonjour Mme Violette, pour former le col châle, il doit être plus "haut" côté extérieur et moins côté intérieur (qui sera cousu le long de l'encolure dos), on va ainsi crocheter des "petites" mailles (= mailles serrées) côté intérieur et augmenter la hauteur des mailles (= demi-brides puis brides) pour le côté extérieur, vu sur l'endroit, on aura 5 ms, 5 dB, 18-22 B (cf taille) et sur l'envers: 18-22 B, 5 dB et 5 ms. Bon crochet!
16.04.2018 - 10:46Tanya Fleming wrote:
I'm really sorry but that didn't help at all. And the video link is for a knitted pattern not a crochet one. I have crocheted the collar but I need more precise details on how to attach the collar and continue down the front
29.09.2017 - 14:11DROPS Design answered:
Dear Mrs Fleming, sorry, I thought you wanted to know how to attach the collar at the very end. To work right front piece, first work shawl collar, cut the yarn and put aside. Then crochet over sleeve as explained, then on the shoulder on back piece (see number of repeats in your size) then crochet over the sts on shawl collar (over last row worked on collar). Collar is now crochet together and you can continue crochet right front piece from top down. Happy crocheting!
02.10.2017 - 13:00Tanya Fleming wrote:
Please can I have a diagram or diagrams of how the collar is attached as the instructions are very unclear
29.09.2017 - 11:31DROPS Design answered:
Dear Mrs Fleming, this video shows this technique for a knitted shawl collar. In that case, crochet together both fundation chains on collar, then crochet together end of rows of collar and neckline on back piece. Happy crocheting!
29.09.2017 - 13:32
|
||||||||||||||||
Silver Rain |
||||||||||||||||
|
|
||||||||||||||||
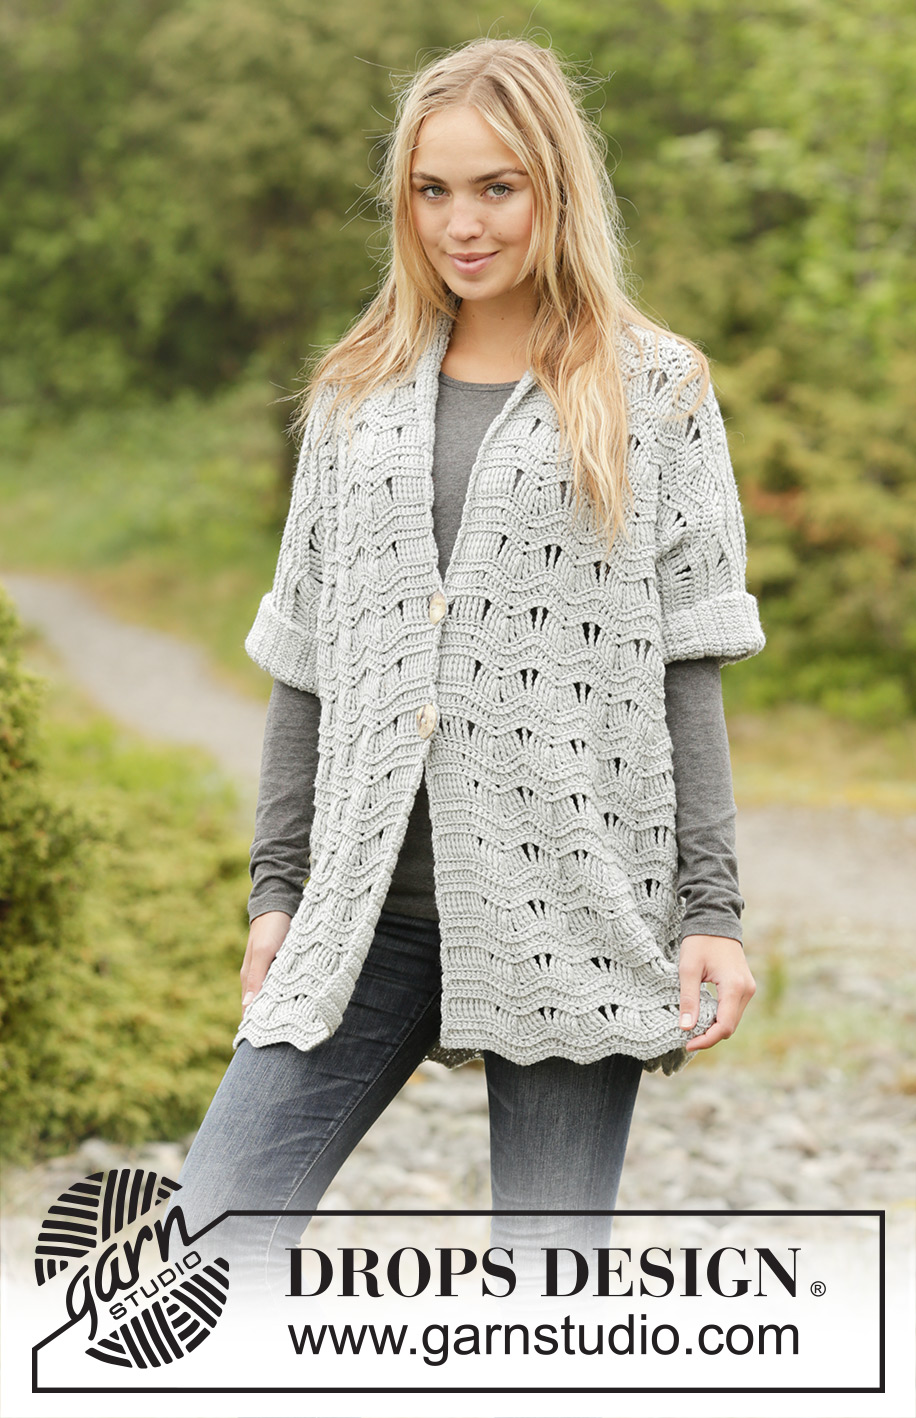
Crochet DROPS jacket with seamless sleeves and wave pattern in ”Merino Extra Fine”. Sizes S/M - XXXL.
DROPS Extra 0-1310 |
||||||||||||||||
|
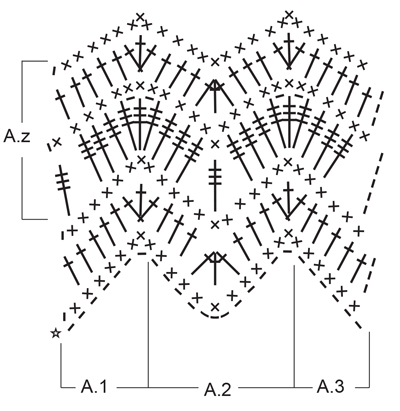
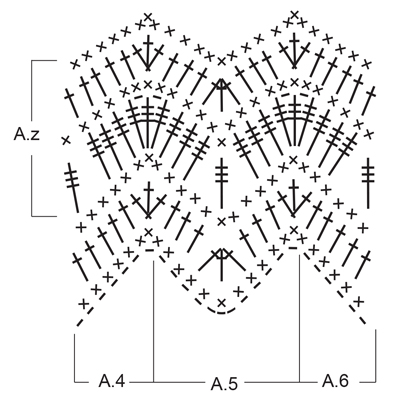
PATTERN: See diagrams A.1 to A.6. CROCHET TIP: Work every row from RS in the back loop of st on previous row and work every row from WS in the front loop of st on previous row. Work every row with dc from WS. Sts that are not worked in diag are worked like the first st in the pattern, i.e. Work the sts in dc on rows with dc in it. NOTE: These sts are also worked in the back and front loop in relation to RS and WS. CROCHET INFO: Beg every row with tr with 3 ch (replaces first tr) Beg every row with dc with 1 ch (replaces first dc) Beg every row with trtr with 5 ch (replaces first trtr) ---------------------------------------------------------- JACKET: Work from back piece and up towards the neck, then divide the piece and work down each front piece. BACK PIECE: Work 110-122-134-146-158 ch (incl 1 ch for turning) with hook size 5 mm and Merino Extra Fine. Work 1st row of A.1 to A.3 (with dc) from WS as follows: Work A.1 over the 1st 8 ch (incl the ch for turning), then A.2 over the next 96-108-120-132-144 ch (= in total 8-9-10-11-12 times in width), and finish with A.3 over the last 6 ch – READ CROCHET TIP! Continue in pattern like this. Repeat A.z in height. REMEMBER THE CROCHET TENSION! When piece measures approx. 50-51-52-53-54 cm – make sure that next row is a row with tr (= from RS) – cut the thread. Then work the sleeves as follows: Work 25-22-20-17-14 LOOSE ch, continue working over the back piece from RS like this: Work A.6 over A.3, A.5 over A.2 and A.4 over A.1 - NOTE: Adjust which row in pattern A.6, A.5 and A.4 to start with so that the pattern continues with the similar row as before, and finish with 25-22-20-17-14 LOOSE ch (incl 1 ch for turning) – READ CROCHET INFO, turn the piece. Work from WS like this: Work 1 dc in the 2nd ch from hook (= 2 dc), 1 dc in each of the next 23-20-18-15-12 ch, work A.4, A.5 and A.6 as before, work 1 dc in each of the last 25-22-20-17-14 ch = 25-22-20-17-14 dc in each side of the piece and A.4 to A.6 (= in total 159-165-173-179-185 sts). The first and last 25-22-20-17-14 sts are not worked in diag, but like the first st in diag, i.e. Work triple tr in i diag work sleeve sts like triple tr – REMEMBER THE CROCHET TIP! Continue like this until work measures in total 70-72-74-76-78 cm, make sure that next row is a row from RS, put piece aside and work the shawl collar. RIGHT SHAWL COLLAR: Work 34-39-34-39-34 ch (inkl 3 ch for turning) with hook size 5 mm and Merino Extra Fine. Work 1 tr in the 4th ch from hook (= 2 tr), 1 tr in each of the next 2-0-2-0-2 ch, * skip1 ch, 1 tr in each of the next 6 ch *, repeat from *-* = 28-32-28-32-28 tr. Then work as follows: 1st ROW (= RS: 5 dc, 5 htr, 18-22-18-22-18 tr. 2nd ROW (= WS): Work 1 tr in each of the 28-32-28-32-28 sts. Repeat 1st and 2nd row until piece measures approx. 6-6-7-7-8 cm in the most narrow part – make sure to finish with the 2nd row (= WS). Cut and fasten the thread. RIGHT FRONT PIECE Then work right front piece tog with the right shawl collar from RS as follows: Beg on the outermost part of sleeve: Work the first 25-22-20-17-14 sts like the first st in the pattern as before, A.6 as before (= 6 sts), repeat A.5 over the next 36-36-48-48-60 sts (= in total 3-3-4-4-5 times in width), work next A.5 over the next 0-6-0-6-0 sts on the back piece and the first 12-6-12-6-12 tr from the shawl collar, repeat A.5 in total 0-1-0-1-0 more time, A.4 over the next 7 tr, and finish with 9-7-9-7-9 sts like the first st in the pattern (= front band) = repeat A.5 in total 4-5-5-6-6 times in width (= 95-102-102-109-108 sts). Continue in pattern like this. When piece measures 40-42-44-46-48 cm from where ch for sleeve were worked (Piece measures in total 90-93-96-99-102 cm), make sure to work the next row from RS. Cut the thread. Skip the first 25-22-20-17-14 sts (= for sleeve), work A.3 over A.6 (adjust to the row in pattern) and A.5 and A.4 as before, and 9-7-9-7-9 sts like the first st in the pattern (= 70-80-82-92-94 sts). When piece measures 50-51-52-53-54 cm from where sts for sleeve were skipped (work measures in total 140-144-148-152-156 cm), make sure to finish with 1 whole repeat of A.z (make sure the number of repeats in height matches the number of repeats in back piece). Cut and fasten the thread. LEFT SHAWL COLLAR: Work 33-37-33-37-33 ch (incl 3 ch for turning) with hook size 5 mm and Merino Extra Fine. Work 1 st in the 4th ch from hook (= 2 tr), 1 st in each of the next 1-5-1-5-1 ch, * skip 1 ch, 1 tr in each of the next 6 ch *, repeat from *-* = 27-31-27-31-27 tr. Then work as follows: 1st row (= RS): Work 17-21-17-21-17 tr, 5 htr and 5 dc. 2nd row (= WS): Work 1 tr in each of the 27-31-27-31-27 sts. Repeat 1st and 2nd row until work measures approx. 6-6-7-7-8 cm in the most narrow part – make sure to finish with 2nd row (= WS). LEFT FRONT PIECE: Do not work any longer over the mid 24 sts (= 2 repeats of A.5) = neck. Work left front piece tog with left shawl collar from RS like this: work the first 9-7-9-7-9 sts from shawl collar like the first st in the pattern, A.6 over the next 6 tr from shawl collar, A.5 in total 0-1-0-1-0 time over shawl collar, repeat A.5 over the next 12-6-12-6-12 tr from shawl collar, skip 24 sts for neck between the right and left front piece (= 2 repeats of A.5), work the remaining 0-6-0-6-0 sts of A.5 over de first 0-6-0-6-0 tr from front piece, repeat A.5 over de next 36-36-48-48-60 sts, A.4 over the next 7 sts, work the next 25-22-20-17-14 sts like the first st in the pattern as before= repeat A.5 in total 4-5-5-6-6 times in width (= 95-102-102-109-108 sts). Continue in pattern like this. When piece measures 40-42-44-46-48 cm from where ch for sleeve were worked (work measures in total 90-93-96-99-102 cm), make sure that next row is a row from RS. Work like this from RS: Work 9-7-9-7-9 sts like the first st in diag as before, A.6 as before, repeat A.5 as before, Work A.1 over A.4, turn and work back again (= 70-80-82-92-94 sts). I.e. do not work any longer over the last 25-22-20-17-14 sts (= sleeve). When piece measures 50-51-52-53-54 cm from where sts for sleeve were skipped (Work measures in total 140-144-148-152-156 cm), make sure to finish with 1 whole repeat of A.z (adjust the pattern after right front piece). Cut and fasten the thread. ASSEMBLY: Start at the bottom and work the sides together through both layers from WS as follows: 1 dc, * 3 ch, skip 1 cm, 1 dc around next row *, repeat from *-* along the whole side and finish with 1 dc. Continue working under sleeve through both layers as follows: * 1 ch, 1 dc in the next st *, repeat from *-* and make sure to finish with 1 dc. Work the collar together mid back like this: 1 dc, * 1 ch, 1 dc in the next tr *, repeat from *-*. Sew the collar to the neck. Fold an edge on the sleeves and fasten with a stitch to keep the edge up. Sew on buttons. The buttons are buttoned through the row of triple tr on the front band. |
||||||||||||||||
Diagram explanations |
||||||||||||||||
|
||||||||||||||||
 |
||||||||||||||||
 |
||||||||||||||||
 |
||||||||||||||||
Have you finished this pattern?Tag your pictures with #dropspattern or submit them to the #dropsfan gallery. Do you need help with this pattern?You'll find 7 tutorial videos, a Comments/Questions area and more by visiting the pattern on garnstudio.com. © 1982-2026 DROPS Design A/S. We reserve all rights. This document, including all its sub-sections, has copyrights. Read more about what you can do with our patterns at the bottom of each pattern on our site. |
||||||||||||||||


With over 40 years in knitting and crochet design, DROPS Design offers one of the most extensive collections of free patterns on the internet - translated to 17 languages. As of today we count 324 catalogues and 12290 patterns translated into English (UK/cm). 12290
We work hard to bring you the best knitting and crochet have to offer, inspiration and advice as well as great quality yarns at incredible prices! Would you like to use our patterns for other than personal use? You can read what you are allowed to do in the Copyright text at the bottom of all our patterns. Happy crafting!
Post a comment to pattern DROPS Extra 0-1310
We would love to hear what you have to say about this pattern!
If you want to leave a question, please make sure you select the correct category in the form below, to speed up the answering process. Required fields are marked *.