
Popular categories
Looking for a yarn?


Comments / Questions (30)
![]() Stephanie Wall wrote:
Stephanie Wall wrote:
Please explain how to position pattern evenly. See my comments.
17.10.2025 - 16:22
![]() Stephanie Wall wrote:
Stephanie Wall wrote:
Very frustrating having to repeatedly undo these rows before can get it right.
17.10.2025 - 15:42
![]() Stephanie Wall wrote:
Stephanie Wall wrote:
Size XL. Yoke pattern. Row 3. I have 3 pink sts after garter 5 stitch band and before next colour. I have only 2 sts in same position at end of this row, so to even up the pattern I need to add a yarn over after the last pattern stitch, before garter sts, at the end of this row. But instructions say not to do that.....
17.10.2025 - 15:41
![]() Stephanie Wall wrote:
Stephanie Wall wrote:
I think that there's an error in the pattern. I think that the first yarn over at the beginning of pattern on the third row is in the wrong place. It is making the V shape be off set with more pink stitches before the next colour on one side than the other. I am going to have to work out how to correct this ........
17.10.2025 - 15:24
![]() Sofia wrote:
Sofia wrote:
Fråga från en nybörjare på att sticka efter mönster med diagram; varför är diagrammen upp och ned? Vore det inte enklare att ha dem i andra riktningen, framförallt när man stickar uppifrån och ned som den här tröjan.
15.02.2025 - 11:42DROPS Design answered:
Hej Sofia, det er fordi du strikker hver maske i samme retning og rækkefølge som du ser dem i diagrammet. Du starter med første maske i nederste højre hjørne nøjagtig som du strikker :)
18.02.2025 - 11:09
![]() Marti wrote:
Marti wrote:
Are there any row by row written directions? I’m terrible at charts. If there aren’t is it alright if I write them out for myself ?
06.02.2025 - 01:01DROPS Design answered:
Hi Marti, Of course you can write the chart out for yourself. Regards, Drops Team.
06.02.2025 - 09:45
![]() LHEBRARD wrote:
LHEBRARD wrote:
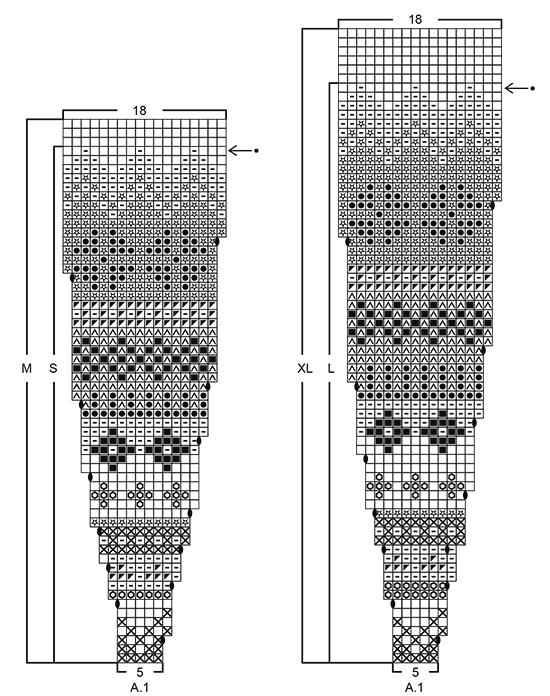
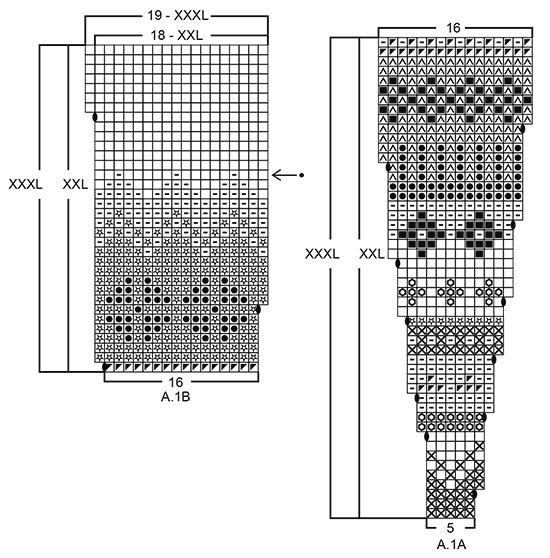
Concernant les augmentations pour la taille S, comment passe-t-on de 106 mailles à 354m pour l empiècement alors qu il n y a qu un rang d augmentation indiqué par une flèche sur le diagramme ? Je ne comprends pas car sur d autres modèles similaires de cardigans il y a au moins 8 rangs d augmentations pour l empiècement en jacquard ?
20.01.2025 - 20:37DROPS Design answered:
Bonjour Mme Lhebrard, les augmentations figurent dans le diagramme A.1, en taille S, vous allez répéter 19 fois A.1 qui commence par 5 mailles et se termine par 18 mailles, vous aurez ainsi, quand A.1 es terminé: 5 m de bordure devant + 19 fois les 18 m de A.1. + la 1ère m de A.1 (pour que le motif soit symétrique) + 5 m de bordure devant =353 m + 1 m à augmenter au rang avec la flèche dans A.1= 354 mailles. Bon tricot!
21.01.2025 - 09:45
![]() Virginie wrote:
Virginie wrote:
J'ai déjà tricoté cette veste pour ma fille, elle est magnifique. Je souhaiterais la tricoter à nouveau en baby merino. Pouvez vous me dire ce que vous en pensez ? Le rendu sera t'il très différent ?
06.02.2024 - 10:19DROPS Design answered:
Bonjour Virginie, l'effet sera différent car les 2 laines sont différentes, toutefois, Baby Merino se prête bien aux jacquards, retrouvez nos modèles type nordique ici à titre d'exemple. Bon tricot!
07.02.2024 - 07:50
![]() Kerstin Davidsson wrote:
Kerstin Davidsson wrote:
Hej. Tack för att ni svarade på min fråga igår om ökningarna i A1. Då förstod jag bättre. Jag undrar nu om jag också ska öka enligt texten : "På v markerat med pil i diag ökas det 3 m (storlek M) jämnt fördelat osv." Det är lite svårt att läsa denna beskrivning rätt. Tack för att ni hjälper mig. Kerstin
14.05.2022 - 10:58DROPS Design answered:
Hei Kerstin. Når du har 4 pinner igjen av diagram A.1, har du 370 masker på pinnen (5 stolpemasker + 20 rapporter av A.1 (= 360 m) + 5 stolpemasker). Deretter skal du i str. M øke med 3 masker jevnt fordelt på hele pinnen = 373 masker (husk: øk de 3 maskene i partiene med lys beige og det økes ikke over stolpene). mvh DROPS Design
16.05.2022 - 08:46
![]() Kerstin Davidsson wrote:
Kerstin Davidsson wrote:
Jag stickar modell 173-50 damkofta. Diag A1 st. M Stora problem med att det inte står något om ökningen till 374 m när A1 är klart. Liknande modeller har kompletta beskrivningar. I diag står bara att vid PIL så ökas 3 m på det varvet . (13 ggr á 3 m) Tacksam för svar.
13.05.2022 - 12:35DROPS Design answered:
Hej Kerstin, jo når du følger diagram A.1 for din størrelse, så ser du at på varv 3 i diagrammet (du starter nederst i diagrammet), laver du et omslag før de 5 masker, det gør du så hele vejen rundt i hver rapport. Næste udtagning er på varv 7 men nu är det sist i diagrammet. Lycka till!
13.05.2022 - 13:39
|
|||||||||||||||||||||||||||||||||||||
Stavanger Cardigan#stavangercardigancardigan |
|||||||||||||||||||||||||||||||||||||
|
|
|||||||||||||||||||||||||||||||||||||
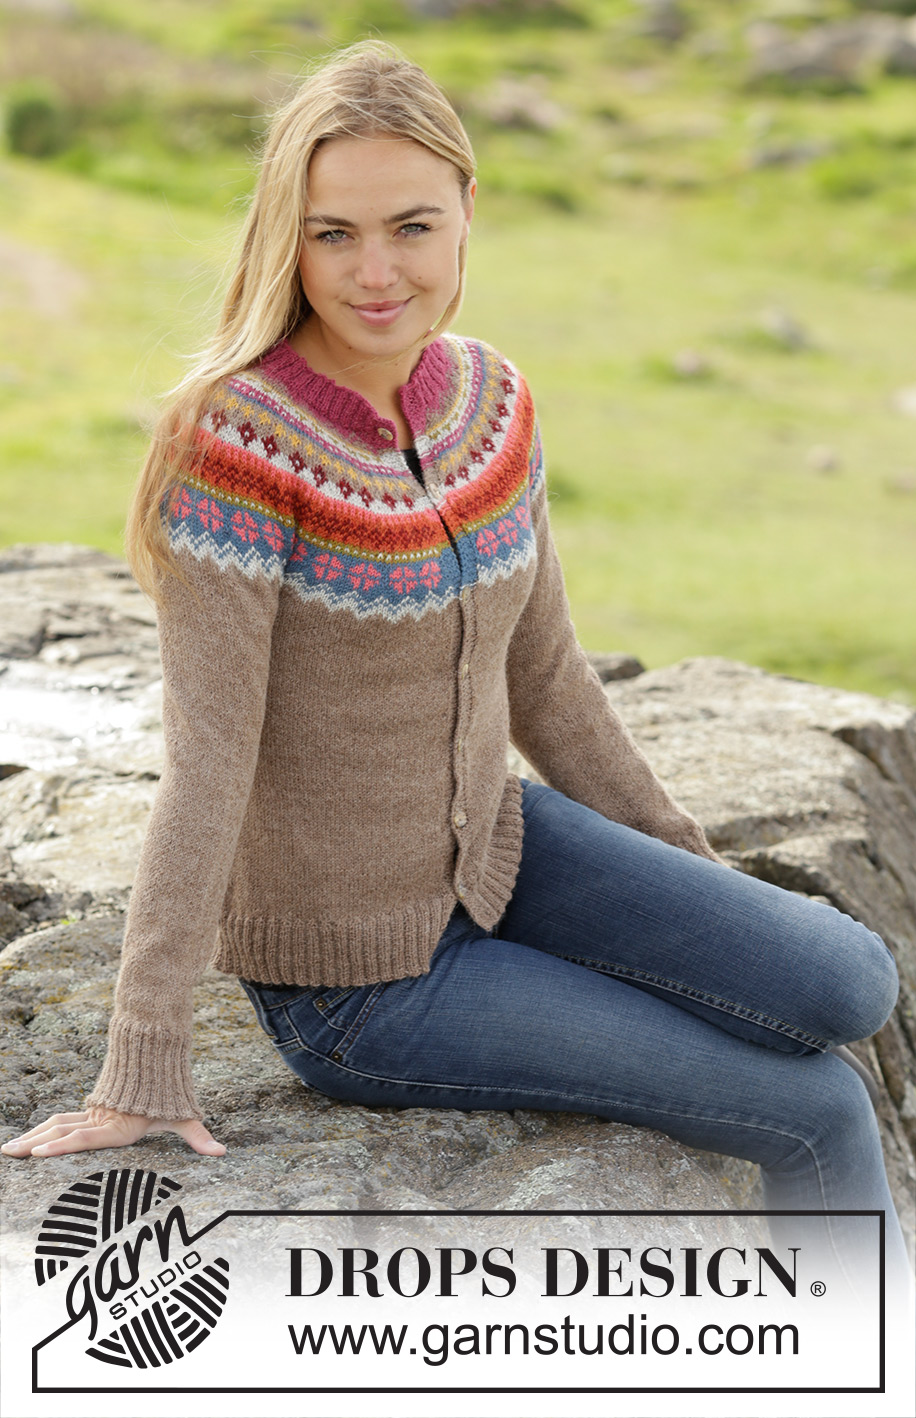
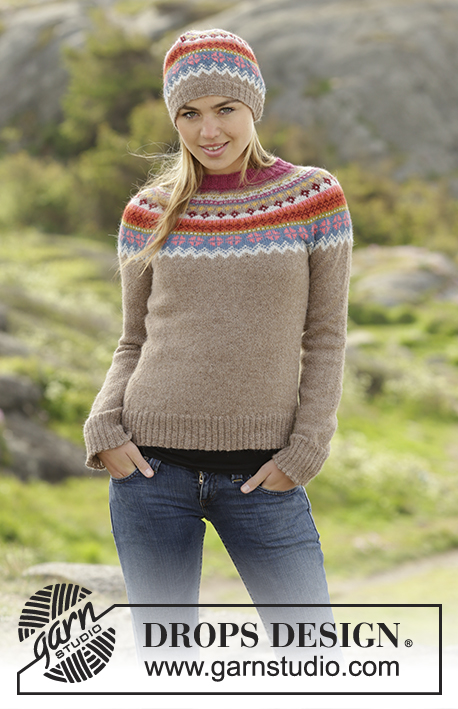
Knitted DROPS jacket worked top down with round yoke and multi-coloured pattern on yoke in ”Alpaca”. Size: S - XXXL.
DROPS 173-50 |
|||||||||||||||||||||||||||||||||||||
|
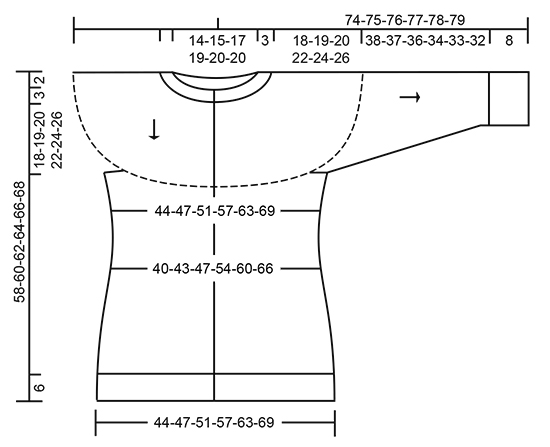
GARTER ST (back and forth): K all rows. 1 ridge = 2 rows K. DECREASE/INCREASE TIP: To calculate how to dec/inc evenly, use the total no of sts on row (e.g. 132 sts), minus bands (e.g. 10 sts) and divide the remaining sts by no of dec/inc to be done (e.g. 26) = 4.7. I.e. in this example K alternately approx. every 3rd and 4th st and every 4th and 5th st tog when dec (do not dec over bands). If inc is done, this is done alternately approx. every 4th and 5th st. PATTERN: See diagram A.1 (choose diagram for correct size). Work entire pattern in stocking st. KNITTING TIP-1 (applies to bands): On the rows where there are pattern border, work base colour in pattern border also over the 5 band sts in each side. KNITTING TIP-2: To avoid the knitting tension to tighten when working pattern, it is important not to tighten the strands on back side of piece. Switch to a higher needle no when working pattern if the pattern is somewhat tight. DECREASE TIP-1 (applies to sides on body and mid under sleeve): All dec are done from RS! Beg 4 sts before marker and K 2 tog, K 4 (marker is between these 4 sts), slip 1 st as if to K, K 1, psso (= 2 sts dec). INCREASE TIP-1 (applies to sides of body): Work until 2 sts remain before marker: Make 1 YO, K 4 (marker is in the middle of these 4 sts), make 1 YO (= 2 sts inc). On next row work YOs twisted to avoid holes. BUTTONHOLES: Dec for buttonholes on right band (when garment is worn). Dec from RS when 3 sts remain on row as follows: Make 1 YO, K the next 2 sts tog, K last st. On next round K the YO to make a hole. Dec first buttonhole when rib in neck measures approx. 1½-2 cm. Then dec the next 6-6-7-7-7-7 buttonholes, approx. 8-8-7½-7½-7-7 cm between each. ---------------------------------------------------------- JACKET: Work back and forth on circular needle from mid front, work top down. YOKE: Cast on 132-140-148-156-160-160 sts (incl 5 band sts in each side towards mid front) on circular needle size 2.5 mm with dark pink. P 1 row from WS. Work next row as follows from RS: 5 band sts in GARTER ST - see explanation above - * K 2, P 2 *, repeat from *-* until 7 sts remain on needle, finish with K 2 and 5 bands sts in garter st. Continue rib like this – remember BUTTONHOLES on right band – see explanation above. When rib measures 3 cm, K 1 row from RS while at the same time dec 26-29-27-25-24-24 sts evenly - READ DECREASE/INCREASE TIP = 106-111-121-131-136-136 sts. Switch to circular needle size 3 mm. For better shape work an elevation in the back of neck as follows: Insert 1 marker mid back. Beg from WS with dark pink and P until 9-10-11-11-12-12 sts have been worked past marker (K band), turn, tighten yarn and K 18-20-22-22-24-24. Turn, tighten yarn and P 27-30-33-33-36-36 sts, turn, tighten yarn and K 36-40-44-44-48-48 sts back. Turn, tighten yarn and P 45-50-55-55-60-60 sts, turn, tighten yarn and K 54-60-66-66-72-72 sts back. Turn, tighten yarn and P 63-70-77-77-84-84 sts, turn, tighten yarn and K 72-80-88-88-96-96 sts back. turn and P the rest of row (K band). Work next row as follows from RS: 5 band sts in garter st, work pattern according to diagram A.1 until 6 sts remain on row (= 19-20-22-24-25-25 repetitions of 5 sts. NOTE: choose diagram for correct size – in size XXL + XXXL: work first A.1A then A.1B over A.1A), work first st in A.1 (so that pattern beg and ends the same in each side towards mid front - NOTE: Do not inc in this st) and finish with 5 band sts in garter st. Continue pattern like this and inc as shown in diagram. REMEMBER THE KNITTING TENSION On row marked with arrow in diagram inc 1-3-0-0-9-11 sts evenly (inc in the sections with light beige and do not inc over bands). When diagram A.1 has been worked, there are 354-374-407-443-470-497 sts on needle and piece measures approx. 18-19-20-22-24-26 cm (measured mid front without rib in neck). Work next row as follows from WS: Work as before with light beige over the first 55-57-61-68-74-80 sts (= right front piece), slip the next 72-78-86-90-92-94 sts on a stitch holder (= sleeve), cast on 6-8-10-10-14-16 new sts (= in the side under sleeve), work as before over the next 100-104-113-127-138-149 sts (= back piece), slip the next 72-78-86-90-92-94 sts on a stitch holder (= sleeve), cast on 6-8-10-10-14-16 sts (= in the side under sleeve), work as before over the remaining 55-57-61-68-74-80 sts (= left front piece). Finish body and sleeves separately. BODY: = 222-234-255-283-314-341 sts. Insert 1 marker 58-61-66-73-81-88 sts in from each side (= 106-112-123-137-152-165 sts between markers on back piece). NOW MEASURE PIECE FROM HERE! Continue back and forth with light beige and stocking st with 5 band sts in garter st in each side towards mid front. When piece measures 2-2-2-3-3-4 cm, dec 1 st on each side of both markers – READ DECREASE TIP-1 (= 4 sts dec). Dec like this every 2½-2½-2½-3-3-4 cm a total of 5-5-5-4-4-3 times in each side = 202-214-235-267-298-329 sts. When piece measures 16-17-18-18-18-18 cm, inc 1 st on each side of both markers – READ INCREASE TIP-1 (= 4 sts inc). Inc like this every 3-3-3-4-4-5 cm a total of 5-5-5-4-4-3 times in each side = 222-234-255-283-314-341 sts. Continue until piece measures 29-30-31-31-31-31 cm (jacket measures 52-54-56-58-60-62 cm from shoulder). K 1 row from RS while inc 62-74-77-81-82-87 sts evenly - READ DECREASE/INCREASE TIP = 284-308-332-364-396-428 sts. Switch to circular needle size 2.5 mm and work next row from WS as follows: 5 band sts in garter st, * P 2, K 2 *, repeat from *-* until 7 sts remain and finish with P 2 and 5 band sts in garter st. Continue rib like this. When rib measures 6 cm (jacket measures approx. 58-60-62-64-66-68 cm from shoulder) inc 1 st in every transition between K 2 and P 2 by making 1 YO (= 68-74-80-88-96-104 sts inc) = 352-382-412-452-492-532 sts on needle (this inc is done to avoid a tight cast-off edge). On next row cast off with garter st over garter st, K over K and P over P (work YOs twisted before casting them off as regular sts). SLEEVE: Worked in the round on a short circular needle from top down. Switch to double pointed needles when needed. Slip the 72-78-86-90-92-94 sts from stitch holder in one side of piece on a short circular needle size 3 mm and pick in addition 1 st in each of the 6-8-10-10-14-16 sts cast on under sleeve = 78-86-96-100-106-110 sts. Insert 1 marker in the middle of the 6-8-10-10-14-16 sts under sleeve (= beg of round). NOW MEASURE PIECE FROM HERE! Work in stocking st in the round with light beige. When sleeve measures 1-1-3-3-1-3 cm, dec 2 sts mid under sleeve - READ DECREASE TIP-1. Dec like this every 3-2½-1½-1½-1½-1 cm 13-15-19-20-22-23 times in total = 52-56-58-60-62-64 sts. When piece measures 38-37-36-34-33-32 cm (NOTE: Shorter measurements in the larger sizes because of wider shoulders), K 1 round while inc 16-16-18-20-22-24 sts evenly = 68-72-76-80-84-88 sts. Switch to double pointed needles size 2.5 mm and work rib in the round = K 2/P 2. When rib measures 8 cm (or desired length) inc 1 st in every transition between K 2 and P 2 by making 1 YO (= 17-18-19-20-21-22 sts inc) = 85-90-95-100-105-110 sts. On next round cast off sts with K over K and P over P (work YOs twisted before casting them off as regular sts). Sleeve measures approx. 46-45-44-42-41-40 cm. Work the other sleeve the same way. ASSEMBLY: Sew the buttons on to the left band. |
|||||||||||||||||||||||||||||||||||||
Diagram explanations |
|||||||||||||||||||||||||||||||||||||
|
|||||||||||||||||||||||||||||||||||||
 |
|||||||||||||||||||||||||||||||||||||
 |
|||||||||||||||||||||||||||||||||||||
 |
|||||||||||||||||||||||||||||||||||||
Have you finished this pattern?Tag your pictures with #dropspattern #stavangercardigancardigan or submit them to the #dropsfan gallery. Do you need help with this pattern?You'll find 29 tutorial videos, a Comments/Questions area and more by visiting the pattern on garnstudio.com. © 1982-2026 DROPS Design A/S. We reserve all rights. This document, including all its sub-sections, has copyrights. Read more about what you can do with our patterns at the bottom of each pattern on our site. |
|||||||||||||||||||||||||||||||||||||


With over 40 years in knitting and crochet design, DROPS Design offers one of the most extensive collections of free patterns on the internet - translated to 17 languages. As of today we count 324 catalogues and 12290 patterns translated into English (UK/cm). 12290
We work hard to bring you the best knitting and crochet have to offer, inspiration and advice as well as great quality yarns at incredible prices! Would you like to use our patterns for other than personal use? You can read what you are allowed to do in the Copyright text at the bottom of all our patterns. Happy crafting!
Post a comment to pattern DROPS 173-50
We would love to hear what you have to say about this pattern!
If you want to leave a question, please make sure you select the correct category in the form below, to speed up the answering process. Required fields are marked *.