
Popular categories
Looking for a yarn?


Comments / Questions (1)
![]() Camilla Velle wrote:
Camilla Velle wrote:
Skal diagrammene hekles rundt, og ikke frem og tilbake? Jeg får ikke siste rad på A3 til, da jeg skal ha en stavmaske i en bue som ikke finnes.. Eller skal hver runde avsluttes med kjedemaske?
28.02.2016 - 17:34DROPS Design answered:
Hej Camilla, Hele arbejdet hækles frem og tilbage. God fornøjelse!
29.02.2016 - 12:07
|
||||||||||||||||||||||||||||
Uplands |
||||||||||||||||||||||||||||
|
|
||||||||||||||||||||||||||||
Crochet DROPS slippers with lace pattern in "Nepal". Size 35 - 43
DROPS Extra 0-1169 |
||||||||||||||||||||||||||||
|
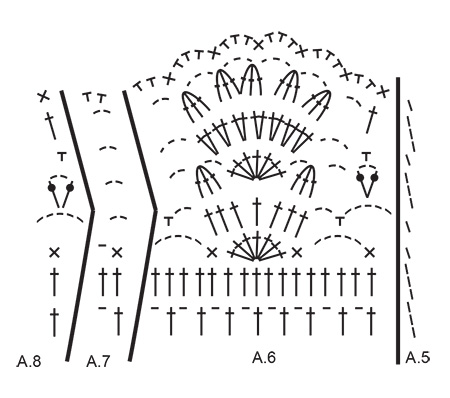
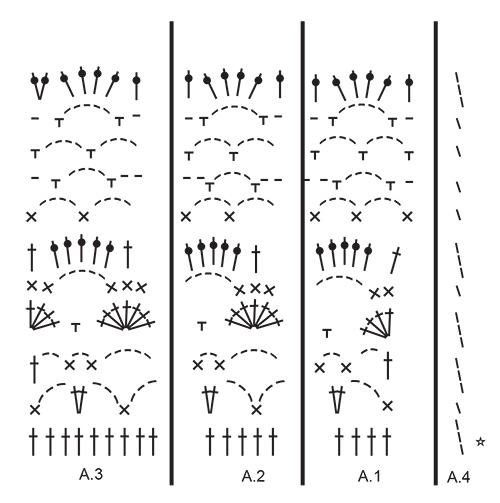
PATTERN: See diagram A.1-A.8. Diagrams A.4 and A.7 show how round beg and ends. CROCHET INFO: Beg every dc row with 1 ch - this ch DOES NOT replace first dc on row. INCREASE TIP: Inc 1 dc by working 2 dc in 1 dc. WORKING 2 DC TOG: * Insert hook in next st, get yarn *, repeat from *-* one more time, make a YO and pull yarn through all 3 sts on hook. ---------------------------------------------------------- SLIPPER: Worked back and forth, bottom up. Work 71-78-87 ch (incl 1 ch to turn with) on hook size 4.5 mm with Nepal. Work 2 dc in 2nd ch from hook, 1 dc in every ch until 1 ch remains, 2 dc in last ch = 72-79-88 dc - READ CROCHET INFO. Work 1 dc in every dc until piece measures 5-6-7 cm. Then work as follows: ROW 1: Work 1 dc in each of the first 31-34-39 dc, * work the next 2 dc tog (= on top of foot) - READ WORKING 2 DC TOG *, repeat from *-* 4 more times, 1 dc in each of the last 31-35-39 dc = 67-74-83 dc. ROW 2: Work the first 2 dc tog, 1 dc in each of the next 28-32-36 dc, * work the next 2 dc tog *, repeat from *-* 2 more times, 1 dc in each of the next 29-32-37 dc, work the last 2 dc tog = 62-69-78 dc. REMEMBER THE CROCHET TENSION! ROW 3: Work 1 dc in each of the first 26-29-34 dc, * work the next 2 dc tog *, repeat from *-* 4 more times, 1 dc in each of the last 26-30-34 dc = 57-64-73 dc. ROW 4: Work the first 2 dc tog, 1 dc in each of the next 23-27-31 dc, * work the next 2 dc tog *, repeat from *-* 2 more times, 1 dc in each of the next 24-27-32 dc, work the last 2 dc tog = 52-59-68 dc. ROW 5: Work 1 dc in each of the first 21-24-29 dc, * work the next 2 dc tog *, repeat from *-* 4 more times, 1 dc in each of the last 21-25-29 dc = 47-54-63 dc. ROW 6: Work the first 2 dc tog, 1 dc in each of the next 18-22-26 dc, * work the next 2 dc tog *, repeat from *-* 2 more times, 1 dc in each of the next 19-22-27 dc, work the last 2 dc tog = 42-49-58 dc. ROW 7: Work 1 dc in each of the first 16-19-24 dc, * work the next 2 dc tog *, repeat from *-* 4 more times, 1 dc in each of the last 16-20-24 dc = 37-44-53 dc. ROW 8: Work the first 2 dc tog, 1 dc in each of the next 13-17-21 dc, * work the next 2 dc tog *, repeat from *-* 2 more times, 1 dc in each of the next 14-17-22 dc, work the last 2 dc tog = 32-39-48 dc. Finish dec in size 35/37 here. SIZE 38/40 - 41/43: ROW 9: Work 1 dc in each of the first 14-19 dc, * work the next 2 dc tog *, repeat from *-* 4 more times, 1 dc in each of the last 15-19 dc = 34-43 dc. Finish dec in size 38/40 here. SIZE 41/43: ROW 10: Work the first 2 dc tog, 1 dc in each of the next 16 dc, * work the next 2 dc tog *, repeat from *-* 2 more times, 1 dc in each of the next 17 dc, work the last 2 dc tog = 38 dc. ALL SIZES: = 32-34-38 dc. Insert 1 marker in piece, NOW MEASURE PIECE FROM HERE. Then work 1 dc in every dc. When piece measures 3 cm, inc 5 dc evenly - READ INCREASE TIP = 37-39-43 dc. When piece measures 6 cm, inc 5-4-5 dc evenly = 42-43-48 dc. When piece measures 8 cm, adjust so that next row is from RS, inc 1-0-0 dc = 43-43-48 dc. Then work as follows: A.1 over the first 4 dc, A.2 until 9 dc remain (= 6-6-7 times), finish with A.3. A.4 shows how rows beg. When A.1-A.3 have been worked 1 time vertically, there are 49-49-55 tr on row. Then work as follows: * Work A.6 1 time, then A.7 0-0-1 time *, repeat from *-* 2 more times, finish with A.8. A.5 shows how rows beg. Fasten off when A.6-A.8 have been worked 1 time vertically. ASSEMBLY: Start under the foot at the front of toe. Sew tog edge to edge in outer loops of edge sts to avoid a chunky seam. Sew tog mid under foot, up along the heel mid back and to the top of the slipper. Fasten off. Crochet another slipper. |
||||||||||||||||||||||||||||
Diagram explanations |
||||||||||||||||||||||||||||
|
||||||||||||||||||||||||||||
 |
||||||||||||||||||||||||||||
 |
||||||||||||||||||||||||||||
Have you finished this pattern?Tag your pictures with #dropspattern or submit them to the #dropsfan gallery. Do you need help with this pattern?You'll find 7 tutorial videos, a Comments/Questions area and more by visiting the pattern on garnstudio.com. © 1982-2026 DROPS Design A/S. We reserve all rights. This document, including all its sub-sections, has copyrights. Read more about what you can do with our patterns at the bottom of each pattern on our site. |
||||||||||||||||||||||||||||


With over 40 years in knitting and crochet design, DROPS Design offers one of the most extensive collections of free patterns on the internet - translated to 17 languages. As of today we count 325 catalogues and 12298 patterns translated into English (UK/cm). 12298
We work hard to bring you the best knitting and crochet have to offer, inspiration and advice as well as great quality yarns at incredible prices! Would you like to use our patterns for other than personal use? You can read what you are allowed to do in the Copyright text at the bottom of all our patterns. Happy crafting!
Post a comment to pattern DROPS Extra 0-1169
We would love to hear what you have to say about this pattern!
If you want to leave a question, please make sure you select the correct category in the form below, to speed up the answering process. Required fields are marked *.