
Popular categories
Looking for a yarn?


Comments / Questions (8)
![]() FOUILLOUX wrote:
FOUILLOUX wrote:
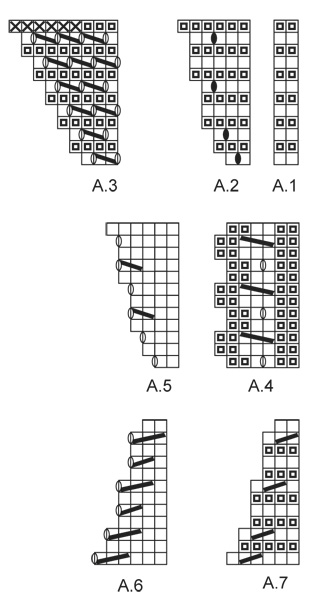
Bonjour, merci pour ce beau modèle et pour les tutos vidéo qui m'ont été bien utiles. Je le termine avec le diagramme A7 et il me semble que son dernier rang sur l'envers devrait indiquer le symbole pour 1 m. env. sur l'endroit, 1 m. end. sur l'envers, pour que ça fasse du point mousse. bien cordialement
08.02.2026 - 22:49
![]() Anja wrote:
Anja wrote:
Kann es sein, daß bei Diagramm A.2 und A.3 die Angaben für die Umschläge verkehrt bezeichnet sind? Auf dem Bild ist nur 1 Loch zu sehen, laut Diagramm wären es am Anfang 2 und später 4.
04.10.2023 - 15:55DROPS Design answered:
Liebe Anja, die Umschläge in A.2 sollen verschränkt gestrickt werden (es soll kein Loch entstehen), aber beim A.3 sollen die Umschläge normal für das Lochmuster gestrickt werden. Alles ist ganz richtig so. Viel Spaß beim stricken!
05.10.2023 - 08:40
![]() Maple wrote:
Maple wrote:
You have one video show us how to do the beginning of the shawl. that was great video. i love it. i wish you guy have second video , show us how to do the second part of shawl. is easy to follow if you have video teach us do the whole shawl.
26.06.2016 - 20:29DROPS Design answered:
Dear Maple, follow instructions to diagram (see also answer below), and read more about how to read diagrams here. Happy knitting!
27.06.2016 - 10:08
![]() BORGNIEZ Jeanine wrote:
BORGNIEZ Jeanine wrote:
Meilleurs voeux et bonne santé. J'ai réalisé ce châle en gris clair et il est superbe !
05.01.2016 - 10:24
![]() Diane wrote:
Diane wrote:
J'ai fait ce châle et il est vraiment très joli, très facile à porter et à agencer, merci beaucoup!
02.08.2015 - 20:09
![]() Gabrie Boon wrote:
Gabrie Boon wrote:
Prachtig afgewerkt met zo n mooi randje.
14.06.2015 - 20:24Marta wrote:
Finally I found headband to match my shawl! Hope to see pattern soon
31.05.2015 - 13:13Maju wrote:
Beautiful pattern
28.05.2015 - 18:19
|
||||||||||||||||||||||||||||
Just Glisten#justglistenset |
||||||||||||||||||||||||||||
 |
 |
|||||||||||||||||||||||||||
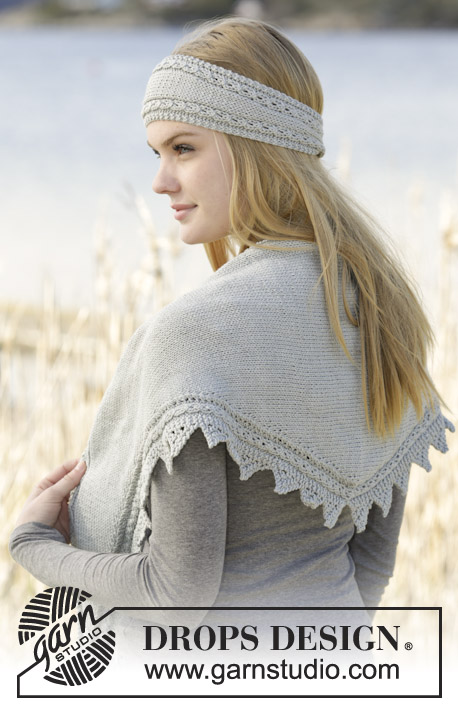
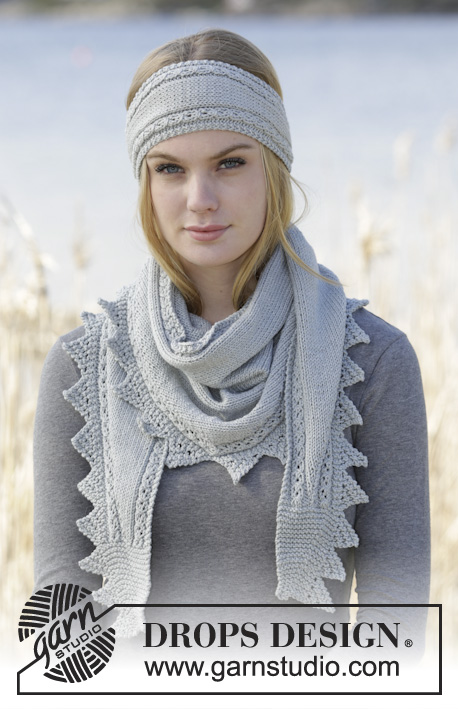
Set consists of: Knitted DROPS shawl and head band in garter st with small cables and lace pattern in "Cotton Merino".
DROPS 166-20 |
||||||||||||||||||||||||||||
|
GARTER ST (back and forth): K all rows. 1 ridge = 2 rows K. PATTERN: See diagrams A.1 to A.7. The diagrams show all rows in pattern seen from RS. SHORT ROWS: Every time A.3 is worked, work a short row over A.3. Work as follows: Cast off the outermost 6 sts, K 3 (incl the last st worked when casting off), turn piece and K 3. Turn piece. INCREASE TIP (applies to head band): Inc 2 sts as follows: Work 2 edge sts in garter st, A.4 over 6 sts, 1 YO, K until 8 sts remain, 1 YO, A.4 over 6 sts and 2 edge sts in garter st. P YOs twisted on next row to avoid holes. Work the inc sts in stocking st. DECREASE TIP (applies to head band): Dec 2 sts as follows: Work 2 edge sts in garter st, A.4 over 6 sts, slip 1 st as if to K, K 1, psso, work until 10 sts remain, K 2 tog, A.4 over 6 sts and 2 edge sts in garter st. ---------------------------------------------------------- SHAWL: Worked back and forth from side to side. Cast on 7 sts on straight needle or circular needle size 3.5 mm with Cotton Merino. K 1 row (= WS). Work next row from RS as follows: A.1 over 2 sts, A.2 over 2 sts, A.3 over 3 sts. Then work according to diagrams until last row remains, now work a SHORT ROW - see explanation above, over A.3. REMEMBER THE KNITTING TENSION Then work last row in diagrams (= WS). Repeat A.1-A.3 as follows: Work A.1 over 2 sts, work in GARTER ST - see explanation above - until 5 sts remain, A.2 over 2 sts and A.3 over 3 sts, work A.1-A.3 3 times in total vertically = 19 sts. ). REMEMBER: Work short row every time diagram is worked vertically. Then work as follows: Work A.1 over 2 sts, A.4 over 6 sts, A.5 over 2 sts, A.4 over 6 sts and A.3 over 3 sts. Then work according to diagram until last row remains, now work a SHORT ROW - see explanation above, over A.3. Then work last row in diagrams (= WS). Repeat A.1, A.3, A.4 and A.5 as follows: Work A.1 over 2 sts, A.4 over 6 sts, stocking st until 11 sts remain, A.5 over 2 sts, A.4 over 6 sts and A.3 over 3 sts. REMEMBER: Work short row every time diagram is worked vertically. Continue like this until diagram A.3 has been worked 19 times in total vertically (= 19 tips in the side). Work diagrams 1 more time vertically, but on last row do not work short row as before. Cast off all sts in A.3. Turn piece and cast on 3 new sts, turn and then work last row in diagrams (= WS). There are 20 tips in the side and 87 sts on needle. Now work as follows: Work A.1 over 2 sts, A.4 over 6 sts, stocking st until 15 sts remain, A.6 over 6 sts, A.4 over 6 sts and A.3 over 3 sts. Then work according to diagram until last row remains, now work a SHORT ROW - see explanation above, over A.3. Then work last row in diagrams (= WS). Continue to work like this until A.3 has been worked 37 times in total vertically. REMEMBER: Work short row every time diagram is worked vertically. There are 37 tips in the side and 19 sts on needle. Now work as follows: Work in garter st until 9 sts remain, A.7 over 6 sts, A.3 over 3 sts. Then work according to diagram until last row remains, now work a SHORT ROW - see explanation above, over A.3. Then work last row in diagrams (= WS). Continue to work like this until A.3 has been worked 40 times in total vertically. REMEMBER: Work short row every time diagram is worked vertically. There are 40 tips in the side and 7 sts on needle. NOTE: Do not work short row the last time, cast off all sts on last row. HEAD BAND: Worked back and forth, sideways. Cast on 18 sts on needle size 3.5 mm with Cotton Merino. K 1 row (= WS). Work next row as follows from RS: 2 edge sts in GARTER ST - see explanation above, A.4 over 6 sts, 2 sts in stocking st, A.4 over 6 sts and 2 edge sts in garter st. REMEMBER THE KNITTING TENSION When piece measures 4-6 cm, inc 2 sts on next row from RS - READ INCREASE TIP! Repeat inc when piece measures 8-10 cm and 12-14 cm = 24 sts. Continue working as before until piece measures 36-38 cm. Now dec 2 sts on next row from RS - READ DECREASE TIP. Repeat dec when piece measures 40-42 cm and 44-46 cm = 18 sts. Continue to work as before until piece measures 48-50 cm, K 1 row from WS and cast off with K from RS. Sew cast-off and cast-on edge tog with small stitches. |
||||||||||||||||||||||||||||
Diagram explanations |
||||||||||||||||||||||||||||
|
||||||||||||||||||||||||||||
 |
||||||||||||||||||||||||||||
Have you finished this pattern?Tag your pictures with #dropspattern #justglistenset or submit them to the #dropsfan gallery. Do you need help with this pattern?You'll find 22 tutorial videos, a Comments/Questions area and more by visiting the pattern on garnstudio.com. © 1982-2026 DROPS Design A/S. We reserve all rights. This document, including all its sub-sections, has copyrights. Read more about what you can do with our patterns at the bottom of each pattern on our site. |
||||||||||||||||||||||||||||


With over 40 years in knitting and crochet design, DROPS Design offers one of the most extensive collections of free patterns on the internet - translated to 17 languages. As of today we count 324 catalogues and 12290 patterns translated into English (UK/cm). 12290
We work hard to bring you the best knitting and crochet have to offer, inspiration and advice as well as great quality yarns at incredible prices! Would you like to use our patterns for other than personal use? You can read what you are allowed to do in the Copyright text at the bottom of all our patterns. Happy crafting!
Post a comment to pattern DROPS 166-20
We would love to hear what you have to say about this pattern!
If you want to leave a question, please make sure you select the correct category in the form below, to speed up the answering process. Required fields are marked *.