
Popular categories
Looking for a yarn?


Comments / Questions (81)
![]() Laura wrote:
Laura wrote:
Hi. My foundation row is measuring 64cm. I’m thinking it should be 22. Surely a137 chain cannot be correct. Everything else is working out fine. Thank you.
06.03.2026 - 17:14DROPS Design answered:
Dear Laura, please note that the foundation chain is often too tight reason why we cast on here much more chains (137 in your size) but you will skip chains evenly on first row so should your tension be right with 2 x A.3 = 10,5 cm, then you should have the right measurements when working diagrams. Happy crocheting!
09.03.2026 - 07:29
![]() Maryse wrote:
Maryse wrote:
Bonjour, où est l'échantillon ? Parce que je me pose des questions sur les dimensions : j'ai commencé l'épaule avec en rang 2, 94 brides mais je me retrouve avec une longueur de 33 au lieu de (74-21)/2=26,5 alors que je travaille avec un crochet de 2,5 et du fil coton ? Y'a un truc qui cloche ! Merci de votre retour Cordialement
03.11.2025 - 13:46DROPS Design answered:
Bonjour Maryse, la tension doit être de 2 x A.3 = environ 10, 5 cm de large, pour votre échantillon, crochetez A.1, A.2 puis 3 x A.3 et terminez par A.4 et A.5 ainsi vous aurez le motif entier et vous pourrez vérifier votre tension. Je me trompe peut-être mais je ne trouve pas 94 brides pour aucune des tailles pour commencer les diagrammes. Quelle taille crochetez-vous?
03.11.2025 - 16:31
![]() Sabrina wrote:
Sabrina wrote:
I tried to follow the instruction - but I couldn't make sense of the 5-3-5-3 group. I ended up wtih 2tr+16 tr+4x9tr = 55 ch. But when I start the pattern, once I reached the 5-3-5-3 I don't really know what to do... and I ended up with 4 scallops on Row 1 of A.1-A.5 and 20cm which I think is too big for half shoulder .. I guess I need to remeasure or abandon this pattern. I don't know where i went wrong, appreciate help
15.07.2025 - 13:07DROPS Design answered:
Dear Sabrina, "Work 69-92-114-137 ch (incl 3 ch to turn with). ROW 1 (= WS): Work 1 tr in 4th ch from hook (= 2 tr), 1 tr in each of the next 5-3-5-3 ch, * skip 1 ch, work 1 tr in each of the next 4 ch *, repeat from *-* the entire row = 55-73-91-109 tr. " The numbers in sequences indicate the number of stitches for each size. For example, for size S/M you work 69 chain stitches. Then, in row 1 you work 1 tr in the 4th ch from hook (= 2tr), 1 tr in each of the next 5 chain stitches, *skip 1 ch, work 1 tr in each of the next 4ch*, repeat the entire row = 55 tr. Then, start working the charts in the row with the arrow, working over the tr from the previous row. Happy crochetting!
19.07.2025 - 17:34
![]() Jasmijn wrote:
Jasmijn wrote:
Ik snap het patroon niet, ik heb het filmpje bekeken en daar hadden ze al twee stukken die ze later aan elkaar haken. Maar hoe kom je dan aan die twee stukken? En wat wordt er met de rechter schouder? Graag antwoord.
11.07.2025 - 11:13DROPS Design answered:
Dag Jasmijn,
Je haakt eerst de rechter schouder van boven naar beneden. Dan laat je deze even liggen haak je los daarvan de linker schouder. Als de linker schouder klaar is haak je daarmee verder en haak je op een gegeven moment 35 lossen welk je verbindt met de rechter schouder. Die 35 lossen komen dus bij de hals aan de voorkant.
11.07.2025 - 19:55
![]() Sonia wrote:
Sonia wrote:
Bonjour. Quelle est la différence entre les deux symboles "1 ms autour de la m" et "1 ms dans la maille"? Je suis débutante au crochet et je suis gauchère. Je cherche des modèles faciles à suivre, car je dois tout inverser. Celui-ci est très joli, mais je ne comprends pas ces deux symboles. Merci.
06.05.2025 - 16:27DROPS Design answered:
Bonjour Sonia, dans cette vidéo, nous montrons la différence entre crocheter "autour de la maille" = on pique le crochet dans l'arceau et non dans la maille en l'air et "dans la maille" = on pique le crochet sous les 2 brins de la maille du rang précédent. Cette autre vidéo pourra peut être aussi vous aider. Bon crochet!
07.05.2025 - 08:51
![]() Sylvie Rodriguez wrote:
Sylvie Rodriguez wrote:
Merci beaucoup pour les explications, effectivement, je faisais n'importe quoi 😂😂 Cdt Sylvie Rodriguez
23.04.2025 - 10:31
![]() Sylvie Rodriguez wrote:
Sylvie Rodriguez wrote:
Bonjour, je comprends mal les explications des Rangs 1-6 , d'après le dessin,il faut faire 5 ml et une ms dans la 6 m , maille qui correspond au haut des brides, c'est ça ??? Merci
22.04.2025 - 16:11DROPS Design answered:
Bonjour Mme Rodriguez, au 1er rang, crochetez ainsi en lisant de gauche à droite: A.1 (= 1 ml), A.2 (5 ml, sautez 5 m, 1 ms dans la m suiv, 3 ml, sautez 3 m), puis répétez 2-3-4-5 fois A.3 (=2 ml, sautez 2 m (= arceau de 5 ml, on saute 5 m au total), puis 1 ms dans la m suiv, 5 ml, sautez 5 m, 1 ms dans la m suivante, 5 ml, sautez 5 m, 1 ms dans la m suiv, 3 ml, sautez 3 m) x 2, 3, 4 ou 5 fois, puis A.4 (2 ml, sautez 2 m, 1 ms dans la m suiv, 5 ml, sautez 5 m), A.5 ( 1 ms dans la dernière m). Sur l'envers, lisez les diagrammes de gauche à droite (rang suivant = 1er rang de A.x). Bon crochet!
23.04.2025 - 07:25
![]() Andrea wrote:
Andrea wrote:
Eine superschöne Anleitung, mit der ich als Anfängerin grundsätzlich auch gut zurecht komme. Allerdings habe ich schon in Reihe 1 das Problem, daß ich nicht verstehe, was mit "in die nächsten 5-3-5-3 Lm"gemeint ist . Vielleicht könnt ihr mir ja helfen.
19.04.2025 - 21:14DROPS Design answered:
Liebe Andrea, jede Zahl bezieht sich auf die passende Größe, so in 1. und 3. Größe häkeln Sie 1 Stb in jeder der nächsten 5 Luftmaschen, und in 2. und letzte Größe häkeln sie 1 Stb in jeder der nächsten 3 Luftmaschen. Viel Spaß beim Häkeln!
22.04.2025 - 14:57
![]() Anja wrote:
Anja wrote:
Blusen er flot, men jeg kan ikke tyde hvordan man hækler skuldrene, hvor der skal tages ud i en trekant. Synd at der ikke er instruktionsvideo til andet end sammentælling af skuldrene. Denne har heller ingen lyd. Jeg er bange for at jeg må opgive projektet. Hele modellen er vel strengt taget bare to firkanter der syes sammen i siden og hækles sammen i skuldrene. Disse kunne have været bedre tegnet på målmodellen.
08.11.2024 - 17:44
![]() Anja wrote:
Anja wrote:
Jeg forstår simpelthen ikke hvordan man hækler skuldrene. Har hæklet 7 rækker af 73 masker og skal starte på skuldrene. Hvor skal de sættes på ? Er det i hver ende af de 55 m ? Og hvor kommer halsåbningen fra på forstykket ? Mit er et langt kvadratisk stykke. Synes ikke det er beskrevet på tegningen. Kan godt læse alle a stykkerne, men ville frygtelig gerne se en video forklare hvordan man hækler hver skulder. Der ville også være rart med lyd på videoen
08.11.2024 - 17:39DROPS Design answered:
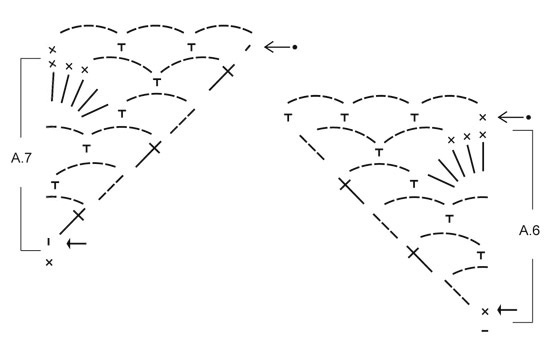
Hei Anja. Har dessverre ingen video på skuldrene, bare etter. Når du har heklet 1.-6.rad til høyre skulder (forstykke) vil arbeidet ha en form som et rektangel, men så på 7.rad skal du hekle A.6 over A.5. Du fortsetter med A.1+A.2+A.3+A.4 som før (diagrammene gjentas i høyden) og hekler A.6 istedenfor A.5. Når du har heklet A.6 1 gang i høyden vil arbeidet ha en trapesium form (du har nå heklet 12 rader tilsammen). Hekle venstre skulder som høyre skulder (men A.7 over A.1). mvh DROPS Design
11.11.2024 - 11:17
|
|||||||||||||||||||||||||
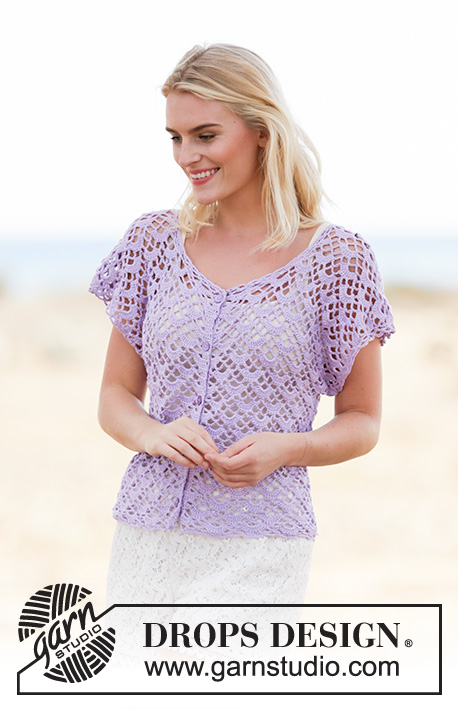
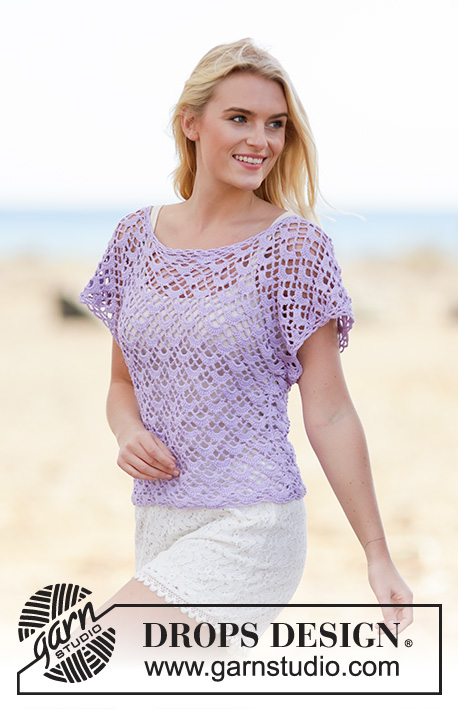
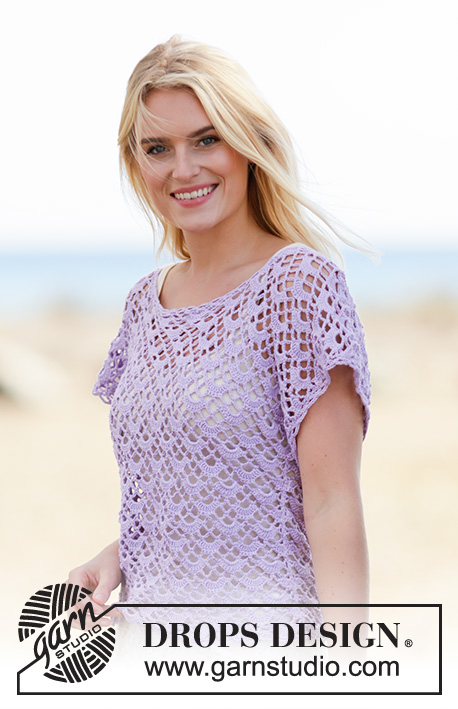
Shy Violet#shyviolettop |
|||||||||||||||||||||||||
 |
 |
||||||||||||||||||||||||
Crochet DROPS top with fan pattern, worked top down in ”Safran”. Size S- XXXL
DROPS 162-15 |
|||||||||||||||||||||||||
|
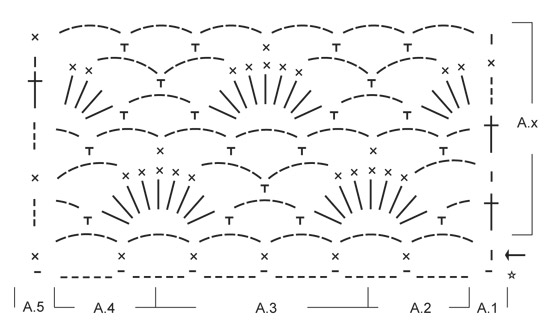
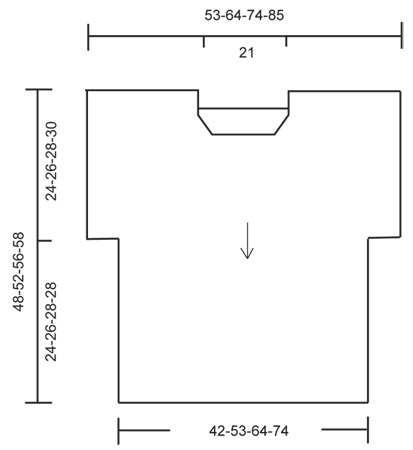
PATTERN: See diagrams A.1 to A.7. The diagrams show all rows in pattern seen from RS. ---------------------------------------------------------- FRONT PIECE: The piece is worked top down. Right shoulder: Work 69-92-114-137 ch (incl 3 ch to turn with) on hook size 3.5 mm with Safran. ROW 1 (= WS): Work 1 tr in 4th ch from hook (= 2 tr), 1 tr in each of the next 5-3-5-3 ch, * skip 1 ch, work 1 tr in each of the next 4 ch *, repeat from *-* the entire row = 55-73-91-109 tr. NOW MEASURE PIECE FROM HERE! Now work according to diagram, i.e. work as follows: ROW 1-6: (1st row = RS): Work A.1, A.2, A.3 2-3-4-5 times in total, A.4, A.5. REMEMBER THE CROCHET TENSION! ROW 7 (= RS): Work last row in A.1-A.4 as before but finish with A.6 over A.5. Continue until A.6 has been worked 1 time vertically, in A.1-A.4 repeat rows in A.x. Cut the yarn. Work left shoulder as right shoulder, work A.7 over A.1. On last row in A.7 (= from WS) work 35 ch for neck at the end of row, fasten with 1 sl st in 3rd ch at beg of last row on right shoulder. Cut the yarn. Now work over all sts, beg from RS as follows: A.1, A.2, A.3 9-10-11-12 times in total, A.4, finish with A.5. Continue like this. When piece measures approx. 24-26-28-30 cm – adjust after 7th row, sleeves are done. Then work as follows, beg from WS: Skip 3 ch-space, beg by working in next dc as follows: A.5, A.4, A.3 7-8-9-10 times in total, A.2, finish with A.1 (do not work the last 3 ch-spaces). Continue like this until piece measures approx. 48-52-56-58 cm, adjust after 5th row in diagram. Fasten off. BACK PIECE: Work left shoulder in ch-row from cast on edge (work in same ch as trebles, i.e. in the 55-73-91-109 tr) from left front piece as follows: ROW 1-6: (1st row = RS): Work A.1, A.2, A.3 2-3-4-5 times in total, A.4, A.5. Cut the yarn. Work right shoulder as left shoulder but in right front piece - NOTE! Instead of cutting the yarn work 71 ch for neck and fasten with 1 sl st in first ch at beg of last row on left shoulder. Cut the yarn. Now work over all sts the same way as on front piece. ASSEMBLY: Sew side and underarm seams in one. EDGES: Work an edge around the neck, beg from one shoulder as follows: ROUND 1: Work * 1 dc, 5 ch *, repeat from *-* along the neck with approx. 2 cm between every dc, finish with 1 sl st in first dc. ROUND 2: 3 ch, 1 dc in next ch-space, * 5 ch, 1 dc in next ch-space *, repeat from *-* the entire round and finish with 3 ch and 1 sl st in first dc from beg of 1st round. Fasten off. Work an edge at the bottom along front and back piece the same way, beg from the side. Work an edge around the sleeve the same way, beg from mid under sleeve. |
|||||||||||||||||||||||||
Diagram explanations |
|||||||||||||||||||||||||
|
|||||||||||||||||||||||||
 |
|||||||||||||||||||||||||
 |
|||||||||||||||||||||||||
 |
|||||||||||||||||||||||||
Have you finished this pattern?Tag your pictures with #dropspattern #shyviolettop or submit them to the #dropsfan gallery. Do you need help with this pattern?You'll find 5 tutorial videos, a Comments/Questions area and more by visiting the pattern on garnstudio.com. © 1982-2026 DROPS Design A/S. We reserve all rights. This document, including all its sub-sections, has copyrights. Read more about what you can do with our patterns at the bottom of each pattern on our site. |
|||||||||||||||||||||||||


With over 40 years in knitting and crochet design, DROPS Design offers one of the most extensive collections of free patterns on the internet - translated to 17 languages. As of today we count 324 catalogues and 12290 patterns translated into English (UK/cm). 12290
We work hard to bring you the best knitting and crochet have to offer, inspiration and advice as well as great quality yarns at incredible prices! Would you like to use our patterns for other than personal use? You can read what you are allowed to do in the Copyright text at the bottom of all our patterns. Happy crafting!
Post a comment to pattern DROPS 162-15
We would love to hear what you have to say about this pattern!
If you want to leave a question, please make sure you select the correct category in the form below, to speed up the answering process. Required fields are marked *.