
Popular categories
Looking for a yarn?


Comments / Questions (186)
![]() Pia Jakobsson wrote:
Pia Jakobsson wrote:
Får inte rätt på armarna . Kan ni visa hur det är tänkt att sätta ihop denna. Förstår inte er beskrivning rrvärr
18.04.2024 - 17:25DROPS Design answered:
Hei Pia. Her syr du bare ermet i ermhullet med pene sting. Ta gjerne en titt på de forskjellige hjelpevideoene vi har under MONTERING, og bruk den monteringesmetoden du syns blir penest. mvh DROPS Design
22.04.2024 - 10:33
![]() PIA Jakobsson wrote:
PIA Jakobsson wrote:
Hur ser jag viket som är rätsida -/ avigsida
03.04.2024 - 12:49DROPS Design answered:
Hej Pia, der er egentlig ingen forskel på retsiden og vrangen, så bestem selv hvilken du vil lade være retsiden :)
04.04.2024 - 15:41
![]() Dorthea Falck wrote:
Dorthea Falck wrote:
Hej. Jeg forstår ikke hvad stjernenerne * betyder i just me opskriften og hvornår skal man bruge afsnittet 3 st sammen. Håber i kan hjælpe Hilsen Dorthea.
18.09.2023 - 20:22DROPS Design answered:
Hei Dorthea Om du ser på diagramteksten så står betydningen av stjernen (* = første række er forklaret i opskriften). Se midt i avsnittet til FORSTK, der brukes 3 st sammen (...således: Hækl som før over de første 31-34-37-37-40-46 st, hækl 3 ST SAMMEN – se forkl over. Vend arb. Gentag denne ...). mvh DROPS Design
26.09.2023 - 13:59
![]() Šárka wrote:
Šárka wrote:
Dobrý den. Mám dotaz k přednímu dílu. Uvádíte v návodu toto:ujímáme pro průkrčník, takto – začínáme rubovou řadou: nad následujícími 31-34-37-37-40-46 DS háčkujeme stejně jako dosud, pak 3 DS sháčkujeme dohromady. To ale nevychází na střed řady a jelikož je na fotce véčkový výstřih, tak mi přijde, že je chyba v návodu. Prosím o radu jak to udělat. Děkuji Šárka
22.08.2023 - 15:24
![]() Saga wrote:
Saga wrote:
Liten fråga.... "Sedan virkas det så här: 3 lm – LÄS VIRKINFO, hoppa över 1 st (ersätts av de 3 lm), A.1 (= 6 m) totalt 13-14-15-17-18-20 ggr, avsluta med 1 st i sista st. " Skall det vara en stolpe i början och slutet på varje varv och däremellan virkas efter A.1? Har tagit mig ett tag att komma fram till detta men får inte diagrammet att gå jämnt ut annars. Hade sparat mig några timmar om man förklarat det istället för att hänvisa till virkinfo.
09.08.2023 - 11:41
![]() Wolfi wrote:
Wolfi wrote:
"Wie zuvor über die ersten 40 Stb (XL), dann 3 stab zusammenhäkeln" - wie ist das zu verstehen? Wenn ich nur die stb zähle, bin ich über der mitte bevor ich was zusammenhäkeln kann. Wenn ich alle maschen zähle, kommen nach 40 maschen 2 luftmaschen, die ich so nicht zusammenhäkeln kann. Mein gesamtmaß (110 maschen) müsste aber korrekt sein, hab ich da irgendwo einen denkfehler?
23.06.2023 - 18:43DROPS Design answered:
Liebe Wolfi, zählen Sie hier alle Maschen (Luftmaschen sowie Stäbchen),diese Reihe muss die 1. Reihe vom Diagram sein, dann häkeln Sie einfach die ersten 40 Maschen und dann häkeln Sie 3 Stäbchen zusammen. Es waren keine 110 Maschen mehr aber nur 86 nach Armlöcher-Abnahmen, so häkeln Sie genau die Hälfte der Maschen. Viel Spaß beim häkeln!
26.06.2023 - 08:22
![]() Ana wrote:
Ana wrote:
No entiendo muy bien por qué al trabajar A.z el tejido me va aumentando y aumentando
27.08.2022 - 11:52DROPS Design answered:
Hola Ana, debe de tratarse de un error en la tensión del tejido, ya que no debería de aumentar según los puntos trabajados. Revisa que estés manteniendo la tensión del tejido inicial.
27.08.2022 - 20:04
![]() Gemma wrote:
Gemma wrote:
Hola! Cuantas cadenetas lleva el delantero? ¿Las mismas que la espalda? Muchas gracias
05.08.2022 - 14:50
![]() Gemma wrote:
Gemma wrote:
¿Cómo diferenció el lado del derecho del revés?Gracias
21.07.2022 - 07:21DROPS Design answered:
Hola Gemma, la primera fila trabajada es por el lado derecho. Puedes marcarla con un marcapuntos para que, cuando tengas el marcapuntos hacia tí, sepas que estás trabajando el lado derecho, mientras que cuando lo tienes hacia fuera estás trabajando por el lado revés.
24.07.2022 - 17:37
![]() Tarja Magnusson wrote:
Tarja Magnusson wrote:
Önskar virka tröjan ”Just me” 162-3 (eller nr cl-042) isblå med hålmönster, hos er virkad i Cotton light istället i garnet Blend Bamboo (har flera nystan över från ett annat arbete). Skulle det fungera? Tacksam för svar!
21.04.2022 - 11:58DROPS Design answered:
Hej Tarja. Jag känner dessvärre inte till det garnet du vill använda men om du får virkfastheten att stämma (16 st x 8 v på 10 x 10 cm) så kan du använda det. Mvh DROPS Design
21.04.2022 - 12:28
|
|||||||||||||
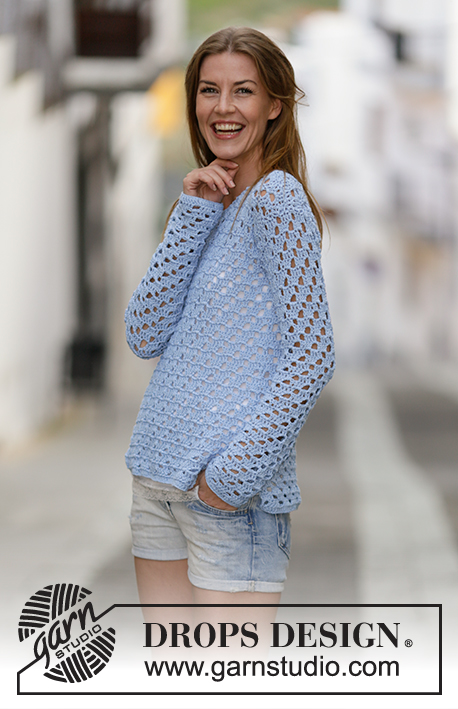
Just Me#justmesweater |
|||||||||||||
 |
 |
||||||||||||
Crochet DROPS jumper with lace pattern in ”Cotton Light”. Size: S - XXXL.
DROPS 162-3 |
|||||||||||||
|
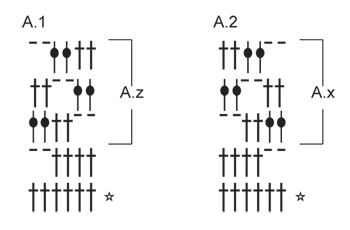
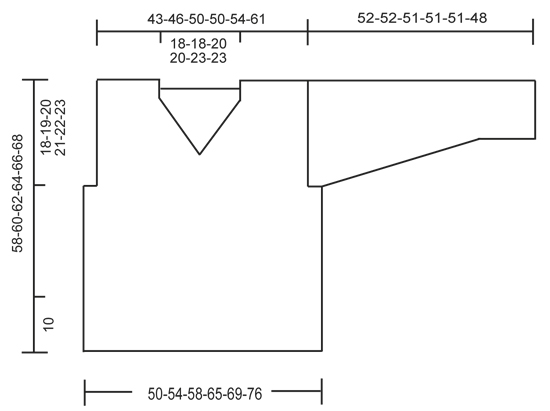
PATTERN: See diagrams A.1-A.2. CROCHET INFO: Replace first tr at beg of every tr row with 3 ch. 3 TR TOG: Work 3 tr into 1 tr as follows: * Work 1 tr but wait with last pull through (= 2 strands on hook) *, repeat from *-* 1 more time, then work next tr but on last pull through, pull yarn through all sts on hook. ---------------------------------------------------------- BACK PIECE: Work back and forth. Work 94-101-108-122-129-143 ch on hook size 4.5 mm with Cotton Light. Work 1 tr in 4th ch from hook (= 2 tr), 1 tr in each of the next 5 ch, * 1 tr in each of the next 6 ch, skip 1 ch *, repeat from *-* until 1 ch remains, 1 tr in last ch = 80-86-92-104-110-122 tr. Then work as follows: 3 ch - READ CROCHET INFO, skip 1 tr (replaced by the 3 ch), A.1 (= 6 sts) 13-14-15-17-18-20 times in total, finish with 1 tr in last tr. Continue pattern like this. Eyelet holes in A.1 goes diagonally towards the left 2 sts on every row (seen from RS) until hole meets the one tr in left side of piece. REMEMBER THE CROCHET TENSION! When A.1 has been worked 1 time vertically, repeat A.z until finished measurements. Fasten off when piece measures 40-41-42-43-44-45 cm. Now work pattern as before over the middle 68-74-80-80-86-98 sts (= 6-6-6-12-12-12 sts in each side for armhole). When piece measures 54-56-58-60-62-64 cm, adjust so that next row is from RS. Work over the first 20-23-24-24-24-31 sts (= shoulder) as follows: Work 1 tr in every tr and 2 tr in every ch-space = 20-23-24-24-24-31 tr. Work 2 rows with 1 tr in every tr. Fasten off. Do the same on the other shoulder FRONT PIECE: Work as back piece but work A.2 instead of A.1, i.e. eyelet holes goes diagonally towards the right (seen from RS). Repeat A.x until finished measurements. When piece measures 45-47-48-50-51-53 cm, adjust after a whole repetition of A.x dec for neck (next row is from WS) as follows: Work as before over the first 31-34-37-37-40-46 tr, work 3 TR TOG - see explanation above. Turn piece. Repeat this dec on every row toward mid-front 7-7-8-8-9-9 times in total = 20-23-24-24-25-31 sts remain for shoulder. Then work 1 row with 1 tr in every tr and 2 tr in every ch-space. Work 2 rows with 1 tr in every tr. Fasten off. Do the same on the other shoulder SLEEVE: Work back and forth. Work 45-45-49-49-52-52 ch on hook size 4.5 mm with Cotton Light. Work 1 tr in 4th ch from hook (= 2 tr), 1 tr in each of the next 5-5-7-7-5-5 ch, * 1 tr in each of the next 6 ch, skip 1 ch *, repeat from *-* until 1-1-3-3-1-1 ch remains, 1 tr in the last 1-1-3-3-1-1 ch = 38-38-42-42-44-44 tr. Work 1 tr in each of the first 1-1-3-3-1-1 tr, A.2 until 1-1-3-3-1-1 tr remain, (= 6-6-6-6-7-7 times in width), 1 tr in each of the last 1-1-3-3-1-1 tr. When A.2 has been worked 1 time vertically, repeat A.x until finished measurements. When piece measures 8-8-8-10-10-10 cm, inc 1 tr by working 2 tr in first and last tr on row (= 2 tr inc). Repeat inc every 4½-4-4-3-3-2½ cm 9-10-10-12-12-14 more times = 58-60-64-68-70-74 sts. Work the inc sts in pattern. NOTE: There is always 1 tr (or 3 ch = 1 tr) in each side of piece. Fasten off when piece measures 52-52-51-51-51-48 cm (shorter measurements in the larger sizes because of wider shoulders). Work another sleeve the same way. ASSEMBLY: Work the shoulder seams tog from WS as follows through both layers: 1 dc in first tr, * 1 ch, skip 1 tr, 1 dc in next tr *, repeat from *-*. Sew in sleeves. Work the under arm seams and side seams tog from WS as follows through both layers: * 1 dc in outer loop, 3 ch, skip 1 row *, repeat from *-* until approx. 10 cm remain on body for vent in each side. Fasten off. NECK EDGE: Work an edge around the neck as follows from mid on top of shoulder: 1 dc, * 3 ch, skip approx. 1 cm, 1 dc *, repeat from *-* around the entire neck and finish with 1 sl st in first dc on round. Fasten off. |
|||||||||||||
Diagram explanations |
|||||||||||||
|
|||||||||||||
 |
|||||||||||||
 |
|||||||||||||
Have you finished this pattern?Tag your pictures with #dropspattern #justmesweater or submit them to the #dropsfan gallery. Do you need help with this pattern?You'll find 5 tutorial videos, a Comments/Questions area and more by visiting the pattern on garnstudio.com. © 1982-2026 DROPS Design A/S. We reserve all rights. This document, including all its sub-sections, has copyrights. Read more about what you can do with our patterns at the bottom of each pattern on our site. |
|||||||||||||


With over 40 years in knitting and crochet design, DROPS Design offers one of the most extensive collections of free patterns on the internet - translated to 17 languages. As of today we count 324 catalogues and 12290 patterns translated into English (UK/cm). 12290
We work hard to bring you the best knitting and crochet have to offer, inspiration and advice as well as great quality yarns at incredible prices! Would you like to use our patterns for other than personal use? You can read what you are allowed to do in the Copyright text at the bottom of all our patterns. Happy crafting!
Post a comment to pattern DROPS 162-3
We would love to hear what you have to say about this pattern!
If you want to leave a question, please make sure you select the correct category in the form below, to speed up the answering process. Required fields are marked *.