
Popular categories
Looking for a yarn?


Comments / Questions (67)
![]() Judit wrote:
Judit wrote:
Hola puede alguien es plicar mas anpliamente como tejer el cuello sinceramente no entiendo su corta espicasion
18.04.2025 - 17:25DROPS Design answered:
Hola Judit, el cuello chal se trabaja sobre 18-18-20-20-22-22 p.a. en el delantero derecho y en el delantero izquierdo, por separado. Comenzando en el centro del delantero, trabajar 1 p.a en cada p.a en la 1ª fila. En la 2ª fila, por el lado revés, comenzando desde el hombro, trabajar 6-6-6-6-6-6 puntos bajos, 2-2-2-2-3-3 puntos medio altos, 3-3-4-4-4-4 puntos altos. y 7-7-8-8-9-9 puntos altos dobles. Repetir estas 2 filas hasta que la labor mida aprox. 16-16-17-17-18-18 cm en el hombro. Repetir en el delantero izquierdo, pero trabajar para que quede simétrico con el derecho, es decir, asegurarse que los p.b se trabajen en el hombro y los p.a.d en el centro del delantero.
20.04.2025 - 23:26
![]() Enza wrote:
Enza wrote:
Pourqua vous ecriver en englese? Pouver vous laisse le explication en francoise ? Merci
30.05.2024 - 14:57DROPS Design answered:
Bonjour Enza, tous nos modèles sont disponibles en français, cliquez sur le menu déroulant à côté de l'icône imprimante pour changer la langue - retrouvez les explications de ce modèle en français ici. Bon tricot!
30.05.2024 - 16:00
![]() Marina wrote:
Marina wrote:
Come è possibile che nella taglia XL le 40 maglie del collo arrivino al centro del dietro ? È impossibile, ho 97 maglie alte e le 40 maglie del collo arrivano molto prima del centro dietro! Non combaciano le maglie del collo con le maglie del cardigan e tutte le altre spiegazioni date su questo argomento non sono per niente chiare. Per favore spiegare molto chiaramente, è impossibile fare come la vostra spiegazione. Allegare uno schema grazie
10.12.2023 - 19:50DROPS Design answered:
Buonasera Marina, lo sprone inizia con 20 maglie alte per il davanti sinistro, e su queste si deve lavorare il collo, e termina con 20 maglie alte per il davanti destro, e su queste si lavora il collo. Ogni parte del collo verrà lavorata a righe accorciate come indicato e poi il collo sarà cucito sul dietro. Buon lavoro!
11.12.2023 - 22:34
![]() Marina wrote:
Marina wrote:
Come è possibile che nella taglia XL le 40 maglie del collo arrivino al centro del dietro ? È impossibile, ho 97 maglie alte e le 40 maglie del collo arrivano molto prima del centro dietro! Non combaciano le maglie del collo con le maglie del cardigan e tutte le altre spiegazioni date su questo argomento non sono per niente chiare. Per favore spiegare molto chiaramente, è impossibile fare come la vostra spiegazione. Allegare uno schema grazie.
10.12.2023 - 18:57DROPS Design answered:
Vedere la risposta sotto.
11.12.2023 - 22:35
![]() Marina wrote:
Marina wrote:
Sono del tutto bloccata nell’ iniziare il collo a scialle, non capisco da dove bisogna iniziare esattamente! Si inizia a fare le maglie alte agganciandosi alle maglie alte nel senso della lunghezza del davanti? In questo caso il numero delle maglie da fare non arriva al centro del dietro. O si fa il colletto separato e si cuce dopo al cardigan? In ogni Ci sarebbe bisogno di un video perché veramente le spiegazioni non sono chiare., non capisco! Per favore spiegare molto bene, grazie
03.12.2023 - 17:36DROPS Design answered:
Buonasera Marina, il collo non è lavorato staccato, ma si lavora a ferri accorciati prima sul davanti destro e poi su quello sinistro. Le maglie su cui lavorarlo sono quelle dell'inizio del cardigan, dopo l'avvio. Buon lavoro!
04.12.2023 - 17:12
![]() Patricia Schenkels wrote:
Patricia Schenkels wrote:
Het waaier patroon komt niet uit,Bij toer 3 van het lijf?Er staat 6 dstk dan 4stk 2 L en 4 stk in onder gelegen lus en 3dstk van de vorige toer,heb het al 3 keer opnieuw gedaan maar kom er niet uit,is hier soms een. Filmpje van? Mvg Patricia Voor de rest vind ik dit een super patroon
27.09.2023 - 15:00DROPS Design answered:
Dag Patricia,
Helaas is hier niet een video van. Je haakt eerst 6 dubbele stokjes, waarbij je elk dubbel stokje in het dubbele stokje van de vorige toer haakt. Als het goed is ben je dan bij het lossenboogje van de vorige toer. In dat lossen boogje haak je 4 stokjes, 2 lossen en 4 stokjes. Vervolgens ga je weer verder met dubbele stokjes in de dubbele stokjes van de vorige toer.
27.09.2023 - 20:21
![]() Marina wrote:
Marina wrote:
Ho terminato lo sprone, quindi ho finito gli aumenti per 22 volte nella taglia XL . Ora devo fare 8 catenelle in corrispondenza delle maniche ma non capisco se le catenelle le devo lasciare libere e fagliare il filo lsenza fissarle al lavoro o se devo fissarle alla manica . Non capisco come procedere
23.09.2023 - 18:22DROPS Design answered:
Buonasera Marina, le 8 catenelle costituiranno il sottomanica. Buon lavoro!
25.09.2023 - 23:09
![]() Jeanne Whiting wrote:
Jeanne Whiting wrote:
Hi guys I solved the collar and no sewing needed. Miss first ten stitches on right hand side. And do 1 st row 6 dc. 2 htr 4 tr, and 8 dtr, then 37 treble across the back. Then do 9dtr, 4tr, 2htr, 6dc,that should leave 10 tr unworked other side. 2nd row 78tr repeat to 18cm in a XL hope this helps any issues use Facebook m.facebook.com/100041616369907
11.01.2023 - 15:18
![]() Jeanne Whiting wrote:
Jeanne Whiting wrote:
Pattern don't seem correct. I've made size xl. I started with 100 at very beginning. Then I had divide and done 20 stitches for front half. 14 stitches for sleeve, 29 stitches for back and the another 14 for second sleeve and for second front 20 stitches. Total 97 stitches... how do you make a collar from 40 stitches on each side plus take 10 each side. An then 37 is unaccounted for on back neck. Do we decrease there to any stitches to lose. Please explain better. I nearly finished it
10.01.2023 - 16:07DROPS Design answered:
See answer below - Happy crocheting!
11.01.2023 - 09:17
![]() Jeanne Whiting wrote:
Jeanne Whiting wrote:
Hi I'm a little confused and I can see so Is many other from reading there reviews. There should be video showing these made. Pattern don't seem correct. I've made size xl. I started with 100 at very beginning. Then I had divide and done 20 stitches for front half. 14 stitches for sleeve, 29 stitches for back and the another 14 for second sleeve and for second front 20 stitches. Total 97 stitches... how do you make a collar from 40 stitches on each side plus take 10 each side. More...
10.01.2023 - 16:03DROPS Design answered:
Dear Mrs Whiting, at the beginning of the yoke the first 20 treble crochets are for the left front piece, you will crochet the collar over these 20 treble crochets - and the yoke ends with 20 treble crochets for right front piece, you will crochet the collar over these 20 treble crochets. Each collar will be worked from these stitches at the beg of the yoke until the shortest side (due to short rows) gets to the mid back. Then both pieces will be sewn together and the shortest side of collar will be sewn along the neckline on back piece. Happy crocheting!
11.01.2023 - 09:17
|
|
Lavender Mist#lavendermistjacket |
|
|
|
|
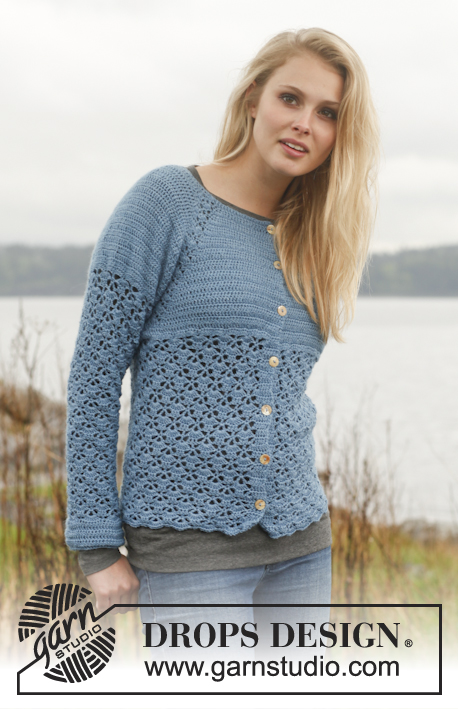
Crochet DROPS jacket with fan pattern, raglan and shawl collar in ”Karisma”. Size: S - XXXL.
DROPS 149-7 |
|
|
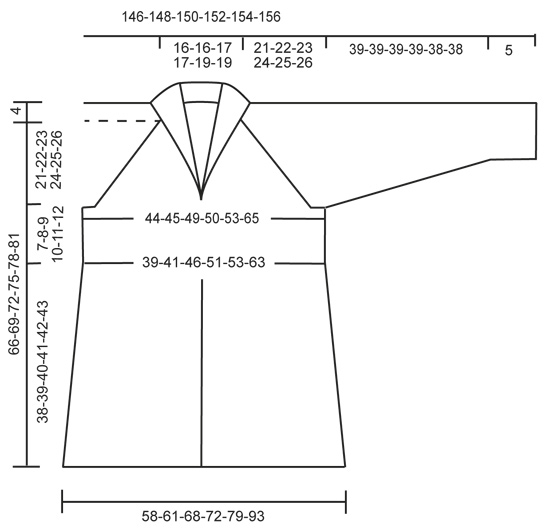
CROCHET INFO: Replace first tr on every round/row with 3 ch. Finish every round with 1 sl st in 3rd ch from beg of round. Finish every row with 1 tr in first tr from beg of previous row. DECREASE TIP: Work 1 tr but wait with last pull through (= 2 sts on hook), then work next tr but on last pull through, pull yarn through all sts on hook = 1 st dec. INCREASE TIP: Inc 1 dtr by working 2 dtr in one of the middle dtr from previous row = 4 dtr between every fan on round. CROCHET TIP: After first inc to 4 dtr, continue to inc 1 dtr between every section with fan pattern when piece measures 14-14-15-15-16-16 cm, 21-21-21-22-23-23 cm and 28-28-28-28-28-28 cm = 7 dtr between every fan when all inc are done. ---------------------------------------------------------- JACKET: The piece is worked top down. Work 92-92-100-100-107-108 ch on hook size 4 mm with Karisma. Work 1 tr in 4th ch from hook, then work 1 tr in every ch the entire row = 89-89-97-97-104-105 tr. Continue to work as follows: 1 tr in each of the first 18-18-20-20-22-22 tr, 1 ch (= front piece), work 1 tr in each of the next 14 tr (= sleeve), 1 ch, work 1 tr in each of the next 25-25-29-29-32-33 tr, 1 ch (= back piece), work 1 tr in each of the next 14 tr (= sleeve), 1 ch, work 1 tr in each of the last 18-18-20-20-22-22 tr = 89-89-97-97-104-105 tr on row and 1 ch for each raglan line (= 4 ch) READ ALL OF THE FOLLOWING SECTION BEFORE CONTINUING: Work next row as follows: Work 1 tr in every tr but in every ch work 2 tr + 2 ch + 2 tr = 105-105-113-113-120-121 tr on row and 2 ch in every raglan line (= 8 ch). Continue inc for raglan on every row as follows: Work 1 tr + 2 ch + 1 tr in each ch-space in every raglan line (= 8 tr inc on row) NOTE! In size XXXL inc 1 st extra each side of front and back piece on the first 9 rows, i.e work 2 tr next to 2 ch on the side towards front and back pieces in every ch-space (= 12 inc in total on each of these rows), then continue as explained above with 8 inc per row. Repeat inc for raglan on every row 18-19-20-21-22-23 more times (= 19-20-21-22-23-24 times in total) = 257-265-281-289-304-349 tr. REMEMBER THE CROCHET TENSION! Work next row as follows: Work 1 tr in each of the first 39-40-43-44-47-57 tr (= front piece), skip the next 56-58-60-62-64-66 tr (= sleeve), work 8 ch, work 1 tr in each of the next 67-69-75-77-82-103 tr (= back piece), skip the next 56-58-60-62-64-66 tr (= sleeve), work 8 ch and work 1 tr in each of the last 39-40-43-44-47-57 tr. Then finish body and sleeves separately. BODY: NOW MEASURE PIECE FROM HERE! Work first row as follows: Work 1 tr in each of the 39-40-43-44-47-57 tr on front piece, 1 tr in every ch (= 8 tr), 1 tr in each of the 67-69-75-77-82-103 tr on back piece, 1 tr in every ch (= 8 tr) and 1 tr in each of the 39-40-43-44-47-57 tr on front piece = 161-165-177-181-192-233 tr on row. Insert 1 marker 43-44-47-48-51-61 sts in from each side (= 75-77-83-85-90-111 sts on back piece). Continue back and forth with 1 tr in every tr. When piece measures 3 cm, dec 1-1-1-0-0-1 tr on each side of both markers – READ DECREASE TIP (= 4-4-4-0-0-4 tr dec). Repeat dec on the next 2-2-1-0-0-1 row (= 12-12-8-0-0-8 tr dec in total). When piece measures 6-7-8-9-10-11 cm, inc 0-0-0-4-1-0 tr and dec 4-0-0-0-0-0 tr evenly = 145-153-169-185-193-225 tr on round. When piece measures 7-8-9-10-11-12 cm, work fan pattern back and forth from mid front as follows: ROW 1: 1 tr in each of the first 6 tr (= band), 1 dc in next tr, * 2 ch, skip 1 tr, 1 dc in next tr, 2 ch, skip 1 tr, 1 dc in next tr, 1 tr in each of the next 3 tr, 1 dc in next tr *, repeat from *-* 15-16-18-20-21-25 more times (= 16-17-19-21-22-26 times in total), ch 2, skip 1 tr, 1 dc in next tr, ch 2, skip 1 tr, 1 dc in next tr, and finish with 1 tr in each of the next 6 tr (= band). Turn piece. There are now 34-36-40-44-46-54 ch-spaces with 6 tr in each side for band. ROW 2: 1 dtr in each of the first 6 tr, * 4 tr in ch-space below, 2 ch, 4 tr in next ch-space, 1 dtr in each of the next 3 tr *, repeat from *-* until 2 ch-spaces remain, work 4 tr in ch-space below, 2 ch, 4 tr in next ch-space, finish with 1 dtr in each of the next 6 tr below. Turn piece. ROW 3: 1 dtr in each of the first 6 dtr, * 4 tr + 2 ch + 4 tr in ch-space below, 1 dtr in each of the 3 dtr from previous row *, repeat from *-* until 1 ch-space remains, 4 tr + 2 ch + 4 tr in ch-space, finish with 1 dtr in each of the 6 dtr on band, turn piece. ROW 4: 1 dtr in each of the first 6 dtr, * 4 tr + 2 ch + 4 tr in ch-space below, 1 dtr in each of the three dtr from previous row AT THE SAME TIME inc 1 dtr – Read INCREASE TIP *, repeat from *-* until 1 ch-space remains, 4 tr + 2 ch + 4 tr in this ch-space, finish with 1 dtr in each of the 6 dtr on band, turn piece. Then continue the same way with fan pattern and 6 dtr in each side for band, AT THE SAME TIME inc 1 dtr between every fan 3 more times - Read CROCHET TIP. Continue to work until piece measures 45-47-49-51-53-55 cm. Piece measures approx. 70-73-76-79-82-85 cm from shoulder. Fasten off. SLEEVE: = 56-58-60-62-64-66 sts. Insert 1 marker here – NOW MEASURE PIECE FROM HERE. Sleeve is worked in the round, top down. Beg by working mid under sleeve as follows: Work 1 dc in 5th ch of the 8 ch worked in armhole on body. Ch 3 (= 1 tr) and work 1 tr in each of the next 3 ch. Then work 1 tr in every tr over sleeve, before working 1 tr in each of the remaining 4 ch under sleeve = 64-66-68-70-72-74 tr. Insert 1 marker mid under sleeve. When sleeve measures 3 cm, dec 1 st on each side of marker - READ DECREASE TIP. Repeat dec every 3-2½-2½-3-2½-2 cm 11-12-13-11-12-13 more times (= 12-13-14-12-13-14 dec in total) = 40-40-40-46-46-46 tr remain. Continue until sleeve measures 39-39-39-39-38-38 cm, AT THE SAME TIME on last row dec 0-0-0-1-1-1 tr mid under sleeve = 40-40-40-45-45-45 tr remain. Then work an edge as follows: - Remember CROCHET INFO! ROUND 1: 1 dc in first tr, * 2 ch, skip 1 tr, 1 dc in next tr, 2 ch, skip 1 tr, 1 dc in next tr, 1 tr in each of the next 3-3-3-4-4-4 tr, 1 dc in next tr *, repeat from *-* 3 more times (= 4 times in total), 2 ch, skip 1 tr, 1 dc in next tr, 2 ch, skip 1 tr, 1 dc in next tr, 1 tr in each of the next 3-3-3-4-4-4 tr. ROUND 2: 1 dc in first tr, * 4 tr in ch-space below, 2 ch, 4 tr in next ch-space, 1 dtr in each of the next 3-3-3-4-4-4 tr below *, repeat from *-* the entire way, finish with 1 sl st in first dc and 3 ch. ROUND 3: Work sl sts until the middle of first ch-space, * 4 tr + 2 ch + 4 tr in ch-space below, 1 dtr in each of the 3-3-3-4-4-4 tr from previous row *, repeat from *-* the entire round 4 more times (= 5 times in total). Repeat 3rd ROUND 1 more time but finish with 1 sl st in first tr on round. Fasten off. SHAWL COLLAR: Work shawl collar with short rows over the 18-18-20-20-22-22 tr on right front piece as follows: ROW 1 (= from mid front): 1 tr in every tr = 18-18-20-20-22-22 tr. ROW 2 (= from shoulder): 6-6-6-6-6-6 dc, 2-2-2-2-3-3 htr, 3-3-4-4-4-4 tr and 7-7-8-8-9-9 dtr. Repeat 1st and 2nd row until piece measures approx. 16-16-17-17-18-18 cm on the shortest. Work on left front piece as right front piece but mirrored. NOTE: Make sure that one side is finished with 1st row and the other side is finished with 2nd row. ASSEMBLY: Sew collar tog mid back and sew collar to neckline at the back of neck. Sew buttons on to left band 2-2-2-2-2-2 cm and 7-7-8-8-9-9 cm over fan pattern. Button between tr on band. |
|
 |
|
Have you finished this pattern?Tag your pictures with #dropspattern #lavendermistjacket or submit them to the #dropsfan gallery. Do you need help with this pattern?You'll find 9 tutorial videos, a Comments/Questions area and more by visiting the pattern on garnstudio.com. © 1982-2026 DROPS Design A/S. We reserve all rights. This document, including all its sub-sections, has copyrights. Read more about what you can do with our patterns at the bottom of each pattern on our site. |


With over 40 years in knitting and crochet design, DROPS Design offers one of the most extensive collections of free patterns on the internet - translated to 17 languages. As of today we count 324 catalogues and 12290 patterns translated into English (UK/cm). 12290
We work hard to bring you the best knitting and crochet have to offer, inspiration and advice as well as great quality yarns at incredible prices! Would you like to use our patterns for other than personal use? You can read what you are allowed to do in the Copyright text at the bottom of all our patterns. Happy crafting!
Post a comment to pattern DROPS 149-7
We would love to hear what you have to say about this pattern!
If you want to leave a question, please make sure you select the correct category in the form below, to speed up the answering process. Required fields are marked *.