
Popular categories
Looking for a yarn?


Comments / Questions (160)
![]() Yasmin wrote:
Yasmin wrote:
Hallo, findet die Aufnahme im Strukturmuster nach 38 cm gleichzeitig statt? Als 1 M jede 4. R und 1 M jede 8. Reihe, sodass in der 8. Reihe 2 M zugenommen werden? Oder strick ich erst die Zunahmen jede 4. Reihe und danach die Zunahmen jede 8. Reihe? Danke im Voraus.
11.11.2025 - 09:31DROPS Design answered:
Liebe Yasmin, die Zunahmen ab 38 cm im Strukturmuster strickekn Sie zuerst in jeder 4. Reihe 6 Mal dann in jeder 8. Reihe 5 oder 5 Mal (siehe Größe). Viel Spaß beim Stricken!
21.11.2025 - 10:23
![]() Rebecca wrote:
Rebecca wrote:
Hallo Drops Design. Ich habe eine Frage zu den Abnahmen ab 8cm und 10cm Gesamthöhe: Es werden an beiden Stellen die Abnahmen vor bzw nach A1 erwähnt, alle 8cm und in jeder 8ten Reihe. Heißt das, die kommen nach 8cm Gesamthöhe, dann nach 10cm Gesamthöhe, dann in der nächsten 8ten Reihe und wieder nach8cm? Ich seh da die Regelmäßigkeit nicht und die würden sich doch auch irgendwann überschneiden? Vielen lieben Dank im Voraus f eine Antwort und liebe Grüße, Rebecca
12.12.2024 - 07:11DROPS Design answered:
Liebe Rebecca, die Abnahmen an den Seiten erfolgen nach 8 cm, dann nach insgesamt 16 cm (= 8 cm danach) und noch einmal nach 24 cm (8 cm danach); gleichzeitig nehmen Sie im Struckturmuster nach 10 cm ab, diese Abnahmen wiederholen Sie in jeder 8 Reihe - so beide Abnahmen sollen gleichzeitig gestrickt werden aber auf einem unterschiedlichen Rythmus. Viel spaß beim Stricken!
12.12.2024 - 10:04
![]() Szilvi wrote:
Szilvi wrote:
Kedves DROPS Desing csapat! Nagyon megtetszett a DROPS 149-1 kardigán, amihez ezúton is gratulálok a tervezőknek! Szeretném én is elkészíteni és a leíráshoz lenne egy apró észrevételem: a "KARDIGÁN" részben a leírásból kimaradt egy "A.1-es minta (= 6 szem)" szövegrész közvetlen az A.3-as minta után, mivel csak így lesz szimmetrikus a minta a kardigán hátán (illetve a kezdő szemszámmal is így fog stimmelni).
17.09.2024 - 15:23
![]() Elizabeth Warren wrote:
Elizabeth Warren wrote:
I am having trouble understanding the decreasing instructions at the 8cm length stage. I don’t understand where abouts the decreasing takes place in the row. Is it next to the A1 panel or next to the side marker? Thank you
14.03.2024 - 19:34DROPS Design answered:
Dear Mrs Warren, the decreases starting after 8 cm are worked on both sides of the markers inserted at the very beginning of body; ie in the middle of the sections worked in stocking stitch on both sides of body, between front and back pieces. Happy knitting!
15.03.2024 - 08:18
![]() Evelyn wrote:
Evelyn wrote:
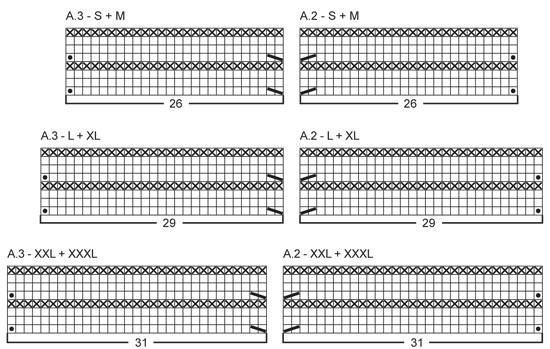
In diagram A2, rows 4 and 8-is it really 1 yo between 2 sts?
06.01.2024 - 00:54DROPS Design answered:
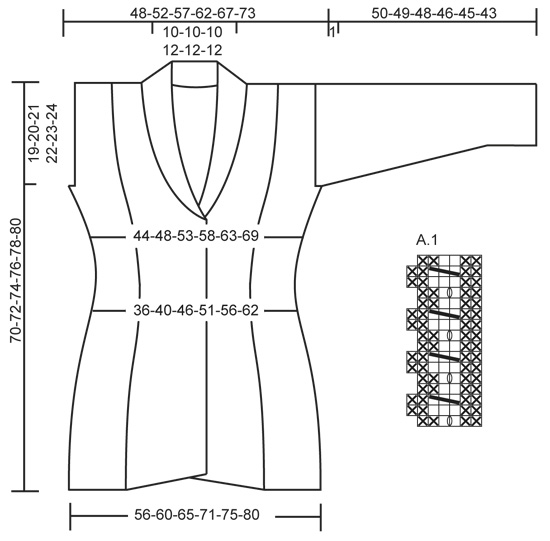
Dear Evelyn, in A.2 there are no yarn overs; in rows 1 and 5 from the bottom (charts are read from bottom to top) you work in both loops of the stitch and increase 1 stitch. In A.1, you have yarn overs in rows 1, 5, 9 and 13, where you work 1 yarn over between 2 stitches. Those 2 stitches are the two white squares, each on one side of the yarn over symbol. So it would be p2, k1, yarn over, k1, p2. Happy knitting!
07.01.2024 - 23:59
![]() Sabine wrote:
Sabine wrote:
In dem Diagramm sind in der vierten Reihe linke Maschen zu stricken. In der Rückreihe würde ich nach Anleitung dann rechte Maschen stricken. So ergeben sich 2 Rippen auf der Vorderseite. Auf dem Foto sieht es aber so aus, als sollte es nur 1 Rippe sein. Was ist richtig? Danke im Voraus
28.11.2023 - 19:44DROPS Design answered:
Liebe Sabine, alle Reihen sind im Diagram gezeichnet, dh jede 4. Reihe stricken Sie eine Rückreihe rechts, so ergibt sich 1 Rippen auf der Vorderseite. (so hat strickt man 2 Reihen glatt rechts, 2 Reihen krausrechts). Viel Spaß beim stricken!
29.11.2023 - 08:23
![]() Denise TerBeest wrote:
Denise TerBeest wrote:
In the transition where you reduce for armholes: I assume this is done at side markers? Also at the end of the bind off row do you cut yarn and begin again in back portion? Not sure how you get over bind off stitches to get to back?
11.05.2022 - 14:03DROPS Design answered:
Dear Mrs TerBeest, correct you cast off 2 stitches before + 2 stitches after each of the marker (= 4 sts in total of each armhole = 2 sts on each front piece + 2 sts on each side of back piece). You can cut the yarn to work first back piece, or put ball aside and work it later when working this front piece and work back piece with a new ball. Happy knitting!
11.05.2022 - 15:58
![]() Manuela Bruckbauer/Mauracher wrote:
Manuela Bruckbauer/Mauracher wrote:
Es ist eine sehr schöne Jacke zu Stricken. Aber kann es sein das nach den ganzen Abnahmen in A2/A3 und Seitlich an den Markierungen die Maschen Anzahl nicht stimmt. Bei 2XL sollten 260Maschen auf der Nadel sein es sind aber tatsächlich 292. Habe es mehrmals durchgerechnet.
15.12.2021 - 15:29DROPS Design answered:
Liebe Frau Bruckbauer/Mauracher, es wird zuerst 4 Maschen x 4 auf der Seiten abgenommen, dann 8 Maschen (in glatt rechts zwisschen A.1 + A.2 + A.2) x 8 Mal, so haben Sie: 340 - (4x4) - (8x8) = 260 Maschen. Kann das Ihnen helfen? Viel Spaß beim stricken!
15.12.2021 - 16:24
![]() Milly wrote:
Milly wrote:
For the shawl collar, we have to increase the garter stitches on both sides from 6 sts to 28 sts by increasing 22 sts on each side but at the same time we are decreasing sts 11 times. So, we end up with 17 sts in total for the garter sts. Are we supposed to have 28 sts or 17 sts in the end?? If we are supposed to have 28 sts in total then should we increase the garter stitch 11 more times (after the 22 sts increase and 11 sts decrease) to make up for the difference??
17.11.2020 - 15:38DROPS Design answered:
Dear Milly, there are 6 sts for each front band and you will increase 1 stitch a total of 6-6-7-7-8-8 times on every other row + 14-14-15-15-16-16 on every 4th row = 20-20-22-22-24-24 times = 20-20-22-22-24-24 stiches increased + 6 sts in garter st for the front band = 26-26-28-28-30-30 sts in garter stitch in total. Hope this will help. Happy knitting!
17.11.2020 - 16:17
![]() Presi wrote:
Presi wrote:
Hello. I have a question. I am not able to understand whether the decrease for neckline happens inside A2/A3 on the front piece or inside the band + collar sts. If the decrease is happening in the band + collar sts section then why are we increasing and decreasing the sts in the band sts simultaneously? I am really confused... Please help!
11.11.2020 - 19:31DROPS Design answered:
Dear Presi, you decrease for neck inside all stitches worked in garter stitch (= front band stitches + increased stitches for collar) - at the same time work A.2/A.3 as before and increase for collar. Happy knitting!
12.11.2020 - 09:05
|
||||||||||||||||||||||
Tanja#tanjajacket |
||||||||||||||||||||||
 |
 |
|||||||||||||||||||||
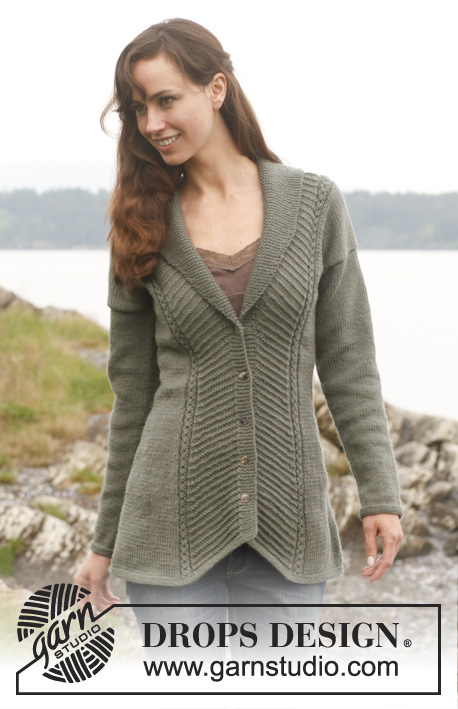
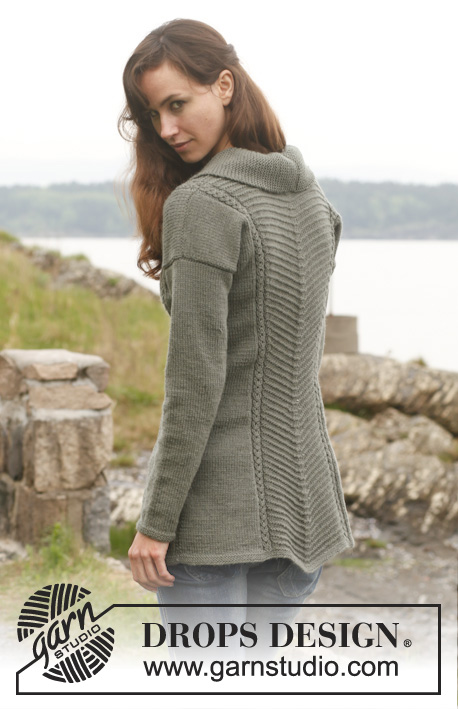
Knitted DROPS fitted jacket with textured pattern and shawl collar in ”Lima”. Size: S - XXXL.
DROPS 149-1 |
||||||||||||||||||||||
|
GARTER ST (back and forth on circular needle): K all rows. 1 ridge = 2 rows K. GARTER ST (in the round on double pointed needles): * K 1 round and P 1 round *, repeat from *-*. 1 ridge = 2 rounds. PATTERN: See diagrams A.1 to A.3 - NOTE: Choose diagram for correct size. Diagrams show all rows in pattern from RS. DECREASE TIP: Dec on each side of marker in the sides on jacket, dec outside A.1 on front and back piece and dec inside sts in garter st on band/collar. All dec are done from RS! Dec as follows before marker/A.1/sts in garter st on collar/band: K 2 tog. Dec as follows after marker/A.1/sts in garter st on collar/band: Slip 1 st as if to K, K 1, psso. INCREASE TIP (applies to collar): Inc inside outermost st by making 1 YO. On next row K YO twisted to avoid holes. BUTTONHOLES: Dec for buttonholes on right band. 1 buttonhole = K tog fourth and fifth st from edge and make 1 YO. Dec for buttonholes when piece measures (measured from bottom edge on the longest part): SIZE S: 11, 18, 25, 32 and 39 cm SIZE M: 12, 19, 26, 33 and 40 cm SIZE L: 13, 20, 27, 34 and 41 cm SIZE XL: 12, 18, 24, 30, 36 and 42 cm. SIZE XXL: 13, 19, 25, 31, 37 and 43 cm. SIZE XXXL: 14, 20, 26, 32, 38 and 44 cm. ---------------------------------------------------------- JACKET: Worked back and forth on circular needle from mid front. Cast on 260-276-300-324-340-364 sts (incl 6 band sts in each side towards mid front) on circular needle size 3 mm with Lima. Work 3 RIDGES in garter st - see explanation above. Switch to circular needle size 4 mm and work next row from RS as follows: 6 band sts in garter st, work A.2 (= 26-26-29-29-31-31 sts), A.1 (= 6 sts), 30-34-37-43-45-51 sts in stocking st, insert 1 marker (= side), 30-34-37-43-45-51 sts in stocking st, A.1 (= 6 sts), A.2 (= 26-26-29-29-31-31 sts), A.3 (= 26-26-29-29-31-31 sts), A.1 (= 6 sts), 30-34-37-43-45-51 sts in stocking st, insert 1 marker (= side), 30-34-37-43-45-51 sts in stocking st, A.1 (= 6 sts), A.3 (= 26-26-29-29-31-31 sts) and 6 band sts in garter st. Continue the pattern like this. REMEMBER THE KNITTING TENSION! DECREASE IN THE SIDES: When piece measures 8 cm, dec 1 st on each side of both markers - READ DECREASE TIP (= 4 sts dec). Repeat dec every 8 cm 3 more times (= 4 dec in total on each side of both markers). DECREASE IN TEXTURED PATTERN: AT THE SAME TIME when piece measures approx. 10 cm – adjust so that next row is a row with inc and dec in A.2/A.3 - dec 1 st outside A.1 on front and back piece, i.e. in stocking st section after/before A.1 – READ DECREASE TIP. Dec in addition 1 extra st in A.2 and A.3 on front and back piece so that section with diagonal stripes gradually becomes smaller. Dec 1 st in A.2 by working the last 2 sts before dec the same way as dec, i.e. K 2 tog. Dec 1 st in A.3 by working the next 2 sts after dec the same way as dec, i.e. slip 1 st as if to K, K 1, psso (= 8 sts dec in total on row). Repeat these dec every 8th row 8-8-8-8-7-7 more times (= 9-9-9-9-8-8 dec in total) – remember BUTTONHOLES on right band – see explanation above. After all dec are done, 172-188-212-236-260-284 sts remain on needle. Continue the pattern as before – READ THE REST OF PATTERN BEFORE CONTINUING. INCREASE IN TEXTURED PATTERN: When piece measures approx. 38 cm – adjust so that next row is with inc and dec in A.2/A.3 - inc 1 extra st in A.2 and A.3 so that section with diagonal stripes becomes larger. Inc 1 st in A.2 by working 2 sts in st after inc and inc 1 st in A.3 by working 2 sts in st before inc (= 4 sts inc on row). Repeat inc every 4th row 5 more times (= 6 times in total) and then every 8th row 6-6-6-6-5-5 times. SHAWL COLLAR: AT THE SAME TIME when piece measures 40-41-42-43-44-45 cm (i.e. 1 cm after last buttonhole on right band), inc 1 st in each side for shawl collar – READ INCREASE TIP. Work next row as follows from RS: Work 1 ridge (i.e. 2 rows K) back and forth over the outermost 7 sts on row (i.e. band + 1 inc st - the other sts on row are not worked), turn piece and work 1 row from RS as before over all sts, turn piece and work 1 ridge back and forth over the outermost 7 sts, turn and work back as before over all sts again (this is done so that the neckline folds nicely when neck dec beg – see explanation below). Then work back and forth over all sts. AT THE SAME TIME continue inc for shawl collar inside outermost st in each side on every other row (i.e. every row from RS) 5-5-6-6-7-7 more times (= 6-6-7-7-8-8 times in total) and then every 4th row (i.e. every other row from RS) 14-14-15-15-16-16 times in total = 20-20-22-22-24-24 sts inc for collar and 26-26-28-28-30-30 sts in garter st in total. NECKLINE: AT THE SAME TIME when piece measures 41-42-43-44-45-46 cm, dec 1 st for neck inside sts in garter st on band + inc sts for collar - READ DECREASE TIP. Repeat dec every other row 3 more times (= 4 times in total) and then every 4th row 7-7-7-9-9-9 times - NOTE: When dec for neck, the inc is moved into pattern in A.2/A.3 on front piece after dec for neck so that inc is further in on piece. ARMHOLES: AT THE SAME TIME when piece measures 51-52-53-54-55-56 cm, cast off 4 sts in each side for armholes (i.e. cast off 2 sts on both sides of both markers) and finish each piece separately. BACK PIECE: Continue pattern as before with 1 edge st in garter st in each side. ADJUSTING DIAGONAL LINES: When piece measures 64-64-64-64-62-62 cm (all inc in A.2/A.3 should now be done), dec and inc in A.2 and A.3 every 8th row instead of every 4th row so that the slanting of the lines is gradually weaker. This is done 3-3-3-3-4-4 times in total, then work A.2/A.3 back and forth over the middle 58-58-64-64-68-68 sts without inc and dec (work the other sts as before). When piece measures 68-70-72-74-76-78 cm, cast off the middle 20-20-20-24-24-24 sts for neck and finish each shoulder separately. Continue to cast off 1 st on next row from neck = 39-43-49-53-58-64 sts remain on the shoulder. Continue until piece measures 70-72-74-76-78-80 cm and cast off. Repeat on the other shoulder. RIGHT FRONT PIECE: Continue pattern as before with 1 edge st in garter st towards armhole AT THE SAME TIME inc for shawl collar and dec for neckline as before. ADJUSTING DIAGONAL LINES: When piece measures 64-64-64-64-62-62 cm (all inc in A.2 should now be done), dec and inc in A.2 every 8th row instead of every 4th row as on back piece so that the slanting of the lines is gradually weaker. This is done 3-3-3-3-4-4 times in total, then work A.2 back and forth without inc and dec (work the other sts as before). After all inc and dec, there are 65-69-77-81-88-94 sts on needle. When piece measures approx. 70-72-74-76-78-80 cm, adjust so that next row is worked from WS, cast off the first 39-43-49-53-58-64 sts on shoulder, K the rest of row over the last 26-26-28-28-30-30 sts. COLLAR: Beg mid front and work in garter st back and forth over the remaining sts for collar as follows: * 2 rows over all sts, 2 rows over only the outermost 18-18-20-20-22-22 sts (towards mid front) *, repeat from *-* until collar measures approx. 7-7-7-8-8-8 cm on the most narrow part, cast off. LEFT FRONT PIECE: Continue as on right front piece but reversed (continue with A.3 instead of A.2 - work the other sts as before). Cast off shoulder sts from RS (instead of WS). SLEEVE: Worked in the round on double pointed needles. Cast on 46-48-50-52-54-56 sts on double pointed needles size 3 mm with Lima and work 3 RIDGES in garter st - see explanation above. Switch to double pointed needles size 4 mm and work in stocking st. When piece measures 7-10-8-13-9-12 cm, inc 2 sts mid under sleeve. Repeat inc every 2½-2-2-1½-1½-1 cm 16-17-18-19-22-26 more times (= 17-18-19-20-23-27 inc in total) = 80-84-88-92-100-110 sts. When piece measures 49-48-47-45-44-42 cm, insert 1 marker mid under sleeve. Continue back and forth on needle until sleeve measures 50-49-48-46-45-43 cm and cast off. Knit another sleeve. ASSEMBLY: Sew the shoulder seams. Sew in sleeves inside 1 edge st - marker mid under sleeve should fit marker in the side on body. Sew collar tog mid back (make sure that seam is not visible when collar is folded down) and sew collar to neckline at the back of neck. Sew on buttons. |
||||||||||||||||||||||
Diagram explanations |
||||||||||||||||||||||
|
||||||||||||||||||||||
 |
||||||||||||||||||||||
 |
||||||||||||||||||||||
Have you finished this pattern?Tag your pictures with #dropspattern #tanjajacket or submit them to the #dropsfan gallery. Do you need help with this pattern?You'll find 25 tutorial videos, a Comments/Questions area and more by visiting the pattern on garnstudio.com. © 1982-2026 DROPS Design A/S. We reserve all rights. This document, including all its sub-sections, has copyrights. Read more about what you can do with our patterns at the bottom of each pattern on our site. |
||||||||||||||||||||||


With over 40 years in knitting and crochet design, DROPS Design offers one of the most extensive collections of free patterns on the internet - translated to 17 languages. As of today we count 324 catalogues and 12290 patterns translated into English (UK/cm). 12290
We work hard to bring you the best knitting and crochet have to offer, inspiration and advice as well as great quality yarns at incredible prices! Would you like to use our patterns for other than personal use? You can read what you are allowed to do in the Copyright text at the bottom of all our patterns. Happy crafting!
Post a comment to pattern DROPS 149-1
We would love to hear what you have to say about this pattern!
If you want to leave a question, please make sure you select the correct category in the form below, to speed up the answering process. Required fields are marked *.