
Popular categories
Looking for a yarn?


Comments / Questions (68)
![]() Lenna wrote:
Lenna wrote:
Hello there, I am not so sure about slip 9sts part. Does it mean working 9sts short row 5 times? I mean, working 9sts and turn work on RS then continue like that until 5 times have done? Please let me know. Thanks.
24.07.2014 - 09:23DROPS Design answered:
Dear Lenna, *at the beg of row from WS, work 9 sts and put them on a thread or a st holder, work end of row, turn and work 1 row from RS, repeat from * a total of 5 times, ie you will have 45 sts on a thread/st holder and 11-31 sts remain on needle (see size). Happy knitting!
24.07.2014 - 11:53
![]() Vitoria wrote:
Vitoria wrote:
Me gustaría que pusieran una relaccion de tallas en cm, ya que la talla s-m-l... son muy relativas. Muchas gracias
27.05.2014 - 12:53Mya wrote:
I am in love with your site but I must ask you about the dress from this picture. What material is used to make it? :) Sorry for my bad english and thank you very much for information :)
26.03.2014 - 13:07DROPS Design answered:
The dress is private and we don't have info about it.
27.03.2014 - 21:43
![]() Jennifer wrote:
Jennifer wrote:
I am making this shrug for my daughter to wear over her wedding dress. I want it to be perfect! However I don't see any directions for sewing up the back. Am I missing something? What do you recommend for closing up the back?
14.03.2014 - 00:22DROPS Design answered:
Dear Jennifer, the seam mid back has been added. Thank you. Happy knitting!
24.03.2014 - 10:28
![]() Taina Tammelin-Laine wrote:
Taina Tammelin-Laine wrote:
Eikös Baby alpaca silk ja Cotton viscose ole yhtä paksuja lankoja, eli tähän malliin voi käyttää myös Cotton viscosea? En vaan ymmärrä, miten hihan resoriin voidaan luoda 110 silmukkaa - siitähän tulee ihan älyttömän leveä, jos ajattelee, että tavallisessa villasukan varressa silmukoita on noin 56. Onko ohjeessa siis virhe, olenko ymmärtänyt väärin vai miten tämä on mahdollista? Ranteen ympärykseni on noin 16 cm.
31.01.2014 - 15:12DROPS Design answered:
Kyllä, voit käyttää Cotton Viscose -lankaa tähän malliin. Hihan joustinneule vetäytyy yhteen, joten siitä ei tule liian leveä. Lisäksi joustinneuleessa myös kavennetaan silmukoita.
03.02.2014 - 17:10Mona Mina wrote:
Learning
15.11.2013 - 09:17
![]() Mara wrote:
Mara wrote:
Buonasera, volevo chiedere una cosa che mi è poco chiara. Quando la spiegazione dice "ATTENZIONE: Lavorare le m aumentate seguendo progressivamente il motivo; lavorare a maglia rasata le m che non possono essere lavorate seguendo il motivo" significa che devo avere 11 maglie aumentate su entrambi i lati per poter iniziare ad inserire il motivo del diagramma? o ne inserisco solo una parte? Non so se sono stata chiara... Grazie mille :)
08.11.2013 - 22:57DROPS Design answered:
Buonasera Mara. Le m aumentate dovrebbero essere lavorate fin da subito come indicato nel diagramma. Non deve quindi aspettare di avere tutte le 11 m per lavorare una nuova ripetizione del motivo. Lavora le m a maglia rasata nel caso in cui deve p.es lavorare 2 m insieme e non sono state ancora aumentate tutte e due le m. Ci riscriva se non è chiaro. Buon lavoro.
11.11.2013 - 23:49
![]() Ingunn Tennefoss Pedersen wrote:
Ingunn Tennefoss Pedersen wrote:
Får ikke strikket ryggen ferdig, da det mangler, eller det er meg som ikke har skjønt siste delen.
10.10.2013 - 21:56DROPS Design answered:
Hei Ingunn. Mönstret er komplet. Du starter med höyre erme og strikker ind til midten af ryggen. Hvor er du nu i mönstret?
14.10.2013 - 11:19
![]() Julia wrote:
Julia wrote:
Ich bekomme die Maschenprobe nicht hin. Auch wenn ich eine dickere Nadel nehme zieht sich das Lochmuster total zusammen. Die 43cm für den Ärmel schaffe ich auch nicht mit nur 13 Mustersätzen.Was kann ich tun?
11.07.2013 - 11:44DROPS Design answered:
Liebe Julia, versuchen Sie enmal Ihre Maschenprobe zu spannen (nur so fest, wie Sie es auch mit dem fertigen Bolero tun werden) - vielelicht passt es ja dann.
12.07.2013 - 11:22
![]() Hanna wrote:
Hanna wrote:
A must have. Pretty, feminine, light, romantic... Made in black goes for a biker chick.
30.01.2013 - 17:18
|
|||||||||||||
Romantic#romanticbolero |
|||||||||||||
 |
 |
||||||||||||
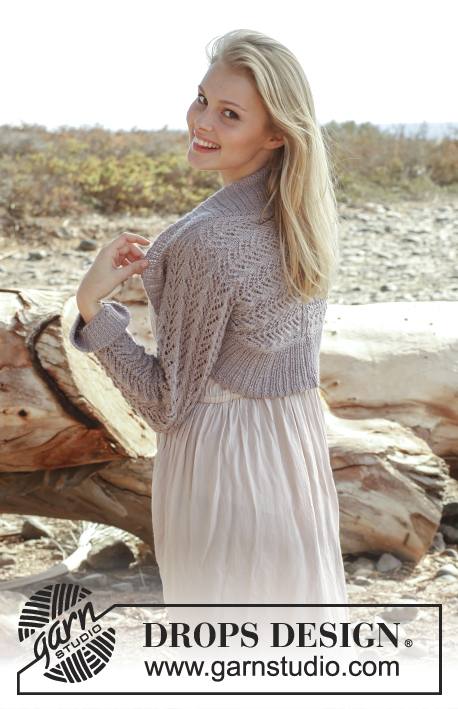
Knitted DROPS shrug worked sideways with lace pattern in ”BabyAlpaca Silk”. Size: S - XXXL.
DROPS 146-3 |
|||||||||||||
|
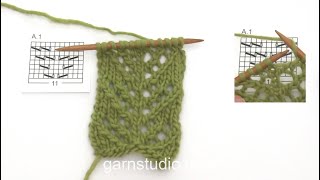
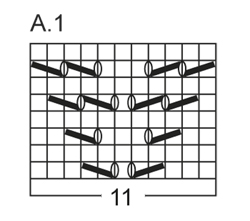
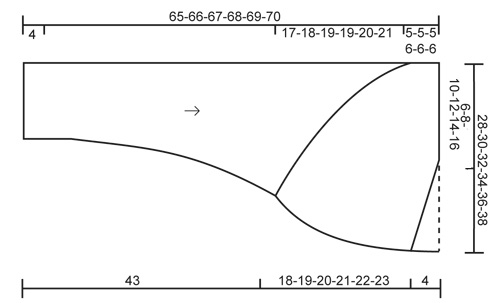
GARTER ST (back and forth on circular needle): K all rows. 1 ridge = 2 rows K. PATTERN: See diagram A.1. Diagram shows all rows in pattern seen from RS. ---------------------------------------------------------- SHRUG: Work 2 parts that are sewn tog mid back. Then knit up an edge in rib around the opening of the shrug. RIGHT SIDE: Cast on 110-110-110-119-119-119 sts (incl 1 edge st in each side) on circular needle size 2.5 mm with Baby Alpaca Silk - work back and forth on needle. P 1 row from WS. Then work rib (= K 1/P 2) with 1 edge st in GARTER ST - see explanation above, in each side. When rib measures 4 cm, dec on next row from RS all 2 P sts to 1 P st = 74-74-74-80-80-80 sts. Switch to needle size 3 mm and P 1 row from WS while AT THE SAME TIME dec 24-24-22-26-23-23 sts evenly = 50-50-52-54-57-57 sts. Work next row as follows from RS: 1 edge st in garter st, 2-2-3-4-0-0 sts in stocking st, work pattern according to diagram A.1 until 3-3-4-5-1-1 st remains, finish with 2-2-3-4-0-0 sts in stocking st and 1 edge st in garter st. Continue pattern like this. REMEMBER THE KNITTING TENSION! When piece measures 7-8-8-9-9-11 cm, inc 1 st in each side. Repeat inc every 9th-7th-7th-6th-6th-5th row 12-14-15-16-16-18 more times = 76-80-84-88-91-95 sts – NOTE: Work the inc sts gradually in pattern, the sts that do not fit are worked in stocking st. When piece measures 43 cm for all sizes, insert 1 marker in each side - now measure piece from here. Now cast off in one side of piece (= at front edge) while AT THE SAME TIME casting on new sts in the other side of piece (= towards back piece) as follows: FRONT PIECE: Cast off on every other row (i.e. at beg of every row from RS): 4 sts 3 times, 3 sts 2 times, 2 sts 4-4-5-6-7-8 times and 1 st 6-8-8-9-7-7 times, then cast off every 4th row (i.e. at beg of every other row from RS): 1 st 6-6-6-5-7-7 times. TOWARDS BACK PIECE: Cast on new sts on every other row (i.e. at the end of every row from RS): 2 sts 4-5-6-6-7-7 times and 1 st 8-8-8-10-11-13 times, then every 4th row (i.e. at the end of every other row from RS): 1 st 2 times. After all cast offs and cast ons, there are 56-60-64-68-72-76 sts on needle. When piece measures 18-19-20-21-22-23 cm, slip 9 sts 5 times in total on a stitch holder from bottom of back piece and up towards the neck on every other row (i.e. at beg of every row from WS - work sts before slipping them on stitch holder) = 11-15-19-23-27-31 sts remain on needle. Switch to circular needle size 2.5 mm and slip all sts from stitch holder back on needle while at the same time working the row from RS = 56-60-64-68-72-76 sts. P 1 row from WS while AT THE SAME TIME inc 12-12-12-14-14-16 sts evenly = 68-72-76-82-86-92 sts. Work 2 ridges in garter st over all sts and cast off. The shrug has now been worked to the middle of back, i.e. halfway. LEFT SIDE: Cast on and work as right side but reversed. I.e. when casting off on front piece, cast off at beg of row from WS (instead of RS). Cast on new sts towards back piece at the end of row from WS (instead of RS) and slip sts on a stitch holder on back piece at beg of every row from RS (instead of WS). ASSEMBLY: Sew the 2 parts tog mid back. Sew sleeve seams inside 1 edge st up to markers. Knit up along the opening on the shrug - i.e. up along right front piece, back of neck, down along left front piece and then along back piece as follows: Knit up from RS approx. 250 to 330 sts on circular needle size 2.5 mm and work in the round on needle as follows: P 1 round, then K 1 round while AT THE SAME TIME inc evenly to 279-288-297-315-333-351 sts. Then work rib = K 1/P 2. When rib measures 2 cm, inc every third P-section to 3 P sts = 310-320-330-350-370-390 sts. Repeat inc when edge measures 6 and 9 cm, but displace inc so that next P-section is inc to 3 P sts = 372-384-396-420-444-468 sts. After last round with inc, the rib should be K 1/P 3 the entire round. Now loosely cast off with K over K and P over P. NOTE: To avoid a tight cast off edge, 1 YO after approx. every 8th or 12th st can be made, cast off YO as a st. |
|||||||||||||
Diagram explanations |
|||||||||||||
|
|||||||||||||
 |
|||||||||||||
 |
|||||||||||||
Have you finished this pattern?Tag your pictures with #dropspattern #romanticbolero or submit them to the #dropsfan gallery. Do you need help with this pattern?You'll find 9 tutorial videos, a Comments/Questions area and more by visiting the pattern on garnstudio.com. © 1982-2026 DROPS Design A/S. We reserve all rights. This document, including all its sub-sections, has copyrights. Read more about what you can do with our patterns at the bottom of each pattern on our site. |
|||||||||||||


With over 40 years in knitting and crochet design, DROPS Design offers one of the most extensive collections of free patterns on the internet - translated to 17 languages. As of today we count 324 catalogues and 12290 patterns translated into English (UK/cm). 12290
We work hard to bring you the best knitting and crochet have to offer, inspiration and advice as well as great quality yarns at incredible prices! Would you like to use our patterns for other than personal use? You can read what you are allowed to do in the Copyright text at the bottom of all our patterns. Happy crafting!
Post a comment to pattern DROPS 146-3
We would love to hear what you have to say about this pattern!
If you want to leave a question, please make sure you select the correct category in the form below, to speed up the answering process. Required fields are marked *.