
Popular categories
Looking for a yarn?


Comments / Questions (74)
![]() Gouezela wrote:
Gouezela wrote:
Bonjour, J'ai fait ce modèle en Andes. il est magnifique!!! Pour la taille M, j'ai employé 10 pelotes Andes. un grand merci pour mettre à disposition ces explications!
27.08.2014 - 11:38
![]() M. Wicht wrote:
M. Wicht wrote:
Hallo, vielen Dank für Ihre Hilfe. Leider ist die Anleitung am Ende sehr verwirrend gewesen. Aber ich habe meine Fantasie walten lassen und den Poncho fertig gestrickt. Er sieht in ESKIMO Farbe Feuerholz ganz toll aus. Jetzt gehts zum nächsten Projekt. Schönen Tag noch und lieben Gruß. M. Wicht
28.05.2014 - 11:09
![]() M. Wicht wrote:
M. Wicht wrote:
Hallo, ich strcike gerade diesen Poncho. Können Sie mir sagen (oder gibts ein Video) wie ich "zwei linke Maschen in die gleiche Masche stricken" mache? Danke im voraus. Lieben Gruß M. Wicht
22.05.2014 - 16:03DROPS Design answered:
Liebe Frau Wicht, im Prinzip machen Sie das wie beim Rechtsstricken, wenn Sie 2 M aus 1 M herausstricken - Sie stricken erst 1 M li ganz normal in das vordere M-Glied, lassen die M aber noch nicht von der Nadel gleiten, dann stechen Sie nochmal ein, aber diesmal in das hintere M-Glied, wieder wie zum Linksstricken, und stricken noch eine M li. Dann lassen Sie die M von der Nadel gleiten.
22.05.2014 - 22:11
![]() Alessandra wrote:
Alessandra wrote:
Scusate ma non capisco con quante maglie devo iniziare. Io lavoro con i ferri circolari, quante maglie devo mettere?
17.02.2014 - 23:08DROPS Design answered:
Buongiorno Alessandra. Il n° delle m da avviare dipende dalla taglia che sta lavorando. Viene indicato di avviare: 194-202-218-226-234-258 m, che corrispondono alle taglie: S - M - L - XL - XXL – XXXL. Quindi, per la taglia S dovrà avviare 194 m, per la taglia M dovrà avviare 202 m, per la taglia L dovrà avviare 226 m e così via. Buon lavoro!
18.02.2014 - 08:51
![]() Alessandra wrote:
Alessandra wrote:
Scusate ma non capisco con quante maglie devo iniziare. Io lavoro con i ferri circolari, quante maglie devo mettere?
17.02.2014 - 23:03DROPS Design answered:
Buongiorno Alessandra. Il n° delle m da avviare dipende dalla taglia che sta lavorando. Viene indicato di avviare: 194-202-218-226-234-258 m, che corrispondono alle taglie: S - M - L - XL - XXL – XXXL. Quindi, per la taglia S dovrà avviare 194 m, per la taglia M dovrà avviare 202 m, per la taglia L dovrà avviare 226 m e così via. Buon lavoro!
18.02.2014 - 08:53
![]() Jose wrote:
Jose wrote:
Hoe breien we de bolletjes in het voorpand of is er een voorbeeld voorhanden?
05.08.2013 - 17:28DROPS Design answered:
De uitleg staat in het patroon, onderaan bij "Telpatroon" en dan uitleg BOBBEL. Bovenaan bij het patroon vindt u een tabblad "VIDEO'S" en daar vindt u ook een video voor nopje/bobbel.
06.08.2013 - 07:44
![]() Christine wrote:
Christine wrote:
Merci pour votre réponse. J'ai compris comment faire ces diminutions mais est-ce normal que l'on finisse cette section avec 5 mailles? merci
22.01.2013 - 17:05DROPS Design answered:
Bonjour Christine, le nombre de mailles est différent en fonction de la taille mais en taille S il reste effectivement 5 m. Bon tricot !
23.01.2013 - 09:44
![]() Christine wrote:
Christine wrote:
Bonjour, Pouvez-vous détailler à quel endroit précisément on doit faire les diminutions dans les sections mailles envers et nopes sur les 17 mailles. Car dans le diagramme A7 les 13 mailles centrales sont presque utiles jusqu'en haut. Sur la dernière nope on aura que 2 mailles envers de chaques cotés ? Merci
22.01.2013 - 16:03DROPS Design answered:
Bonjour Christine, si vous pensez bien aux diminutions à 43...47 cm de hauteur totale, vous placez 1 marqueur de chaque côté des 13 m de A7 + 2 m de chaque côté = 17 m du milieu dos et milieu devant. Vous diminuez ensuite en suivant les indications DIMINUTIONS 2 au début des explications : soit avant le marqueur et avant les 17 m, soit après le marqueur et les 17 m. Bon tricot !
22.01.2013 - 16:51
![]() Bine wrote:
Bine wrote:
Bonjour, au niveau des diminutions du diagramme A1, comment on tricote 2 fois la mëme maille si on tricote à l'envers ?
05.01.2013 - 01:39DROPS Design answered:
Bonjour Bine, pour augmenter 1 m dans A1, vous tricotez 2 fois la même m à l'envers, la 1ère fois dans le brin avant, la 2ème dans le brin arrière. Bon tricot !
05.01.2013 - 12:40
|
|||||||||||||||||||||||||||||||
Lulu#luluponcho |
|||||||||||||||||||||||||||||||
|
|
|||||||||||||||||||||||||||||||
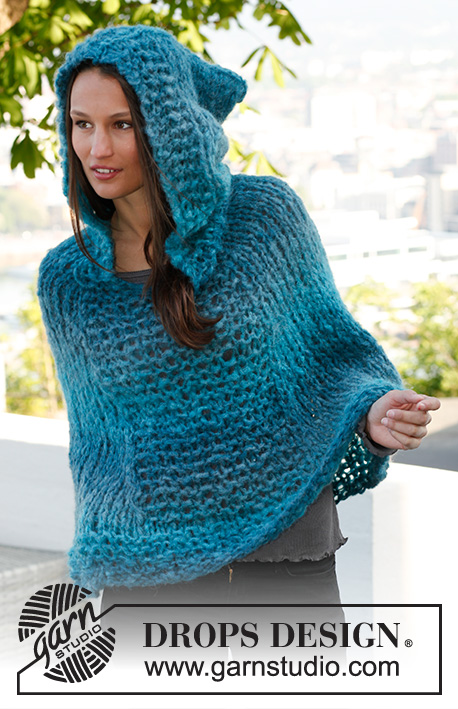
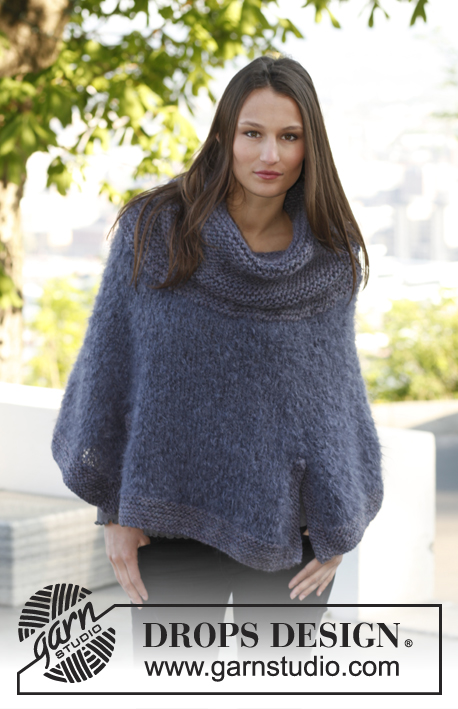
Knitted DROPS poncho with cables and textured pattern in ”Snow”. Size: S - XXXL.
DROPS 143-18 |
|||||||||||||||||||||||||||||||
|
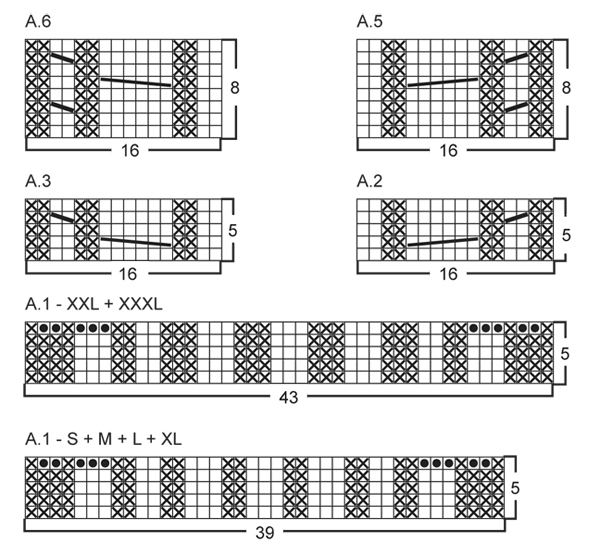
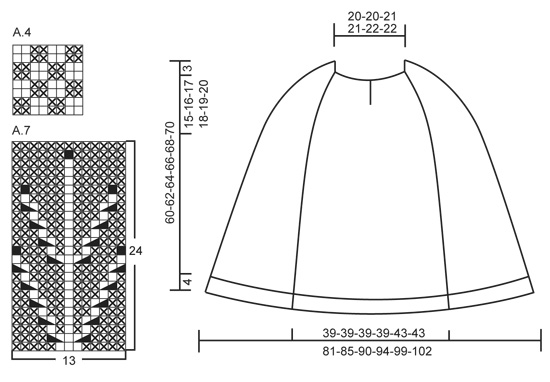
GARTER ST (in the round on circular needle): * K 1 round and P 1 round *, repeat from *-*. GARTER ST (back and forth on needle): K all rows. 1 ridge = 2 rows K. PATTERN: See diagrams A.1 to A.7. Diagrams show all rows seen from RS. MEASURING TIP: All length measurements are made in A.4. DECREASE TIP 1 (applies to dec in diagram A.4): All dec are done from RS! DEC AS FOLLOWS AFTER MARKER: When first st is K: Slip 1 st as if to K, K 1, psso. When first st is P: P 2 twisted tog. DEC AS FOLLOWS BEFORE MARKER: When last st is K: K 2 tog. When last st is P: P 2 tog. DECREASE TIP 2 (applies to dec in P sts): All dec are done from RS. DEC AS FOLLOWS AFTER MARKER: P 2 twisted tog. DEC AS FOLLOWS BEFORE MARKER: P 2 tog. ---------------------------------------------------------- PONCHO: Worked in the round on circular needle from bottom up - READ MEASURING TIP. Cast on 194-202-218-226-234-258 sts on circular needle size 9 mm with Snow. K 1 round. Work next round as follows: Work diagram A.1 (choose diagram for your size = 39-39-39-39-43-43 sts), * K 2, P 2 *, repeat from *-* over the next 56-60-68-72-72-84 sts, K 2, diagram A.1 (= 39-39-39-39-43-43 sts), * K 2, P 2 *, repeat from *-* until 2 sts remain and finish with K 2. When A.1 has been worked 1 time vertically there are now 214-222-238-246-254-278 sts on needle and piece measures approx. 4 cm. Now insert 4 markers in the piece as follows: Insert 1st marker at beg of round, 2nd marker after 49-49-49-49-53-53 sts (i.e. after A.1 on back piece), insert 3rd marker after another 58-62-70-74-74-86 sts (i.e. before A.1 on front piece) and insert 4th marker after another 49-49-49-49-53-53 sts (i.e. after A.1 on front piece) = 58-62-70-74-74-86 sts after last marker. READ ALL OF THE FOLLOWING SECTION BEFORE CONTINUING: Then work as follows: Work diagram A.2 (= 16 sts), P 17-17-17-17-21-21, diagram A.3 (= 16 sts), diagram A.4 over the next 58-62-70-74-74-86 sts, diagram A.2 (= 16 sts), P 17-17-17-17-21-21, diagram A.3 (= 16 sts) and diagram A.4 over the last 58-62-70-74-74-86 sts on round. AT THE SAME TIME on 2nd round with A.2 and A.3, dec 1 st after 2nd and 4th marker and 1 st before 3rd and 1st marker – READ DECREASE TIP 1 (= 4 sts dec). Repeat dec every 6th round, 11-11-10-10-11-9 more times and then every other round a total of 14-16-21-23-22-30 times (i.e. that section with A.4 in each side gets smaller and smaller – NOTE: When dec the pattern will not fit in the sides the entire way but make sure that the pattern fits otherwise. AT THE SAME TIME when A.2 and A.3 have been worked 1 time vertically, work next round as follows: Work diagram A.5 instead of A.2 (= 16 sts), P 2-2-2-2-4-4, A.7 (= 13 sts), P 2-2-2-2-4-4, diagram A.6 instead of A.3 (= 16 sts), diagram A.4 until 3rd marker, diagram A.5 (= 16 sts), P 2-2-2-2-4-4, A.7 (= 13 sts), P 2-2-2-2-4-4, diagram A.6 (= 16 sts) and diagram A.4 over the last sts on round. Continue pattern like this. AT THE SAME TIME when piece measures 43-43-44-45-46-47 cm, insert 1 marker on each side of the middle 17-17-17-17-21-21 sts at the front and back, i.e. on each side of section with P sts and bobbles. Now dec 1 st on each side of this section – READ DECREASE TIP 2 (= 4 sts dec). Repeat dec every 4th round 5-5-5-5-7-7 more times (i.e. that middle section with P sts and bobbles mid front and mid back gets smaller and smaller). AT THE SAME TIME when piece measures 48-49-50-51-52-53 cm, dec all 2 P sts in diagram A.5 and A.6 to 1 P st (P sts tog). AT THE SAME TIME when piece measures approx. 50-52-54-56-58-60 cm - adjust so that next round is 1st-3rd-5th or 7th round in A.5/A.6 (last bobble in diagram A.7 should now be done, i.e. that when diagram A.7 has been worked 3 times vertically, continue in reverse stocking st (seen from RS) over the middle sts in "berry pattern") - inc 1 st in the middle P st at mid front on poncho by P 2 sts in front and back loop of 1 st. Then work 2 ridges in GARTER ST – see explanation above, over the middle 6 sts mid front (work the other sts as before). On next round after the 2 ridges, divide the piece mid front for neck vent and work back and forth on needle until finished measurements. NOTE: Work 1st row from RS and continue pattern as before but work the outermost 3 sts in each side in garter st. Continue to work until piece measures approx. 59-61-63-65-67-69 cm. On next row from RS, work sts in the 2 cables in A.5 K twisted tog 2 by 2 (= 4 sts dec) and sts in the 2 cables in A.6 K tog 2 by 2 (= 4 sts dec), in addition dec 12-12-10-10-8-8 sts evenly over the other sts (do not dec over the 3 sts in garter st in each side). After all dec are done, 47-47-49-49-51-51 sts remain on needle. K 1 row from WS. HOOD: Worked back and forth on circular needle from vent mid front. K 1 row from RS while AT THE SAME TIME inc 5-5-3-7-5-9 sts evenly (do not inc over the 3 sts in garter st in each side) = 52-52-52-56-56-60 sts. Then work pattern according to diagram A.4 with 3 sts in garter st in each side towards mid front until hood measures approx. 34-34-36-36-38-38 cm. Loosely cast off. ASSEMBLY: Sew hood tog at the top. |
|||||||||||||||||||||||||||||||
Diagram explanations |
|||||||||||||||||||||||||||||||
|
|||||||||||||||||||||||||||||||
 |
|||||||||||||||||||||||||||||||
 |
|||||||||||||||||||||||||||||||
Have you finished this pattern?Tag your pictures with #dropspattern #luluponcho or submit them to the #dropsfan gallery. Do you need help with this pattern?You'll find 10 tutorial videos, a Comments/Questions area and more by visiting the pattern on garnstudio.com. © 1982-2026 DROPS Design A/S. We reserve all rights. This document, including all its sub-sections, has copyrights. Read more about what you can do with our patterns at the bottom of each pattern on our site. |
|||||||||||||||||||||||||||||||


With over 40 years in knitting and crochet design, DROPS Design offers one of the most extensive collections of free patterns on the internet - translated to 17 languages. As of today we count 324 catalogues and 12290 patterns translated into English (UK/cm). 12290
We work hard to bring you the best knitting and crochet have to offer, inspiration and advice as well as great quality yarns at incredible prices! Would you like to use our patterns for other than personal use? You can read what you are allowed to do in the Copyright text at the bottom of all our patterns. Happy crafting!
Post a comment to pattern DROPS 143-18
We would love to hear what you have to say about this pattern!
If you want to leave a question, please make sure you select the correct category in the form below, to speed up the answering process. Required fields are marked *.