
Popular categories
Looking for a yarn?


Comments / Questions (74)
![]() Zsófi wrote:
Zsófi wrote:
Hungarian translation incorrect, it says "read increase tips" instead of " read measuring tips".
15.03.2023 - 18:48DROPS Design answered:
Thanks for noticing Zsófi, pattern has been now updated. Happy knitting!
16.03.2023 - 15:46
![]() Cornil wrote:
Cornil wrote:
Bonjour, je m'apprête à tricoter ce poncho , mais je ne comprends pas pourquoi , au début, après avoir tricoter A1, après 4 cm, il y a une augmentation de 20 mailles alors qu'il n'y a pas d'augmentation dans les points... merci.
16.12.2020 - 08:15DROPS Design answered:
Bonjour Mme Cornil, si vous regardez bien le dernier rang de A.1, vous verrez 10 points noirs dans le diagramme, ce qui correspond à 10 augmentations (cf 3ème symbole: tricoter 2 fois la même maille) - comme vous tricotez 2 fois A.1, vous augmentez un total de 20 mailles sur ce tour. Bon tricot!
16.12.2020 - 13:45
![]() CENDOYA MARCELA FABIANA wrote:
CENDOYA MARCELA FABIANA wrote:
Se puede realizar este modelo con dos agujas que no sean circulares
30.06.2020 - 19:05DROPS Design answered:
Hola Cendoya. Aquí tienes la lección de DROPS de cómo adaptar el patrón a agujas rectas: https://www.garnstudio.com/pattern.php?id=7906&cid=19 Pero este modelo quedaría mejor trabajado en redondo.
01.07.2020 - 20:41
![]() Elena wrote:
Elena wrote:
Abbandonato. Troppe cose "ALLO STESSO MOMENTO" da fare per le mie capacità e il tempo che ho a disposizione. Devo concentrarmi così tanto che neanche all'università... Peccato :(
16.11.2019 - 15:26
![]() Elena wrote:
Elena wrote:
....sì però adesso che ho aumentato lavorando 2 maglie in 1, mi accorgo di quanto sia antiestetico questo tipo di aumento, non è per nulla invisibile, anzi! Perché non fare un M1 invece, ovvero un aumento davvero invisibile che consiste nell’avvolgere il filo sul ferro e di lavorarlo a ritorto nel ferro successivo? Io non sono affatto soddisfatta dell’estetica del ‘lavora 2 maglie in 1’, davvero bruttina e irregolare a mio parere... Che ne dite?
10.11.2019 - 12:05DROPS Design answered:
Buongiorno Elena. Può sostituire l'aumento suggerito con un aumento M1. Buon lavoro!
11.11.2019 - 09:57
![]() Elena wrote:
Elena wrote:
....mi sono già data la risposta da sola...dovevo lavorare due volte la stessa maglia in 5 m....SCUSATE il mio rimbambimento.... :)
10.11.2019 - 09:22
![]() Elena wrote:
Elena wrote:
Come mai nei primi cm di lavoro dovrei ritrovarmi con 20 maglie in più? Dice: Dopo aver lavorato 1 volta A.1 in altezza ci sono 214 m (ne abbiamo montate 194)... Non capisco, mi aiutate? Grazie, e complimenti per il modello STREPITOSO!
09.11.2019 - 18:33
![]() Ellen Weckx wrote:
Ellen Weckx wrote:
Goedemorgen, Ik ben gestart met dit patroon maar wat ik niet goed begrijp is, dat ik als ik maat M wil breien, 202 steken moet opzetten en na 5 naalden, er 222 steken op de naald overblijven. Er staat nergens vermeld in het patroon dat er moet gemeerderd worden. Dus ik veronderstel dat er elke naald, 4 steken moeten gemeerderd worden?
07.03.2019 - 08:32DROPS Design answered:
Dag Ellen,
Je breit telpatroon A.1 en daar zijn meerderingen in verwerkt. Dit is het symbool met de zwarte bolletjes (brei 2 steken in dezelfde steek)
07.03.2019 - 20:36
![]() Federica Piga wrote:
Federica Piga wrote:
Salve, mi piacerebbe fare questo modello ma senza il motivo centrale. è possibile farlo? oppure bisogna rielaborare il modello? grazie
23.03.2018 - 10:42
![]() YM wrote:
YM wrote:
Bonjour. Je suis entrain de réaliser ce modèle. Je suis presque rendue à la fin en longueur totale. Le problème est que toutes les diminutions 1 avavt et après les deux sections laterales en A.4 ne sont pas faites. Que pourrais-je faire pour bien commencer le capuchon?
10.07.2017 - 06:21DROPS Design answered:
Bonjour Mme Ym, pensez à bien conserver la même tension que pour l'échantillon pour que les mesures en hauteur soient juste, sinon il vous faudra ajuster en fonction de votre taille et de la longueur souhaitée. Bon tricot!
10.07.2017 - 10:02
|
|||||||||||||||||||||||||||||||
Lulu#luluponcho |
|||||||||||||||||||||||||||||||
|
|
|||||||||||||||||||||||||||||||
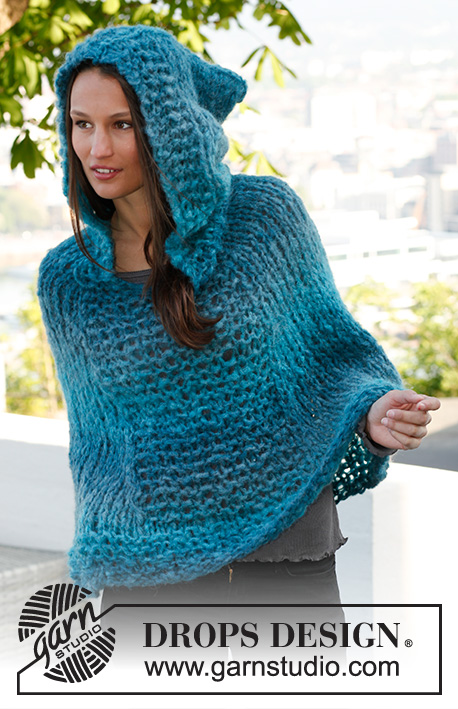
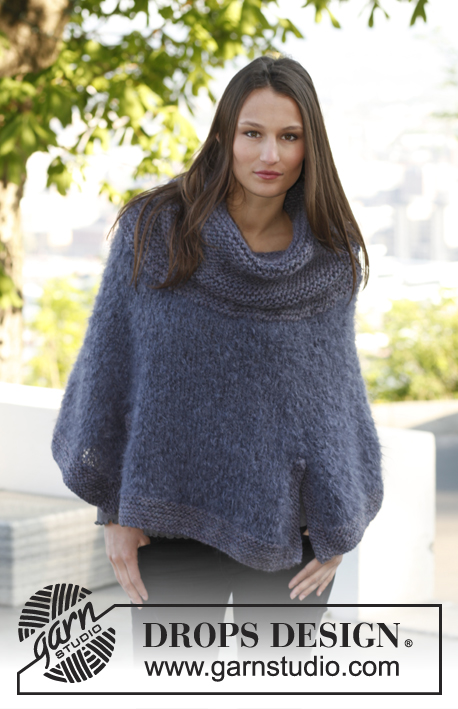
Knitted DROPS poncho with cables and textured pattern in ”Snow”. Size: S - XXXL.
DROPS 143-18 |
|||||||||||||||||||||||||||||||
|
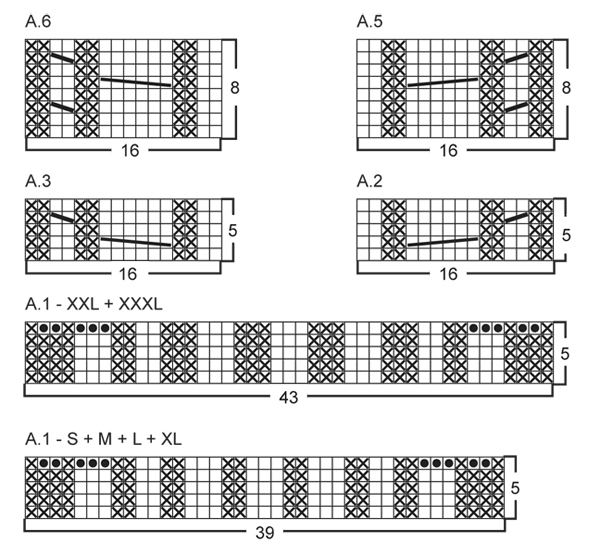
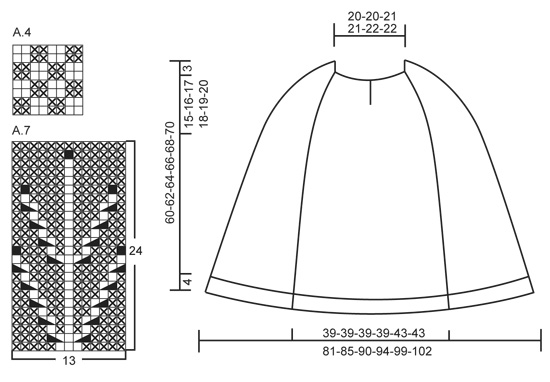
GARTER ST (in the round on circular needle): * K 1 round and P 1 round *, repeat from *-*. GARTER ST (back and forth on needle): K all rows. 1 ridge = 2 rows K. PATTERN: See diagrams A.1 to A.7. Diagrams show all rows seen from RS. MEASURING TIP: All length measurements are made in A.4. DECREASE TIP 1 (applies to dec in diagram A.4): All dec are done from RS! DEC AS FOLLOWS AFTER MARKER: When first st is K: Slip 1 st as if to K, K 1, psso. When first st is P: P 2 twisted tog. DEC AS FOLLOWS BEFORE MARKER: When last st is K: K 2 tog. When last st is P: P 2 tog. DECREASE TIP 2 (applies to dec in P sts): All dec are done from RS. DEC AS FOLLOWS AFTER MARKER: P 2 twisted tog. DEC AS FOLLOWS BEFORE MARKER: P 2 tog. ---------------------------------------------------------- PONCHO: Worked in the round on circular needle from bottom up - READ MEASURING TIP. Cast on 194-202-218-226-234-258 sts on circular needle size 9 mm with Snow. K 1 round. Work next round as follows: Work diagram A.1 (choose diagram for your size = 39-39-39-39-43-43 sts), * K 2, P 2 *, repeat from *-* over the next 56-60-68-72-72-84 sts, K 2, diagram A.1 (= 39-39-39-39-43-43 sts), * K 2, P 2 *, repeat from *-* until 2 sts remain and finish with K 2. When A.1 has been worked 1 time vertically there are now 214-222-238-246-254-278 sts on needle and piece measures approx. 4 cm. Now insert 4 markers in the piece as follows: Insert 1st marker at beg of round, 2nd marker after 49-49-49-49-53-53 sts (i.e. after A.1 on back piece), insert 3rd marker after another 58-62-70-74-74-86 sts (i.e. before A.1 on front piece) and insert 4th marker after another 49-49-49-49-53-53 sts (i.e. after A.1 on front piece) = 58-62-70-74-74-86 sts after last marker. READ ALL OF THE FOLLOWING SECTION BEFORE CONTINUING: Then work as follows: Work diagram A.2 (= 16 sts), P 17-17-17-17-21-21, diagram A.3 (= 16 sts), diagram A.4 over the next 58-62-70-74-74-86 sts, diagram A.2 (= 16 sts), P 17-17-17-17-21-21, diagram A.3 (= 16 sts) and diagram A.4 over the last 58-62-70-74-74-86 sts on round. AT THE SAME TIME on 2nd round with A.2 and A.3, dec 1 st after 2nd and 4th marker and 1 st before 3rd and 1st marker – READ DECREASE TIP 1 (= 4 sts dec). Repeat dec every 6th round, 11-11-10-10-11-9 more times and then every other round a total of 14-16-21-23-22-30 times (i.e. that section with A.4 in each side gets smaller and smaller – NOTE: When dec the pattern will not fit in the sides the entire way but make sure that the pattern fits otherwise. AT THE SAME TIME when A.2 and A.3 have been worked 1 time vertically, work next round as follows: Work diagram A.5 instead of A.2 (= 16 sts), P 2-2-2-2-4-4, A.7 (= 13 sts), P 2-2-2-2-4-4, diagram A.6 instead of A.3 (= 16 sts), diagram A.4 until 3rd marker, diagram A.5 (= 16 sts), P 2-2-2-2-4-4, A.7 (= 13 sts), P 2-2-2-2-4-4, diagram A.6 (= 16 sts) and diagram A.4 over the last sts on round. Continue pattern like this. AT THE SAME TIME when piece measures 43-43-44-45-46-47 cm, insert 1 marker on each side of the middle 17-17-17-17-21-21 sts at the front and back, i.e. on each side of section with P sts and bobbles. Now dec 1 st on each side of this section – READ DECREASE TIP 2 (= 4 sts dec). Repeat dec every 4th round 5-5-5-5-7-7 more times (i.e. that middle section with P sts and bobbles mid front and mid back gets smaller and smaller). AT THE SAME TIME when piece measures 48-49-50-51-52-53 cm, dec all 2 P sts in diagram A.5 and A.6 to 1 P st (P sts tog). AT THE SAME TIME when piece measures approx. 50-52-54-56-58-60 cm - adjust so that next round is 1st-3rd-5th or 7th round in A.5/A.6 (last bobble in diagram A.7 should now be done, i.e. that when diagram A.7 has been worked 3 times vertically, continue in reverse stocking st (seen from RS) over the middle sts in "berry pattern") - inc 1 st in the middle P st at mid front on poncho by P 2 sts in front and back loop of 1 st. Then work 2 ridges in GARTER ST – see explanation above, over the middle 6 sts mid front (work the other sts as before). On next round after the 2 ridges, divide the piece mid front for neck vent and work back and forth on needle until finished measurements. NOTE: Work 1st row from RS and continue pattern as before but work the outermost 3 sts in each side in garter st. Continue to work until piece measures approx. 59-61-63-65-67-69 cm. On next row from RS, work sts in the 2 cables in A.5 K twisted tog 2 by 2 (= 4 sts dec) and sts in the 2 cables in A.6 K tog 2 by 2 (= 4 sts dec), in addition dec 12-12-10-10-8-8 sts evenly over the other sts (do not dec over the 3 sts in garter st in each side). After all dec are done, 47-47-49-49-51-51 sts remain on needle. K 1 row from WS. HOOD: Worked back and forth on circular needle from vent mid front. K 1 row from RS while AT THE SAME TIME inc 5-5-3-7-5-9 sts evenly (do not inc over the 3 sts in garter st in each side) = 52-52-52-56-56-60 sts. Then work pattern according to diagram A.4 with 3 sts in garter st in each side towards mid front until hood measures approx. 34-34-36-36-38-38 cm. Loosely cast off. ASSEMBLY: Sew hood tog at the top. |
|||||||||||||||||||||||||||||||
Diagram explanations |
|||||||||||||||||||||||||||||||
|
|||||||||||||||||||||||||||||||
 |
|||||||||||||||||||||||||||||||
 |
|||||||||||||||||||||||||||||||
Have you finished this pattern?Tag your pictures with #dropspattern #luluponcho or submit them to the #dropsfan gallery. Do you need help with this pattern?You'll find 10 tutorial videos, a Comments/Questions area and more by visiting the pattern on garnstudio.com. © 1982-2026 DROPS Design A/S. We reserve all rights. This document, including all its sub-sections, has copyrights. Read more about what you can do with our patterns at the bottom of each pattern on our site. |
|||||||||||||||||||||||||||||||


With over 40 years in knitting and crochet design, DROPS Design offers one of the most extensive collections of free patterns on the internet - translated to 17 languages. As of today we count 324 catalogues and 12290 patterns translated into English (UK/cm). 12290
We work hard to bring you the best knitting and crochet have to offer, inspiration and advice as well as great quality yarns at incredible prices! Would you like to use our patterns for other than personal use? You can read what you are allowed to do in the Copyright text at the bottom of all our patterns. Happy crafting!
Post a comment to pattern DROPS 143-18
We would love to hear what you have to say about this pattern!
If you want to leave a question, please make sure you select the correct category in the form below, to speed up the answering process. Required fields are marked *.