
Popular categories
Looking for a yarn?


Comments / Questions (71)
![]() Giovanna wrote:
Giovanna wrote:
Non capisco come la circonferenza finale delle maniche possa essere di cm. 62(la prima taglia)come si evince dal disegno con le misure in fondo alle spiegazioni.C'è un errore o io non capisco?
22.01.2013 - 16:17DROPS Design answered:
è giusto. La manica è molto larga. Se vede le maglie della manica sono tante.
27.01.2013 - 16:11
![]() Giovanna wrote:
Giovanna wrote:
Non capisco come la circonferenza finale delle maniche possa essere di cm. 62(la prima taglia)come si evince dal disegno con le misure in fondo alle spiegazioni. grazie
22.01.2013 - 13:17DROPS Design answered:
Buongiorno, è corretto, la circonferenza finale della manica all'altezza del gomito per la taglia S sarà di 62 cm.
14.02.2013 - 12:59
![]() Tiziana wrote:
Tiziana wrote:
Non riesco a caoire le istruzioni con il ferro circolare gia' dall'inizio quando si parla di fare un'alzata. Si possono avere istruzioni alternative? Grazie
29.12.2012 - 21:41DROPS Design answered:
Se preferisce usare oi ferri diritti lo può fare, ma ci sono tante maglie sui ferri, ecco perché si usano i ferri circolari lavorando avanti e indietro. L'alzata è molto semplice. Lavora le maglie normalmente, ma quando rimangono p.es. 16 m, si ferma e gira il lavoro e continua fino a quando non rimangano 22 m, gira e continua così. Avrà sempre la stessa quantità di m, ma in questo modo il collo sarà più bello.
03.01.2013 - 17:10
![]() Giovanna wrote:
Giovanna wrote:
Non riesco a capire le istruzioni per lavorare con i ferri circolari. E' possibile avere le istruzioni anche lavorando i pezzi separati?
26.12.2012 - 12:42DROPS Design answered:
Questo modello si lavora dall'alto verso il basso con il raglan ed è difficile dividerlo in 4 pezzi, ma il lavoro si lavora avanti e indietro, quindi potrebbe utilizzare i ferri diritti.
03.01.2013 - 17:58
![]() Addy Manneke wrote:
Addy Manneke wrote:
Ik ben een ervaren breister, maar ik vind het patroon erg moeilijk/onduidelijk wat meerderingen betreft, kom er niet uit. Is er een duidelijker omschrijving te krijgen?
23.12.2012 - 09:41DROPS Design answered:
Het is eigenlijk heel eenvoudig. Je hebt 4 markeerders in het werk. Je meerdert 2 st aan beidekanten van elke markeerder door 2 st in elke van de eerste 2 st aan beide kanten van de markeerder (dus 4 st meer per markeerder = 16 st in totaal). De meerderingen later worden gemaakt door een omsl en vervolgens gebreid in de achterkant om een gaatje te voorkomen - zie TIP VOOR HET MEERDEREN en onze instructievideo's hoe de meerderingen worden gemaakt.
25.12.2012 - 16:15
![]() Froukje wrote:
Froukje wrote:
Hoe gaat de meerdering van de mouwen? aan beide kanten 1 steek meerderen om de naald?
26.08.2012 - 14:02DROPS Design answered:
MEERDER ALS VOLGT OP DE MOUWEN: Begin in de 1e nld aan de goede kant en meerder om de nld (dus elke nld aan de goede kant) in totaal 31-33-34-36-37-38 keer.
03.09.2012 - 12:27MaFrançoise wrote:
Où se situent les augmentations "manches" par rapport aux Marqueurs n° 1,2,3,4 ? en conséquence où se situent les augmentations our le dos et les devants par rapport aux mêmes marqueurs ?? grand merci
13.08.2012 - 18:06DROPS Design answered:
Bonjour Mafrançoise, les augmentations se font comme indiqué dans le paragraphe "Raglan", en suivant les indications des explications pour les manches et les devants/dos, soit tous les 2 (4) rangs. Bon tricot
14.08.2012 - 09:55
![]() Maritza wrote:
Maritza wrote:
Este modelo es precioso, pero tengo una duda, la parte de abajo del saco es un accesorio o parte del tejido, porque se ve negro y luego marrón como la parte de arriba. Gracias por antelación. saludos.
13.07.2012 - 22:13DROPS Design answered:
Hola Maritza! La parte a la que te refieres no forma parte del tejido. Saludos!
14.07.2012 - 05:47
![]() Bente wrote:
Bente wrote:
Ærmerne måtte gerne være mere smalle, da kroppen ville fremstå slankere derved. Men rigtig fin model i øvrigt.
23.06.2012 - 10:20Esme Barnard wrote:
Baie mooi!!! Chic
21.06.2012 - 08:44
|
|||||||||||||
Paris weekend#parisweekendcardigan |
|||||||||||||
 |
 |
||||||||||||
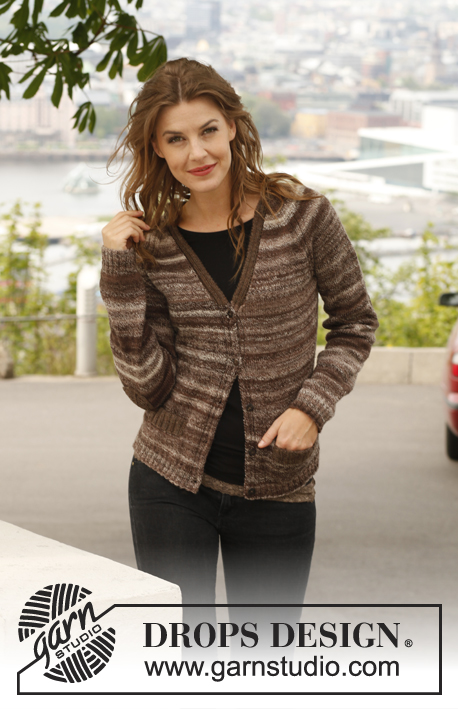
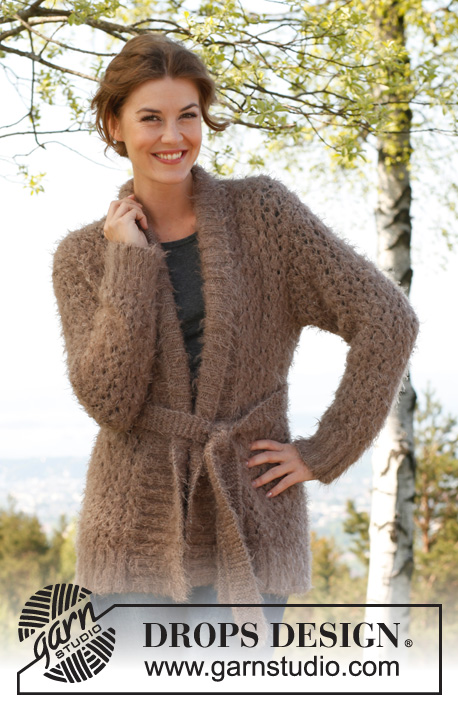
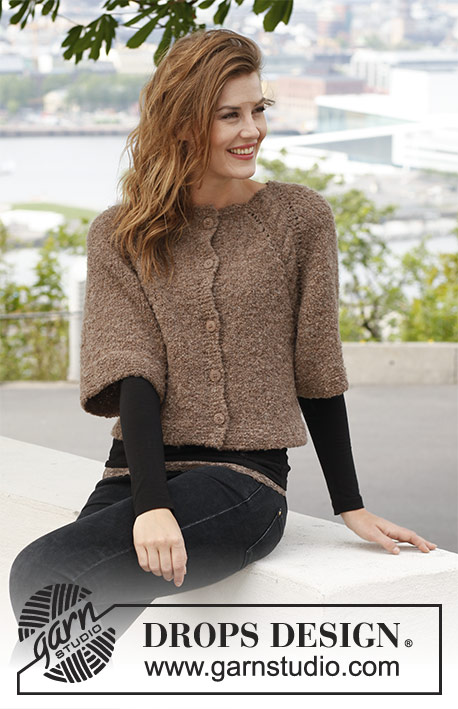
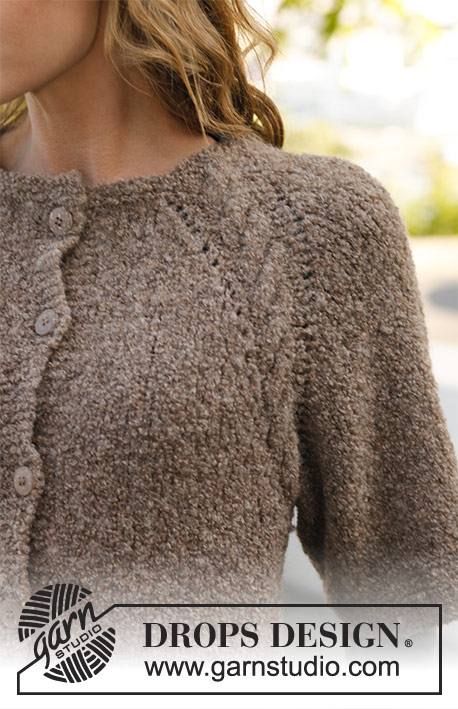
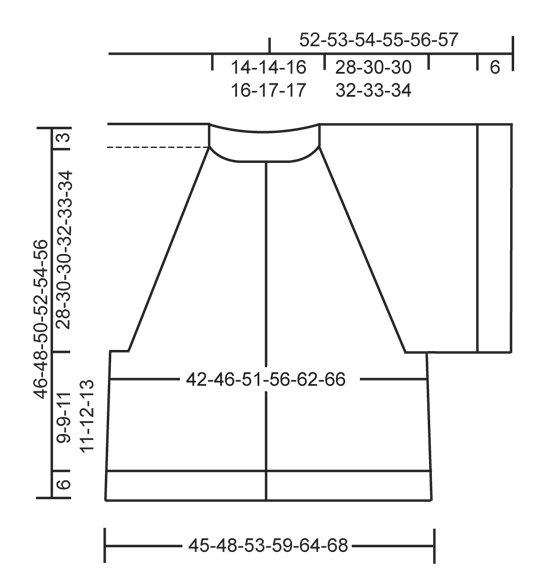
Knitted DROPS jacket with raglan and ¾ sleeves in ”Alpaca Bouclé”, worked top down. Size: S - XXXL.
DROPS 142-26 |
|||||||||||||
|
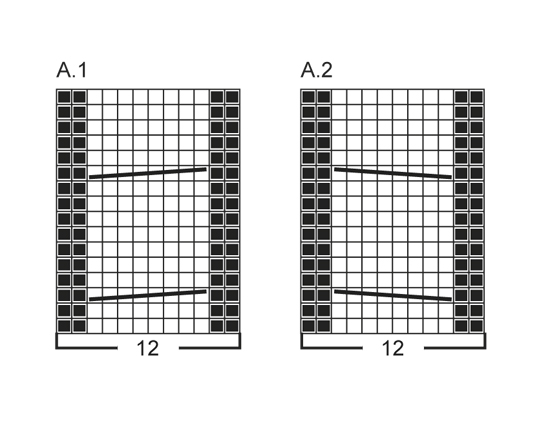
GARTER ST (back and forth on needle): K all rows. 1 ridge = 2 rows K. GARTER ST (in the round on circular needle): * K 1 round and P 1 round *, repeat from *-*. BUTTONHOLES: Cast off for buttonholes on right band. 1 buttonhole = K tog third and fourth st from edge and make 1 YO. Cast off for buttonholes when piece measures (measured from the neck and down): SIZE S: 2, 11, 21, 30 and 40 cm SIZE M: 2, 12, 22, 32 and 42 cm SIZE L: 2, 12, 23, 33 and 44 cm SIZE XL: 2, 10, 19, 28, 37 and 46 cm. SIZE XXL: 2, 12, 21, 30, 39 and 48 cm. SIZE XXXL: 2, 12, 21, 31, 40 and 50 cm. PATTERN: See diagrams A.1 and A.2. Diagrams show pattern from RS. RAGLAN: Beg 6 sts before marker: Make 2 YO on needle, work diagram A.1/A.2 (marker is in the middle of repetition), make 2 YO on needle. On next row slip one of the 2 YO before and after A.1/A.2 off the needle and work the other YO in stocking st (i.e. P from WS). INCREASE TIP (applies to body): Inc 1 st by making 1 YO. On next row work YO twisted to avoid holes. -------------------------------------------------------- JACKET: Worked back and forth on circular needle from neck and down. YOKE: LOOSELY cast on 72-72-76-76-83-83 sts (incl 6 band sts in each side towards mid front) on circular needle size 4.5 mm with Alpaca Bouclé. Work 6 rows in GARTER ST - see explanation above (1st row = RS). Switch to circular needle size 5 mm and work in stocking st AT THE SAME TIME work an elevation at the back of neck as follows (1st row = RS): Work until 16-16-18-18-19-19 sts remain, turn, tighten thread and work until 16-16-18-18-19-19 sts remain in the other side, turn, tighten thread and work until 22-22-24-24-26-26 sts remain, turn, tighten thread and work until 22-22-24-24-26-26 sts remain in the other side, turn, tighten thread and work until 28-28-30-30-33-33 sts remain, turn, tighten thread and work until 28-28-30-30-33-33 sts remain in the other side, turn, tighten thread and work the rest of row. Now insert 4 markers in the piece for raglan as follows (insert the markers in the piece without working the row): Insert 1st marker after 16-16-17-17-19-19 sts (= front piece), insert 2nd marker after 10-10-10-10-10-10 sts (= sleeve), insert 3rd marker after 20-20-22-22-25-25 sts (= back piece) and insert 4th marker after 10-10-10-10-10-10 sts (= sleeve). 16-16-17-17-19-19 sts remain on needle after last marker on front piece. READ ALL OF THE FOLLOWING SECTION BEFORE CONTINUING: P 1 row from WS (work bands in garter st), AT THE SAME TIME inc 2 sts on each side of the 4 markers by working 2 sts in each of the 2 sts on each side of all 4 markers (= 16 sts inc) = 88-88-92-92-99-99 sts. Then work in stocking st with 6 band sts in garter st in each side towards mid front (1st row = RS) – AT THE SAME TIME work a cable according to diagram A.1 over 1st and 3rd marker and a cable according to diagram A.2 over 2nd and 4th marker (markers are in the middle of each cable) - Remember BUTTONHOLES on right band - see explanation above. AT THE SAME TIME on first row from RS, beg inc for RAGLAN – see explanation above. NOTE: The inc on body and sleeves are uneven. REMEMBER THE KNITTING TENSION! INC AS FOLLOWS ON SLEEVES: Beg on 1st row from RS and inc on every other row (i.e. every row from RS) a total of 31-33-34-36-37-38 times. INC AS FOLLOWS ON BODY: Beg on 1st row from RS and inc every other row (i.e. every row from RS) a total of 13-17-22-28-33-38 times and then every 4th row (i.e. every other row from RS) a total of 9-8-6-4-2-0 times = 300-320-340-364-387-403 sts. Inc for raglan are now done. Work 1 row from WS as before. Then work 1 row from RS as before while AT THE SAME TIME K sts in cable in diagram A.1 tog 2 by 2 and K sts in cable in diagram A.2 twisted tog 2 by 2 (= 4 sts dec per cable) = 284-304-324-348-371-387 sts remain on needle. Work next row as follows from WS: Work until 1st marker, slip the 72-76-78-82-84-86 sts between 1st and 2nd marker on a stitch holder for sleeve, cast on 8-8-8-10-10-10 new sts over stitch holder, work until 3rd marker, slip the 72-76-78-82-84-86 sts between 3rd and 4th marker on a stitch holder for sleeve, cast on 8-8-8-10-10-10 new sts over stitch holder and work the rest of row = 156-168-184-204-223-235 sts on needle. BODY: NOW MEASURE PIECE FROM HERE! Continue back and forth in stocking st and 6 band sts in garter st in each side towards mid front. AT THE SAME TIME insert 1 marker in the middle of the 8-8-8-10-10-10 new sts in each side. When piece measures 4-4-5-5-5-6 cm, inc 1 st on each side of markers in each side - READ INCREASE TIP (= 4 sts inc). Repeat inc when piece measures 8-8-10-10-11-12 cm = 164-176-192-212-231-243 sts. Continue to work until piece measures 9-9-11-11-12-13 cm (piece measures approx. 40-42-44-46-48-50 cm from shoulder and down). Switch to circular needle size 4.5 mm and work in garter st back and forth for 6 cm, then LOOSELY cast off. Piece measures approx. 46-48-50-52-54-56 cm from shoulder and down. SLEEVE: Slip sts from one stitch holder on a short circular needle size 5 mm and cast in addition on 8-8-8-10-10-10 new sts under sleeve = 80-84-86-92-94-96 sts. NOW MEASURE PIECE FROM HERE! Work in stocking st in the round until sleeve measures 9-8-8-7-6-6 cm (shorter measurements in the larger sizes because of broader shoulder width and longer sleeve cap). Switch to circular needle size 4.5 mm and work in garter st in the round for 6 cm, then LOOSELY cast off. Work the other sleeve the same way. ASSEMBLY: Sew the openings under the sleeves. Sew on buttons. |
|||||||||||||
Diagram explanations |
|||||||||||||
|
|||||||||||||
 |
|||||||||||||
 |
|||||||||||||
Have you finished this pattern?Tag your pictures with #dropspattern #parisweekendcardigan or submit them to the #dropsfan gallery. Do you need help with this pattern?You'll find 17 tutorial videos, a Comments/Questions area and more by visiting the pattern on garnstudio.com. © 1982-2026 DROPS Design A/S. We reserve all rights. This document, including all its sub-sections, has copyrights. Read more about what you can do with our patterns at the bottom of each pattern on our site. |
|||||||||||||


With over 40 years in knitting and crochet design, DROPS Design offers one of the most extensive collections of free patterns on the internet - translated to 17 languages. As of today we count 324 catalogues and 12290 patterns translated into English (UK/cm). 12290
We work hard to bring you the best knitting and crochet have to offer, inspiration and advice as well as great quality yarns at incredible prices! Would you like to use our patterns for other than personal use? You can read what you are allowed to do in the Copyright text at the bottom of all our patterns. Happy crafting!
Post a comment to pattern DROPS 142-26
We would love to hear what you have to say about this pattern!
If you want to leave a question, please make sure you select the correct category in the form below, to speed up the answering process. Required fields are marked *.