
Popular categories
Looking for a yarn?


Comments / Questions (71)
![]() Oxana Liebert wrote:
Oxana Liebert wrote:
Vielen Dank für Ihre Antwort. Noch eine Frage bitte, ab dem "dann 9 x in jeder 4. R am Rumpf 4 M zunehmen", wenn ich nur im jeden 4 zunehmen soll, wie es soll in jeder 2 R von der Rumpf Seiten gestrickt sein, dekorative Lochen oder ? Vielen Dank im Voraus für Ihre Antwort.
16.03.2015 - 22:09DROPS Design answered:
Die Löcher erscheinen dann einfach nur noch in jeder 4. R. Wenn Sie die Loch-R ganz genau so forsetzen möchten, können Sie auch in der dazwischenliegenden 2. R an der entsprechenden Stelle 1 Umschlag (bzw. 2, wie bei den Raglanzunahmen erklärt) machen und direkt danach 2 M zusammenstricken, dann haben Sie 1 Loch, aber keine M zugenommen.
19.03.2015 - 11:21
![]() Oxana Liebert wrote:
Oxana Liebert wrote:
Hallo! Ich bin gerade beim Model 142-26, und kann nicht weiter machen ab dem Zeitpunkt (Stand 216 M insgesamt)"FÜR DIE ÄRMEL AUFNEHMEN" - 31MX 2 Armel = 62 M und FÜR DAS RUMPFTEIL AUFNEHMEN -13 MX 4 Mahl pro Reihe=52 M ; plus 9MX 4 Mahl =36M. Das macht zusammen 356 M statt 300 M. Könnten Sie mir bitte sagen wo meine Fehler ist. Vielen Dank im Voraus.
15.03.2015 - 21:52DROPS Design answered:
Die letzte in der Anleitung genannte Zahl bei Größe S ist 88 M, vor den Raglanzunahmen. Wenn Sie diese nun wie beschrieben arbeiten, kommen Sie auf Folgendes: 31 x an den Ärmeln zunehmen = 31 x 4 M (pro Ärmel 2 M), 13 x in jeder 2. R 4 M am Rumpf zunehmen (Vorderteil 2 M und Rückenteil 2 M) und dann 9 x in jeder 4. R am Rumpf 4 M zunehmen. Das ergibt: 124 (= 31 x 4) + 52 (= 13 x 4) + 36 (= 9 x 4) = 212 M zugenommen + 88 M = 300 M.
15.03.2015 - 22:59Maarsha Otto wrote:
I am making the cardigan with raglan sleeves #142-26. It says to increase on sleeves a different number of times than on the body. Is the body the back of the sweater? If not which side of cables 1-4 are considered to be the sleeves?
28.02.2015 - 16:25DROPS Design answered:
Dear Mrs Otto, body means here back piece + each front piece. Happy knitting!
02.03.2015 - 08:29
![]() Anne Lise wrote:
Anne Lise wrote:
Nach die erste 16 maschen zunahme, weiter je 16 maschen oder dann nur 8 Maschen weiter
10.12.2014 - 11:35DROPS Design answered:
Antwort siehe unten! :-)
10.12.2014 - 23:25
![]() Anne Lise wrote:
Anne Lise wrote:
Also in grosse l 16 maschen
10.12.2014 - 11:31DROPS Design answered:
Antwort siehe unten! :-)
10.12.2014 - 23:25
![]() Anne Lise wrote:
Anne Lise wrote:
Für die Ärmel und rumpfzunahe, in jeder Reihe vor und nach Diagramm A1-a2 je 2maschen zunehmen. Also 16 Maschen in jeder hinreichend oder nur 8 Maschen
10.12.2014 - 11:28DROPS Design answered:
Sie nehmen nur einmalig 16 M zu, danach für die Raglanzunahmen 8 pro R (an jeder Markierung 2). Sie machen zwar an jeder Markierung insgesamt 4 Umschläge (2 vor A.1/A.2 und 2 danach) und somit 16 Umschläge pro Zunahme-R, lassen aber den einen der beiden Umschläge in der nächsten R fallen, sodass Sie also an jedem Markierer nur 2 M zunehmen.
10.12.2014 - 23:25
![]() LEFEBVRE Jean-Claude wrote:
LEFEBVRE Jean-Claude wrote:
Bonjour je ne comprends pas quand vous dites tricoter une ré_hausse pour l'encolure dos à partir ou et combien mailles. éclaircisse moi s'il vous plait merci.
07.11.2014 - 19:45DROPS Design answered:
Bonjour Mme Lefebvre, la ré-hause dos permet que l'encolure dos soit plus haute que celle du devant, et se tricote en rangs raccourcis: tricotez 1 rang sur l'end en laissant les 16-19 m de la fin du rang non tricotées sur l'aig, tournez et tricotez le rang suivant en laissant les 16-19 m de la fin du rang non tricotées sur l'aig (on a 16-19 m non tricotées de chaque côté), et continuez ainsi, aux 2 rangs suivants, vous laissez un total de 22-26 m non tricotées (y compris celles du 1er rang) de chaque côté et ainsi de suite. Bon tricot!
08.11.2014 - 10:22
![]() Sandra Ellegiers wrote:
Sandra Ellegiers wrote:
Stricke ich auf der Hin- wie auf der Rückreihe eine verkürzte Reihe? In welchem Moment stricke ich wieder eine ganze Reihe? Es fehlt eine Beschreibung des Übergangs von den verkürzten zu den ganzen Reihen. Mfg, Sandra Ellegiers
17.10.2014 - 14:52DROPS Design answered:
Ja, Sie stricken in Hin- und Rück-R verkürzte R. Halten Sie sich einfach genau an die Anleitung. Sie stricken einfach die verkürzten R, die angegeben sind, dann wieder über alle M, d.h. bis zu der Stelle, an der Sie die Markierer setzen, dann wird wieder über alle M gestrickt. Es fehlt also nichts in der Beschreibung.
17.10.2014 - 16:14
![]() Luiza wrote:
Luiza wrote:
Dzień dobry Prawa strona roboty to oczka prawe czy lewe?
09.12.2013 - 17:25DROPS Design answered:
Prawa strona robótki to ta, która jest na zewnątrz po nałożeniu. Na prawej stronie robótki mogą być zarówno oczka prawe jak i lewe, to wszystko zależy od zastosowanych wzorów.
09.12.2013 - 18:33
![]() RuthBodil wrote:
RuthBodil wrote:
Fin på sitt sätt. Boucle'modet är ju idealiskt, då man snart fått till en värmande och trivsam jacka, utan att ens fodra den. men j gillar inte knappar, utan vill, utan att det blr klumpigt, av ett så pass kraftigt garn, slippa dem, men mera en Chaneljacka, till en vacker blå klänning...Dölja hyske/hake t.ex. Och Ha en smal värmande ärm; Tack!
09.11.2013 - 12:22
|
|||||||||||||
Paris weekend#parisweekendcardigan |
|||||||||||||
 |
 |
||||||||||||
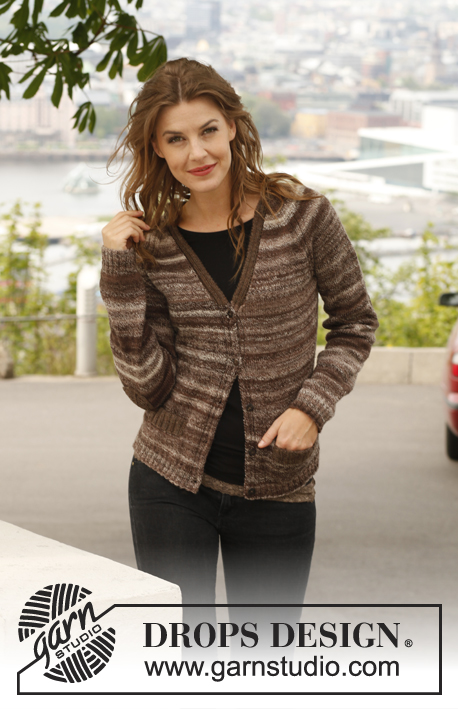
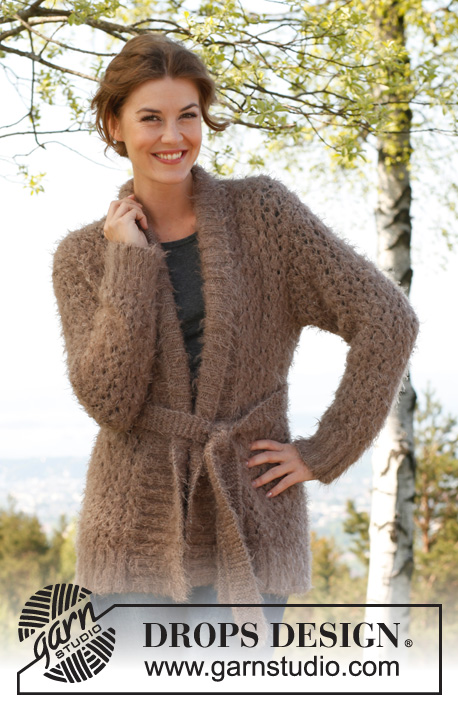
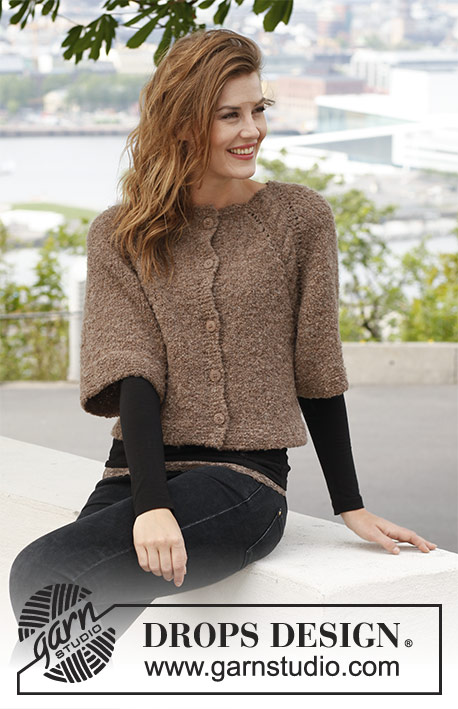
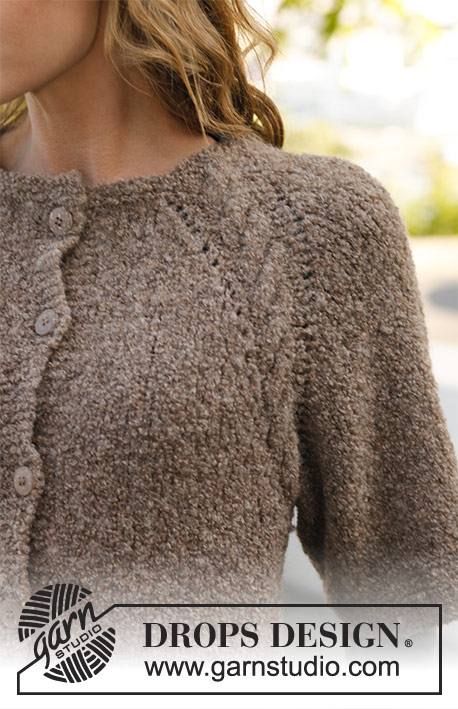
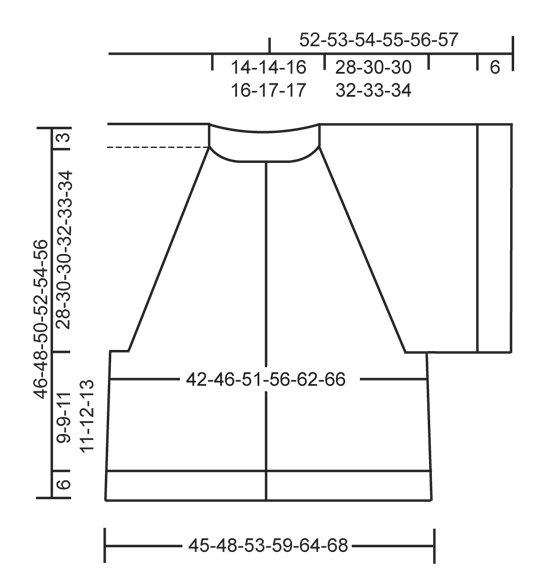
Knitted DROPS jacket with raglan and ¾ sleeves in ”Alpaca Bouclé”, worked top down. Size: S - XXXL.
DROPS 142-26 |
|||||||||||||
|
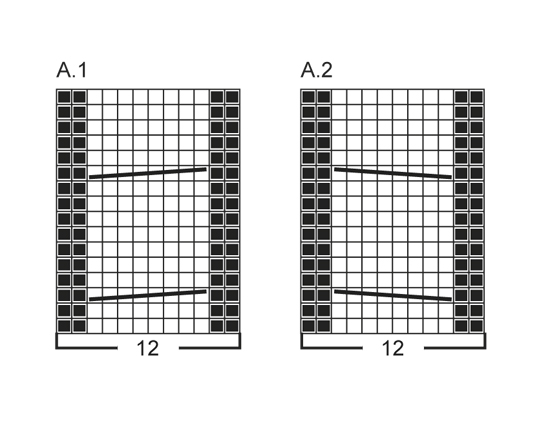
GARTER ST (back and forth on needle): K all rows. 1 ridge = 2 rows K. GARTER ST (in the round on circular needle): * K 1 round and P 1 round *, repeat from *-*. BUTTONHOLES: Cast off for buttonholes on right band. 1 buttonhole = K tog third and fourth st from edge and make 1 YO. Cast off for buttonholes when piece measures (measured from the neck and down): SIZE S: 2, 11, 21, 30 and 40 cm SIZE M: 2, 12, 22, 32 and 42 cm SIZE L: 2, 12, 23, 33 and 44 cm SIZE XL: 2, 10, 19, 28, 37 and 46 cm. SIZE XXL: 2, 12, 21, 30, 39 and 48 cm. SIZE XXXL: 2, 12, 21, 31, 40 and 50 cm. PATTERN: See diagrams A.1 and A.2. Diagrams show pattern from RS. RAGLAN: Beg 6 sts before marker: Make 2 YO on needle, work diagram A.1/A.2 (marker is in the middle of repetition), make 2 YO on needle. On next row slip one of the 2 YO before and after A.1/A.2 off the needle and work the other YO in stocking st (i.e. P from WS). INCREASE TIP (applies to body): Inc 1 st by making 1 YO. On next row work YO twisted to avoid holes. -------------------------------------------------------- JACKET: Worked back and forth on circular needle from neck and down. YOKE: LOOSELY cast on 72-72-76-76-83-83 sts (incl 6 band sts in each side towards mid front) on circular needle size 4.5 mm with Alpaca Bouclé. Work 6 rows in GARTER ST - see explanation above (1st row = RS). Switch to circular needle size 5 mm and work in stocking st AT THE SAME TIME work an elevation at the back of neck as follows (1st row = RS): Work until 16-16-18-18-19-19 sts remain, turn, tighten thread and work until 16-16-18-18-19-19 sts remain in the other side, turn, tighten thread and work until 22-22-24-24-26-26 sts remain, turn, tighten thread and work until 22-22-24-24-26-26 sts remain in the other side, turn, tighten thread and work until 28-28-30-30-33-33 sts remain, turn, tighten thread and work until 28-28-30-30-33-33 sts remain in the other side, turn, tighten thread and work the rest of row. Now insert 4 markers in the piece for raglan as follows (insert the markers in the piece without working the row): Insert 1st marker after 16-16-17-17-19-19 sts (= front piece), insert 2nd marker after 10-10-10-10-10-10 sts (= sleeve), insert 3rd marker after 20-20-22-22-25-25 sts (= back piece) and insert 4th marker after 10-10-10-10-10-10 sts (= sleeve). 16-16-17-17-19-19 sts remain on needle after last marker on front piece. READ ALL OF THE FOLLOWING SECTION BEFORE CONTINUING: P 1 row from WS (work bands in garter st), AT THE SAME TIME inc 2 sts on each side of the 4 markers by working 2 sts in each of the 2 sts on each side of all 4 markers (= 16 sts inc) = 88-88-92-92-99-99 sts. Then work in stocking st with 6 band sts in garter st in each side towards mid front (1st row = RS) – AT THE SAME TIME work a cable according to diagram A.1 over 1st and 3rd marker and a cable according to diagram A.2 over 2nd and 4th marker (markers are in the middle of each cable) - Remember BUTTONHOLES on right band - see explanation above. AT THE SAME TIME on first row from RS, beg inc for RAGLAN – see explanation above. NOTE: The inc on body and sleeves are uneven. REMEMBER THE KNITTING TENSION! INC AS FOLLOWS ON SLEEVES: Beg on 1st row from RS and inc on every other row (i.e. every row from RS) a total of 31-33-34-36-37-38 times. INC AS FOLLOWS ON BODY: Beg on 1st row from RS and inc every other row (i.e. every row from RS) a total of 13-17-22-28-33-38 times and then every 4th row (i.e. every other row from RS) a total of 9-8-6-4-2-0 times = 300-320-340-364-387-403 sts. Inc for raglan are now done. Work 1 row from WS as before. Then work 1 row from RS as before while AT THE SAME TIME K sts in cable in diagram A.1 tog 2 by 2 and K sts in cable in diagram A.2 twisted tog 2 by 2 (= 4 sts dec per cable) = 284-304-324-348-371-387 sts remain on needle. Work next row as follows from WS: Work until 1st marker, slip the 72-76-78-82-84-86 sts between 1st and 2nd marker on a stitch holder for sleeve, cast on 8-8-8-10-10-10 new sts over stitch holder, work until 3rd marker, slip the 72-76-78-82-84-86 sts between 3rd and 4th marker on a stitch holder for sleeve, cast on 8-8-8-10-10-10 new sts over stitch holder and work the rest of row = 156-168-184-204-223-235 sts on needle. BODY: NOW MEASURE PIECE FROM HERE! Continue back and forth in stocking st and 6 band sts in garter st in each side towards mid front. AT THE SAME TIME insert 1 marker in the middle of the 8-8-8-10-10-10 new sts in each side. When piece measures 4-4-5-5-5-6 cm, inc 1 st on each side of markers in each side - READ INCREASE TIP (= 4 sts inc). Repeat inc when piece measures 8-8-10-10-11-12 cm = 164-176-192-212-231-243 sts. Continue to work until piece measures 9-9-11-11-12-13 cm (piece measures approx. 40-42-44-46-48-50 cm from shoulder and down). Switch to circular needle size 4.5 mm and work in garter st back and forth for 6 cm, then LOOSELY cast off. Piece measures approx. 46-48-50-52-54-56 cm from shoulder and down. SLEEVE: Slip sts from one stitch holder on a short circular needle size 5 mm and cast in addition on 8-8-8-10-10-10 new sts under sleeve = 80-84-86-92-94-96 sts. NOW MEASURE PIECE FROM HERE! Work in stocking st in the round until sleeve measures 9-8-8-7-6-6 cm (shorter measurements in the larger sizes because of broader shoulder width and longer sleeve cap). Switch to circular needle size 4.5 mm and work in garter st in the round for 6 cm, then LOOSELY cast off. Work the other sleeve the same way. ASSEMBLY: Sew the openings under the sleeves. Sew on buttons. |
|||||||||||||
Diagram explanations |
|||||||||||||
|
|||||||||||||
 |
|||||||||||||
 |
|||||||||||||
Have you finished this pattern?Tag your pictures with #dropspattern #parisweekendcardigan or submit them to the #dropsfan gallery. Do you need help with this pattern?You'll find 17 tutorial videos, a Comments/Questions area and more by visiting the pattern on garnstudio.com. © 1982-2026 DROPS Design A/S. We reserve all rights. This document, including all its sub-sections, has copyrights. Read more about what you can do with our patterns at the bottom of each pattern on our site. |
|||||||||||||


With over 40 years in knitting and crochet design, DROPS Design offers one of the most extensive collections of free patterns on the internet - translated to 17 languages. As of today we count 324 catalogues and 12290 patterns translated into English (UK/cm). 12290
We work hard to bring you the best knitting and crochet have to offer, inspiration and advice as well as great quality yarns at incredible prices! Would you like to use our patterns for other than personal use? You can read what you are allowed to do in the Copyright text at the bottom of all our patterns. Happy crafting!
Post a comment to pattern DROPS 142-26
We would love to hear what you have to say about this pattern!
If you want to leave a question, please make sure you select the correct category in the form below, to speed up the answering process. Required fields are marked *.