
Popular categories
Looking for a yarn?


Comments / Questions (152)
![]() Vernette wrote:
Vernette wrote:
Je ne comprend pas le motif M1, Je comprend 1 maille endroit 1 maille envers 1maille endroit et je suppose qu'on continue ainsi jusqu'au bout du 1° rang endroit. sur l'envers on aurai donc 1 maille envers 2 maille endroit jusqu'au bout du rang envers. Il s'agit donc d'une côte 2 -1 ? SI possible je souhaite une réponse rapide Cordialement
05.03.2026 - 10:54DROPS Design answered:
Bonjour Mme Vernette, les côtes de M.1 sont des côtes qui vont se tricoter ainsi: (1 m jersey endroit, 1 maille jersey envers, 1 maille point mousse); sur l'envers, la maille point mousse va se tricoter à l'endroit, la maille jersey envers aussi et la maille jersey endroit se tricote à l'envers, donc sur l'endroit on a sur 3 mailles (1m end, 1 m env, 1 m end) et sur l'envers (2 m end, 1m env). Notez que vous allez terminer par la 1ère maille de M.1 autrement dit, vous terminez par 1 m jersey endroit (= end sur l'endroit) et vous commencez par 1 m envers sur l'envers (= 1 m jersey envers). Bon tricot!
05.03.2026 - 17:06
![]() Lis wrote:
Lis wrote:
Jeg kan ikke se diagram M1 på opskriften?
30.01.2026 - 20:38DROPS Design answered:
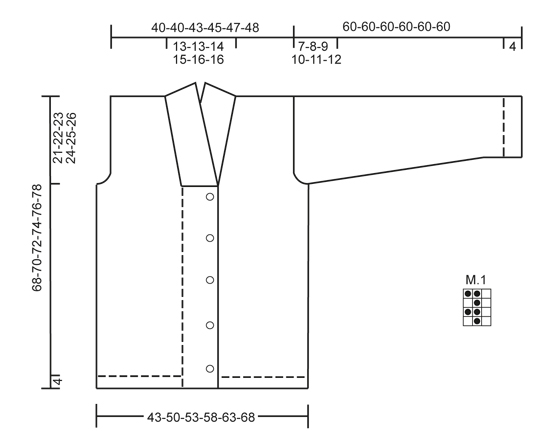
Hei Lis. Du finner diagram M.1 under ermet på målskissen, helt nederst på oppskriften. mvh DROPS Design
02.02.2026 - 12:08
![]() Mary wrote:
Mary wrote:
The garter stitch band seems to be a lot shorter than the main pattern. I'm sure I've knitted something before that included extras rows in the band in order to even them up but this pattern doesn't seem to include that. And I can't find which pattern it was to know how often to do it. From the picture it doesn't look like there is this difference so I'm a bit unsure how to proceed. Any advice? Thanks
11.01.2026 - 22:11DROPS Design answered:
Dear Mary, if your garter stitch is shorter than the main pattern, then just work some short rows evenly distributed in height to compensate. You can work a swatch for both patterns and compare number of rows/height to know how much/how often you should work short rows. Happy knitting!
13.01.2026 - 08:32
![]() Maikki wrote:
Maikki wrote:
En ymmärrä miten hihan viimeiset kavennukset tehdään. Tarkoittaako ohje että molemmissa reunoissa kavennetaan 2 s kun työn pituus on 59 cm ja seuraavalla kerroksella kavennetaan 3 s molemmissa reunoissa?
03.01.2026 - 20:53DROPS Design answered:
Hei, päätä kummastakin reunasta 2 silmukkaa, kunnes työn pituus on 59 cm (eli päätä jokaisen kerroksen alusta 2 silmukkaa). Päätä sitten vielä kummastakin reunasta 3 silmukkaa.
05.01.2026 - 16:46
![]() Jane wrote:
Jane wrote:
Hi. I might be blind but I can't see the sizing measurements on the pattern. We want it to fit generous and he has a 109cm chest. Would I make the XXXL? Thank you in advance.
26.12.2025 - 21:44DROPS Design answered:
Hi Jane, how to choose the right size you will find in the lesson DROPS HERE. Happy knitting!
28.12.2025 - 23:45
![]() Maikki wrote:
Maikki wrote:
En hahmota kuinka kauas reunasta napit ommellaan. Missä kohtaa mallissa on keskietu? (Kuinka paljon etureunat tulevat päällekkäin kun takki on kiinni?)
08.12.2025 - 19:31DROPS Design answered:
Hei, kiinnitä napit n. 2-2½ cm:n päähän reunasta. Sovita tarvittaessa jakkua ja tarkista, että napituksesta tulee siisti ja jakusta oikean kokoinen.
09.12.2025 - 16:36
![]() Pia wrote:
Pia wrote:
Hallo Wenn ich im Muster M1 stricke, sieht das ganz anders aus als auf dem Bild. Verstehe ich M1 so, dass ich in der Hinreihe *rechts links rechts* stricke und zurück dann *rechts links links*? Oder ist das falsch? Vielen Dank
01.12.2025 - 17:33DROPS Design answered:
Liebe Pia, M.1 ist wie Rippenmuster so: (1 Masche glatt rechts (die 1Masche M.1: rechts bei den Hinreihen, links bei den Rückreihen), dann 1 Masche glatt links (die 2. Masche M.1 = links bei den Hinreihen, rechts bei den Rückreihen) und 1 Masche kraus rechts (die 3. Masche M.1 = rechts bei den Hin- und den Rückreihen)); beachten Sie daß das Muster endet bei den Hinreihen mit der 1. Masche M.1 so bei den Rückreihen stricken Sie zuerst diese Masche links, dann das Diagram von links nach rechts. Viel Spaß beim Stricken!
02.12.2025 - 09:22
![]() Caroline wrote:
Caroline wrote:
Bonjour, comment être sûre que je choisis la bonne taille s'il vous plait? je souhaite tricoter une taille XXL mais je ne sais pas les mesures que va faire le gilet une fois fini et je ne trouve pas d'infos sur la page. Merci de votre aide
01.12.2025 - 16:24DROPS Design answered:
Bonjour Caroline, regardez la lecon DROPS ICI. Bon tricot!
01.12.2025 - 16:32
![]() Elina wrote:
Elina wrote:
Strikkes det dobbel perlestrikk på vrangen når mønster M1 strikkes? På forhånd takk.
14.09.2025 - 09:12DROPS Design answered:
Hei Elina, Mønsteret til denne jakken er ikke dobbel perlestrikk. Diagram M1 er lest fra høyre til venstre når man strikker fra retten og venstre til høyre fra vrangen, og fra bunnen oppover. Hvite ruter skal strikkes rett fra retten og vrang fra vrangen, svarte ruter skal strikkes vrang fra retten og rett fra vrangen. Håper dette hjelper. Hilsen Drops team.
15.09.2025 - 06:58
![]() Tiina wrote:
Tiina wrote:
Mistä löydän DROPS 135-20 mallin (Lewis villatakki) ruutupiirroksen M1?
24.06.2025 - 16:47DROPS Design answered:
Hei, piirros löytyy mittapiirroksen oikealta puolelta.
24.06.2025 - 17:40
|
|||||||
Lewis#lewisjacket |
|||||||
|
|
|||||||
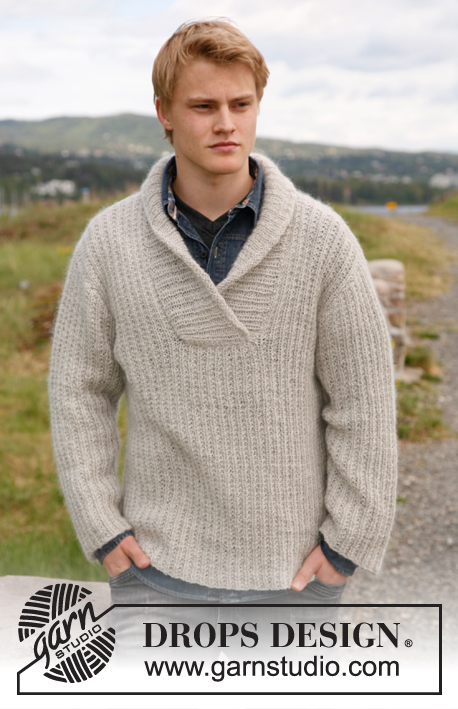
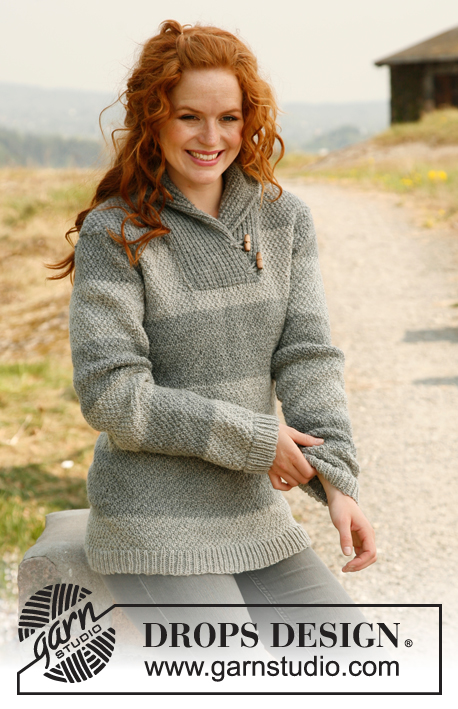
Knitted jacket for men with broad bands and shawl collar in DROPS Karisma and DROPS Kid-Silk. Size: S to XXXL.
DROPS 135-20 |
|||||||
|
GARTER ST (back and forth on needle): K all rows. PATTERN: See diagram M.1 – diagram shows pattern from RS. BUTTON HOLES: Cast off for 5 button holes from RS on left front band. 1 button hole = cast off 5th st from mid front and cast on 1 new st on next row over this st. Cast off for button holes when piece measures: SIZE S: 14, 22, 30, 38 and 46 cm SIZE M: 15, 23, 31, 39 and 47 cm SIZE L: 16, 24, 32, 40 and 48 cm SIZE XL: 17, 25, 33, 41 and 49 cm SIZE XXL: 18, 26, 34, 42 and 50 cm SIZE XXXL: 19, 27, 35, 43 and 51 cm DECREASE TIP (applies to neck): Dec from RS inside 1 edge st in garter st. Dec AFTER 1 st as follows: Slip 1 st as if to K, K 1, psso. Dec BEFORE 1 st as follows: K 2 tog. ---------------------------------------------------------- BODY: Worked back and forth on circular needle from mid front. Cast on 176-200-212-227-248-263 sts (incl 20 band sts in each side towards mid front) on needle size 4.5 mm with 1 thread Karisma and 1 thread Kid-Silk. Work rib as follows (seen from from RS): 20 band sts in GARTER ST - see explanation above - * K 1, P 2 *, repeat from *-* until 21 sts remain, K 1 and 20 band sts in garter st. Then work K over K and P over P and band sts in garter st. When piece measures 4 cm, switch to needle size 5.5 mm. Continue with diagram M.1 and band sts in garter st – diagram M.1 starts and ends with 1 K st (seen from RS). When piece measures 14-15-16-17-18-19 cm, cast off for BUTTON HOLES on left front band - see explanation above! When piece measures 47-48-49-50-51-52 cm, work next row as follows: Cast off the first 19 sts, insert a marker (this marks where to start the knit up for collar), work 27-33-36-39-45-48 sts (= right front piece), cast off 6 sts for armhole, work 72-84-90-99-108-117 sts (= back piece), cast off 6 sts for armhole and work the rest of row (= 46-52-55-58-64-67 sts on left front piece). Turn and cast off the first 19 sts, insert a marker (this marks where to end the knit up for collar), work the rest of row = 27-33-36-39-45-48 sts. Finish each part separately. LEFT FRONT PIECE: = 27-33-36-39-45-48 sts. Continue with diagram M.1 as before and outermost st towards mid front in garter st. AT THE SAME TIME cast off for armhole at beg of every row from the side: 2 sts 0-2-2-3-4-5 times and 1 st 0-2-2-3-4-5 times. AT THE SAME TIME when piece measures 49-50-51-52-53-54 cm, dec 1 st towards the neck - SEE DECREASE TIP! Repeat dec every 5-5-5-5-3-4 cm a total of 3-3-4-3-5-4 times. After all cast offs and dec are done, 24-24-26-27-28-29 sts remain on needle. Cast off when piece measures 68-70-72-74-76-78 cm. RIGHT FRONT PIECE: Work as left front piece but reversed. BACK PIECE: = 72-84-90-99-108-117 sts. Continue with diagram M.1 while at the same time casting off for armholes at the beg of every row in each side as on front piece = 72-72-78-81-84-87 sts. When piece measures 66-68-70-72-74-76 cm, cast off the middle 22-22-24-25-26-27 sts for neck and finish each shoulder separately. At beg of next row from neck, dec 1 st = 24-24-26-27-28-29 sts remain on shoulder. Cast off when piece measures 68-70-72-74-76-78 cm. SLEEVE: Worked back and forth on needle. Cast on 50-53-53-56-56-59 sts (incl 1 edge st in each side) on needle size 4.5 mm with 1 thread Karisma and 1 thread Kid-Silk. Work as follows (seen from from RS): 1 edge st in garter st, * K 1, P 2 *, repeat from *-* and finish with 1 edge st in garter st. When piece measures 4 cm, switch to needle size 5.5 mm. Continue with diagram M.1 with 1 edge st in each side in garter st. AT THE SAME TIME when piece measures 10 cm, inc 1 st in each side. Repeat inc every 5-5-3½-3-2½-2½ cm a total of 9-9-12-12-15-15 times = 68-71-77-80-86-89 sts – work the inc sts gradually in diagram M.1. When piece measures 53-52-51-50-49-48 cm (shorter measurements in the larger sizes because of longer sleeve cap and broader shoulder width) cast off at beg of every row in each side: 4 sts 1 time, 2 sts 3 times and 1 st 1-2-4-5-7-8 times. Then cast off 2 sts in each side until piece measures 59 cm, then cast off 3 sts 1 time in each side. Cast off, the piece measures approx. 60 cm in all sizes. ASSEMBLY: Sew the shoulder seams. SHAWL COLLAR: Knit up sts (inside 1 edge st) on circular needle size 4.5 mm with 1 thread Karisma and 1 thread Kid-Silk - start mid front at marker on right front piece: Knit up approx. 40 to 50 sts up to shoulder, then 26 to 32 sts along the neck, and 40 to 50 sts down along left front piece until marker = 106 to 132 sts. K 1 row from WS while AT THE SAME TIME inc no of sts to 132-138-144-150-156-162. Then work rib as follows (seen from RS): 1 st in garter st, * K 1, P 2 *, repeat from *-* and finish with K 1 and 1 st in garter st. Continue like this until collar measures approx. 5 cm. Now inc 1 st in each of the middle 12 P-sections, seen from RS (= back of neck) = 144-150-156-162-168-174 sts. Continue with K over K and P over P until collar measures approx. 10 cm - adjust so that next row is from WS. K 3 rows over all sts, then cast off all sts with K from RS. Fasten collar with stitches in each side towards band – sew edge to edge to avoid a chunky seam. MORE ASSEMBLY: Sew in sleeves and sew on buttons. |
|||||||
Diagram explanations |
|||||||
|
|||||||
 |
|||||||
Have you finished this pattern?Tag your pictures with #dropspattern #lewisjacket or submit them to the #dropsfan gallery. Do you need help with this pattern?You'll find 14 tutorial videos, a Comments/Questions area and more by visiting the pattern on garnstudio.com. © 1982-2026 DROPS Design A/S. We reserve all rights. This document, including all its sub-sections, has copyrights. Read more about what you can do with our patterns at the bottom of each pattern on our site. |
|||||||


With over 40 years in knitting and crochet design, DROPS Design offers one of the most extensive collections of free patterns on the internet - translated to 17 languages. As of today we count 324 catalogues and 12290 patterns translated into English (UK/cm). 12290
We work hard to bring you the best knitting and crochet have to offer, inspiration and advice as well as great quality yarns at incredible prices! Would you like to use our patterns for other than personal use? You can read what you are allowed to do in the Copyright text at the bottom of all our patterns. Happy crafting!
Post a comment to pattern DROPS 135-20
We would love to hear what you have to say about this pattern!
If you want to leave a question, please make sure you select the correct category in the form below, to speed up the answering process. Required fields are marked *.