
Popular categories
Looking for a yarn?


Comments / Questions (9)
![]() Anna wrote:
Anna wrote:
Danke für ihre Antwort, leider verstehe ich es nicht ganz. Ich bin Strick Anfänger. Die erste Zunahme stricke ich am Ende von Runde 3 und die nächste gleich am Anfang von Runde 4 ist das richtig so? Und ich mache die Zunahmen so wie aus dem Video? Können sie mir bitte anhand der ersten Zunahmen Masche für Masche erläutern was ich zu stricken habe? Ihre Antwort habe ich nicht ganz verstanden, vielen lieben Dank
01.02.2025 - 14:44DROPS Design answered:
Liebe Anna, ja genauso können Sie z.B. zunehmen, oder auch mit dieser Technik: rechts am Ende der Runde und links am Anfang der nächsten Runde; die neuen Maschen werden wie zuvor erklärt gestrickt, dh wie die neue Masche am Ende der Runde wie die nâchste Masche im Muster, und die neue Masche am Anfang der Runde wie die vorige Masche (lesen Sie hier Diagram links nach rechts). Viel Spaß beim Stricken!
03.02.2025 - 08:33
![]() Anna wrote:
Anna wrote:
Guten Abend, unter dem Ärmel sollen 2M aufgenommen werden. Können sie mir bitte genau erklären an welcher Stelle? Am Anfang der Runde bei der ersten Masche und am Ende der Runde bei der letzten Masche? Und wie genau soll ich die Maschen zunehmen? Im Muster sind ja Rechte und linke Maschen, nimmt man dort unterschiedlich zu? Falls sie mir das etwas detaillierter erklären könnten wäre das toll. Ich bedanke mich im Voraus
28.01.2025 - 19:06DROPS Design answered:
Liebe Anna, die Zunahmen werden unter den Ärmel gestrickt, dh die 1. am Ende der Runde und die 2. sofort am Anfang nächster Runde - Sie können 1 Masche dazwischen stricken oder z.B. wie bei dieser Technik zunehmen. Die Zunahmen stricken Sie wie die nächste Masche vom Muster am Ende der Runde und wie die vorige Masche vom Muster am Anfang der Runde, so wird sich das Muster verbreitern. Viel Spaß beim Stricken!
29.01.2025 - 09:15
![]() Stefanie wrote:
Stefanie wrote:
Nach dem stricken von M6 sieht mein Maschenbild nicht mehr schön aus. Ich habe versucht die Rückreihen mit einer halben nadelstärke kleiner zu stricken, aber ich bin nicht überzeugt von dem Maschenbild. Gibt es die Möglichkeit den Rest des Pullovers in Runden fertig zu stricken? Aber wie mache ich dann die arm Ausschnitte? Vielen Dank
09.11.2024 - 22:00DROPS Design answered:
Liebe Stefanie, versuchen Sie mal mit einer Maschenprobe zuerst in Runden dann in Hin- und Rückreihen gestrickt, ob das Maschenbild nach waschen regelmäßiger aussieht; sonnst können Sie auch vielleicht mit Steek-Maschen Technik versuchen? Siehe Video. Viel Spaß beim Stricken!
11.11.2024 - 08:49
![]() Stefanie wrote:
Stefanie wrote:
Hallo, in der Anleitung steht nach 27cm M1 Stricken, wird der Bund auch zu den 27cm gerechnet oder ohne? Und wie stricke ich M1 in Größe S? Ich beginne an der Vorderteil Seite beim Pfeil das sind dann 12 M, wie geht der Rapport weiter? Immer wieder beim Pfeil anfangen ? Also immer nur die 12 Maschen oder danach alle 16Maschen? Danke
08.11.2024 - 09:36DROPS Design answered:
Liebe Stefanie, die 27 cm messen Sie ab der Anschlagskante, dann stricken Sie M.1 vom Pfeil an, so Dame in S = mit der 5. Maschen vom Diagram anfangen und die letzte 11 Maschen stricken, dann die 16 Maschen von M.1 bis zur Ende vom 1. Teil (über die Maschen vom Vorderteil) stricken, dann genauso über die Maschen vom Rückenteil wiederholen, so passt das Muster nicht an den Seiten aber das Muster wird zentriert. Viel Spaß beim Stricken!
08.11.2024 - 12:54
![]() Laencina wrote:
Laencina wrote:
Bonjour, Je ne comprends pas au niveau des manches ,je fais la taille S, après avoir fait les 15 augmentations j'ai 51 mailles,l'explication dit tricoter les 7 dernières mailles de M3,M2,M4,M2,et les 7 premières mailles de M3,j'obtiens 35 mailles et non 51 mailles, et j'ai des demi diagrammes, qu'est ce que je n'ai pas compris. Merci pour votre réponse
17.02.2023 - 19:43DROPS Design answered:
Bonjour Laencina, tricotez ainsi: les 7 dernières m de M.3, les 10 mailles de M.2, les 17 mailles de M.4, les 10 mailles de M.2 et les 7 premières mailles de M.3 soit: 7+10+17+10+7=51 mailles. Vous augmenterez ensuite au milieu sous la manche et vous allez incorporer les augmentations en M.3. Bon tricot!
20.02.2023 - 09:01
![]() Laencina Isabelle wrote:
Laencina Isabelle wrote:
Bonjour, J'aimerais savoir à quoi cela correspond sur le diagramme M1,commencer à la flèche,je fais la taille S/M femme,les lettres H et D,je ne sais pas laquelle des deux flèches je dois démarrer,merci de votre réponse
05.01.2023 - 16:04DROPS Design answered:
Bonjour Mme Laencina, les lettres H et D sont pour les tailles H = homme et D = femme; puis vous retouvez la taille, soit en taille S/M pour femme, vous commencez M.1 par la 5ème maille de M.1. Bon tricot!
05.01.2023 - 16:37
![]() Stacey wrote:
Stacey wrote:
Hi. I'm about to start working on the neck, and I have a question. When I increase, how can I keep the ribbing pattern? Thank you!
18.11.2021 - 15:06DROPS Design answered:
Dear Stacey, just incorporate the new stitches in the rib pattern, ie before K2 increase the next 2 sts purled, the next 2 knitted etc.. and after P2, increase the next 2 sts knitted, the next 2 purled, etc.. so that the rib continue in the row. Happy knitting!
18.11.2021 - 17:32
![]() Metha wrote:
Metha wrote:
Hej Jeg mangler mål på sweateren. Brystmål, længdemål, etc
21.10.2019 - 08:43DROPS Design answered:
Hei Metha. Da ligger målskissen med alle mål helt nederst i oppskriften. God Fornøyelse!
21.10.2019 - 13:34
![]() Christina wrote:
Christina wrote:
....nach 31 cm die Arbeit teilen. Werden die ersten bzw. letzten Maschen des Vorder- und Rückenteils dann zu Randmaschen?
26.11.2018 - 15:36DROPS Design answered:
Liebe Christina, die erste und letzte Masche beim Rücken- bzw Vorderteil können Sie als Randmasche stricken - Nach M.6, wenn Sie 3-7 (5-8) M. glatt rechts beidseitig stricken sollen, stricken Sie dann 1 Masche glatt weniger um die Randmaschen zu haben. Viel Spaß beim stricken!
26.11.2018 - 15:57
|
||||||||||
DROPS 23-4 |
||||||||||
|
|
||||||||||
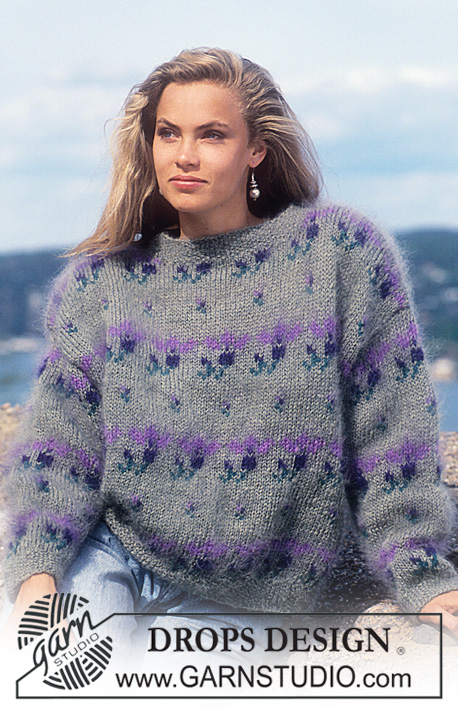
DROPS jumper with textured pattern, cables and collar in “Alaska”. Ladies and men’s sizes S – L.
DROPS 23-4 |
||||||||||
|
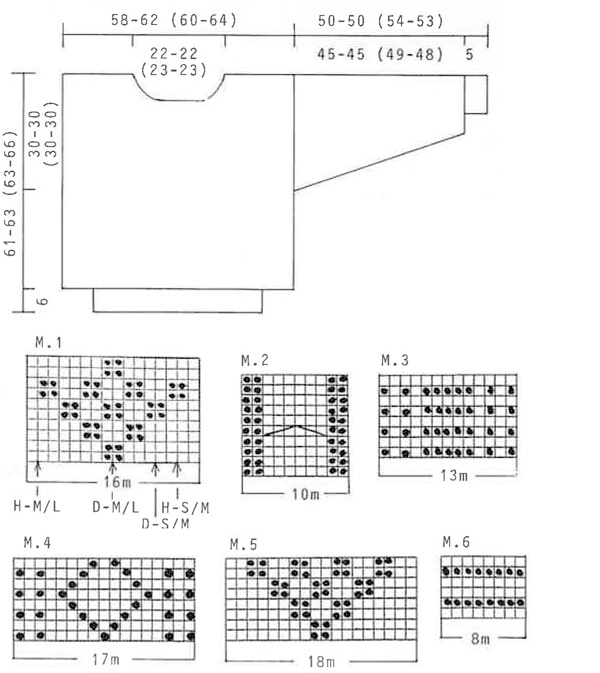
Pattern: See diagram. The pattern is seen from the RS. English Translations for the wording in the diagrams are given at the bottom of this pattern, and they are given in the vertical order in which they appear in the diagram. Rib: * K2, P2 *, repeat from *-*. Body: The jumper is worked in the round on circular needle. Numbers in ( ) refer to men’s sizes. Cast on 156-164 (164-168) sts on circular needle size 3.5 mm and work 6 cm Rib. Change to circular needle size 5 mm and continue in stocking st, at the same time inc 52-60 (52-60) sts evenly on first round = 208-224 (216-228) sts. Remember the knitting tension! When piece measures 27-28 (28-30) cm work M.1 (beg by arrow and work pattern on front piece, beg by arrow again and repeat pattern on back piece). After M.1 work M.6, at the same time when piece measures 31-33 (33-36) cm divide the piece in two and complete front and back pieces separately. Back piece: = 104-112 (108-114) sts. After M.6 continue as follows from RS: 3-7 (5-8) stocking sts, M.4, M.2, M.3, M.5, M.3, M.2, M.4, 3-7 (5-8) stocking sts. Continue in pattern like this. When piece measures 59-61 (61-64) cm cast off the middle 34-34 (36-36) sts for neck and complete each side separately. Cast off to shape the neckline on every other row: 2 sts 1 time, 1 st 1 time. Cast off remaining sts on shoulder when piece measures 61-63 (63-66) cm. Front piece: = 104-112 (108-114) sts. Like back piece, but when piece measures 54-56 (56-59) cm cast off the middle 16-16 (18-18) sts for neck and complete each side separately. Cast off to shape the neckline on every other row: 4 sts 1 time, 3 sts 1 time, 2 sts 2 times and 1 st 1 time. Cast off remaining sts on shoulder when piece measures 61-63 (63-65) cm. Sleeve: Cast on 36-40 (40-40) sts on double pointed needles size 3.5 mm and work 5 cm Rib. Change to double pointed needles size 5 mm and K 1 round, at the same time inc 15-13 (11-13) sts evenly on round = 51-53 (51-53) sts. Work next round as follows: the last 7-8 (7-8) sts of M.3, M.2,M.4, M.2, the first 7-8 (7-8) sts of M.3. Continue in pattern like this, at the same time inc 2 sts mid under arm a total of 28-27 (28-27) times on every 3rd round for ladies sizes and on every * 3rd and 4th round * alternately for men’s sizes = 107-107 (107-107) sts. Incorporate inc sts in M.3 as you go along. Cast off when sleeve measures 50-50 (54-53) cm. Assembly: Sew the shoulder seams. Pick up 90 (94) sts round neckline on circular needle size 3.5 mm (do not pick up on the 16 (18) sts mid front) and work 8 (8.5) cm rib back and forth on needle from mid front, at the same time inc 1 st inside 1 edge st each side towards mid front on every row 10 times, cast off. Place left side of rib over right side mid front and fasten. Set in sleeves. English explanation to pattern diagram: = P = K = slip 3 sts on cable needle in front of piece, K3, K3 from cable needle |
||||||||||
Diagram explanations |
||||||||||
|
||||||||||
 |
||||||||||
Have you finished this pattern?Tag your pictures with #dropspattern or submit them to the #dropsfan gallery. Do you need help with this pattern?You'll find 20 tutorial videos, a Comments/Questions area and more by visiting the pattern on garnstudio.com. © 1982-2026 DROPS Design A/S. We reserve all rights. This document, including all its sub-sections, has copyrights. Read more about what you can do with our patterns at the bottom of each pattern on our site. |
||||||||||


With over 40 years in knitting and crochet design, DROPS Design offers one of the most extensive collections of free patterns on the internet - translated to 17 languages. As of today we count 324 catalogues and 12290 patterns translated into English (UK/cm). 12290
We work hard to bring you the best knitting and crochet have to offer, inspiration and advice as well as great quality yarns at incredible prices! Would you like to use our patterns for other than personal use? You can read what you are allowed to do in the Copyright text at the bottom of all our patterns. Happy crafting!
Post a comment to pattern DROPS 23-4
We would love to hear what you have to say about this pattern!
If you want to leave a question, please make sure you select the correct category in the form below, to speed up the answering process. Required fields are marked *.