
Popular categories
Looking for a yarn?


Comments / Questions (28)
![]() Gudrun wrote:
Gudrun wrote:
Guten Tag, ich habe beim Rückenteil auf jeder Seite die Maschen abgenommen. Die Zunahme soll nach 5 cm erfolgen. Muss ich nun erst noch 5 cm stricken? Vielen Dank für Ihre Unterstützung Gudrun
15.03.2025 - 12:58DROPS Design answered:
Liebe Gudrun, die Abnahmen sollen nach ca 4 cm fertig sein (insgesamt. 11 Reihen *1. R: Abnahme, 2. Reihe ohne Abnahmen. 3. Reihe abnehmen; 4. Reihe ohne abnahmen, 5. Reihe abnehmen*, insgesamt 2 Mal von *bis* stricken, dann bei der nächsten Reihe abnehmen = 7 Mal insgesamt abwechslungsweise in jeder Reihe und in jeder 2. Reihe), so können Sie die Zunahmen nach 5 cm ab Anschlagksante anfangen. Viel Spaß beim Stricken!
17.03.2025 - 07:39
![]() Cecile Vandenborre wrote:
Cecile Vandenborre wrote:
Zou graag dat patroon willen bestellen vind het heel mooi en wil het proberen het te breien bedankt groetjes Cecile
20.02.2025 - 07:32
![]() Gre Minnaert wrote:
Gre Minnaert wrote:
Mooie spencer ik vraag me af of de armsgaten niet te wijd zijn
03.02.2025 - 19:55
![]() Monique Gallardo wrote:
Monique Gallardo wrote:
Le modèle de ce gilet est très beau. Modèle que je cherchais... Merci pour partage...
14.11.2024 - 21:40
![]() Brigid wrote:
Brigid wrote:
It's still unclear to me. one surface is mostly knit stiches (smoother texture), and one surface is mostly purl (bumpy texture) which is the right side and which is the wrong side? Thank you
13.11.2024 - 11:25DROPS Design answered:
Dear Brigid, the right side is the side where you work alternately (K1, P1) - you can add a marker on this side of piece to remember that's the right side. Happy knitting!
13.11.2024 - 17:06
![]() Brigid wrote:
Brigid wrote:
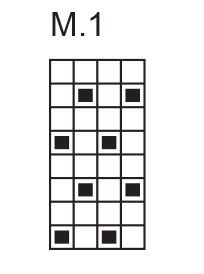
When knitting the ridge M.1, every second row is entirely knit stitches. Are these knit rows on the right side or the wrong side of the piece ? Thank you
12.11.2024 - 23:38DROPS Design answered:
Dear Brigid, M.1 is a kind of seed/moss stitch, so start from RS with row 1: (K1, P1) repeat from (to), Row2: purl all stitches, Row 3: (P1, K1) repeat from (to), Row 4: purl all stitches. Repeat these 4 rows. Happy knitting!
13.11.2024 - 08:05
![]() Brigid wrote:
Brigid wrote:
Does the back of this also have the texture, or is it just stocking stitch?
07.10.2024 - 15:42DROPS Design answered:
Dear Brigid, back piece is here worked entirely in stocking stitch, only front pieces are worked in moss/seed stitch. Happy knitting!
07.10.2024 - 16:08
![]() Ellen wrote:
Ellen wrote:
How do you do the bind off on the right front piece after casting on the stitches?
04.09.2024 - 15:51DROPS Design answered:
Hi Ellen, The text should say to decrease, not bind off, inside the 1 edge stitch by the armhole. Decrease by working 2 stitches together after working the edge stitch. Happy knitting!
05.09.2024 - 06:41
![]() Teresa Soza wrote:
Teresa Soza wrote:
Please, I need a more detalles instruction for the increases in the L side at the beginning of front
04.08.2024 - 22:02DROPS Design answered:
Dear Mrs Soza, for the right front piece you will increase on the right side of piece (1 time on every row, 2 times on every other row) - either at the beg of row from RS or at the end of row from WS; and at the same time increase on the left side of piece = at the end of every row from RS. Happy knitting!
05.08.2024 - 08:14
![]() Bärbel Grabsch wrote:
Bärbel Grabsch wrote:
Hallo, was ist mit den Zunahmen in jeder Reihe gemeint? Bezieht sich das nur auf Hinreihen oder muss in Hin-und Rückreihen zugenommen werden? Vor den Randmaschen und nach den Randmaschen? Ich habe schon einige Teile nach euren Anleitungen gestrickt, komne diesmal aber irgendwie nicht zurecht. Liebe Grüße Bärbel
17.07.2024 - 16:32DROPS Design answered:
Liebe Bärbel, wenn in jeder Reihe zugenommen werden soll, dann sind auch die Rück-Reihen gemeint (also Hin- UND Rück-Reihen). Die Zunahmen arbeiten Sie direkt neben der Randmasche (die Randmasche bleibt immer ganz außen am Rand). Gutes Gelingen weiterhin!
22.07.2024 - 10:16
|
|||||||
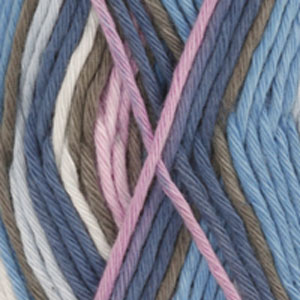
Tropical Oceania |
|||||||
 |
 |
||||||
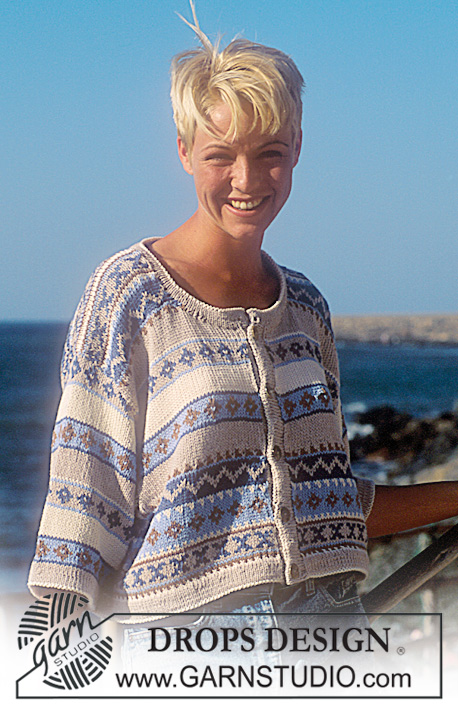
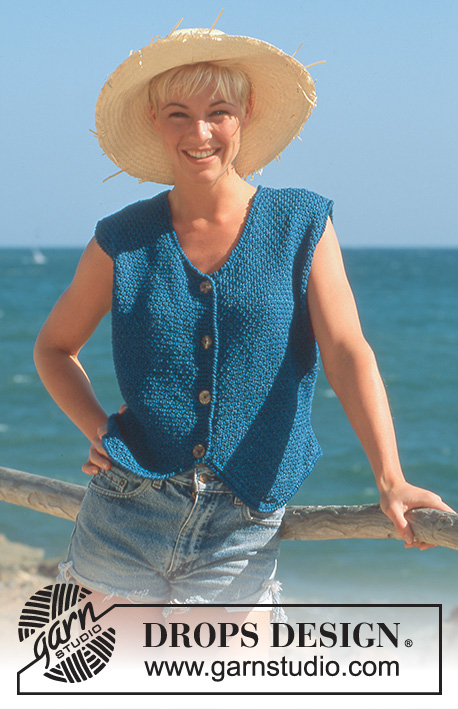
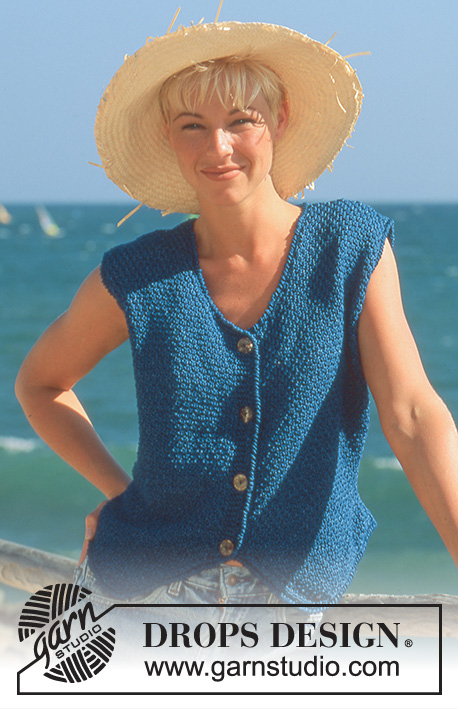
DROPS waistcoat with texture
DROPS 41-7 |
|||||||
|
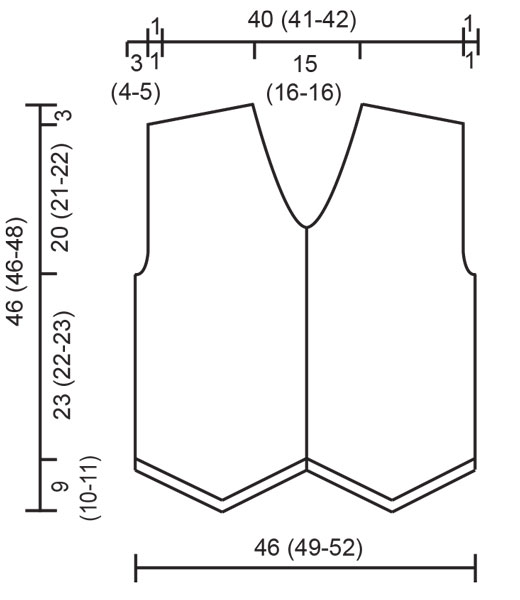
Knitting tension: 20 sts x 26 rows on needle size 4 mm and stocking sts = 10 x 10 cm Ridge (back and forth on needle): 1 ridge = 2 rows 1st row: K, 2nd round: K Buttonhole: When front piece measures 1 (1-1), 10 (10-11), 19 (19-20) and 28 (28-30) cm cast off for buttonhole on right front piece as follows: Cast off 3rd and 4th sts and cast on 2 new sts over cast off sts on next row. Right front piece: Cast on 3 sts on needle size 4 mm and knit M.1 at the same time inc on each side within edge sts as follows: On right side (= towards mid front): 1 st 14 (15-16) times on Size S: Alternate on each row and every other row and Size M+L: Alternating on every row, every 2nd row and every 2nd row and on left side: 2 sts 13 (14-15) times on Size S+M: Alternate on each row, every 2nd row and every 2nd row and Size L: Every 2nd row = 43 (46-49) sts. Piece measures approx 9 (10-11) cm. Measure piece from here: Cast on 1 st on left side for side seam and 5 sts on right side (= front band) = 49 (52-55) sts (incl 1 edge st for seam). Knit the 5 front band sts in ridge throughout until piece is completed. Remember buttonhole on right front edge – see explanation above. Continuing cast off on left side within edge sts alternating on each row, every 2nd row and every 2nd row: 1 sts 7 (7-7) times = 42 (45-48) sts (incl 1 edge sts). When piece measures 5 (5-5) cm inc on left side within edge sts on every 4th row: 1 sts 10 (10-10) times = 52 (55-58) sts (incl 1 edge sts). Continuing when piece measures 23 (22-23) cm cast off for armhole on left side on every other row: 2 sts 3 (3-4) times, 1 st 1 (3-3) times = 45 (46-47) sts. When piece measures 29 (29-31) cm cast off for neck on right side on every other row: 5 (6-6) st 1 time, 2 st 3 times, 1 st 4 times and then on every 4th row: 1 st 5 times. At the sime time when piece measures 43 (43-45) cm cast off for shoulder from armhole towards neckline on every other row: 6 sts 3 times and then cast off remaining 7 (7-8) sts. All sts are now cast off. Piece measures approx 46 (46-48) cm (total length incl split = approx 55 (56-59) cm.) Left front piece: Knit like right, but opposite and without buttonholes on front band. Back piece: Cast on 88 (94-100) sts (incl 1 edge st on each side for seam) on needle size 4 mm and knit stocking sts at the same time cast off on each side within edge st on alternating on every row, every 2nd row and every 2nd row: 1 st 7 (7-7) times = 74 (80-86) st (incl 2 edge sts). When piece measures 5 (5-5) cm inc on each side within edge sts on every 4th row: 1 st 10 (10-10) times = 94 (100-106) sts. Continuing when piece measures 23 (22-23) cm cast off each side for armholes on every other row: 2 sts 3 (3-4) times, 1 st 1 (3-3) times = 80 (82-84) sts. When piece measures 43 (43-45) cm cast off each side for shoulder from armhole towards middle of piece on every other row: 6 m 3 times and then cast off remaining 7 (7-8) sts. At the same time, when piece measures 44 (44-46) cm cast off middle 26 (28-28) sts for neck. Then cast off 2 sts towards neck on next row to shape neckline. All should now be cast off and piece measures approx 46 (46-48). Assembly: Sew shoulder and side seams. Crochet 1 row dc with single yarn from RS with crochet hook size 4 mm distributed as follows: 30 sts on back neck, 38 sts along V-neck, 55 sts on front band, 28 sts on front part of split point, 30 sts on other part of split point, 70 sts over back piece. Then crochet a row of lobster st from RS as follows: Crochet a row of dc the opposite way, i.e. from left to right without turning piece. Lobster sts can also be crochet as follows: * Pick yarn under through dc, loosen sts slightly, (approx 2 cm high), now twist crochet hook 360 degrees anti clock wise, make a new loop on crochet hook and pull this through both sts on hook *. Repeat from *-*. Repeat both rows around armhole with approx 85 sts. Sew in buttons. |
|||||||
Diagram explanations |
|||||||
|
|||||||
 |
|||||||
 |
|||||||
Have you finished this pattern?Tag your pictures with #dropspattern or submit them to the #dropsfan gallery. Do you need help with this pattern?You'll find 17 tutorial videos, a Comments/Questions area and more by visiting the pattern on garnstudio.com. © 1982-2026 DROPS Design A/S. We reserve all rights. This document, including all its sub-sections, has copyrights. Read more about what you can do with our patterns at the bottom of each pattern on our site. |
|||||||


With over 40 years in knitting and crochet design, DROPS Design offers one of the most extensive collections of free patterns on the internet - translated to 17 languages. As of today we count 324 catalogues and 12290 patterns translated into English (UK/cm). 12290
We work hard to bring you the best knitting and crochet have to offer, inspiration and advice as well as great quality yarns at incredible prices! Would you like to use our patterns for other than personal use? You can read what you are allowed to do in the Copyright text at the bottom of all our patterns. Happy crafting!
Post a comment to pattern DROPS 41-7
We would love to hear what you have to say about this pattern!
If you want to leave a question, please make sure you select the correct category in the form below, to speed up the answering process. Required fields are marked *.