DROPS Children 49 · Lots of new kid designs!
Product image DROPS Nepal yarn
DROPS Nepal
65% Wool, 35% Alpaca
from 2.80 € /50g
Get the yarn to make this pattern from 36.40€.

The yarn cost is calculated from the pattern’s smallest size and the yarn’s cheapest product type. Looking for an even better price? You might find it on the DROPS Deals!

DROPS AW2425

Ivory Coast

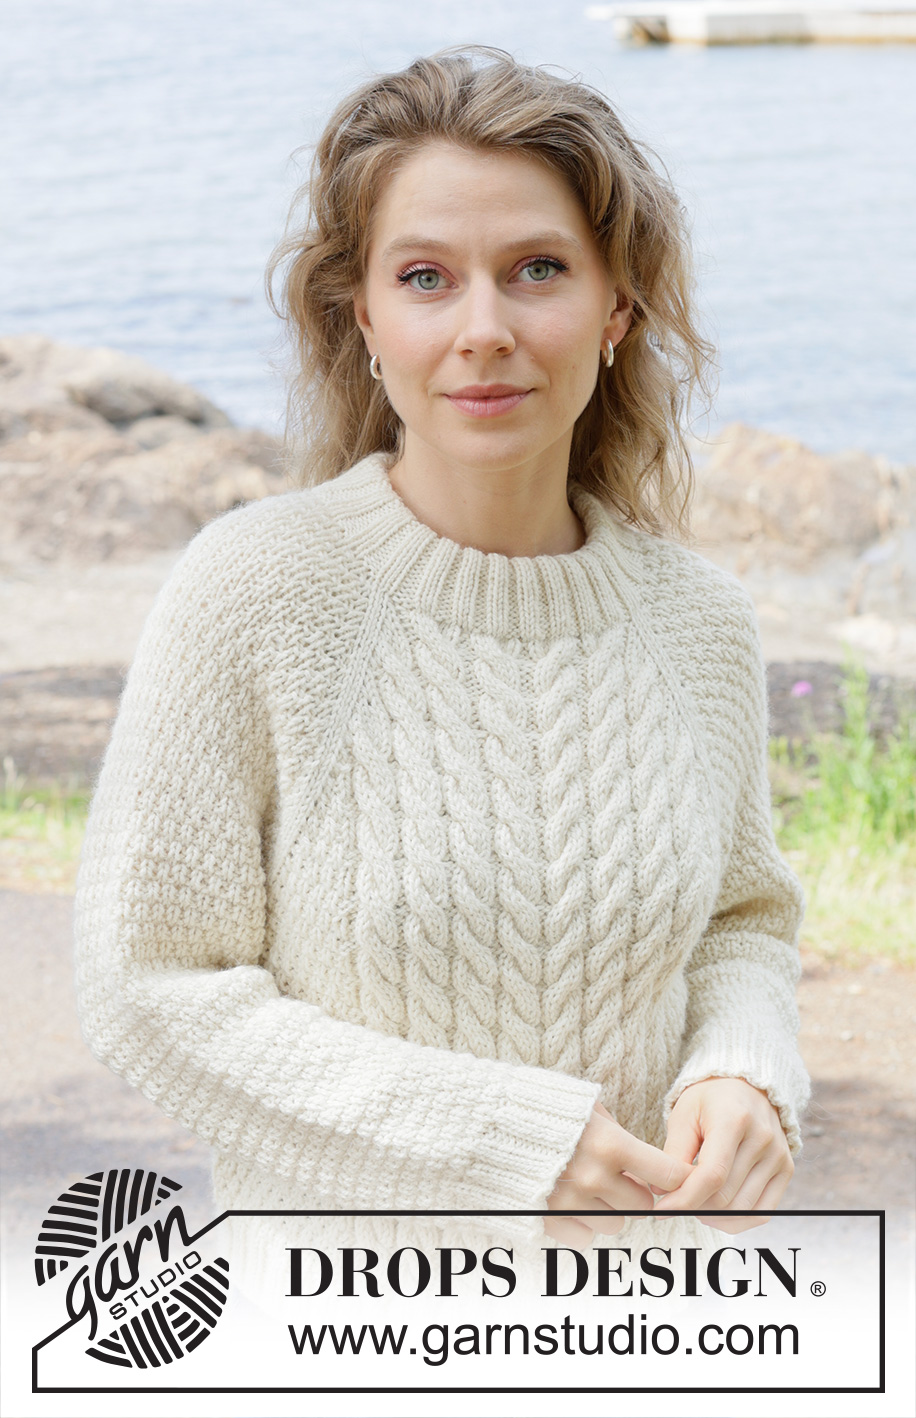
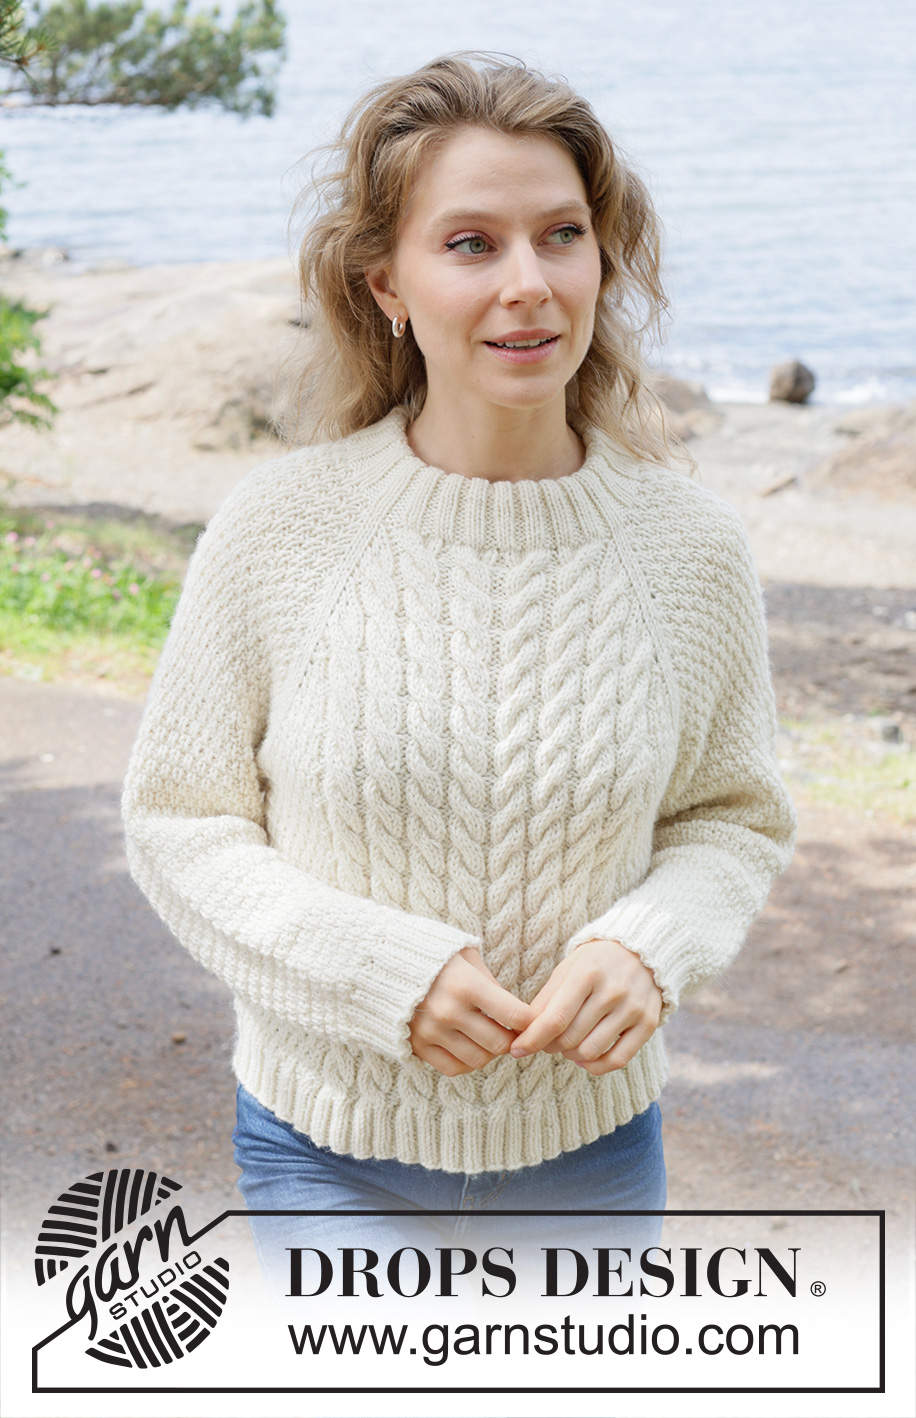
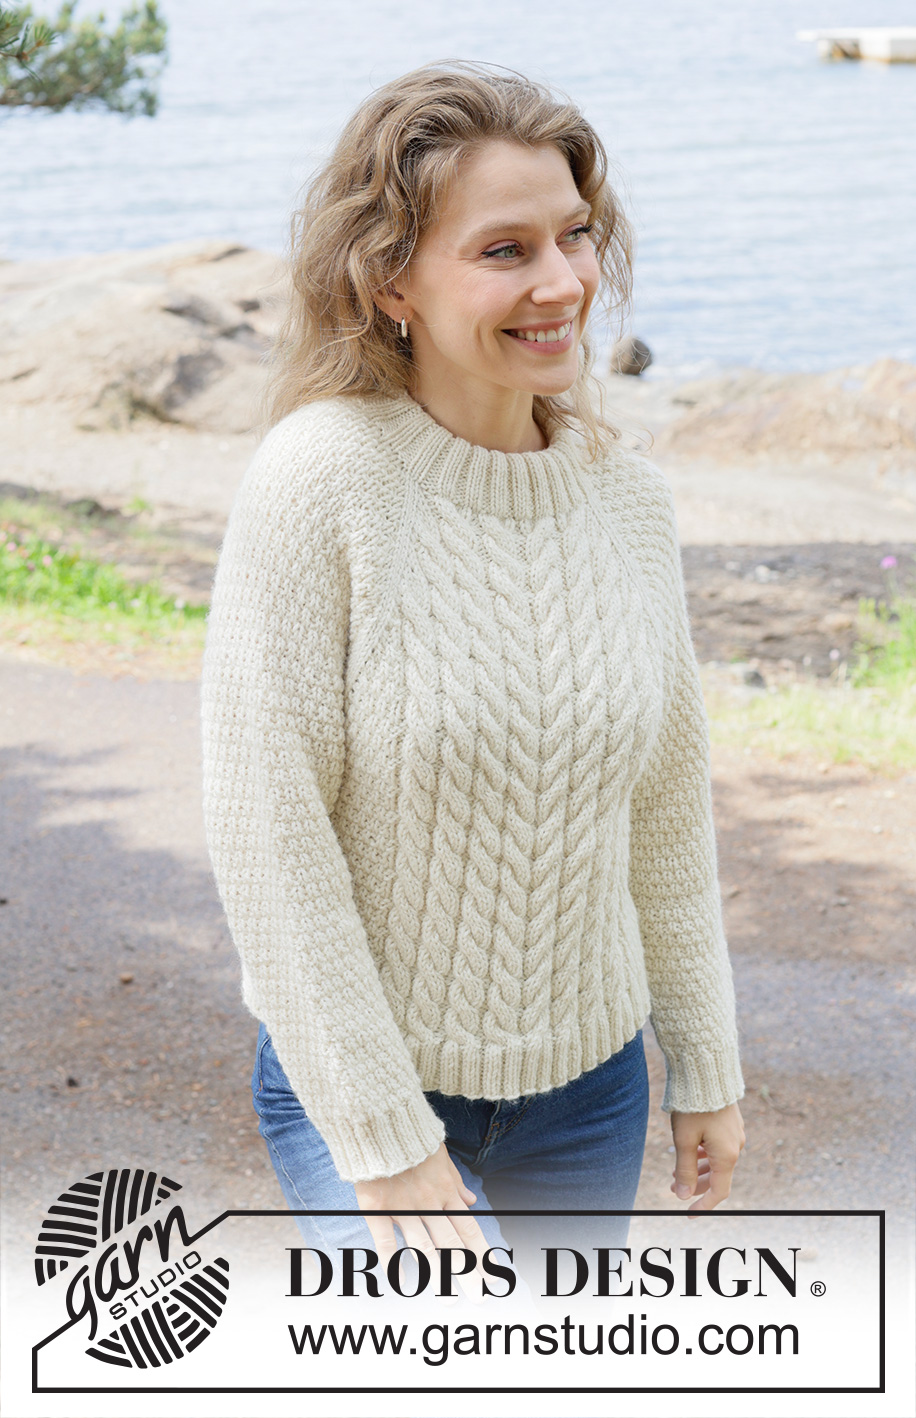
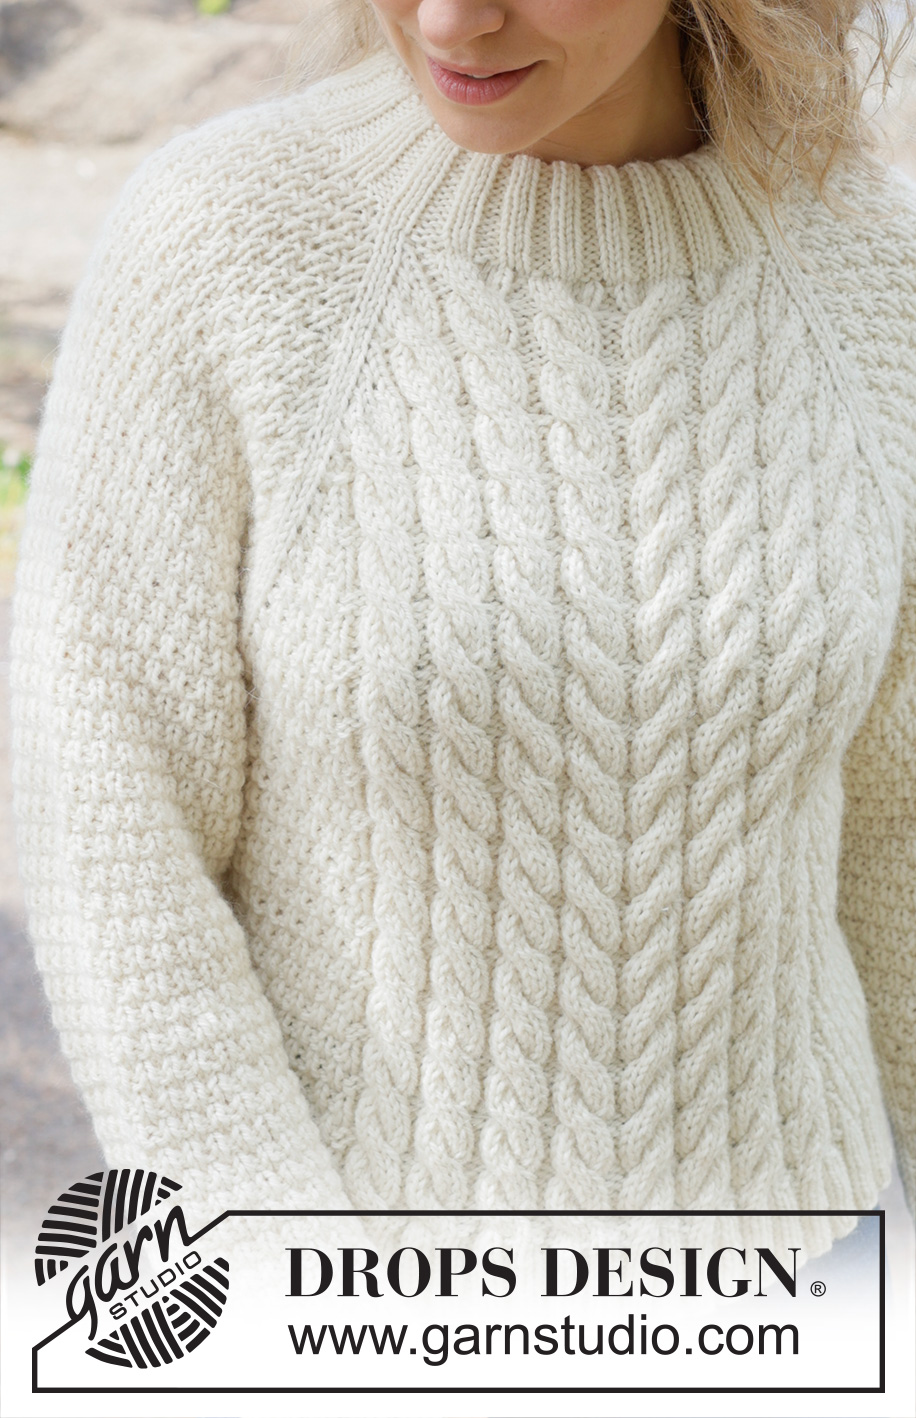
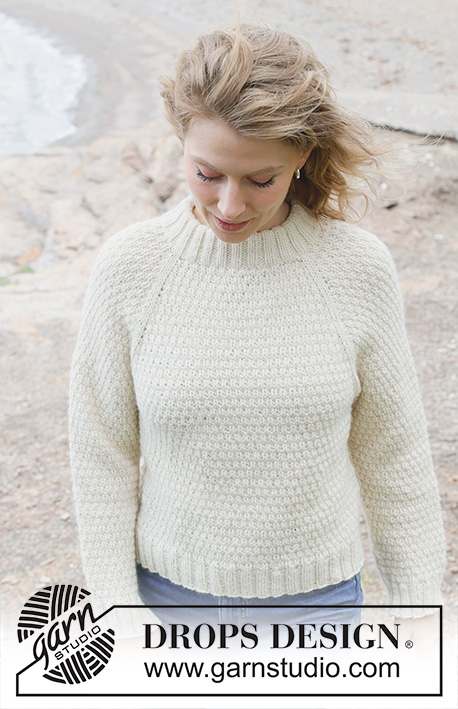
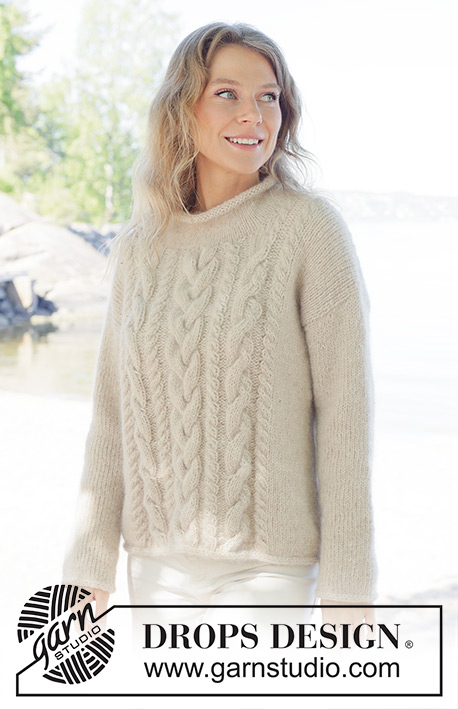
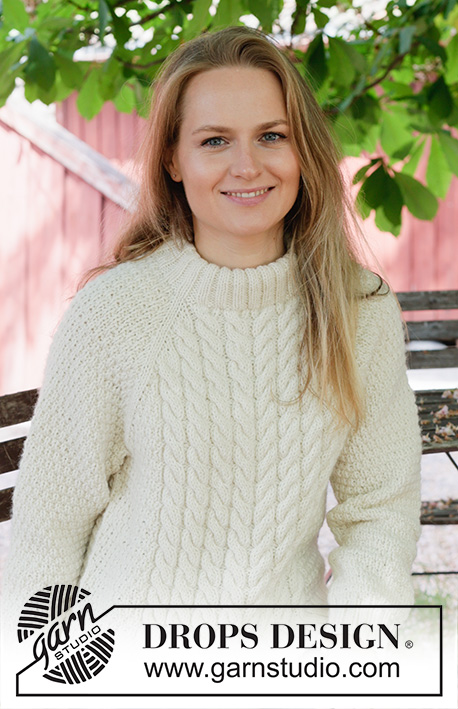
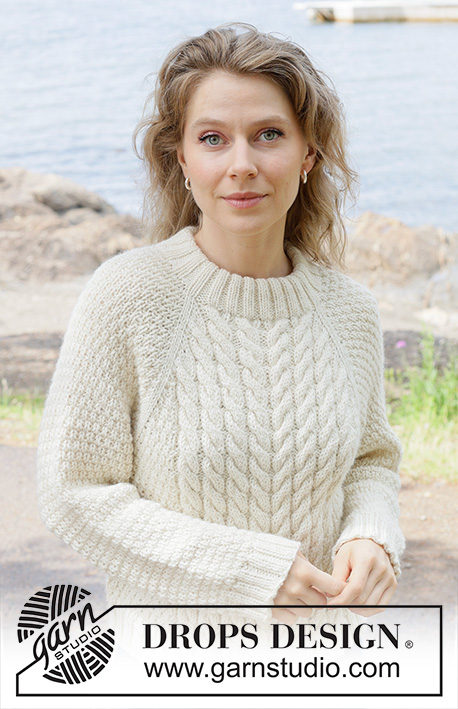
Knitted jumper in DROPS Nepal or DROPS Alaska. The piece is worked top down with raglan, cables and relief-pattern. Sizes S - XXXL.

Highlight Size:
DROPS 252-17

#ivorycoastsweater

DROPS Design: Pattern ne-387
Yarn group C or A + A
-------------------------------------------------------

SIZES:
S - M - L - XL - XXL - XXXL

YARN:
DROPS NEPAL from Garnstudio (belongs to yarn group C)
650-700-800-850-950-1000 g colour 0100, off white

Or use:
DROPS ALASKA from Garnstudio (belongs to yarn group C)
700-750-850-900-1000-1100 g colour 02, off white

NEEDLES:
DROPS CIRCULAR NEEDLE SIZE 5.5 MM: Length 40 cm and 80 cm.
DROPS CIRCULAR NEEDLE SIZE 3.5 MM: Length 40 cm and 80 cm.
DROPS DOUBLE POINTED NEEDLES SIZE 5.5 MM.
DROPS DOUBLE POINTED NEEDLES SIZE 3.5 MM.
DROPS CABLE NEEDLE.
The technique MAGIC LOOP can be used – you then only need 80 cm circular needle in each size.

KNITTING TENSION:
16 stitches in width and 21 rows in height, with stocking stitch on needle size 5.5 mm = 10 x 10 cm.
17 stitches in width and 22 rows in height, with relief-pattern on needle size 5.5 mm = 10 x 10 cm.
NOTE: Needle size is only a guide. If you get too many stitches on 10 cm, change to a larger needle size. If you get too few stitches on 10 cm, change to a smaller needle size.

-------------------------------------------------------

Alternative Yarn – See how to change yarns here
Yarn Groups A to F – Use the same pattern and change the yarn here
Yarn usage using an alternative yarn – Use our yarn converter here

-------------------------------------------------------

You might also like...

Product image DROPS Nepal
DROPS Nepal
65% Wool, 35% Alpaca
from 2.80 € /50g
Get the yarn to make this pattern from 36.40€.

The yarn cost is calculated from the pattern’s smallest size and the yarn’s cheapest product type. Looking for an even better price? You might find it on the DROPS Deals!

Pattern instructions

-------------------------------------------------------

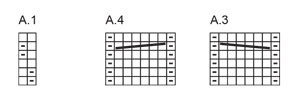
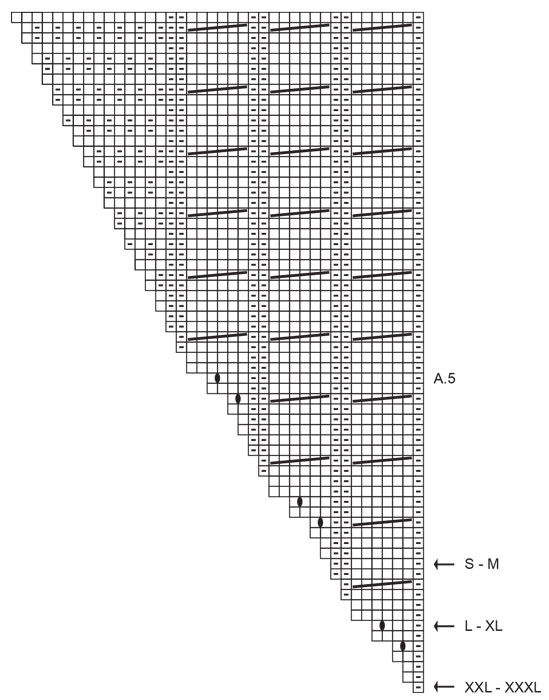
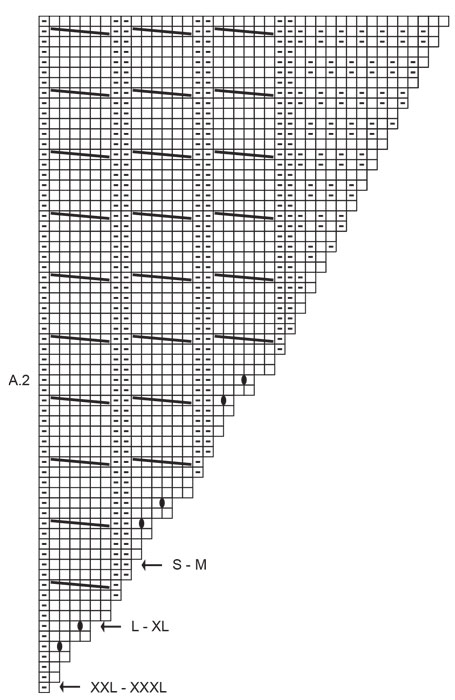
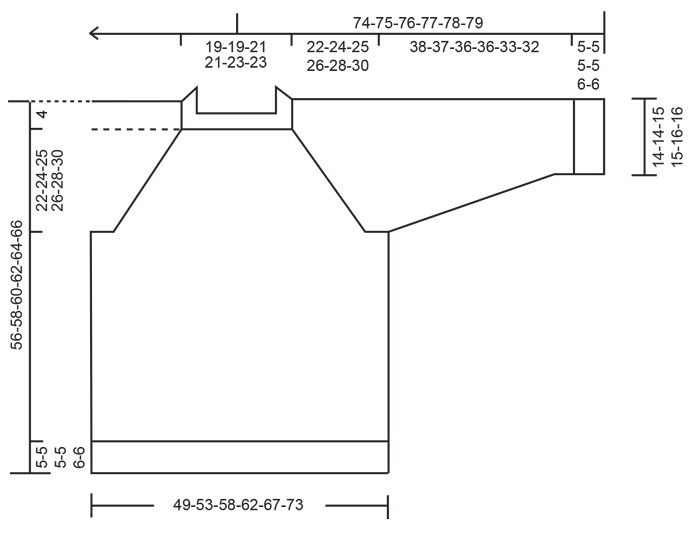
EXPLANATIONS FOR THE PATTERN:

-------------------------------------------------------

INCREASE TIP:
This symmetrical increase gives 1 new stitch. Follow steps 1-4 below:
1. Loosely slip the first stitch on the left needle onto the right needle as if to purl. Hold the knitting yarn behind the work.
2. Insert the left needle behind the slipped stitch and between the slipped stitch and the first stitch on the right needle.
3. Make a yarn over on the right needle and pull the yarn over through the stitch to make 1 new stitch on the right needle.
4. Drop the outermost part of the stitch off the left needle and then knit the second strand of the stitch through the front loop.
You have now increased 1 stitch.

PATTERN:
See diagrams A.1 to A.5.
Find your size in the diagram and begin at your arrow – applies to A.2 and A.5.

RAGLAN:
Increase 1 stitch by making 1 yarn over after/before the 2 knitted raglan-stitches. On the next round, work the yarn overs as follows:
BEFORE RAGLAN-STITCHES:
Slip the yarn over off the left needle and replace it twisted (insert the left needle through the back when replacing it). Knit the front loop to avoid a hole. Then work the new stitch in pattern.
AFTER RAGLAN-STITCHES:
Knit through the back loop to avoid a hole. Then work the new stitch in pattern.

SLEEVE TIP:
When knitting up stitches under the sleeve, you can get a small hole in the transition between stitches on the body and sleeve. This hole can be closed by picking up the strand between 2 stitches and working this strand twisted together with the first stitch between body and sleeve.

DECREASE TIP:
Decrease 1 stitch on each side of the marker-stitch as follows:
Work until there are 2 stitches left before the marker, knit 2 together, knit 1 (marker-stitch), slip 1 stitch knit-wise, knit 1 and pass the slipped stitch over the knitted stitch (2 stitches decreased).

-------------------------------------------------------

START THE PIECE HERE:

-------------------------------------------------------

JUMPER – SHORT OVERVIEW OF THE PIECE:
The pattern uses both long and short needles; start with the length which fits the number of stitches and change when necessary.
The neck and yoke are worked in the round with circular needle, top down and from the right back shoulder. When the yoke is finished, it is divided for the body and sleeves and the body continued in the round, while the sleeves wait. The sleeves are worked top down, in the round.
The neck is folded double and fastened to the inside.

NECK:
Cast on 96-96-104-104-112-112 stitches with circular needle size 5.5 mm and DROPS Nepal or DROPS Alaska. Change to needle size 3.5 mm (casting on with a larger needle size makes the cast-on edge elastic).
Knit 1, work rib in the round (purl 2, knit 2) until there are 3 stitches left, purl 2 and knit 1. Work this rib for 11-11-11-11-13-13 cm. The neck is later folded double, leaving a neck-height of approx. 5-5-5-5-6-6 cm.
The round begins on the right back shoulder. Insert 1 marker after the first 32-32-34-34-36-36 stitches (approx. mid-front), the piece is now measured from here.

YOKE:
Change to needle size 5.5 mm. Insert 4 marker-threads while working the first round, all marker-threads inserted between 2 knitted stitches which are the raglan-stitches and are always worked in stocking stitch.
Knit the first round as follows: Insert marker-thread 1 at the beginning of the round, knit 16 stitches and decrease 1 stitch across these stitches (= 15 sleeve-stitches), insert marker-thread 2 before the next stitch, knit 32-32-36-36-40-40 stitches and increase 4-4-8-8-12-12 stitches evenly across these stitches – read INCREASE TIP (= 36-36-44-44-52-52 stitches on front piece), insert marker-thread 3 before the next stitch, knit 16 stitches and decrease 1 stitch across these stitches (= 15 sleeve-stitches), insert marker-thread 4 before the next stitch, knit 32-32-36-36-40-40 stitches and decrease 3-3-1-1-1-1 stitch across these stitches (= 29-29-35-35-39-39 stitches on back piece) = 95-95-109-109-121-121 stitches in total.
There are more stitches on the front piece than on the back piece due to cabling on the front piece.

You now work PATTERN but the raglan-stitches in stocking stitch and AT THE SAME TIME increase for RAGLAN on each side of the raglan-stitches – read description above. Work the first round as follows: Knit 1 (= raglan-stitch), increase 1 stitch, work A.1 across the next 13 stitches, increase 1 stitch, knit 2 (= raglan-stitches), increase 1 stitch, work A.2 – start at the arrow for your size, work A.3 1-1-2-2-3-3 times (= 8-8-16-16-24-24 stitches), work A.4 1-1-2-2-3-3 times (= 8-8-16-16-24-24 stitches), work A.5 – start at the arrow for your size, increase 1 stitch, knit 2 (= raglan-stitches), increase 1 stitch, work A.1 across the next 13 stitches, increase 1 stitch, knit 2 (= raglan-stitches), increase 1 stitch, work A.1 across the next 27-27-33-33-37-37 stitches, increase 1 stitch, knit 1 (= raglan-stitch).
Continue this pattern and increase for raglan every 2nd round a total of 19-21-22-23-25-25 times = 255-271-295-303-333-333 stitches (= 8 stitches increased on each increase-round + increases in A.2 and A.5). Remember to maintain the knitting tension.
The sleeve-increases are now finished. Continue increasing for raglan on the front and back pieces every 2nd round 5-5-5-5-5-8 more times = 275-291-315-323-353-365 stitches (= 4 stitches increased on each increase-round).
Continue the pattern without further increases until the yoke measures 22-24-25-26-28-30 cm from the marker mid-front – adjusting so the last round is either round 2 or 5 in A.1, with the next round in A.1 knitted. Now divide for the body and sleeves.

DIVIDE FOR BODY AND SLEEVES:
Place the first 53-57-59-61-65-65 stitches on a thread for the sleeve, cast on 7-9-9-15-15-19 stitches (in side mid-under sleeve), work 92-96-108-110-124-130 stitches as before (= front piece), place the next 53-57-59-61-65-65 stitches on a thread for the sleeve, cast on 7-9-9-15-15-19 stitches (in side mid-under sleeve), work the last 77-81-89-91-99-105 stitches as before (= back piece). Cut the strand. The body and sleeves are finished separately.

BODY:
= 183-195-215-231-253-273 stitches. Insert 1 marker in the middle stitch of the 7-9-9-15-15-19 cast-on stitches under each sleeve. These marker-stitches are always knitted. Start the round with the marker-stitch under the right sleeve and continue the pattern from the yoke. The raglan-stitches are no longer knitted and the new stitches under each sleeve are worked into the pattern on the front and back pieces, on each side of the knitted marker-stitches.
Work until the piece measures 47-49-51-53-54-56 cm from the marker mid-front – adjusting so the last round is either round 3 or 6 in A.1.
Change to circular needle size 3.5 mm. Work rib (knit 2, purl 2) AT THE SAME TIME, increase 13-17-17-17-15-19 stitches evenly on the first round (do not increase across the cables) – remember INCREASE TIP = 196-212-232-248-268-292 stitches.
When the rib measures 5-5-5-5-6-6 cm, cast off with rib.
The jumper measures approx. 52-54-56-58-60-62 cm from the marker mid-front and 56-58-60-62-64-66 cm from the shoulder.

SLEEVES:
Place the 53-57-59-61-65-65 sleeve-stitches from one thread on circular needle size 5.5 mm and knit up 1 stitch in each of the 7-9-9-15-15-19 stitches cast on under the sleeve = 60-66-68-76-80-84 stitches. Insert a marker in the middle stitch of the 7-9-9-15-15-19 stitches under the sleeve and allow the marker to follow your work onwards.
The round begins at the marker-thread.
Read SLEEVE TIP and continue A.1 from the yoke. The marker-stitch under the sleeve is always knitted.
When the sleeve measures 2 cm, decrease 2 stitches under the sleeve – read DECREASE TIP. Decrease like this every 5-4-3½-2½-2-2 cm a total of 7-9-9-12-13-14 times = 46-48-50-52-54-56 stitches. Continue working until the sleeve measures 38-37-36-36-33-32 cm from the division, adjusting so the last round is either round 3 or 6 in A.1.
Change to double pointed needles size 3.5 mm. Work rib (knit 2, purl 2), AT THE SAME TIME increase 6-8-6-8-10-8 stitches evenly on the first round = 52-56-56-60-64-64 stitches. When the rib measures 5-5-5-5-6-6 cm, cast off a little loosely with rib. The sleeve measures approx. 43-42-41-41-39-38 cm.

ASSEMBLY:
Fold the neck double to the inside and sew down. To avoid the neck being tight and rolling outwards, it is important that the seam is elastic.

This pattern has been corrected.

Updated online: 19.03.2025
Pattern is updated. Correction under Raglan.

Diagram

knit = knit
purl = purl
place 3 stitches on cable needle in front of piece, knit 3, knit 3 from cable needle = place 3 stitches on cable needle in front of piece, knit 3, knit 3 from cable needle
place 3 stitches on cable needle behind the piece, knit 3, knit 3 from cable needle = place 3 stitches on cable needle behind the piece, knit 3, knit 3 from cable needle
between 2 stitches make 1 yarn over which is knitted twisted on next round to avoid a hole = between 2 stitches make 1 yarn over which is knitted twisted on next round to avoid a hole
Diagram for DROPS 252-17

Each of our patterns has specific tutorial videos to help you.

Do you have a question? See a list of frequently asked questions (FAQ)

Knitting tension is what determines the final measurements of your work, and is usually measured per 10 x 10 cm. It is provided like so: number of stitches in width x number of rows in height - eg: 19 stitches x 26 rows = 10 x 10 cm.

The knitting tension is very individual; some people knit/crochet loosely while others work tightly. You adjust the knitting tension with the needle size, which is why the suggested needle size is only meant as a guide! You need to adjust this (up or down) to ensure that YOUR knitting tension matches the knitting tension provided in the pattern. If you work with a different knitting tension than provided you will have a different yarn consumption, and your work will have different measurements than what the pattern suggests.

The knitting tension also determines which yarns can replace each other. As long as you achieve the same knitting tension you can replace one yarn with another.

See DROPS lesson: How to measure your tension/gauge

See DROPS video: How to make a gauge tension swatch

The required amount of yarn is provided in grams, eg: 450 g. To calculate how many balls you’ll need you first need to know how many grams are in 1 ball (25g, 50g or 100g). This information is available if you click on the individual yarn quality on our pages. Divide the amount required with the amount of each ball. For example, if each ball is 50g (the most common amount), the calculation will be as follows: 450 / 50 = 9 balls.

The important thing when changing from one yarn to another is that the knitting/crochet tension remains the same. This is so that the measurements of the finished piece will be the same as on the sketch provided. It is easier to achieve the same knitting tension using yarns from the same yarn group. It is also possible to work with multiple strands of a thinner yarn to achieve the knitting tension of a thicker one. Please try our yarn converter. We recommend you to always work a test swatch.

Please NOTE: when changing yarn the garment might have a different look and feel to the garment in the photo, due to individual properties and qualities of each yarn.

See DROPS lesson: Can I use a different yarn than the one mentioned in the pattern?

All our yarns are categorised into yarn groups (from A to F) according to thickness and knitting tension – group A contains the thinnest yarns and group F the thickest. This makes it easier for you to find alternative yarns to our patterns, should you wish to switch yarn. All yarns within the same group have a similar knitting tension and can easily replace each other. However, different yarn qualities have different structures and properties which will give the finished work a unique look and feel.

Click here for an overview of the yarns in each yarn group

At the top of all our patterns you’ll find a link to our yarn calculator, which is a helpful tool should you wish to use a different yarn than suggested. By filling in the yarn quality you wish to replace, the amount (in your size) and number of strands, the calculator will present good alternative yarns with the same knitting tension. Additionally it will tell you how much you’ll require in the new qualities and whether you’ll need to work with multiple strands. Most skeins are 50g (some are 25g or 100g).

If the pattern is worked with multiple colours, every colour will have to be calculated separately. Similarly, if the pattern is worked with several strands of different yarns (for example 1 strand Alpaca and 1 strand Kid-Silk) you will have to find alternatives for each, individually.

Click here to see our yarn calculator

Since different yarns have different qualities and textures we have chosen to keep the original yarn in our patterns. However, you can easily find options among our available qualities by using our yarn calculator, or simply pick a yarn from the same yarn group.

It is possible that some retailers still have discontinued yarns in stock, or that someone has a few skeins at home that they would like to find patterns for.

The yarn calculator will provide both alternative yarn as well as required amount in the new quality.

If you think it's hard to decide what size to make, it can be a good idea to measure a garment you own already and like the size of. Then you can pick the size by comparing those measures with the ones available in the pattern's size chart.

You'll find the size chart at the bottom of the pattern.

See DROPS lesson: How to read size chart

The needle size provided in the pattern serves only as a guide, the important thing is to follow the knitting tension. And since knitting tension is very individual, you will have to adjust the needle size to ensure that YOUR tension is the same as in the pattern – maybe you’ll have to adjust 1, or even 2 needle sizes, up or down to achieve the correct tension. For this, we recommend that you work test swatches.

Should you work with a different knitting tension than the one provided, the measurements of the finished garment might deviate from the measurement sketch.

See DROPS lesson: How to measure your tension/gauge

See DROPS video: How to make a tension/gauge swatch

Working a garment top-down provides more flexibility and room for personal adjustment. For example it is easier to try the garment on while working, as well as making adjustments to length of yoke and shoulder caps.

The instructions are carefully explaining every step, in the correct order. Diagrams are adjusted to the knitting direction and are worked as usual.

The diagram depicts all rows/rounds, and every stitch seen from the right side. It is read from bottom to top, from right to left. 1 square = 1 stitch.

When working back and forth, every other row is worked from the right side and every other row is worked from the wrong side. When working from the wrong side, the diagram will have to be worked reversed: from left to right, knit stitches are purled, purl stitches are knit etc.

When working in the round every round is worked from the right side and the diagram are worked from right to left on all rounds.

See DROPS lesson: How to read knitting diagrams

The diagram depicts all rows/rounds, and every stitch seen from the right side. It is worked from bottom to top, from right to left.

When working back and forth every other row is worked from the right side: from right to left and every other row is worked from the wrong side: from left to right.

When working in the round, every row in the diagram are worked from the right side, from right to left.

When working a circular diagram you start in the middle and work your way outwards, counter clockwise, row by row.

The rows usually start with a given number of chain stitches (equivalent to the height of the following stitch), this will either be depicted in the diagram or explained in the pattern.

See DROPS lesson: How to read crochet diagrams

Instructions for working several diagrams after each other on the same row/round, will often be written like so: “work A.1, A.2, A.3 a total of 0-0-2-3-4 times". This means you work A.1 once, then A.2 is worked once, and A.3 is repeated (in width) the number of times provided for your size – in this case like so: S = 0 times, M = 0 times, L=2 times, XL= 3 times and XXL = 4 times.

The diagrams are worked as usual: begin with the first row in A.1, then work the first row in A.2 etc.

See DROPS lesson: How to read knitting diagrams

See DROPS lesson: How to read crochet diagrams

The total width of the garment (from wrist-to-wrist) will be larger in the larger sizes, despite the actual sleeves being shorter. The larger sizes have longer sleeve caps and wider shoulders, so there will be a good fit in all sizes.

The measurement sketch/schematic drawing provides information regarding the full length of the garment. If it’s a jumper or a jacket the length is measured from the highest point on the shoulder closest to the neckline, and straight down to the bottom of the garment. It is NOT measured from the tip of shoulder. Similarly, the length of yoke is measured from the highest point on the shoulder and down to where yoke is split into body and sleeves.

On a jacket measures are never taken along bands, unless specifically stated. Always measure inside band stitches when measuring the length.

See DROPS lesson: How to read a schematic drawing

Diagrams are often repeated on the round or in height. 1 repeat is the diagram the way it appears in the pattern. If it says to work 5 repeats of A.1 in the round, then you work A.1 a total of 5 times after/next to each other in the round. If it says to work 2 repeats of A.1 vertically/in height you work the entire diagram once, then begin again at the start and work the entire diagram one more time.

Chain stitches are slightly narrower than other stitches and to avoid working the cast-on edge too tight, we simply chain more stitches to begin with. The stitch count will be adjusted on the following row to fit the pattern and measurement sketch.

The rib edge is more elastic and will contract slightly compared to, for example, stocking stitch. By increasing before the rib edge, you avoid a visible difference in width between the rib edge and the rest of the body.

It’s very easy to cast off too tightly, and by making yarn overs while casting off (and simultaneously casting these off) you avoid a too tight cast off edge.

See DROPS video: How to bind off with yarn overs (yo)

To achieve an even increase (or decrease) you can increase on, for example: every 3rd and 4th row alternately, like so: work 2 rows and increase on the 3rd row, work 3 rows and increase on the 4th. Repeat this until the increase is complete.

See DROPS lesson: Increase or decrease 1 st on every 3rd and 4th row alternately

Should you prefer to work in the round instead of back and forth, you may of course adjust the pattern. You’ll need to add steeks mid-front (usually 5 stitches), and follow the instructions. When you would normally turn and work from the wrong side, simply work across the steek and continue in the round. At the end you’ll cut the piece open, pick up stitches to work bands, and cover the cut edges.

See DROPS video: How to knit steeks and cut open

Should you prefer to work back and forth instead of in the round, you may of course adjust the pattern so you work the pieces separately and then assemble them at the end. Divide the stitches for the body in 2, add 1 edge stitch in each side (for sewing) and work the front and back pieces separately.

See DROPS lesson: Can I adapt a pattern for circular needles into straight needles?

Pattern repeats can vary slightly in the different sizes, in order to get the correct proportions. If you’re not working the exact same size as the garment in the photo, yours might deviate slightly. This has been carefully developed and adjusted so that the complete impression of the garment is the same in all sizes.

Make sure to follow instructions and diagrams for your size!

If you have found a pattern you like which is available in women’s size it’s not very difficult to convert it to men’s size. The biggest difference will be the length of sleeves and body. Start working on the women size that you think would fit across the chest. The additional length will be worked right before you cast off for the armhole/sleeve cap. If the pattern is worked top-down you can add the length right after the armhole or before the first decrease on sleeve.

Regarding additional yarn amount, this will depend on how much length you add, but it is better with a skein too many than too few.

All yarns will have excess fibres (from production) that might come off as lint or shedding. Brushed yarns (ie hairier yarns) have more of these loose, excess fibres, causing more shedding.

Shedding also depends on what is worn under or over the garment, and whether this pulls at the yarn fibres. It’s therefore not possible to guarantee that there will be no shedding

Below are some tips on how to get the best result when working with hairier yarns:

1. When the garment is finished (before you wash it) shake it vigorously so the looser hairs come off. NOTE: do NOT use a lint roller, brush or any method that pulls at the yarn.

2. Place the garment in a plastic bag and put it in your freezer - the temperature will cause the fibres to become less attached to each other, and excess fibres will come off easier.

3. Leave in the freezer for a few hours before taking it out and shaking it again.

4. Wash the garment according to the instructions on the yarn label.

Pilling is a natural process that happens to even the most exclusive of fibers. It's a natural sign of wear and tear that is hard to avoid, and that is most visible in high friction areas of your garment like a sweater's arms and cuffs.

You can make your garment look as new by removing the pilling, using a fabric comb or a pill/lint remover.

Still can't find the answer you need? Then scroll down and leave your question so one of our experts can try to help you. This will be done normally within 5 to 10 working days.
In the meantime, you can read the questions and answers that others have left to this pattern or join the DROPS Workshop on Facebook to get help from fellow knitters/crocheters!
Have you finished this pattern?
Tag your pictures with #dropspattern #ivorycoastsweater or submit them to the #dropsfan gallery.

Post a comment to pattern DROPS 252-17

We would love to hear what you have to say about this pattern!

If you want to leave a question, please make sure you select the correct category in the form below, to speed up the answering process. Required fields are marked *.

Comments / Questions (10)

country flag Tigresse wrote:

Bonjour. Le paragraphe AVANT LES MAILLES DU RAGLAN: Lâcher le jeté de l’aiguille gauche et le remettre torse (le prendre avec l’aiguille gauche par l’arrière). Tricoter le jeté à l’endroit, dans le brin avant pour éviter un trou, faut-il faire une boucle pour la tricoter? La vidéo en réponse à Mimi, faut-il faire les augmentations de A2 et A5 comme la vidéo ? Merci d'avance pour vos réponses.

02.04.2025 - 10:38

DROPS Design answered:

Bonjour Trigresse, les jetés des augmentations des raglans se tricotent comme dans cette vidéo: on fait 1 jeté, et en fonction de sa position avant les mailles du raglan on va le tricoter soit en le lâchant puis en le reprenant par l'arrière = avant les mailles du raglan soit torse à l'endroit = après les mailles du raglan. Les jetés/augmentations des diagrammes A.2 et A.5 se tricotent simplement torse à l'endroit. Bon tricot!

02.04.2025 - 14:05

country flag Nina wrote:

Jeg kan ikke forstå denne opskrift, eller det vil sige, når jeg kommer til "Nu skal der strikkes mønster", som jeg læser opskrifter (str xxl) så skal jeg starte med en omgang vr og derefter en omgang 1r 1vr (mønster A2)

13.02.2025 - 14:53

DROPS Design answered:

Jo, vi beskriver første pind i mønsteret (du starter på nederste pind i diagrammerne): Strik 1 maske ret (= raglanmaske), tag 1 maske ud, strik A.1(1vr,1r) over de næste 13 masker, tag 1 maske ud, strik 2 masker ret (= raglanmasker), tag 1 maske ud, strik A.2 (1vr) – start ved pil for valgt størrelse, strik A.3 (8m) totalt 3 (= 24 masker), strik A.4 totalt 3 gange (=24), strik A.5 – start ved pil for valgt størrelse, tag 1 maske ud, strik 2 masker ret (= raglanmasker), tag 1 maske ud, strik A.1 over de næste 13 masker, tag 1 maske ud, strik 2 masker ret (= raglanmasker), tag 1 maske ud, strik A.1 over de næste 37 masker, tag 1 maske ud, strik 1 maske ret (= raglanmaske).

18.02.2025 - 09:55

country flag Malory Vialard wrote:

Bonjour, je n’ai pas accès à A2 ça correspond à quoi du coup ? Merci

24.01.2025 - 08:49

DROPS Design answered:

Bonjour Mme Vialard, vous trouverez le diagramme A.2 en bas de page, sous le diagramme A.5 et juste au-dessus du schéma des mesures. Bon tricot!

24.01.2025 - 09:56

country flag Eilen wrote:

Ville denne være mulig å strikke i drops Air? Jeg ser at det garnet har samme strikkefasthet som garnet i oppskriften, men vil det at det er mer fluffy gjøre at det ikke kan brukes til denne oppskriften? Spør da jeg ofte opplever at Nepal og Alaska kan klø

16.01.2025 - 22:17

DROPS Design answered:

Hej Eilen, ja du kan absolut bruge DROPS Air til denne opskrift :)

17.01.2025 - 12:02

country flag Rachel wrote:

Hi, I have another question. Should the yarn over Raglan increases be worked on the following round, as stockinette stitch or in pattern. The instructions say to work in stockinette stitch. If that's the case, there's isn't enough room on the front section to complete A.5. If it's worked in pattern, the charts fit. It's just not working for me. Please help.

28.12.2024 - 21:07

DROPS Design answered:

Dear Rachel, the increased stitches should be worked in the pattern/charts; there seems to be a typo in the UK version, we will correct it as soon as possible. Happy knitting!

30.12.2024 - 01:38

country flag Rachel wrote:

Hi. I'm finding this pattern extremely confusing. I've done my first raglan increase row on the yoke using the charts. How are the inbetween rows worked? Are the yarn over stitches just worked as per the raglan increase instructions and then follow on with the charts? Or are the charts knitted immediately after the raglan stitches? I hope this makes sense. Thank you.

27.12.2024 - 19:40

DROPS Design answered:

Dear Rachel, you work according to the established patterns and the charts. The charts show all rounds in the pattern so, where you worked each chart you simply work the next round of the same chart above it. The increased stitches are worked as indicated in RAGLAN, depending on whether the increase is before or after the 2 knit stitches and, in the next rows, this stitch is worked in stocking stitch. These stitches should be worked in the pattern/charts. Happy knitting!

30.12.2024 - 00:52

country flag Mimi wrote:

Bonjour, Je n'ai rien compris à vos explications des augmentations. Point 1 : OK Point 2 : je pique dans le brin avant ou le brin arrière? Point 3 : "écouler ce jeté dans la maille"???? Qu'est-ce que ça veut dire? Point 4 : ????? Ne peut-on pas faire tout simplement une augmentation intercalaire? Merci pour vos explications

12.11.2024 - 18:21

DROPS Design answered:

Bonjour Mimi, dans cette vidéo nous montrons comment réaliser ce type d'augmentations, vous pouvez toujours augmenter différemment, l'effet en sera juste différent. Bon tricot!

13.11.2024 - 07:40

country flag Maria wrote:

I don't get your messy explanation... "Continuethis pattern and increase for raglan every 2nd round a total of 19-21-22-23-25-25 times " and right after that "The sleeve-increases are now finished. Continue increasing for raglan on the front and back pieces every 2nd round 5-5-5-5-5-8 more times". So why you just don't say that I need to increase 26 times for raglan in total (making an M size)? It's really difficult to understand.

31.10.2024 - 18:27

DROPS Design answered:

Dear Maria, in size M you will increase for front and back piece a total of 26 times on every other round and at the same time increase for sleeves a total of 21 times, so that on the last 5 increases for raglan you increase only on body and not on sleeves anymore. Hope it can help. Happy knitting!

01.11.2024 - 08:13

country flag Carol McMillan wrote:

I'm making size XL and have another questioWhen I get to the 323 sts for my size I still have 5 more rows left on Charts A.2 & A.5 which would include 2 more increases on each side - Do I just ignore the increase and work even with thefurther increases?

16.10.2024 - 02:57

DROPS Design answered:

Dear Mrs McMillan, just work the number of increases stated for your size, do not work more otherwise your number of stitches cannot be right. then continue without increasing until piece measures 26 cm from marker after neck edge (adjust after 2nd or 5th round in A.1) then divide yoke for body and sleeves. Happy knitting!

16.10.2024 - 08:06

country flag Carol McMillan wrote:

I'm making size XL and have a question about the raglan increases. Continue this pattern and increase for raglan every 2nd round a total of 23 times = 303 sts (= 8 sts inc’d on each increase-round + increases in A.2 and A.5). Can you provide me with the number of stitches for each sleeve, the front and back that would add up to the 303 sts Also the breakdown of the 323 sts noted after the the sleeve increases are completed.

16.10.2024 - 02:10

DROPS Design answered:

Dear Mrs McMillan, when all increases are done, the division will be worked in the middle of both raglan stitches, at the end of yoke you should have: 1 st raglan, 59 sts sleeve, 2 sts raglan, 108 sts front piece, 2 sts raglan, 59 sts sleeve, 2 sts raglan, 89 sts back piece, 1 st raglan. Happy knitting!

16.10.2024 - 08:03