
Popular categories
Looking for a yarn?


Comments / Questions (33)
![]() Louise wrote:
Louise wrote:
Bonjour, pour les diminutions à l’encolure au dos, est-ce qu’on les fait près de l’encolure mais avant de faire les 2 mailles i-cord + 2 mailles en côtes côté encolure? Et est-ce que les diminutions se font toutes sur l’endroit, côté droit et côté gauche? Merci!
29.04.2026 - 02:49DROPS Design answered:
Bonjour Louise, les diminutions de l'encolure se font comme indiqué sous DIMINUTIONS -2 (encolure dos):, autrement dit, en début de rang sur l'endroit pour l'épaule gauche et en fin de rang sur l'endroit pour l'épaule droite. Bon tricot!
29.04.2026 - 09:26
![]() Louise wrote:
Louise wrote:
Veste grandeur Large. À l’épaule, il y a 34 mailles sur l’aiguille. Pour les diminutions à l’épaule, on doit les faire 2 fois tous les deux rangs; il restera 32 mailles. Or il y a 2 diminutions par rang, une au début et une à la fin du rang. On ne peut donc pas les faire deux fois. Est-ce le cas? Merci!
23.04.2026 - 04:09DROPS Design answered:
Bonjour Louise, on diminue pour l'encolure dos 2 fois 1 maille tous les rangs en début de rang à partir de l'encolure, autrement dit, 2 x en début de rang sur l'endroit pour l'épaule gauche et 2 x en début de rang sur l'envers pour l'épaule droite. Bon tricot!
23.04.2026 - 11:05
![]() PETIT Josiane wrote:
PETIT Josiane wrote:
Bonjour, Es-t-on obligé de tricoter avec des aiguilles circulaires,? Merci pour votre réponse. Sincèrement J.P
15.04.2026 - 13:41DROPS Design answered:
Bonjour Mme Petit, on tricote ici le devant et le dos séparément en allers et retours sur aiguille circulaire pour avoir suffisamment de place pour y loger toutes les mailles, ainsi, vous pouvez ici utiliser des aiguilles droites, vos mailles seront juste davantage serrées (pensez à bien conserver la bonne tension). Découvrez ici plus d'infos sur les aiguilles circulaires. Bon tricot!
15.04.2026 - 16:16
![]() Fabienne wrote:
Fabienne wrote:
Bonjour, Je vous ai adressé une question hier mais j’ai compris mon erreur et donc n’ai pas besoin de vos réponses. Désolée mais après grande réflexion j’ai détricoté ce que j’ai mal interprété ! Merci
30.03.2026 - 16:39
![]() Fabienne wrote:
Fabienne wrote:
Bonjour, j’ai 2 questions concernant le dos, taille S (je démarre) : Sur le côté, la bordure passe de 8 mailles à 17 m puis on rabat de 9 m : j’obtiens une patte de 4 cm de haut qui dépasse de chaque côté, est-ce bon ? Pour les emmanchures, on passe de 108 m à 84 m faut-il comprendre que l’on diminue de 4 fois 6 m tous les 4 rang en utilisant la méthode Diminutions -1 ? Merci de vos explications, Fabienne
29.03.2026 - 15:36DROPS Design answered:
Bonjour Fabienne, après les côtes, vous devez tricoter ainsi: 8 m de bordure comme avant, tricotez ensuite les 101 m suivantes en diminuant 9 m (= il reste 101-9=92 m), et 8 m de bordure comme avant; il vous reste ainsi: 8+92+8=108 m - vous tricotez les 8 m de chaque côté comme avant et les 92 m en jersey. Vous rabattez ensuite 9 m de chaque côté = 108-18=90 m et vous diminuez ensuite pour les emmanchures 3 fois 2 m (1 au début + 1 à la fin du rang) = 90-(3x2)=84 m. Bon tricot!
07.04.2026 - 13:14
![]() Paola wrote:
Paola wrote:
Mi riferisco all'inizio del lavoro, all'avvio del dietro/davanti con 117 maglie per la taglia M. Grazie
07.03.2026 - 16:08DROPS Design answered:
Buongiorno Paola, all'inizio e alla fine deve lavorare il bordo con I-cord, che è formato da 8 maglid per parte, più 1 maglia diritto, quindi 17 maglie. Deve lavorare le coste su 100 maglie. Buon lavoro!
08.03.2026 - 16:56
![]() Paola wrote:
Paola wrote:
Sto lavorando la taglia M, ma vedo che il problema è comune anche per le altre taglie. Se si inizia il lavoro con un numero di maglie dispari non posso iniziare con una maglia a rovescio e finire con una maglia dritta, ottengo ciò solo se avvio un numero di maglie pari. Grazie
07.03.2026 - 11:45DROPS Design answered:
Buongiorno Paola, a quale parte del modello sta facendo riferimento? Buon lavoro!
07.03.2026 - 12:40
![]() Connie wrote:
Connie wrote:
Could you clarify the knitting instructions as we come close to lower armhole edge? What does "work in addition 15 stitches rib (A.1/A.) inside the 8 edge stitches mean? I can't quite understand what I'm to do at that point. Thanks!
28.01.2026 - 19:14DROPS Design answered:
Hi Connie, The edge stitches consist of 2 stitches I-cord + 6 ribbed stitches. After these 8 stitches at the beginning of the row and before these 8 stitches at the end of the row, you work an extra 15 ribbed stitches so that you have 21 ribbed stitches and 2 stitches I-cord on each side. Regards, Drops Team.
29.01.2026 - 06:36
![]() Helene wrote:
Helene wrote:
Hej! Har tidigare sänt en fråga - då jag inte kan tolka tabellerna A1 och A2. Kommer stickningen av de yttersta maskorna bli 1 slätstickning 2 Resårsticning 3 Mossstickning?
10.12.2025 - 17:31DROPS Design answered:
Hei Helena. Kan ikke finne noen tidligere spørsmål fra deg ang denne vesten. Når du strikker etter diagram A.1 og A.2 er det rettmasker over rattmasker og vrangmasker over vrangemasker (som en vanlig vrangbord), mens ytterste maske strikkes med en i-cord kant. Se gjerne hjelpevideoen: Hur man stickar en i-cord kant, fram och tillbaka. mvh DROPS Design
15.12.2025 - 10:27
![]() Anita wrote:
Anita wrote:
Bonjour 2 questions : > Les 6 mailles avant et après les 2 mailles de la bordure i-cord ne ressemblent pas à des côtes 1/1 : est-ce normal ? (contrairement aux 121 mailles centrales) > sur l'envers, quelle maille (envers ou endroit) pour la dernière maille avant les 8 dernières mailles de la bordure sachant qu'elle est endroit sur l'endroit ? Merci
30.11.2025 - 23:09DROPS Design answered:
Bonjour Anita, les 6 mailles de A.1 à 2 m des bords sont des côtes 1/1, A.1 commence par 1 m endroit, 1 m envers, mais A.2 va commencer par 1 m envers, 1 m endroit (dans les 2 cas, vu sur l'endroit). Bon tricot!
01.12.2025 - 11:00
|
|||||||
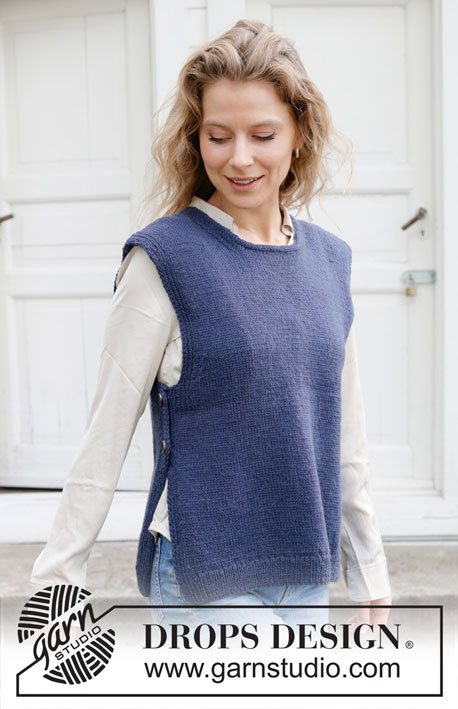
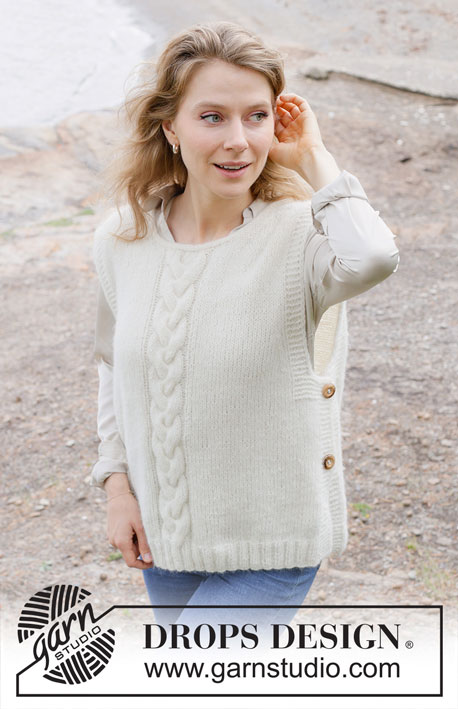
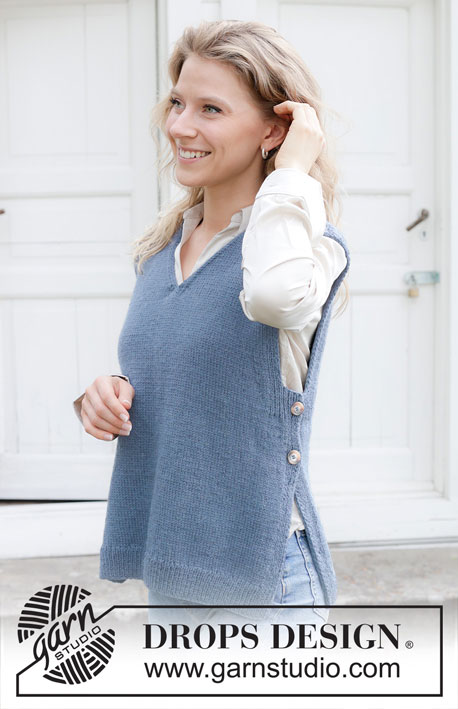
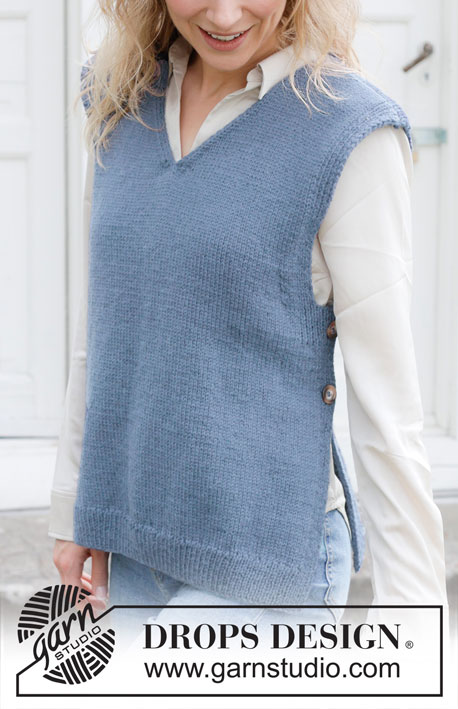
Steel Sky Vest#steelskyvest |
|||||||
 |
 |
||||||
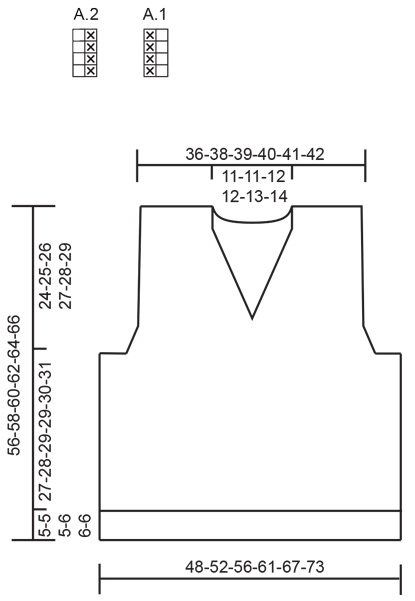
Knitted waistcoat in DROPS Lima or DROPS Fiesta. Piece is knitted from bottom up with V-neck vents in the sides and i-cord. Size: S - XXXL
DROPS 254-38 |
|||||||
|
---------------------------------------------------------- EXPLANATION FOR THE PATTERN: ---------------------------------------------------------- PATTERN: See diagrams A.1 and A.2. Diagrams show all rows in pattern seen from the right side. EDGE WITH I-CORD: BEGINNING OF ROW: Slip 1 stitch purlwise with strand in front of piece, knit 1 and work 6 stitches in A.1. END OF ROW: Work until 8 stitches remain on row, work 6 stitches in A.2, slip 1 stitch purlwise with strand in front of piece, knit 1. DECREASE TIP-1 (applies to armholes): All decreases are done from the right side! BEGINNING OF ROW: Work as before over the first 10 stitches, slip 1 stitch knitwise, knit 1, pass slipped stitch over stitch worked (= 1 stitch decreased). END OF ROW: Work until 12 stitches remain on needle, knit 2 together (= 1 stitch decreased), work rest of row as before. DECREASE TIP-2 (applies to neck on back piece): All decreases are done from the right side! BEGINNING OF ROW: Work as before over the first 3 stitches, slip 1 stitch knitwise, knit 1, pass slipped stitch over stitch worked (= 1 stitch decreased). END OF ROW: Work until 5 stitches remain on needle, knit 2 together (= 1 stitch decreased), knit 3. CAST-OFF TIP: To get a nice finish on the shoulder knit the first 2/last 2 edge stitches together while casting off with knit stitches. ---------------------------------------------------------- START THE PIECE HERE: ---------------------------------------------------------- WAISTCOAT - SHORT OVERVIEW OF PIECE: Worked back and forth on circular needle, bottom up. Work back piece and front piece separately. Sew the parts together on the shoulders and sew on buttons for decoration in each side. BACK PIECE: Cast on 117-127-137-149-163-177 stitches on circular needle size 3.5 mm with DROPS Lima or DROPS Fiesta. Work EDGE WITH I-CORD, work rib (= knit 1/purl 1) until 9 stitches remain, knit 1 and work EDGE WITH I-CORD. Work rib and edges like this until piece measures 5-5-5-6-6-6 cm. Switch to circular needle size 4 mm and work 1 row from right side as follows: Work edge as before (= 8 stitches), work in stocking stitch while AT THE SAME TIME decreasing 9-11-13-13-15-17 stitches evenly over the next 101-111-121-133-147-161 stitches, work edge as before (= 8 stitches) = 108-116-124-136-148-160 stitches. Continue in stocking stitch and 8 edge stitches in each side as before. Remember to follow the knitting tension! When piece measures 28-29-30-31-32-33 cm, work in addition 9-9-11-15-19-23 stitches rib (= A.1/A.2) inside the 8 edge stitches, i.e. work edges over 17-17-19-23-27-31 stitches in each side. When piece measures 32-33-34-35-36-37 cm, begin decrease for armholes as explained below. Cast off 9-9-11-15-19-23 stitches 1 time in each side (now work EDGE WITH I-CORD over 8 stitches as before in each side until finished measurements). Then decrease stitches for armholes on every 4th row - read DECREASE TIP-1 and decrease as follows: Decrease 1 stitch 3-5-6-7-8-9 times in total in each side = 84-88-90-92-94-96 stitches on needle. When piece measures 50-52-54-56-58-60 cm, work the middle 28-28-30-30-32-34 stitches in rib (= A.1). When piece measures 52-54-56-58-60-62 cm, cast off the middle 20-20-22-22-24-26 stitches for neck, and finish each shoulder separately. SHOULDER: = 32-34-34-35-35-35 stitches. Work in stocking stitch with 8 edge stitches as before towards armhole, 2 stitches i-cord and 2 stitches rib towards the neck. At the same time decrease for neck – read DECREASE TIP-2 and decrease on every other row 2 times towards neck = 30-32-32-33-33-33 stitches remain on each shoulder. Cast off when piece measures 56-58-60-62-64-66 cm – read CAST-OFF TIP. FRONT PIECE: Cast on 117-127-137-149-163-177 stitches on circular needle size 3.5 mm with DROPS Lima. Work EDGE WITH I-CORD - read explanation above, work rib (= knit 1/purl 1) until 9 stitches remain, knit 1 and EDGE WITH I-CORD. Work rib and edges like this until piece measures 5-5-5-6-6-6 cm. Switch to circular needle size 4 mm and work 1 row from right side as follows: Work edge as before (= 8 stitches), work in stocking stitch while AT THE SAME TIME decreasing 9-11-13-13-15-17 stitches evenly over the next 101-111-121-133-147-161 stitches, work edge as before (= 8 stitches) = 108-116-124-136-148-160 stitches. Continue with stocking stitch and 8 edge stitches in each side. When piece measures 28-29-30-31-32-33 cm, work in addition 9-9-11-15-19-23 stitches rib (= A.1/A.2) inside the 8 edge stitches, i.e. work edges over 17-17-19-23-27-31 stitches in each side. When piece measures 32-33-34-35-36-37 cm, begin decrease for armholes as explained below. Cast off 9-9-11-15-19-23 stitches 1 time in each side (now work EDGE WITH I-CORD over 8 stitches as before in each side until finished measurements) = 90-98-102-106-110-114 stitches. Then decrease stitches for armholes and V-neck. In size S and M decrease for V-neck begins after decrease for armhole is done, but in size L, XL, XXL and XXXL decrease for V-neck begins before decreases for armhole are done. Read the sections below before continuing in these sizes. Insert a marker thread in the middle of piece so that there are 45-49-51-53-55-57 stitches on each side of marker thread (marker thread is used when making V-neck). ARMHOLE: Decrease for armholes on every 4th row - remember DECREASE TIP-1 and decrease as follows: Decrease 1 stitch 3-5-6-7-8-9 times in each side. V-NECK: Decrease for V-neck when piece measures 40-41-42-43-44-45 cm from cast-on edge (i.e. piece measures 8 cm from where 9-9-11-15-19-23 stitches were cast off in each side for armholes). LEFT SHOULDER (V-neck): Work first row as follows from right side: Work as before until 1 stitch remain before marker thread, slip 1 stitch on a cable needle in front of piece, knit 1. Slip stitch on cable needle on to a thread together with the last stitches on needle without working these stitches (= right shoulder). Turn piece. ROW 2 (= wrong side): Slip 1 stitch purlwise with strand in front of piece, knit 1 (= 2 edge stitches), purl until 8 stitches remain and work 8 edge stitches as before. ROW 3 (= right side): Work 8 edge stitches as before, knit until 5 stitches remain on needle, knit 2 together, knit 1, slip 1 stitch purlwise with strand in front of piece, knit 1. Repeat 2nd and 3rd row until decrease for V-neck have been done 12-12-13-13-14-15 times. When all decreases for armhole and V-neck are done, there are 30-32-32-33-33-33 stitches on row. Work with 2 edge stitches towards V-neck, stocking stitch and 8 edge stitches towards armhole. Cast off when piece measures 56-58-60-62-64-66 cm – remember CAST-OFF TIP. RIGHT SHOULDER (V-neck): Slip stitches for right shoulder back on circular needle size 4 mm. Work first row as follows from right side: Slip first stitch purlwise with strand in front of piece, knit until 8 stitches remain and work 8 edge stitches as before. ROW 2 (= wrong side): Work 8 edge stitches as before, purl until 2 stitches remain on needle, slip 1 stitch purlwise with strand in front of piece and knit 1. ROW 3 (= right side): Slip 1 stitch purlwise with strand in front of piece, knit 1 (= 2 edge stitches), knit 1, slip 1 stitch knitwise, knit 1 and pass slipped stitch over stitch worked (= 1 stitch decreased), knit until 8 stitches remain and work 8 edge stitches as before. Repeat 2nd and 3rd row until decrease for V-neck have been done 13-13-14-14-15-16 times. When all decreases for armhole and V-neck are done, there are 30-32-32-33-33-33 stitches on row. Work with 2 edge stitches towards V-neck, stocking stitch and 8 edge stitches towards armhole. Cast off when piece measures 56-58-60-62-64-66 cm – remember CAST-OFF TIP. ASSEMBLY: Sew the shoulder seams. Sew on 2 buttons for decoration in each side of waistcoat, place edge stitches from front piece over edge stitches from back piece, then fasten button through both layers. Place top button approx. 1 cm from armhole and place the next approx. 9-10 cm below. |
|||||||
Diagram explanations |
|||||||
|
|||||||
 |
|||||||
 |
|||||||
Have you finished this pattern?Tag your pictures with #dropspattern #steelskyvest or submit them to the #dropsfan gallery. Do you need help with this pattern?You'll find 19 tutorial videos, a Comments/Questions area and more by visiting the pattern on garnstudio.com. © 1982-2026 DROPS Design A/S. We reserve all rights. This document, including all its sub-sections, has copyrights. Read more about what you can do with our patterns at the bottom of each pattern on our site. |
|||||||


With over 40 years in knitting and crochet design, DROPS Design offers one of the most extensive collections of free patterns on the internet - translated to 17 languages. As of today we count 324 catalogues and 12290 patterns translated into English (UK/cm). 12290
We work hard to bring you the best knitting and crochet have to offer, inspiration and advice as well as great quality yarns at incredible prices! Would you like to use our patterns for other than personal use? You can read what you are allowed to do in the Copyright text at the bottom of all our patterns. Happy crafting!
Post a comment to pattern DROPS 254-38
We would love to hear what you have to say about this pattern!
If you want to leave a question, please make sure you select the correct category in the form below, to speed up the answering process. Required fields are marked *.