
Popular categories
Looking for a yarn?


Comments / Questions (22)
![]() Darlene Wainwright wrote:
Darlene Wainwright wrote:
Love this design
18.07.2024 - 01:15
![]() Anna wrote:
Anna wrote:
Hej! Går det att sticka denna i Drops air? Och hur mkt garn hår det för en M/L? Med vänlig hälsning, Anna
28.02.2024 - 17:40DROPS Design answered:
Hej Anna. Ja det kan du göra, det går då åt 500 g Air till Storlek M/L. Mvh DROPS Design
01.03.2024 - 11:43
![]() Anna wrote:
Anna wrote:
Hej! Är denna stor i modellen eller tight? Är själv medium och vill ha den i den passformen enligt bilden. Ska jag då göra M/L? Med vänlig hälsning, Anna
28.02.2024 - 17:26DROPS Design answered:
Hej Anna. Längst ner på mönstret hittar du en måttskiss men mått i cm för alla storlekar. Det bästa är att du mäter ett plagg du redan har och jämför med måtten i måttskissen för att se vilken storlek som skulle passa bäst. Mvh DROPS Design
01.03.2024 - 11:39
![]() Maite wrote:
Maite wrote:
Me encanta el diseño. ¿Podría hacerse este patrón en ganchillo ? Aunque los puntos no fueran idénticos, respetar la forma del poncho y sustituir los puntos por otros a croché. Cuales serían, sería el mismo número...No se trabajar con dos agujas. Gracias
30.10.2023 - 12:52DROPS Design answered:
Hola Maite, no hacemos patrones personalizados. Puedes ver nuestra selección de ponchos a ganchillo aquí: https://www.garnstudio.com/search.php?action=search&c=women-ponchos&mt=2&lang=es.
05.11.2023 - 20:03
![]() Staephanie wrote:
Staephanie wrote:
Hallo, er staat een foutje in naald 5 van de picorant uitleg (‘maak 1 omslag in elk…’ moet zijn ‘maak 1 omslag’)
15.10.2023 - 07:31
![]() Patricia wrote:
Patricia wrote:
Can I leave out the picot edge on all the pieces?
26.08.2023 - 22:25DROPS Design answered:
Dear Patricia, yes, you can skip these edges by working rows 1 to 4 of the edge but not rows 5 and 6. This way, the edge won't look the same but it will still be cast -off. Happy knitting!
28.08.2023 - 00:49
![]() Sofi wrote:
Sofi wrote:
Hej Jag undrar om man kan sticka det nedre stycket utan öppning, alltså runt och sy i hop i ena sidan? Utan slitsar så det blir som en stor tröja Hälsningar Sofi
13.12.2022 - 06:42DROPS Design answered:
Hej Sofi, ja det går helt fint :)
15.12.2022 - 09:10
![]() Pat wrote:
Pat wrote:
It looks like the wool in the photos is the Light Blue colour, not Greyish Green as listed in the pattern?
14.11.2022 - 15:33DROPS Design answered:
Dear Pat, the colour is matching the number and the real colour, the one on the picture might look different because of many reason (light on the day the picture was taken, etc.) - please feel free to ask your DROPS store for any help choosing the colour, they will assist you even per mail or telephone. Happy knitting!
16.11.2022 - 11:57
![]() Ingrid wrote:
Ingrid wrote:
In der Anleitung für das Vorderteil steht:.....9 M abnehmen.. 100 M übrig pa pinnen. Pa pinnen ist wohl dänisch. Was bedeutet das auf deutsch?
06.09.2022 - 20:46DROPS Design answered:
Liebe Ingrid, sorry, es sollte "auf Nadel" sein, danke für den Hinweis, die deutsche Anleitung wird korrigiert. Viel Spaß beim stricken!
07.09.2022 - 08:14
![]() Elaine Forster wrote:
Elaine Forster wrote:
What are the finished measurements for each of the sizes?
15.10.2021 - 13:22DROPS Design answered:
Dear Mrs Forster, you will find all finished measurements for each size in the measurement chart - read more here. Happy knitting!
15.10.2021 - 13:30
|
|||||||||||||||||||
Indiekimono#indiekimono |
|||||||||||||||||||
 |
 |
||||||||||||||||||
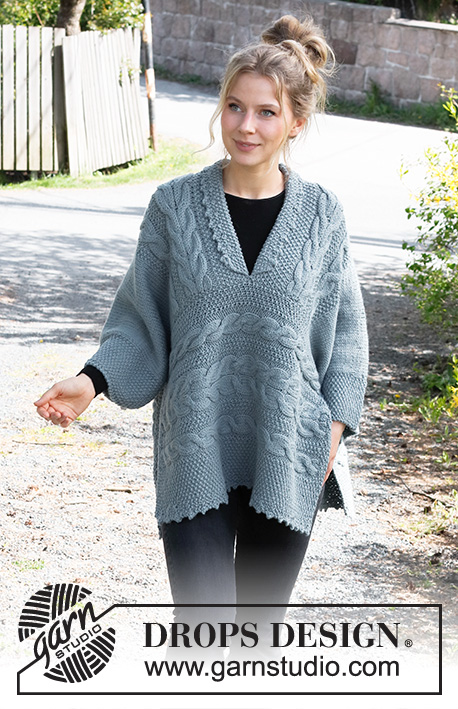
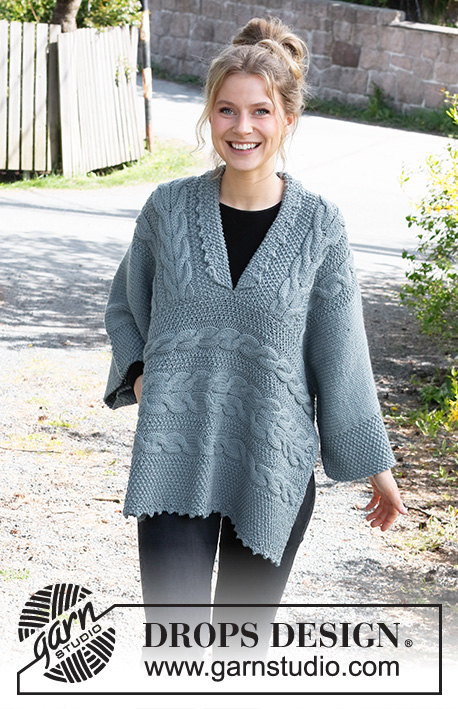
Knitted poncho in DROPS Nepal. Piece is knitted with cables and moss stitch. Size: S - XXXL
DROPS 215-40 |
|||||||||||||||||||
|
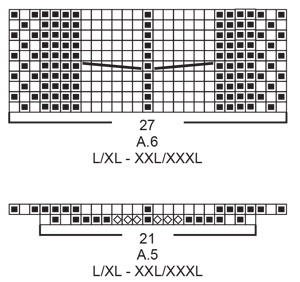
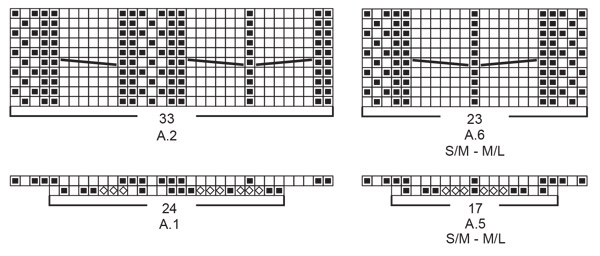
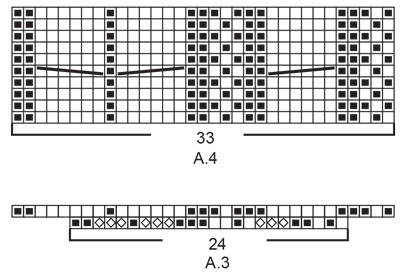
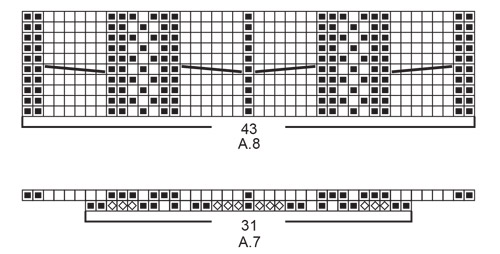
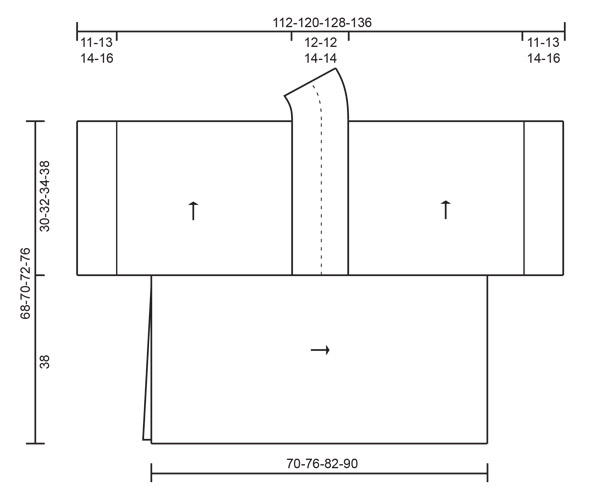
------------------------------------------------------- EXPLANATION FOR THE PATTERN: ------------------------------------------------------- MOSS STITCH: ROW 1: * Knit 1, purl 1 *, repeat from *-* the entire row. ROW 2: Purl over knit and knit over purl. Repeat 2nd row upwards. PATTERN: See diagrams A.1 to A.8. Choose diagram for your size (applies to A.5 and A.6). Diagrams show all rows in pattern seen from the right side. PICOT EDGE (back and forth): Picot edge is counted as 4 stitches in total number of stitches. When increasing and decreasing in picot edge, the extra stitches are not counted in total number of stitches. ROW 1: Work moss stitch over the last 4 stitches. ROW 2: Work moss stitch over the first 4 stitches. ROW 3: Work moss stitch over the last 4 stitches. ROW 4: Work moss stitch over the first 4 stitches. ROW 5: Work as before until 4 stitches remain on row, work these 4 stitches as follows: Knit 2 together, make 1 yarn over, in each of the last 2 stitches work 2 stitches in every stitch by working in front and back loop of same stitch = 2 new stitches on row. ROW 6: Slip first stitch knitwise, knit 1, pass slipped stitch over stitch worked, knit 1, pass the back stitch back on right needle over front stitch. 2 stitches have been decreased - then work the rest of row as before. Repeat rows 1 to 6. CAST-OFF TIP: To avoid a tight cast-off edge you may use a larger needle size. If this also is too tight, work a 1 yarn over after approx. every 6th stitch while casting off (cast off yarn overs as regular stitches). ------------------------------------------------------- START THE PIECE HERE: ------------------------------------------------------- PONCHO– SHORT OVERVIEW OF THE PIECE: Work piece back and forth on circular needle in 5 parts. First work 2 front pieces and one back piece for yoke, bottom up. Sew these together on the shoulders. Then work a front piece and a back piece from side to side to form the bottom part of poncho. Then sew these part together. Sew the seams under the sleeves. The poncho should be open in each side. RIGHT FRONT PIECE (when garment is worn): Cast on 86-92-100-106 stitches on circular needle size 6 mm with Nepal. Work 2 rows in MOSS STITCH - read explanation above. Insert 1 marker after the first 4 stitches at beginning of row (seen from right side). Marker marks where picot edge is worked later. Switch to circular needle size 7 mm. Work next row as follows from the right side (i.e. from mid front): Work 16-16-20-20 stitches moss stitch, work A.1 (= 24 stitches increased to 33 stitches), work 30-34-36-40 stitches in stocking stitch, and finish with 16-18-20-22 stitches in moss stitch towards the sleeve. There are now 95- 101-109-115 stitches on row. Work back from wrong side – at the same time work PICOT EDGE over the last 4 stitches on row - read explanation above (work 1st row picot edge from wrong side). Work next row as follows from right side: Continue with moss stitch and picot edge over the first 16-16-20-20 stitches, work A.2 (= 33 stitches), work 30-34-36-40 stitches in stocking stitch and finish with 16-18-20-22 stitches moss stitch. Continue pattern like this. REMEMBER THE KNITTING TENSION! When piece measures 29-31-33-37 cm from cast-on edge, work next row as follows from right side: Work moss stitch and picot edge over the first 16-16-20-20 stitches, and stocking stitch over the remaining stitches – AT THE SAME TIME decrease 9 stitches by knitting stitches each of the 3 cables together 2 by 2 = 86-92-100-106 stitches remain on row. Knit 1 row from wrong side and knit 1 row from right side (work the 16-16-20-20 stitches towards mid front as before). Work next row as follows from wrong side: Cast off 70-76-80-86 stitches – read CAST-OFF TIP, and work moss stitch and picot edge over the remaining 16-16-20-20 stitches. Front piece measures approx. 30-32-34-38 cm from cast-on edge. Then work right collar as explained below. RIGHT COLLAR: = 16-16-20-20 stitches. Begin from right side and work short rows back and forth as follows from mid front: * Work 2 rows back and forth as before over the first 10-10-14-14 stitches, work 2 rows back and forth as before over all 16-16-20-20 stitches *, work from *-* until collar measures approx. 8-8-9-9 cm on the inside on the most narrow part. NOTE! To avoid holes in every transition when turning, tighten yarn when piece is turned. Cast off. LEFT FRONT PIECE (when garment is worn): Cast on 86-92-100-106 stitches on circular needle size 6 mm with Nepal. Work 2 rows in moss stitch. Insert 1 marker before the last 4 stitches on row towards mid front (seen from right side). Marker marks where picot edge is worked. Switch to circular needle size 7 mm. Work next row as follows from the right side (i.e. from the side): Work 16-18-20-22 stitches moss stitch, work 30-34-36-40 stitches in stocking stitch, work A.3 (= 24 stitches increased to 33 stitches), work 12-12-16-16 stitches moss stitch, and picot edge over the remaining 4 stitches (work 1st row picot edge from right side). There are now 95- 101-109-115 stitches on row. Work back from wrong side. Work next row as follows from right side: Work 16-18-20-22 stitches moss stitch, 30-34-36-40 stitches in stocking stitches, work A.4 (= 33 stitches), and finish with moss stitch and picot edge over the remaining 16-16-20-20 stitches. Continue pattern like this. When piece measures 29-31-33-37 cm from cast-on edge, work next row as follows from right side: Work in stocking stitch until 16-16-20-20 stitches remain on row and decrease AT THE SAME TIME 9 stitches by knitting stitches in each of the 3 cables together 2 by 2, then work moss stitch and picot edge over the remaining 16-16-20-20 stitches as before = 86-92-100-106 stitches remain on row. Knit 1 row from wrong side (work the 16-16-20-20 stitches towards mid front as before). Work next row as follows from right side: Cast off 70-76-80-86 stitches – remember cast-off tip, and work moss stitch and picot edge over the remaining 16-16-20-20 stitches as before. Then work left collar as explained below. LEFT COLLAR: = 16-16-20-20 stitches. Begin from wrong side and work short rows back and forth as follows from mid front: * Work 2 rows back and forth as before over the first 10-10-14-14 stitches, work 2 rows back and forth as before over all 16-16-20-20 stitches *, work from *-* until collar measures approx. 8-8-9-9 cm on the inside on the most narrow part. Cast off. BACK PIECE: Cast on 157-169-181-193 stitches on circular needle size 6 mm with Nepal. Work 2 rows in moss stitch. Switch to circular needle size 7 mm. Work next row as follows from right side: Work 16-18-20-22 stitches moss stitch, 30-34-36-40 stitches in stocking stitch, work A.3 (= 24 stitches increased to 33 stitches), work A.5 (= 17-17-21-21 stitches increased to 23-23-27-27 stitches), work A.1 (= 24 stitches increased to 33 stitches), work 30-34-36-40 stitches in stocking stitch, and finish with 16-18-20-22 stitches moss stitch. There are now 181- 193-205-217 stitches on row. Work back from wrong side. Work next row as follows from right side: 16-18-20-22 stitches moss stitch, 30-34-36-40 stitches in stocking stitch, work A.4 (= 33 stitches), work A.6 (= 23-23-27-27 stitches), work A.2 (= 33 stitches), work 30-34-36-40 stitches in stocking stitch, and finish with 16-18-20-22 stitches moss stitch. Continue pattern like this. When 1 row remains before piece measures 28-30-32-36 cm, decrease 6 stitches over the 2 middle cables mid back by knitting stitches in each cable together 2 by 2 = 175-187-199-211 stitches. On next row cast off the middle 15-15-19-19 stitches for neck, and finish each shoulder separately. Continue pattern as before , and cast off 1 stitch on next row from the neck = 79-85-89-95 stitches remain on shoulder. Work until piece measures 29-31-33-37 cm. Knit 1 row from right side while decreasing 9 stitches by knitting the stitches in the remaining 3 cables together 2 by 2 = 70-76-80-86 stitches remain. Knit 1 row from wrong side. Cast off knitting from right side. Back piece measures approx. 30-32-34-38 cm from cast-on edge. Work the other shoulder the same way. ASSEMBLY: Sew shoulder seams inside cast-off edge. Sew collar together mid back, make sure that seam is facing inwards when collar is folded down. Sew collar to neckline in the back of neck. Fold the collar double out towards the right side – see dotted line in chart. Fasten corner on collar (bottom mid front) with a couple of stitches - see photo. FRONT PIECE FROM SIDE TO SIDE: Cast on 53 stitches in all sizes on circular needle size 6 mm with Nepal. Work 6 rows in moss stitch back and forth over all stitches. Insert 1 marker after the first 4 stitches at beginning of row (seen from right side). Switch to circular needle size 7 mm. Work next row as follows from right side: Work 16 stitches moss stitch, work A.7 (= 31 stitches increased to 43 stitches), and finish with 6 stitches moss stitch. There are now 65 stitches on needle in all sizes. Continue pattern back from wrong side - work at the same time PICOT EDGE over the last 4 stitches on row (1st row picot edge = wrong side). Work next row as follows from right side: Work picot edge and moss stitch over the first 16 stitches, work A.8 (= 43 stitches), and finish with 6 stitches moss stitch. Continue pattern like this. When piece measures 68-74-80-88 cm from cast-on edge, work 1 row from right side where stitches in A.8 are knitted (work the remaining stitches as before) – AT THE SAME TIME decrease 12 stitches by knitting stitches in each of the 4 cables together 2 by 2 = 53 stitches remain on row. Work 6 rows in moss stitch back and forth over all stitches. Cast off with purl over knit and knit over purl - remember cast-off tip! BACK PIECE FROM SIDE TO SIDE: Work the same way as front piece from side to side. ASSEMBLY: Sew back piece to back piece - begin mid back and sew out towards each side in outermost loop of edge stitch. Sew front piece to front piece - begin mid front and sew out towards each side, see photo. Sew seam under sleeves and continue seam down along the 6 stitches in moss stitch in each side on poncho. Let the rest of side be open for high vent. |
|||||||||||||||||||
Diagram explanations |
|||||||||||||||||||
|
|||||||||||||||||||
 |
|||||||||||||||||||
 |
|||||||||||||||||||
 |
|||||||||||||||||||
 |
|||||||||||||||||||
 |
|||||||||||||||||||
Have you finished this pattern?Tag your pictures with #dropspattern #indiekimono or submit them to the #dropsfan gallery. Do you need help with this pattern?You'll find 19 tutorial videos, a Comments/Questions area and more by visiting the pattern on garnstudio.com. © 1982-2026 DROPS Design A/S. We reserve all rights. This document, including all its sub-sections, has copyrights. Read more about what you can do with our patterns at the bottom of each pattern on our site. |
|||||||||||||||||||


With over 40 years in knitting and crochet design, DROPS Design offers one of the most extensive collections of free patterns on the internet - translated to 17 languages. As of today we count 324 catalogues and 12290 patterns translated into English (UK/cm). 12290
We work hard to bring you the best knitting and crochet have to offer, inspiration and advice as well as great quality yarns at incredible prices! Would you like to use our patterns for other than personal use? You can read what you are allowed to do in the Copyright text at the bottom of all our patterns. Happy crafting!
Post a comment to pattern DROPS 215-40
We would love to hear what you have to say about this pattern!
If you want to leave a question, please make sure you select the correct category in the form below, to speed up the answering process. Required fields are marked *.