
Popular categories
Looking for a yarn?


Comments / Questions (27)
![]() Galla wrote:
Galla wrote:
Bonjour Anna Est-il possible de voir le dos du pull ? Un photo du dos du pull ? Merci beaucoup Anna
08.03.2025 - 12:49DROPS Design answered:
Bonjour Mme Galla, nous n'avons pas d'autres photos et nous n'avons plus ce pull en notre possession, notez toutefois que le dos est juste tricoté en point fantaisie A.1 (côtes 1 m point mousse, 2 m jersey). Bon tricot!
10.03.2025 - 10:22
![]() Anna wrote:
Anna wrote:
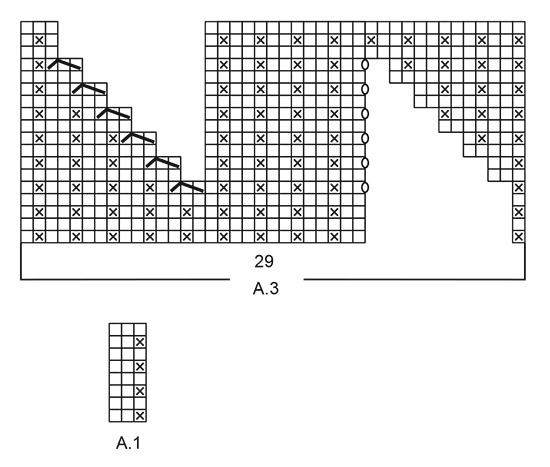
Hello. Is my understanding correct that A2 and A3 (3 repeats of the diagrams) are combined with 2k and A1 pattern as per the beginning of the work?
18.01.2024 - 11:26DROPS Design answered:
Dear Anna, I'm not sure what you mean with "combined", but A.1 should be worked over the rib so that the K2 in A.1 are worked over the K2 of the rib.Happy knitting!
19.01.2024 - 08:15
![]() Anna wrote:
Anna wrote:
Hello. How is it possible to work the first A1 (p,k,k) when we start with k1 (the first marker sits between the two knit stitches) and the description asks that the 2 knitted stitches in A.1 should sit over the 2 knitted stitches in the rib? Thank you, Anna
16.01.2024 - 20:58DROPS Design answered:
Dear Anna, did you place the marker on the side after the 2 knitted stitches? Then A.1 will start with 1 st in garter stitch over P1 from rib. Happy knitting!
17.01.2024 - 09:31
![]() Satu wrote:
Satu wrote:
Hei, ohjeessa on, että etu ja takakappaleet neulotaan alun resorin jälkeen 5,5 koon pyöröpuikolla. A. 1 kuvion alussa pitäisi kääntää työtä eli neuloa edestakaisin. jos neulon edestakaisin niin pitääkö takaosan silmukat nostaa erilliselle puikolle siksi aikaa?
25.12.2023 - 19:56DROPS Design answered:
Hei, silmukoita ei tarvitse siirtää erilliselle puikolle, vaan ne jäävät pyöröpuikolle odottamaan.
03.01.2024 - 18:13
![]() Jolanta Srogi wrote:
Jolanta Srogi wrote:
Jak zrobić w tym modelu przy wykończeniu dekoltu podwójny ściągacz skoro ze wzoru oczka schodzą 2 prawe i 1 lewe? Rozpoczynając robótkę podwójnym ściągaczem, po jego zakończeniu zmniejszaliśmy liczbę oczek przerabiając razem dwa oczka lewe. Przy dekolcie tak się nie da.
12.03.2023 - 19:25DROPS Design answered:
Witaj Jolu, masz rację. Ściągacz przy dekolcie będzie regularny gdy na środku przodu będzie sekwencja 2 oczka prawe, 1 oczko lewe. Zgłosiłam problem i prośbę o ewentualną korektę. ja osobiście zrobiłabym ściągacz przy dekolcie 2 oczka prawe/ 1 oczko lewe, ale oczywiście możesz poczekać na korektę, jeżeli nie ma pośpiechu. Pozdrawiamy!
13.03.2023 - 08:49
![]() Ally wrote:
Ally wrote:
Mbt patroon 212-8, z-884, begrijp ik t goed dat verkorte toeren aan 1 kant worden gebreid? En inbrei-patronen (A2, A1 en A3) ook 1x? Wordt trui dan niet ongelijk? Lijkt op plaatje of draaiing onder beide zijkanten is
02.12.2022 - 19:18DROPS Design answered:
Dag Ally,
De verkorte toeren worden inderdaad alleen op het achterpand gebreid. A.2 en A.3 worden op het voorpand gebreid, elk aan een zijkant zodat beide kanten van het voorpand gelijk zijn. In de telpatronen zit de verschuivingen aan het werk.
04.12.2022 - 16:19
![]() Ally wrote:
Ally wrote:
Mbt patroon 212-8, z-884, begrijp ik t goed dat verkorte toeren aan 1 kant worden gebreid? En inbrei-patronen (A2, A1 en A3) ook 1x? Wordt trui dan niet ongelijk? Lijkt op plastje of draaiing onder beide zijkanten is
02.12.2022 - 19:17
![]() Vera wrote:
Vera wrote:
Hallo, ik maak nu het achterpand, en ik begrijp niet wat "Brei richting de armsgaten 2 recht aan de binnenkant van de 1 kantsteek in ribbelsteek." betekent. Moet ik aan de verkeerde kant 2 recht breien aan de uiteinden? En wat doe ik aan de goede kant?
09.11.2022 - 06:07DROPS Design answered:
Dag Vera,
Met richting de armsgaten wordt bedoeld aan de kant waar de armsgaten zitten. Je breit deze steken averecht aan de verkeerde kant.
10.11.2022 - 17:19
![]() Vik wrote:
Vik wrote:
Hello, I have a hard time understanding what the even rows in all the patterns (A2, A3, A4, A5) mean? For example, when knitting the A2 pattern, on the second row, does that mean it should be all 'knit' stitches (working on circular needles) - it does not look so looking at the image of the sweater, so very confusing..? Thank you.
06.08.2022 - 12:09DROPS Design answered:
Dear Vik, if you are working in the round, you work the symbols as for the right side; for example, in A.2, you would be knitting all stitches. If you were working back and forth and the diagram had the same symbol on an even row you would need to purl the stitches instead. When working A.2 and A.3 you are working the body in the round, so you work exactly as the symbols show. When working A.4 and A.5 you are working back and forth, so the knit symbol means knit a stitch on an uneven row or purl a stitch on an even row. Happy knitting!
07.08.2022 - 22:22
![]() Ingebjørg Borch wrote:
Ingebjørg Borch wrote:
Diagrammet A.1 starter med en vrang. Når jeg strikker, matcher diagrammet ikke med vrangborden under. Omgangen starter jo med en rettmaske. Kan du forklare dette for meg?
06.02.2022 - 13:40DROPS Design answered:
Hej Ingebjørg, har du sat mærket i siden imellem 2 ret, da vil første maske i side starte med 1 ret. God fornøjelse!
08.02.2022 - 11:47
|
|||||||||||||||||||
Wake the Wind#wakethewindsweater |
|||||||||||||||||||
 |
 |
||||||||||||||||||
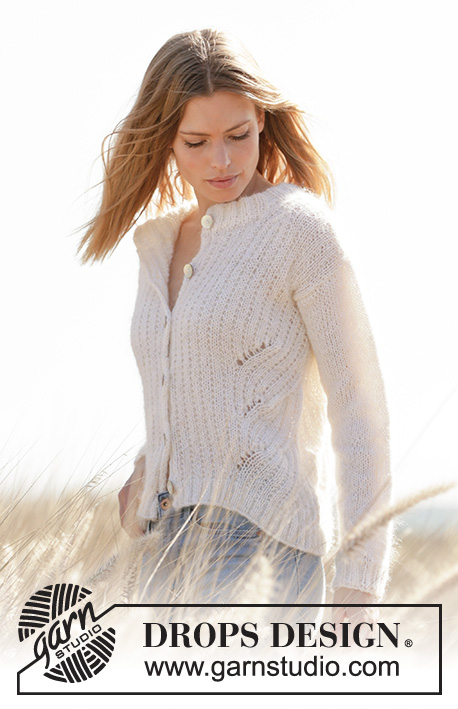
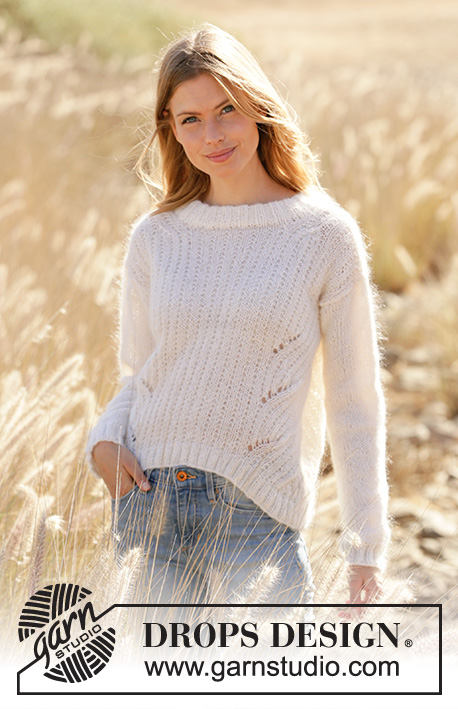
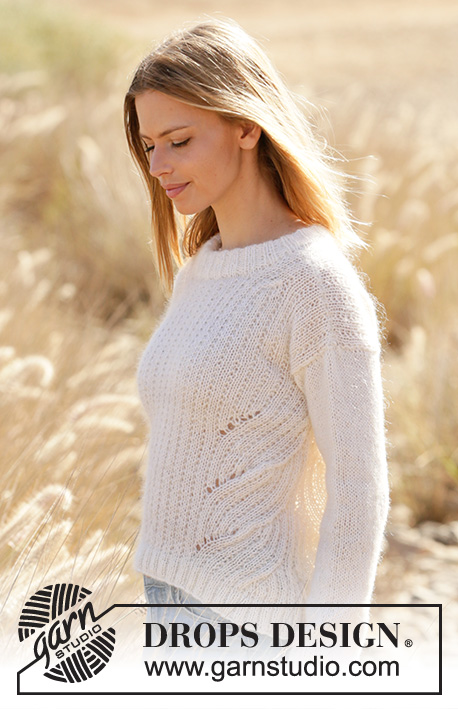
Knitted jumper in DROPS Alpaca and DROPS Kid-Silk. The piece is worked with textured pattern and displacements. Sizes XS - XXL.
DROPS 212-8 |
|||||||||||||||||||
|
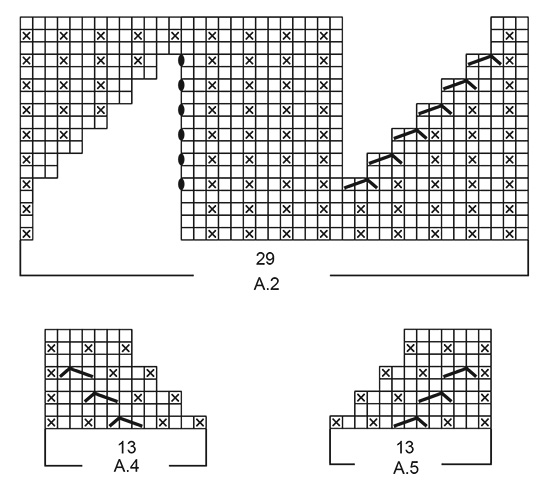
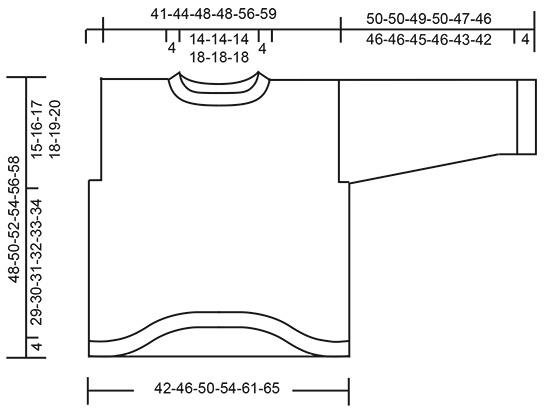
------------------------------------------------------- EXPLANATIONS FOR THE PATTERN: ------------------------------------------------------- PATTERN: See diagrams A.1 to A.5. The diagrams show the pattern from the right side. DECREASE TIP-1 (for sides of body): Decrease 1 stitch on each side of the marker thread as follows: Work until there are 5 stitches left before the marker thread, knit 2 together, work 6 stitches (marker thread sits in the middle of these 6 stitches), slip 1 stitch as if to knit, knit 1 and pass the slipped stitch over the knitted stitch (= 2 stitches decreased). DECREASE TIP-2 (evenly spaced): To work out how to decrease evenly, count the total number of stitches on the round (e.g. 44 stitches) and divide by the number of decreases to be made (e.g. 4) = 11. In this example decrease by knitting together each 10th and 11th stitch. INCREASE TIP (for sleeves): Work until there are 2 stitches left before the marker thread, 1 yarn over, knit 4 (marker thread sits between these 4 stitches), 1 yarn over. On the next round knit the yarn overs twisted to avoid holes (2 stitches increased). Then work the new stitches in stocking stitch. ------------------------------------------------------- START THE PIECE HERE: ------------------------------------------------------- JUMPER – SHORT OVERVIEW OF THE PIECE: The body is worked in the round with circular needle as far as the armholes. Stiches are then cast off for the armhole on each side, dividing the front and back pieces, which are finished separately. The sleeves are worked in the round with double pointed needles/short circular needle, bottom up. The neck is worked in the round with short circular needle to finish. BODY: Cast on 216-232-248-264-296-312 stitches with circular needle size 4.5 mm and 1 strand Alpaca + 1 strand Kid-Silk (= 2 strands). Knit 1 round, then work rib as follows: Knit 1, * purl 2, knit 2 *, work from *-* until there are 3 stitches left on the round, purl 2 and knit 1. Continue this rib for 4 cm. When the rib is finished, work 1 row from the right side where all purl-2 sections are purled together to purl-1 = 162-174-186-198-222-234 stitches. Change to circular needle size 5.5 mm. You will later work textured pattern with displacements in the sides. The displacements will cause the piece to arch downwards in the sides and upwards mid front and back. To avoid the piece arching upwards mid-back you can now work short rows as follows: Insert a marker thread at the beginning of the round (= in the side between 2 knitted stitches). Insert a marker after the first 40-43-46-49-55-58 stitches, the next stitch is a purled stitch (= mid-stitch on the back piece). Work A.1 (= 3 stitches) to the marker, continue with A.1 until you have worked 9-12-15-18-24-27 stitches past the marker (the 2 knitted stitches in A.1 should sit over the 2 knitted stitches in the rib), turn, tighten the strand and work A.1 over 17-23-29-35-47-53 stitches, turn, tighten the strand and work A.1 over 20-26-32-38-50-56 stitches, turn, tighten the strand and work A.1 over 23-29-35-41-53-59 stitches. Continue back and forth like this, working 3 more stitches each time you turn and until you have worked 19 short rows. The last row is worked from the right side. Then continue A.1 to the beginning of the round. Now work pattern in the round as follows: * A.2 (= 29 stitches), knit 2, A.1 over the next 21-27-33-39-51-57 stitches (= 7-9-11-13-17-19 repeats of 3 stitches), A.3 (= 29 stitches) *, insert a marker thread here (= side), work from *-* 1 more time. Allow the marker threads to follow your work onwards; they will be used later. REMEMBER THE KNITTING TENSION! When A.2 and A.3 have been completed in height, repeat the diagrams 2 more times (= a total of 3 times). Then continue with knit over knit and garter stitch over garter stitch over the 29 stitches on each side of both marker threads. The other stitches are continued as before. On the next round begin to decrease on each side of both marker threads – read DECREASE TIP-1. Decrease like this every 2nd round a total of 3 times = 150-162-174-186-210-222 stitches. When the piece measures 33-34-35-36-37-38 cm, measured from the cast-on edge and along the marker thread in the side (i.e. longest part), cast off 8-8-8-14-14-14 stitches on each side for the armholes (= 4-4-4-7-7-7 stitches on each side of both marker threads). There are 67-73-79-79-91-97 stitches for the front piece and 67-73-79-79-91-97 stitches for the back piece. Each piece is finished separately. BACK PIECE: = 67-73-79-79-91-97 stitches. Continue back and forth with textured pattern (= A.1) as before. Towards the armholes knit 2 inside the 1 edge stitch in garter stitch. When the piece measures 11-12-13-14-15-16 cm from where stitches were cast off for the armholes, cast off the middle 33-33-33-39-39-39 stitches for the neck and each shoulder is finished separately. On the next row from the neck cast off 1 stitch = 16-19-22-19-25-28 stitches on the shoulder. Continue until the piece measures 15-16-17-18-19-20 cm from where stitches were cast off for the armholes. Cast off with knit. Work the other shoulder in the same way. The jumper measures approx. 48-50-52-54-56-58 cm from the shoulder down (measured at its longest). FRONT PIECE: = 67-73-79-79-91-97 stitches. Continue back and forth with textured pattern (= A.1) as before. Towards the armhole, knit 2 stitches inside the 1 edge stitch in garter stitch. When the piece measures 8-9-10-10-11-12 cm – adjust so the next row is worked from the right side, work as follows; Work pattern as before over the first 22-25-28-25-31-34 stitches (= left shoulder), work the next 23-23-23-29-29-29 stitches before placing them on 1 thread for the neck and work the remaining 22-25-28-25-31-34 stitches (= right shoulder). Work 1 row back over the right shoulder. Now work pattern as before but the 13 stitches towards the neck are worked as shown in A.4. When A.4 has been completed in height there are 16-19-22-19-25-28 stitches left on the shoulder. Continue working until the piece measures 15-16-17-18-19-20 cm from where stitches were cast off for the armholes, cast off with knit. Work the other shoulder in the same way but A.5 is worked over the 13 stitches towards the neck. The jumper measures approx. 48-50-52-54-56-58 cm from the shoulder down (measured where it is longest). SLEEVE: Cast on 44-44-48-48-48-52 stitches with double pointed needles size 4.5 mm and 1 strand Alpaca + 1 strand Kid-Silk (= 2 strands). Knit 1 round, then work rib (= knit 2 / purl 2) in the round for 4 cm. Knit 1 round where you decrease 8-8-10-8-6-8 stitches evenly spaced – read DECREASE TIP-2 = 36-36-38-40-42-44 stitches. Change to double pointed needles size 5.5 mm and insert a marker thread at the beginning of the round (= mid under the sleeve). Work stocking stitch in the round. When the sleeve measures 8-8-8-9-8-8 cm, increase 1 stitch on each side of the marker thread – read INCREASE TIP. Increase like this every 7-5-5-4-3½-3½ cm a total of 6-8-8-9-10-10 times = 48-52-54-58-62-64 stitches. When the sleeve measures 47-47-46-46-43-42 cm (shorter sleeves in larger sizes due to longer yoke), finish the sleeve back and forth from the beginning of the round, with 1 edge stitch in garter stitch on each side. This gives you a split which is sewn to the bottom of the armhole. When the sleeve measures 50-50-49-50-47-46 cm, cast off with knit. Work the other sleeve in the same way. ASSEMBLY: Sew the shoulder seams with grafting stitches inside the cast-off edge. Sew the sleeves to the body inside the 1 edge stitch on the body and the cast-off edge on the sleeves. Sew the split to the 4-4-4-7-7-7 stitches cast off for the armhole. NECK: Start from the right side on the top of one shoulder and using 1 strand of each quality (= 2 strands) and circular needle size 4.5 mm, knit up 88 to 100 stitches around the neck, including the stitches from the threads (number of stitches should be divisible by 4). Work rib in the round (= knit 2 / purl 2). When the neck measures 8 cm, change to circular needle size 5.5 mm and cast off with knit over knit and purl over purl – make sure the cast-off edge is not tight. Fold the neck double to the wrong side and sew down. Make sure the seam is not tight. |
|||||||||||||||||||
Diagram explanations |
|||||||||||||||||||
|
|||||||||||||||||||
 |
|||||||||||||||||||
 |
|||||||||||||||||||
 |
|||||||||||||||||||
Have you finished this pattern?Tag your pictures with #dropspattern #wakethewindsweater or submit them to the #dropsfan gallery. Do you need help with this pattern?You'll find 34 tutorial videos, a Comments/Questions area and more by visiting the pattern on garnstudio.com. © 1982-2026 DROPS Design A/S. We reserve all rights. This document, including all its sub-sections, has copyrights. Read more about what you can do with our patterns at the bottom of each pattern on our site. |
|||||||||||||||||||


With over 40 years in knitting and crochet design, DROPS Design offers one of the most extensive collections of free patterns on the internet - translated to 17 languages. As of today we count 324 catalogues and 12291 patterns translated into English (UK/cm). 12291
We work hard to bring you the best knitting and crochet have to offer, inspiration and advice as well as great quality yarns at incredible prices! Would you like to use our patterns for other than personal use? You can read what you are allowed to do in the Copyright text at the bottom of all our patterns. Happy crafting!
Post a comment to pattern DROPS 212-8
We would love to hear what you have to say about this pattern!
If you want to leave a question, please make sure you select the correct category in the form below, to speed up the answering process. Required fields are marked *.