
Popular categories
Looking for a yarn?


Comments / Questions (25)
![]() Miriam wrote:
Miriam wrote:
Hallo! Ich habe jetzt 2 Reihen gestrickt, nachdem ich die Ärmel angesetzt habe. Ich würde dann jetzt in einer Rückreihe mit A2 anfangen. Ist das tatsächlich korrekt?
17.01.2025 - 18:50DROPS Design answered:
Liebe Miriam, die erste Reihe A.2 muss eine Hinreihe sein, damit das Lochmuster auch bei den Hinreihen gestrickt werden, wenn Ihre nächste Reihe eine Rückreihe ist, dann stricken Sie diese Reihen zurück und gleichzeitig nehmen Sie regelmäßig verteilt ab, dann bei der nächsten Reihe beginnen Sie mit A.2. Viel Spaß beim Stricken!
20.01.2025 - 07:27
![]() Alison wrote:
Alison wrote:
I’m confused! I’ve knitted the body and both the sleeves but it seems a bit of the pattern is missing about where to place the sleeves when joining them to the body? The pattern just say ‘slip the sleeves onto the same circular needles size 8’ I would expect it to say knit (?) stitches for front , attach sleeve, knit (?) for back attach sleeve knit remaining stitches. Can you help please?
24.01.2023 - 15:29DROPS Design answered:
Dear Allison, you slip the stitches before working them (just insert the sleeve over the space created by the stitches cast off on body) - and work in stocking stitch for 2,4,6 or 8 rows (see size). In this video, we show how to work a sleeve onto body, it might be helpful. Happy knitting!
24.01.2023 - 16:53
![]() Joëlle Weitel Munch wrote:
Joëlle Weitel Munch wrote:
Merci beaucoup pour votre réactivité et votre professionnalisme, c'est top
05.01.2021 - 15:31
![]() Joëlle Weitel Munch wrote:
Joëlle Weitel Munch wrote:
Bonjour, j'aimerais exécuter le modèle 164.4 avec des aiguilles droites, est ce possible ? Pourriez vous me donner le nombre de mailles pour les devants et pour le dis, je ne comprends pas le modèle en aiguilles circulaires, merci d'avance Bien cordialement
05.01.2021 - 13:55DROPS Design answered:
Bonjour Mme Weitel Munch, cette leçon explique comment adapter un modèle sur aiguilles droites et vous permettra ainsi de faire les ajustements souhaités. Bon tricot!
05.01.2021 - 14:45
![]() Combes wrote:
Combes wrote:
Bonjour, je ne comprends pas la logique pour les manches : monter 30 mailles. puis ajuster au premier tour à 28 mailles. Ca veut dire quoi car ensuite on doit ajouter 6 mailles et on me dit que je dois obtenir 36 mailles en taille S. Merci pour vos conseils.
13.11.2020 - 14:00DROPS Design answered:
Bonjour Mme Combes, on monte d'abord 30 mailles pour le poignet, puis on diminue 2 mailles en taille S car on a besoin de davantage de mailles avec les aiguilles 7 qu'avec les aiguilles 8 pour la même largeur - à 10 cm de hauteur totale, on commence à augmenter 2 mailles au milieu sous la manche (= 1 m à la fin du tour + maille au début du tour) tous les 8 cm , et on aura 36 m quand toutes les augmentations seront faites. Bon tricot!
13.11.2020 - 15:32
![]() Nicoke wrote:
Nicoke wrote:
Ist es korrekt, dass die 3 M Re vor dem Perlmuster in der RR links gestrickt werden? Es sieht auf dem Bild so aus, aber es ist nicht ausdrücklich angegeben.
23.09.2019 - 16:33DROPS Design answered:
Liebe Nicoke, Perlmuster wird bei den Rückreihe auch im Perlmuster gestrickt, aber Bündchen wird so gestrickt: *3 M re (bei der Hinreihe, dh links bei der Rückreihe), 3 M im Perlmuster*, und von *-* wiederholen, und mit 3 M re enden (mit A.1 beidseitig). Viel Spaß beim stricken!
24.09.2019 - 10:05
![]() Elisa wrote:
Elisa wrote:
Merci beaucoup de votre retour, c’est exactement la question que je me posais ! Bonne journee
05.11.2018 - 10:55
![]() Elisa wrote:
Elisa wrote:
Bonjour, Ma question concerne l’empiècement, pour le motif. Je vois qu’il faut ajouter une maille jersey à chaque rang en plus des motifs (et des bordures). Faut-il toujours faire cette maille après le motif ou un fois avant, une fois après ?? Merci de votre réponse
04.11.2018 - 14:38DROPS Design answered:
Bonjour Elisa, vous allez toujours tricoter ainsi, vu sur l'endroit: 4 m de bordure devant, répétez A.2 en largeur et terminez par 1 m jersey (= à l'end sur l'end) et 4 m de bordure devant. Sur l'envers, tricotez les 4 m de bordure devant, 1 m jersey (= à l'env sur l'env) et répétez A.2 (en lisant de gauche à droite), 4 m de bordure devant. Ainsi, le motif sera symétrique de chaque côté. Bon tricot!
05.11.2018 - 09:41
![]() Eugenia Bordignon wrote:
Eugenia Bordignon wrote:
Non esce la foto del modello nè il disegno con misure nè lo schema.
19.03.2018 - 12:42DROPS Design answered:
Buongiorno Eugenia. Sia la foto che lo schema sono caricati correttamente. Provi a svuotare la cache o a navigare usando un browser diverso. Buon lavoro!
19.03.2018 - 17:16
![]() Looten Marianne wrote:
Looten Marianne wrote:
Bonjour, Je n'ai pas la légende du diagramme. Les 3 premières cases ont des points d'interrogation. Pouvez-vous me renseigner svp ? (DROP164/4 - Warm Autumn cardigan). J'ai déjà acheté la laine. Merci d'avance. Marianne. Diagramme = 1 m end sur l'endroit, env sur l'envers = 1 m env sur l'endroit, end sur l'envers = 1 jeté entre 2 m
19.01.2018 - 21:45DROPS Design answered:
Bonjour Mme Looten, vous trouverez la légende du diagramme juste au-dessus de A.1/A.2. Bon tricot!
22.01.2018 - 08:58
|
|||||||||||||||||||
Warm Autumn Cardigan#warmautumncardigan |
|||||||||||||||||||
 |
 |
||||||||||||||||||
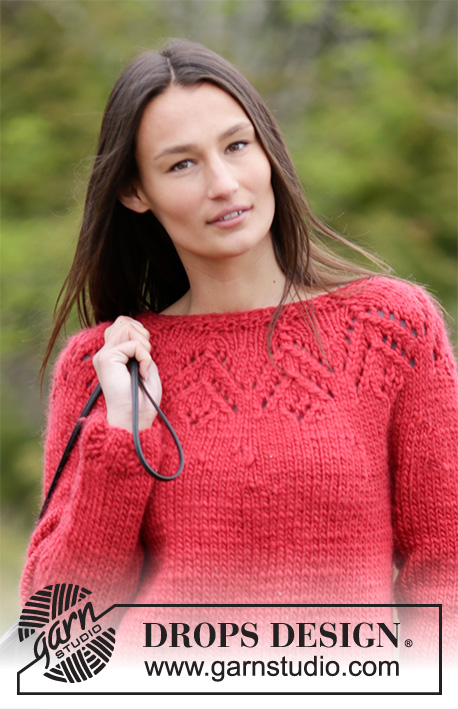
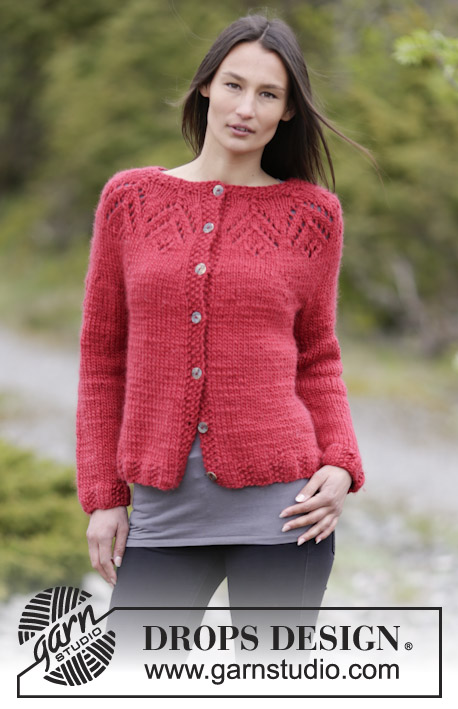
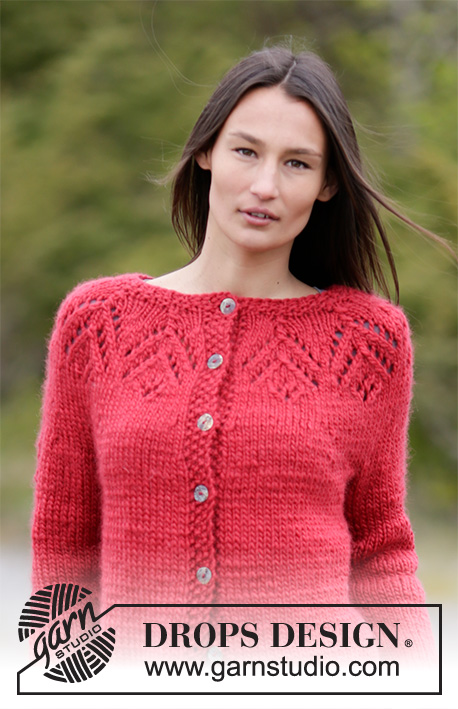
Knitted DROPS jacket with lace pattern and round yoke in ”Snow”. Size: S - XXXL.
DROPS 164-4 |
|||||||||||||||||||
|
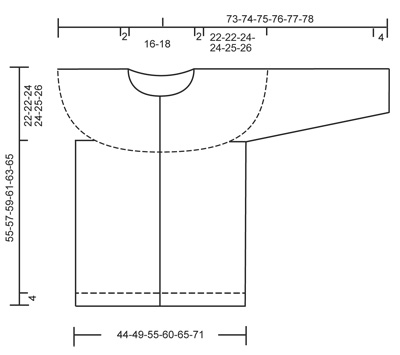
PATTERN: See diagrams A.1and A.2. The diagrams shows all rows in pattern seen from RS. MOSS ST (back and forth): ROW 1 (RS): P 1, K 1, P 1. ROW 2 (WS): P 1, K 1, P 1. Repeat 1st and 2nd row. MOSS ST (in the round): ROUND 1: P 1, K 1, P 1. ROUND 2: K 1, P 1 and K 1. Repeat 1st and 2nd round. BUTTONHOLES: Dec for buttonholes on right band. 1 buttonhole = K tog third and fourth st from edge and make 1 YO. Dec for buttonholes when piece measures: SIZE S: 2, 11, 20, 29, 37, 45 and 53 cm SIZE M: 2, 11, 20, 29, 38, 47 and 55 cm SIZE L: 3, 12, 21, 30, 39, 48 and 57 cm SIZE XL: 3, 13, 23, 32, 41, 50 and 59 cm SIZE XXL: 4, 14, 24, 34, 43, 52 and 61 cm SIZE XXXL: 4, 14, 24, 34, 44, 54 and 63 cm ---------------------------------------------------------- JACKET: Worked back and forth on circular needle. Work sleeves in the round on double pointed needles. BODY: Cast on 119-125-131-149-161-179 sts on circular needle size 7 mm with Snow. Work rib as follows (from RS): A.1 (= band), * K 3, 3 sts in MOSS ST back and forth - see explanation above *, repeat from *-* until 7 sts remain, finish with K 3, A.1 (= band). Continue like this until 7 row have been worked. Remember BUTTONHOLES - see explanation above. Switch to circular needle size 8 mm and work 2 rows in stocking st with A.1 in each side while AT THE SAME TIME on row from RS dec 15-9-3-9-9-15 sts evenly = 104-116-128-140-152-164 sts. Then continue in stocking st and A.1. NOTE: Work the 4 band sts in each side in A.1 until finished measurements. REMEMBER THE KNITTING TENSION When piece measures 33-35-35-37-38-39 cm, work as follows: Work the first 25-28-31-34-37-40 sts, cast off the next 6 sts (= armhole), work the next 42-48-54-60-66-72 sts, cast off the next 6 sts (= armhole) and work the remaining 25-28-31-34-37-40 sts. Put piece aside and knit the sleeves. SLEEVE: Worked in the round on double pointed needles. Cast on 30-30-30-30-36-36 sts on double pointed needles size 7 mm with Snow. Work rib as follows * K 3, 3 sts in MOSS ST in the round - see explanation above*, repeat *-* around. When 7 rounds have been worked, switch to double pointed needles size 8 mm. Work in stocking st, AT THE SAME TIME on first round adjust no of sts to 28-28-32-32-36-36. Insert 1 marker in first st at beg of round (= mid under sleeve). When piece measures 10 cm, inc 1 st on each side of st with marker, repeat inc every 8-8-6-6-5-5 cm 3-3-4-4-5-5 more times = 36-36-42-42-48-48 sts. When sleeve measures 41 cm in all sizes, cast off 6 sts mid under sleeve (i.e. 3 sts before marker and the next 3 sts) = 30-30-36-36-42-42 sts remain on needle. Knit another sleeve. YOKE: Slip sleeves on to same circular needle size 8 mm as body = 152-164-186-200-224-236 sts. Now work as follows from mid front: Work 2-2-4-4-6-8 rows in stocking st with A.1 in each side, AT THE SAME TIME on first row adjust no of sts to 153-169-185-201-217-233 sts (but not over band sts). Then work pattern as follows: 4 band sts as before, A.2 (= 16 sts) 9-10-11-12-13-14 times in width, 1 st in stocking st, 4 band sts as before. When entire A.2 has been worked vertically, 72-79-86-93-100-107 sts remain on needle. Now work 2 rows in stocking st with A.1 in each side while AT THE SAME TIME on row from RS dec 16-21-26-31-36-41 sts evenly = 56-58-60-62-64-66 sts. NECK: Switch to circular needle size 7 mm and work an edge in moss st as follows: Work sts in band and continue moss st in A.1 the entire row. Continue like this back and forth until 4 rows in moss st have been worked. Then cast off sts with K over K and P over P. ASSEMBLY: Sew the openings under the sleeves. Sew the buttons on to left band. Fasten off. |
|||||||||||||||||||
Diagram explanations |
|||||||||||||||||||
|
|||||||||||||||||||
 |
|||||||||||||||||||
 |
|||||||||||||||||||
Have you finished this pattern?Tag your pictures with #dropspattern #warmautumncardigan or submit them to the #dropsfan gallery. Do you need help with this pattern?You'll find 26 tutorial videos, a Comments/Questions area and more by visiting the pattern on garnstudio.com. © 1982-2026 DROPS Design A/S. We reserve all rights. This document, including all its sub-sections, has copyrights. Read more about what you can do with our patterns at the bottom of each pattern on our site. |
|||||||||||||||||||


With over 40 years in knitting and crochet design, DROPS Design offers one of the most extensive collections of free patterns on the internet - translated to 17 languages. As of today we count 324 catalogues and 12290 patterns translated into English (UK/cm). 12290
We work hard to bring you the best knitting and crochet have to offer, inspiration and advice as well as great quality yarns at incredible prices! Would you like to use our patterns for other than personal use? You can read what you are allowed to do in the Copyright text at the bottom of all our patterns. Happy crafting!
Post a comment to pattern DROPS 164-4
We would love to hear what you have to say about this pattern!
If you want to leave a question, please make sure you select the correct category in the form below, to speed up the answering process. Required fields are marked *.