
Popular categories
Looking for a yarn?


Comments / Questions (57)
![]() Guro wrote:
Guro wrote:
Jeg skjønner ikke raglanøkningen. Får ikke masker og mønster til å stemme, dersom det strikkes likt på alle pinner som det fremgår av oppskriften.
19.04.2015 - 12:50DROPS Design answered:
Hei Guro. Hvilken störrelse strikker du. Jeg har regnet str S igennem og det skulle passe med maskeantal.
22.04.2015 - 14:57
![]() Ann Kelsall wrote:
Ann Kelsall wrote:
The same question ! A1 is four rows. Where are these four rows in the instructions for the neck? I assume there is only one row of pattern, the remainder being garter stitch?
16.04.2015 - 11:53DROPS Design answered:
Dear Mrs Kelsall, A.1 is worked over 2 sts and 6 rows, at the beg of yoke, after inc evenly, work A.1 with 2 sts in garter st on each side until whole diagram has been worked 1 time in height (= 6 rows). Happy knitting!
16.04.2015 - 13:04Oksana wrote:
I mean - could you please change that line in the main explanation. Thanks!
07.04.2015 - 09:23Oksana wrote:
No, it is not "(das ist in der Tat nicht ganz deutlich formuliert)"! Nor in English, neither in German! Please change that line. At the moment it says :Work next row (ONE ROW!!) as follows://///. Then work in GARTER ST /// But A.1 makes 4 rows, doesnt it?
07.04.2015 - 08:43
![]() Anna wrote:
Anna wrote:
Toller Pullover. Leider komme ich schon direkt am Anfang nicht weiter: Wie geht man mit A1 vor? Nach dem Anschlagen nimmt man in der Hinrunde ja auf 100 zu. Dann soll man A1 stricken - strickt man dann pro Reihe jeweils nur zwei Kästchen des Diagramms? In der Anleitung hört es sich so an als wäre A1 nur eine Reihe: "Die nächste R wie folgt str: 2 M kraus re, A.1 (= 2 M) bis noch 2 M übrig sind, enden mit 2 M kraus re." dann allerdings ergibt sich ein sehr seltsames Muster! Bitte um Hilfe! :)
31.03.2015 - 12:45DROPS Design answered:
Sie stricken das Diagramm 1x in der Höhe (das ist in der Tat nicht ganz deutlich formuliert). A.1 besteht ja aus 2 M, es passt also in die 100 M 48x hinein, da Sie ja noch 4 M kraus re stricken (am Anfang und am Ende je 2 M kraus re). Die 1. R von A.1 (= Rück-R, Sie haben ja davor 1 Hin-R re gestrickt) sind nur Rechtsmaschen, die 2. R (= Hin-R) auch Rechtsmaschen, die 3. R (= Rück-R) wieder rechts, in der 4. R (= Hin-R) mustern Sie (Zusammenstricken + Umschlag im Wechsel). 5. und 6. R jeweils rechts, dann stricken Sie kraus rechts weiter. Erst nach diesen 6 R von A.1 beginnen Sie mit den Raglanzunahmen (nach A.1 wird ja kraus re gestrickt).
31.03.2015 - 13:33
![]() Friederike S. wrote:
Friederike S. wrote:
Eine Frage zur Raglanzunahme: Wird A2 sowohl in der Hin- als auch in der Rückrunde gestrickt? Und wenn ja, dann auch hier streng nach Diagramm also von rechts unten nach links oben?
30.03.2015 - 15:57DROPS Design answered:
Ja, A.2 wird wie dargestellt gestrickt. Es sind ja alle R eingezeichnet, die Rück-R sind die R, die auf der Vorderseite links erscheinen (also in der Rück-R re gestrickt werden). Streng lesen brauchen Sie hier nicht - die Rück-R besteht nur aus besagten Rechtsmaschen. Sie stricken immer 1 gemusterte R (R, in der Sie die Umschläge machen, Hin-R) und 1 R mit Rechtsmaschen (= Rück-R) im Wechsel.
31.03.2015 - 10:43
![]() Anne wrote:
Anne wrote:
Hei. Jeg sliter med å forstå raglan økningen. Skal det strikkes likt på alle øke - omganger? Får ikke diagrammet til å stemme når jeg prøver det?
03.03.2015 - 20:20DROPS Design answered:
Hej Anne, Du starter med "BÆRESTK"! Strikker A.1 først ifølge opskriften. Efter det øker du til raglan ifølge "RAGLAN". God fornøjesel!
21.05.2015 - 15:44
![]() Stéphanie wrote:
Stéphanie wrote:
Je ne comprends pas comment on peut augmenter au niveau du raglan car on fait toujours le même nombre de mailles, mes jetés du premier rang ne sont pas en face de mes jetés du second rang (que j'ai bien faites coté endroit).merci beaucoup pour vos réponses
03.03.2015 - 17:19DROPS Design answered:
Bonjour Stéphanie, on augmente en faisant 1 jeté avant A.2 et 1 jeté après A.2 (8 jetés = 8 augm). Au rang suivant, on a 1 m en plus pour chaque demi-dos (début et fin de rang), et 2 m en plus sur chaque manche/sur le devant. Bon tricot!
04.03.2015 - 08:54
![]() Stéphanie Couderc wrote:
Stéphanie Couderc wrote:
Bonjour, je ne comprends pas pour le deuxième rang du pull, quand on a :"Tricoter le rang suivant ainsi: 2 m point mousse, A.1 (= 2 m) jusqu'à ce qu'il reste 2 m", on fait que les 2 premières cases du diagramme, deux mailles envers? ou il faut suivre tout le diagramme?
03.03.2015 - 09:02DROPS Design answered:
Bonjour Mme Couderc, on tricote ainsi sur l'endroit: 2 m end (= point mousse), on répète les 2 m de A.1 (= 2 m end sur l'end) jusqu'à ce qu'il reste 2 m et on termine par 2 m end (point mousse). On répète ainsi les 2 m de A.1 (au rang 2, sur l'envers, on tricote les m de A.1 à l'end et ainsi de suite). Cliquez ici pour en savoir plus sur les diagrammes. Bon tricot!
03.03.2015 - 09:27
![]() Akmokk wrote:
Akmokk wrote:
Hei. Hvordan skal det økes videre etter 1.pinnen med økning? Får ikke maskeantall og mønster til å stemme da
28.02.2015 - 20:34DROPS Design answered:
Hej, du øker på samme sted og på samme måde men de nye masker strikkes i riller. God fornøjelse!
25.05.2015 - 15:10
|
|||||||||||||
Summer in Paris#summerinparissweater |
|||||||||||||
 |
 |
||||||||||||
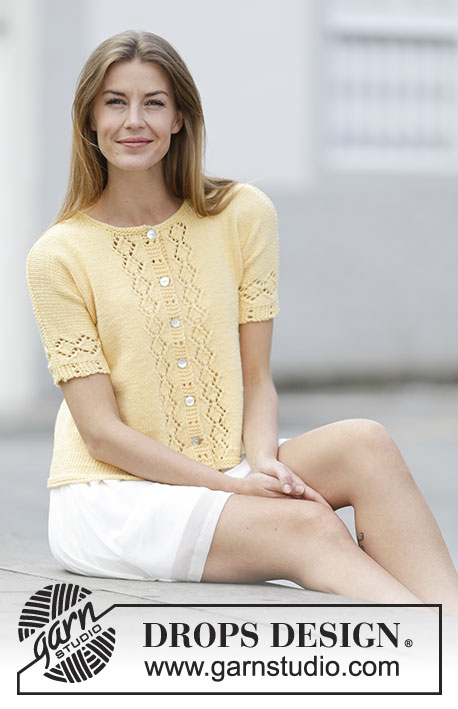
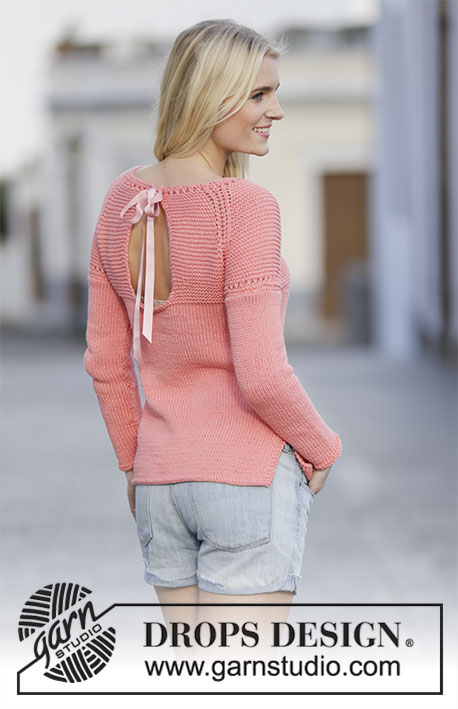
Knitted DROPS jumper with lace pattern, vent and raglan in ”Paris”. Worked top down. Size: S - XXXL.
DROPS 159-10 |
|||||||||||||
|
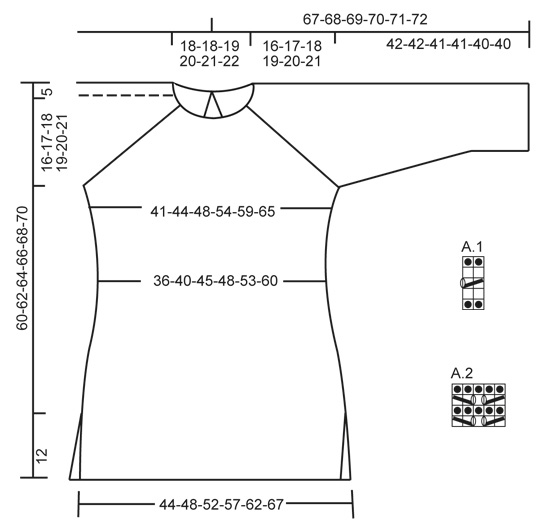
GARTER ST (worked in the round): * K 1 round and P 1 round *, repeat from *-*. 1 ridge = 2 rounds. GARTER ST (back and forth): K all rows. 1 ridge = 2 rows K. PATTERN: See diagrams A.1-A.2. The diagrams show all rows in pattern seen from RS. Do not work YOs twisted on next round/row, they should make holes. DECREASE TIP-1 (applies to vent): All dec are done from RS. Dec before 1 edge st as follows: K 2 tog. Dec after 1 edge st as follows: Slip 1 st as if to K, K 1, psso. DECREASE TIP-2 (applies to body and sleeves): All dec are done from RS! Dec as follows before marker: Work until 3 sts remain before marker, K 2 tog, K 1. Dec as follows after marker: K 1, slip 1 st as if to K, K 1, psso. INCREASE TIP (applies to body): Work until 1 st remains before marker, 1 YO, K 2, 1 YO = 2 sts inc. On next round K YOs twisted (i.e. work in back loop of st instead of front) to avoid holes. ---------------------------------------------------------- YOKE: Piece is worked back and forth from mid back, then worked in the round on circular needle. Cast on 76-76-80-84-88-92 sts on circular needle size 5 mm with Paris. K 1 row while AT THE SAME TIME inc 24-24-32-32-32-36 sts evenly = 100-100-112-116-120-128 sts. Work next row as follows: 2 sts in garter st, A.1 (= 2 sts) until 2 sts remains, finish with 2 sts in garter st. Then work in GARTER ST - see explanation above. REMEMBER THE KNITTING TENSION READ ALL OF THE FOLLOWING SECTION BEFORE CONTINUING! Inc for raglan AT THE SAME TIME dec for vent mid back. RAGLAN: On next row (= RS) inc for raglan as follows: K 15-15-17-19-20-22, 1 YO, A.2 (= 5 sts), 1 YO, K 10-10-12-10-10-10, 1 YO, A.2, 1 YO, K 30-30-34-38-40-44, 1 YO, A.2, 1 YO, K 10-10-12-10-10-10, 1 YO, A.2, 1 YO, K 15-15-17-19-20-22 (= 8 sts inc). YOs that are not included in A.2 are K twisted on nex row, they should not make holes. Repeat inc every other row 3-5-8-12-16-20 more times, then every 4th row 8-8-7-6-5-4 times, then every 6th row 1 time. VENT: Dec for vent mid back AT THE SAME TIME inc for raglan. All dec are done from RS! On first row from RS dec 1 st inside 1 edge st in each side of piece - Read DECREASE TIP-1! Repeat dec every 8th row 6 more times. When raglan inc and vent are done, work next row as follows from RS: K 21-23-27-32-36-41, K the next 3 (= the first 3 sts in A.2), slip the next 40-44-50-54-60-66 sts on a stitch holder for sleeve, cast on 8 sts under sleeve, insert 1 marker in the middle of these 8 sts, K the next 62-66-74-84-92-102 sts (= front piece), slip the next 40-44-50-54-60-66 sts on a stitch holder for sleeve, cast on 8 sts under sleeve, insert 1 marker in the middle of these 8 sts, K the next 3 (= last 3 sts of A.2), K 21-23-27-32-36-41, cast on 14 sts at the end of row (over vent). BODY: Work around on circular needle. = 140-148-164-184-200-220 sts. Work 2 ridges in GARTER ST - see explanation above. There are now 70-74-82-92-100-110 sts on each side of each marker in the sides. Now continue piece in stocking st. When piece measures 3 cm from new sts under arms, dec 1 st on each side of each markers (= 4 sts dec) - READ DECREASE TIP-2! Repeat dec every 3-4-4-3-3-4 cm 3-2-2-4-4-3 more times = 124-136-152-164-180-204 sts. When piece measures 37-39-41-43-45-47 cm, inc 1 st on each side of each marker (= 4 sts inc) – see INCREASE TIP. Repeat inc every 2-1½-2-1½-1-2 cm 5-6-5-6-7-5 more times = 148-164-176-192-212-228 sts. When piece measures 48-50-52-54-56-58 cm in total, work 1 ridge over 3 sts on each side of each marker (= 6 sts in garter st in each side of piece), work the other sts in stocking st. Then divide the piece at each marker and finish front and back piece separately. FRONT PIECE: = 74-82-88-96-106-114 sts. Continue in stocking st with 3 sts in garter st in each side of piece. When piece measures 59-61-63-65-67-69 cm in total, work 1 ridge over all sts. Cast off. BACK PIECE: Work as front piece. SLEEVE: Work sleeves in the round on double pointed needles. Slip the 40-44-50-54-60-66 sts from stitch holder back on double pointed needles size 5 mm. Insert 1 marker in piece, NOW MEASURE PIECE FROM HERE. Cast on 8 new sts under sleeve, insert 1 marker in the middle of these 8 sts = 48-52-58-62-68-74 sts. Work A.1. Then work piece in stocking st. When piece measures 6 cm, dec 1 st on each side of marker - READ DECREASE TIP-2. Repeat dec every 7-4-3-2½-2-1½ cm 4-6-8-9-11-13 more times = 38-38-40-42-44-46 sts. When piece measures 41-41-40-40-39-39 cm, work 2 ridges. Cast off. Work the other sleeve the same way. ASSEMBLY: Sew the opening under the sleeves. Divide the silk ribbon in two, fold the cutting edge inwards and fasten it at the top of vent, tie a bow. |
|||||||||||||
Diagram explanations |
|||||||||||||
|
|||||||||||||
 |
|||||||||||||
Have you finished this pattern?Tag your pictures with #dropspattern #summerinparissweater or submit them to the #dropsfan gallery. Do you need help with this pattern?You'll find 19 tutorial videos, a Comments/Questions area and more by visiting the pattern on garnstudio.com. © 1982-2026 DROPS Design A/S. We reserve all rights. This document, including all its sub-sections, has copyrights. Read more about what you can do with our patterns at the bottom of each pattern on our site. |
|||||||||||||


With over 40 years in knitting and crochet design, DROPS Design offers one of the most extensive collections of free patterns on the internet - translated to 17 languages. As of today we count 324 catalogues and 12290 patterns translated into English (UK/cm). 12290
We work hard to bring you the best knitting and crochet have to offer, inspiration and advice as well as great quality yarns at incredible prices! Would you like to use our patterns for other than personal use? You can read what you are allowed to do in the Copyright text at the bottom of all our patterns. Happy crafting!
Post a comment to pattern DROPS 159-10
We would love to hear what you have to say about this pattern!
If you want to leave a question, please make sure you select the correct category in the form below, to speed up the answering process. Required fields are marked *.