
Popular categories
Looking for a yarn?


Comments / Questions (56)
![]() FERY wrote:
FERY wrote:
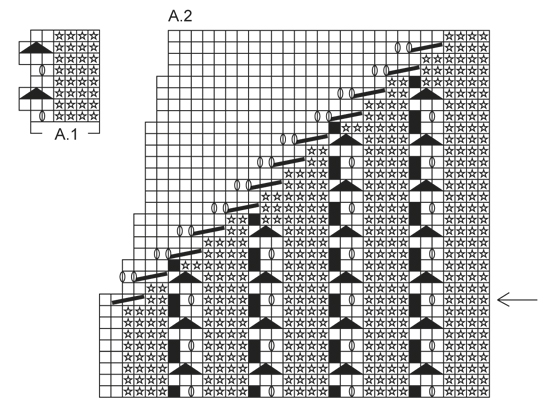
Si j'ai 90 mailles pour mon devant, le diagramme 2 représente 30 mailles, je tricote 3 fois le rang 1 du diagramme à partir de la flèche à droite pour tomber sur mes 90 mailles du devant ?
13.03.2025 - 22:27DROPS Design answered:
Bonjour Mme Fery, les mailles de A.2 sont les dernières mailles du devant avant le côté, vous continuez le point ajouré A.1 (celles à droite dans A.2) jusqu'aux mailles envers avant le côté et diminuez comme indiqué pour diminuer le nombre de mailles des torsades et augmenter en même temps le nombre de mailles jersey après ces torsade. Bon tricot!
14.03.2025 - 07:53
![]() Ann-Charlotte Dollbring wrote:
Ann-Charlotte Dollbring wrote:
Hej. Förstår inte hur man fortsätter att sticka efter diagrammet A2 när man stickat klart från pilen och upp till slutet av diagrammet. Vill gärna få färdigt toppen. Tycker det är lite dåligt förklarat. Är inte så jättevan på att sticka efter diagram. Har läst i tråden för att försöka få svar men blir inte klokare för det. Tack på förhand.
07.08.2023 - 23:39DROPS Design answered:
Hej Ann-Charlotte, jo når du er færdig med diagrammet, strikkes alle masker i glatstrik som på ryggen :)
18.08.2023 - 10:05
![]() Mary Scherrebeck wrote:
Mary Scherrebeck wrote:
I mønsteret står intet om aflukning til ærmegab. Hvad skal der lukkes af masker.
14.02.2023 - 23:29DROPS Design answered:
Hej Mary, jo det står nederst i første stykke: På næste omg efter de 4 p retstrik lukkes de midterste 4-4-4-6-6 m af i hver side til ærmegab og for- og rygstk strikkes færdig for sig.
16.02.2023 - 09:04
![]() Pia Burvall wrote:
Pia Burvall wrote:
Hur fortsätter diagrammet A2? När jag gjort de 24 varven som visas från pilen så är jag ju bara ca hslvvägs på frsmstycket. Stickar storlrk XXL. Tacksam för hjälp! Vänligs hälsningar!
29.03.2021 - 11:38DROPS Design answered:
Hej Pia, du fortsætter på samme måde, afslutter en ny stolpe med hulmønster for hver 4:e varv, nøjagtig som du har gjort hele tiden. God fornøjelse!
28.04.2021 - 14:18
![]() Lise wrote:
Lise wrote:
Bonjour. Au début de la ligne avec une flèche du diagramme À.2 j’ai 90 mailles. Après cette ligne, j’obtiens 102 mailles alors que, selon les instructions, je devrais en avoir 2 de moins que le dos, soit 88. Je ne comprends pas comment obtenir des mailles en moins alors que je fais 14 augmentations et deux seules diminutions à la fin du rang. Merci de bien vouloir m’aider
26.03.2021 - 22:45DROPS Design answered:
Bonjour Lise, les jetés faits dans les torsades ne doivent pas compter comme des mailles (comme avant la flèche) car ils seront diminués 2 tours plus tard. Bon tricot!
06.04.2021 - 07:40
![]() GENEVIEVE MUNSCH wrote:
GENEVIEVE MUNSCH wrote:
Bonjour, dans le diagramme A2 du modèle, vous dites pour la case noire " pas de maille sautez la case" . OK mais comment faites vous ?????? Merci pour votre réponse.
16.06.2020 - 17:24DROPS Design answered:
Bonjour Mme Munsch, faites seulement comme si cette case n'existait pas, sur ces 2 rangs, vous avez seulement 2 mailles endroit entourées de mailles envers. Bon tricot!
17.06.2020 - 07:36
![]() Giorgia wrote:
Giorgia wrote:
Se si lavora in tondo e quindi si é sempre sul dritto del lavoro, non riesco a capire il senso della stellina della legenda per entrambi i diagrammi..
23.04.2020 - 21:47DROPS Design answered:
Buongiorno Giorgia. Lavorando in tondo la maglia indicata dalla stellina viene lavorata a rovescio. Buon lavoro!
23.04.2020 - 21:59
![]() Giorgia wrote:
Giorgia wrote:
Is it possible to make this model top down?
22.04.2020 - 23:37DROPS Design answered:
Dear Giorgia, it might be possible but we are unfortunately not able to adapt every pattern to every single request, please contact your DROPS store or any knitting forum for any further individual assistance. Thanks for your comprehension. Happy knitting!
23.04.2020 - 09:53
![]() Giorgia wrote:
Giorgia wrote:
Is it possible to make this model topdown?
22.04.2020 - 23:29
![]() Catia Lo Giacco wrote:
Catia Lo Giacco wrote:
Buonasera, per chi lavora con il metodo english con filo a destra, il passaggio della legenda con la stellina. 1m rovescio dal diritto del lavoro 1 m al dritto dal rovescio del lavoro. La maglia fatto il passaggio rimane 1. Ho guardato anche il video al rallenty ma mi vengono due maglie. E' facile che non abbia ben capito il passaggio. Grazie
13.04.2020 - 18:14DROPS Design answered:
Buongiorno Catia. La maglia è una sola: se sta lavorando sul diritto del lavoro, lavora la maglia a rovescio. Se sta lavorando sul rovescio del lavoro, lavora la maglia a diritto. Buon lavoro!
13.04.2020 - 21:20
|
|||||||||||||||||||
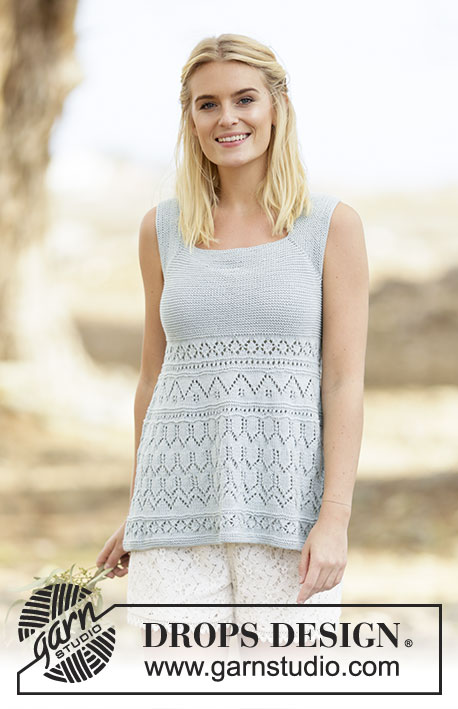
Light Breeze#lightbreezetop |
|||||||||||||||||||
 |
 |
||||||||||||||||||
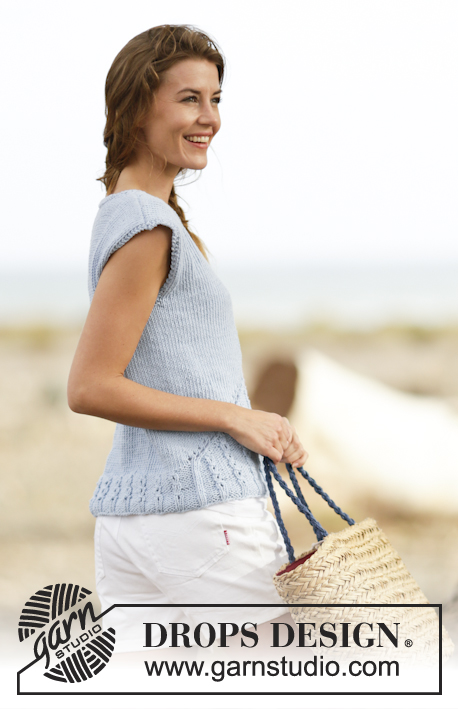
Knitted DROPS top with lace pattern and diagonal line in ”Paris”. Size: S - XXXL.
DROPS 161-28 |
|||||||||||||||||||
|
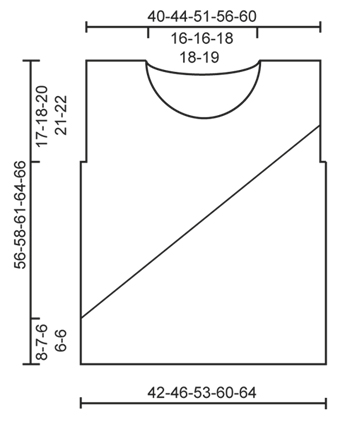
GARTER ST (worked in the round): * K 1 round and P 1 round *, repeat from *-*. 1 ridge = 2 rounds. GARTER ST (back and forth): K all rows. 1 ridge = 2 rows K. RIB: * P 4, K 2 *, repeat from *-*. PATTERN: See diagrams A.1 and A.2. The diagrams show all rows in pattern seen from RS. ---------------------------------------------------------- BODY: Worked in the round on circular needle. Cast on 144-156-180-204-216 sts on circular needle size 4.5 mm with Paris. K 1 round. Then work RIB - see explanation above. When rib measures 2 cm, switch to circular needle size 5 mm. Insert 1 marker at beg of round and 1 marker after 72-78-90-102-108 sts (= the sides). Then work pattern in the round according to diagram A.1 (pattern should fit over rib) BUT K the last 2 sts before both markers on every round onwards. REMEMBER THE KNITTING TENSION When piece measures approx. 8-7-6-6-6 cm (finish after 4th or 8th round in A.1), continue as follows: Beg on round marked with arrow in A.2 and work pattern according to diagram A.2 until 2nd marker (= front piece – NOTE: Diagram shows how eyelet rows goes over into stocking st), then work in stocking st over the remaining sts (= back piece). After 1st round in A.2 there are now 2 sts less on front piece than on back piece. Continue pattern according to A.2 on front piece and stocking st on back piece until all P sts and eyelet row sts have been worked into stocking st (pattern will finish approx. 2-2-6-9-11 cm after cast off for armholes). AT THE SAME TIME when piece measures 38-39-40-42-43 cm, work 2 ridges over the middle 8-8-8-10-10 sts in each side (work the other sts as before). On next round after the 2 ridges, cast off the middle 4-4-4-6-6 sts in each side for armhole and finish front and back piece separately. BACK PIECE: = 68-74-86-96-102 sts. Continue in stocking st but work the outermost 2 sts in each side in garter st (= sleeve edge). When piece measures 54-56-59-62-64 cm, cast off the middle 26-26-28-28-30 sts for neck and finish each shoulder separately. Then cast off 1 st on next row from neck = 20-23-28-33-35 sts remain on shoulder. Cast off when piece measures 56-58-61-64-66 cm. Repeat on the other shoulder. FRONT PIECE: = 66-72-84-94-100 sts. Continue in stocking st and A.2 as before but work the outermost 2 sts in each side in garter st (= sleeve edge). After A.2 continue in stocking st with 2 sts in garter st in each side. When piece measures 46-48-49-51-53 cm, slip the middle 10-10-12-12-14 sts on 1 stitch holder for neck and finish each shoulder separately. Then cast off at beg of every row from neck as follows: Cast off 2 sts 3 times and 1 st 2 times = 20-23-28-33-35 sts remain on shoulder. Cast off when piece measures 56-58-61-64-66 cm. Repeat on the other shoulder. ASSEMBLY: Sew the shoulder seams. NECK EDGE: Pick up approx. 74 to 92 sts around the neck (incl sts on stitch holder at the front) on circular needle size 4.5 mm with Paris. P 1 round, K 1 round and P 1 round, then loosely cast off with K. |
|||||||||||||||||||
Diagram explanations |
|||||||||||||||||||
|
|||||||||||||||||||
 |
|||||||||||||||||||
 |
|||||||||||||||||||
Have you finished this pattern?Tag your pictures with #dropspattern #lightbreezetop or submit them to the #dropsfan gallery. Do you need help with this pattern?You'll find 26 tutorial videos, a Comments/Questions area and more by visiting the pattern on garnstudio.com. © 1982-2026 DROPS Design A/S. We reserve all rights. This document, including all its sub-sections, has copyrights. Read more about what you can do with our patterns at the bottom of each pattern on our site. |
|||||||||||||||||||


With over 40 years in knitting and crochet design, DROPS Design offers one of the most extensive collections of free patterns on the internet - translated to 17 languages. As of today we count 324 catalogues and 12290 patterns translated into English (UK/cm). 12290
We work hard to bring you the best knitting and crochet have to offer, inspiration and advice as well as great quality yarns at incredible prices! Would you like to use our patterns for other than personal use? You can read what you are allowed to do in the Copyright text at the bottom of all our patterns. Happy crafting!
Post a comment to pattern DROPS 161-28
We would love to hear what you have to say about this pattern!
If you want to leave a question, please make sure you select the correct category in the form below, to speed up the answering process. Required fields are marked *.