
Popular categories
Looking for a yarn?


Comments / Questions (47)
![]() Lorence wrote:
Lorence wrote:
Merci pour votre réponse du 12.09. j ai terminé les 2 côtés. Toutefois je ne comprends pas les explications pour le col... il semble que la traduction française soit un mot à mot. Merci de votre aide Lorence
23.10.2014 - 16:43DROPS Design answered:
Bonjour Lorence, le col se tricote en montant d'abord 45-58 m, puis on relève les mailles autour de l'encolure et on monte 45-49 m et on tricote le col comme indiqué avec les rangs raccourcis. Quand les mailles sont rabattues, on assemble les 2 extrémités du col entre elles en les passant comme autour du cou. Bon tricot!
23.10.2014 - 16:49
![]() Ewar wrote:
Ewar wrote:
Vielen Dank!!! :)
18.07.2014 - 16:02
![]() Ewar wrote:
Ewar wrote:
Hallo, stimmt das Muster 1 so wirklich? bei mir kommen da nur glatt re auf der vorderseite raus... aber so soll das nich sein, oder? lg und danke schon mal für die Antwort!
17.07.2014 - 20:33DROPS Design answered:
Vielen Dank für den Hinweis, da ist tatsächlich bei der Übersetzung etwas durcheinander geraten, das Muster wird gleich korrigiert. In der 4. R (Rück-R) müssen Sie re stricken, nicht li, damit sich eine Krausrippe ergibt. Weiterhin gutes Gelingen!
18.07.2014 - 11:43
![]() Mamminic wrote:
Mamminic wrote:
Un modèle très joli que je vais mettre dans mes futurs ouvrages.
03.07.2014 - 17:42TRACY ROBERTS wrote:
Latte
29.06.2014 - 16:50Funy wrote:
Joli modèle pour l'automne
17.06.2014 - 12:42Elizabeth wrote:
Love this, it's practical and cosy and a very easy make.
02.06.2014 - 16:36
|
|
Peru#peruponcho |
|
|
|
|
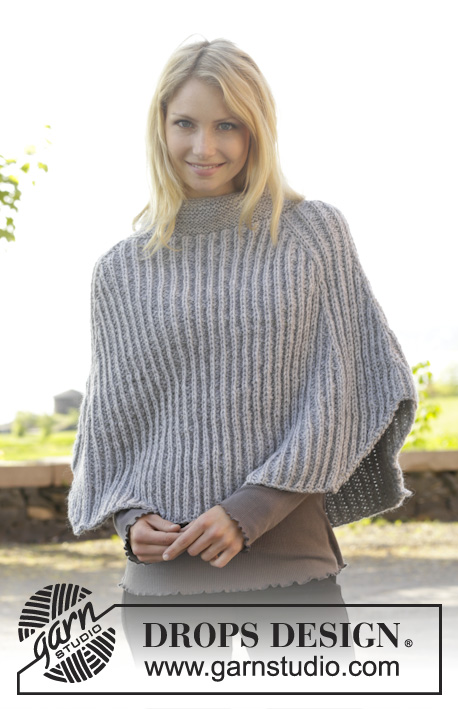
Knitted DROPS poncho in garter st in 2 strands ”Brushed Alpaca Silk”. Size: S - XXXL.
DROPS 156-48 |
|
|
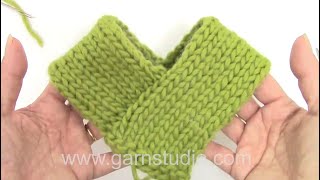
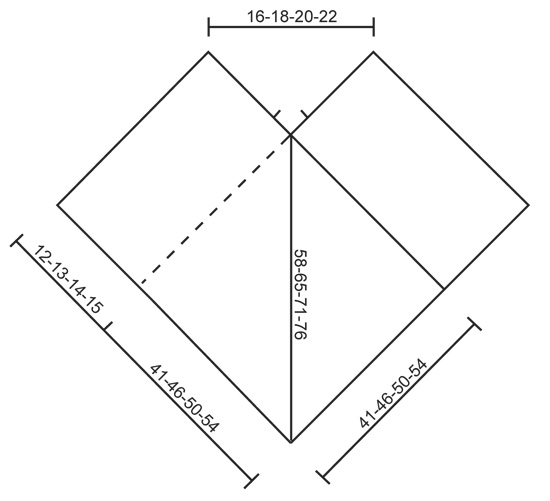
GARTER ST (back and forth on needle): K all rows. 1 ridge = 2 rows K. PATTERN 1: ROW 1: K from RS. ROW 2: P from WS. ROW 3: K from RS. ROW 4: K from WS. PATTERN 2: ROW 1 (= RS): K all sts. ROW 2 (= WS): * K 1, P 1 *, repeat from *-* and finish with K 1. ---------------------------------------------------------- PONCHO: Worked in two parts that are sewn tog when finished. Each part is worked back and forth on circular needle. PART 1: Cast on 45-51-55-59 sts on circular needle size 8 mm with 2 strands Brushed Alpaca Silk. Work the first 2 rows as follows: Work PATTERN 2 over the first 17-19-21-23 sts, 1 ridge in GARTER ST - see explanation – over the remaining 28-32-34-36 sts. Then work as follows from RS: Pattern 2 over the first 17-19-21-23 sts as before, PATTERN 1 over the remaining 28-32-34-36 sts. Continue pattern like this. REMEMBER THE KNITTING TENSION! When piece measures approx. 64-71-77-83 cm - adjust so that next row is worked from RS, work pattern 2 over the first 17-19-21-23 sts as before, work 1 ridge over 28-32-34-36 sts. Cast off. Piece measures approx. 65-72-78-84 cm. PART 2: Cast on and work as 1st part. ASSEMBLY: Place cast-off edge on 1st part towards right long side on 2nd part - at the bottom towards cast-on edge and 41-46-50-54 cm upwards – make sure not to stretch the piece too much. Sew the 2 parts tog with neat little stitches. Then sew cast-off edge on 2nd part to right side on 1st part the same way. NECK WARMER: Work an neck edge with a "scarf" on each side of opening at the front as follows (sew scarfs tog mid back when finished): Insert 2 markers mid front of neck, approx. 5-5-6-7 cm from tip mid front and up, measured along each side of neck. LOOSELY cast on 45-49-54-58 sts around the neck on circular needle size 7 mm with 2 strands Brushed Alpaca Silk, then pick up from RS approx. 37 to 47 sts (beg at one marker at the front and finish at the other marker), then LOOSELY cast on 45-49-54-58 new sts at the end of row = approx. 127-163 sts. Work in garter st back and forth until neck edge measures 7-7-8-9 cm. Now work short rows to make the edge higher at the back of neck as follows: Work 46-50-56-60 sts, slip these sts on 1 stitch holder, work the rest of row, turn and work 46-50-56-60 sts, slip these sts on 1 stitch holder, work the rest of row, * turn and work 4-5-5-6 sts, slip these sts on 1 stitch holder, work the rest of row, turn piece and work 4-5-5-6 sts, slip these sts on 1 stitch holder and work the rest of row *, repeat from *-* 2 more times. Now slip sts from stitch holders back on the needle and continue in garter st back and forth over all sts until neck edge measures approx. 9-9-10-11 cm on the most narrow part (i.e. at the edge in each side). Loosely cast off. Place the two "scarfs" over shoulders and to mid back so that short sides meet mid back. Sew short sides tog edge to edge in outer loops of edge sts. Neck edge now lies around the opening of the poncho. |
|
 |
|
Have you finished this pattern?Tag your pictures with #dropspattern #peruponcho or submit them to the #dropsfan gallery. Do you need help with this pattern?You'll find 16 tutorial videos, a Comments/Questions area and more by visiting the pattern on garnstudio.com. © 1982-2026 DROPS Design A/S. We reserve all rights. This document, including all its sub-sections, has copyrights. Read more about what you can do with our patterns at the bottom of each pattern on our site. |


With over 40 years in knitting and crochet design, DROPS Design offers one of the most extensive collections of free patterns on the internet - translated to 17 languages. As of today we count 324 catalogues and 12290 patterns translated into English (UK/cm). 12290
We work hard to bring you the best knitting and crochet have to offer, inspiration and advice as well as great quality yarns at incredible prices! Would you like to use our patterns for other than personal use? You can read what you are allowed to do in the Copyright text at the bottom of all our patterns. Happy crafting!
Post a comment to pattern DROPS 156-48
We would love to hear what you have to say about this pattern!
If you want to leave a question, please make sure you select the correct category in the form below, to speed up the answering process. Required fields are marked *.