
Popular categories
Looking for a yarn?


Comments / Questions (47)
![]() Britt wrote:
Britt wrote:
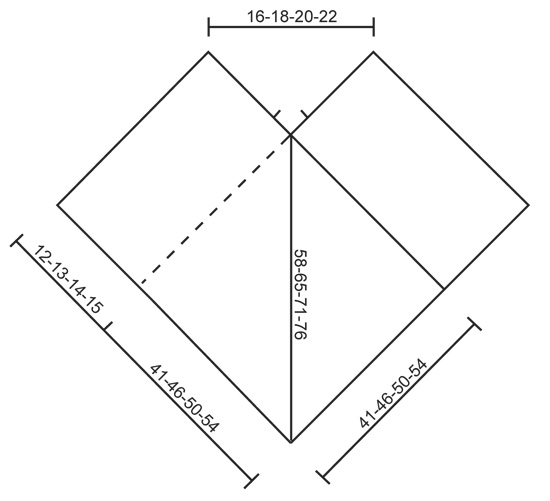
Hej, enligt diagram så är stycket 41+12 = 53 cm i stl s/m men i mönstret ska stycket vara 65 cm 🤔
18.10.2024 - 07:38DROPS Design answered:
Hei Britt. Arbeidet strikkes til det måler 64 cm / ca 65 cm etter avfelling. Målskissen med 41 + 12 cm viser forsiden av plagget (41+12= 53 cm), de resterende 12 cm vil komme på baksiden. Om du ser på målskissen og på det øverst retangelet til venstre, så ligger den dobbelt. Den prikkete linjen er avfellingskanten når arbeidet måler ca 65 cm og er på baksiden. mvh DROPS Design
23.10.2024 - 09:03
![]() Lisbeth wrote:
Lisbeth wrote:
Hei, ønsker p strikke denne i drops air, må det være dobbel tråd da? Synes dobbel tråd blir veldig tykt
26.09.2024 - 18:05DROPS Design answered:
Hei Lisbeth, Denne oppskriften bruker 2 tråder av et garn fra gruppe C (så 2 tråder med Drops Air). Vi har mange andre sjal i forskjellige tykkelser hvis du vil ha en tynnere variant. Bare søk under Gratis Oppskrifter og Sjal. God fornøyelse!
27.09.2024 - 08:37
![]() Val31 wrote:
Val31 wrote:
Bonjour, je ne vois pas le nombre de pelotes (et grammes) nécessaires pour vos modèles sauf erreur? merci à vous et pour votre site plein d\'inspirations!
28.01.2024 - 09:29
![]() Jenny wrote:
Jenny wrote:
My cast on edge is rolling up (not the rib pattern section) but your poncho image is nice and flat. How did you prevent yours from rolling please?
24.07.2023 - 05:55DROPS Design answered:
Hi Jenny, It could be that your cast-on edge is too tight. This causes the edge to roll up. You could try casting on with a larger size needle or with 2 needles held together, before continuing with the correct needle size. Happy knitting!
24.07.2023 - 06:35
![]() Jocelyne De Magog, Quebec wrote:
Jocelyne De Magog, Quebec wrote:
Pouvez vous me donnez le liens du zoom du points fantaisie nMerci beaucoup. Très contente d’avoir enfin compris les patrons. Avec ma laine bouclée je ne le vois pas beaucoup, je le ferai sûrement dans une autres laine.
30.03.2022 - 19:08DROPS Design answered:
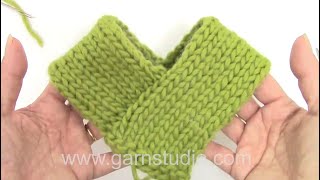
Bonjour Jocelyne, vous trouverez la photo du zoom du point fantaisie juste sous la grande photo en haut de la page, cliquez dessus pour la voir en plus grand. Bon tricot!
31.03.2022 - 09:59
![]() Jocelyne wrote:
Jocelyne wrote:
Je crois avoir compris? Svp. Me confirmer. Sa donne un genre de cotes 1/1 sur les 23 premières mailles et sur les 36 mailles suivantes après quelques rangs nous retrouvons les 2 rangs endroits = 1 côte Mousse et ses rangs se répète sur les 36 mailles pour former un patrons. Sa donne 2 patrons différents. 1 sur les 23 mailles et l’autre sur le 36 mailles restantes.
30.03.2022 - 14:12DROPS Design answered:
Bonjour Jocelyne, c'est bien cela, le point fantaisie-1 alterne 2 rangs jersey, 2 rangs endroit/1 côte mousse, et les point fantaisie-2 alterne 1 m jersey endroit, 1 m point mousse, en commençant et en terminant par 1 m jersey. Le zoom sur le point fantaisie pourra vous aider à bien visualiser. bon tricot!
30.03.2022 - 14:56
![]() Jocelyne wrote:
Jocelyne wrote:
Après que vous m’avez confirmer les 4 rangs . Je continue de cette façons jusqu’à la hauteur de 83 cm si je me retrouve sur un rang endroit. C’est la première fois que je fait un patron plus que tout au point mousse ou en point jersey et aimerais bien réussir ce patron. Merci d’être patiente avec moi. Au plaisir. Jocelyne de Magog au Québec
30.03.2022 - 11:48DROPS Design answered:
Bonjour Jocelyne, répétez ces 4 rangs jusqu'à ce que l'ouvrage mesure 83 cm, ajustez pour arrêter après un rang sur l'envers (soit après un rang 2 soit après un rang 4, soit un peu avant soit un peu après les 83 cm). Tricotez ensuite comme au tout début: les 2 rangs du pf-2 sur les 23 premières mailles et les 36 dernières mailles à l'endroit. Bon tricot!
30.03.2022 - 13:55
![]() Jocelyne wrote:
Jocelyne wrote:
Aurait t’il une erreur sur le (Rang 4PF1) car je me retrouve sur l’envers de mon tricot et vous m’avez dit les 36 première mailles envers et si je regarde les patrons sur l’envers du tricot sa aurais dû être les 36 première mailles en endroit. Qui correspond au Rand 4 PF1. Merci de m’éclairer, je commence à comprendre petits as petits .
30.03.2022 - 11:01DROPS Design answered:
Bonjour Jocelyne, vous avez raison, je me suis trompée, les mailles du point fantaisie-1 se tricotent à l'endroit sur l'envers au 4ème rang, vous tricoterez ainsi: 36 m end (r4, pf-1), puis 23 m (1 m end, 1 m env), répétez de (à) et terminez par 1 m end (rang 2 pf-2). Bon tricot!
30.03.2022 - 11:10
![]() Jocelyne wrote:
Jocelyne wrote:
Quand fait ton les rangs du Points Mousse? Je sais que je vous pause beaucoup de questions comme je suis débutante c’est la raison et j’aimerais tellement comprendre pour faire ce patron. Merci
28.03.2022 - 22:28DROPS Design answered:
Bonjour Jocelyne, les rangs point mousse que vous voyez sur la photo sont ceux tricotés lors du rang 4 du point fantaisie-1 (= quand on tricote les 36 mailles à gauche, vu sur l'endroit). Bon tricot!
29.03.2022 - 09:07
![]() Jocelyne wrote:
Jocelyne wrote:
Je fais La grandeur xxxl Je suis rendu au rang 4 et je fait quoi? Et les rangs suivant aussi? Merci de me répondre vite
28.03.2022 - 22:15DROPS Design answered:
Bonjour Jocelyne, désolée pour les réponses tardives en raison du décalage horaire des 2 continents. Vous trouverez la réponse ci-dessous. Bonne continuation!
29.03.2022 - 09:06
|
|
Peru#peruponcho |
|
|
|
|
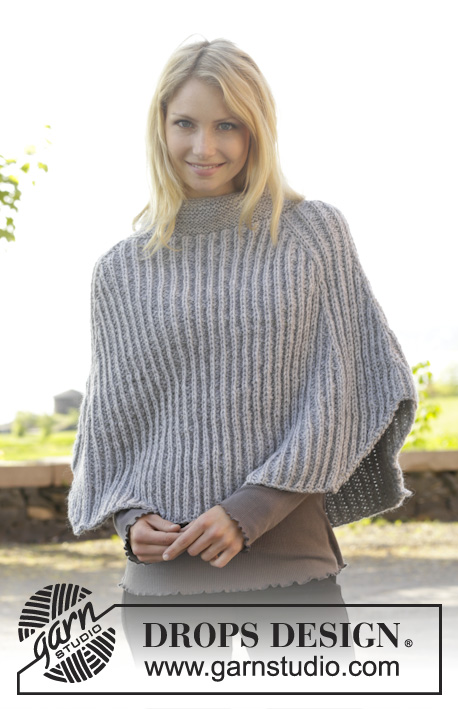
Knitted DROPS poncho in garter st in 2 strands ”Brushed Alpaca Silk”. Size: S - XXXL.
DROPS 156-48 |
|
|
GARTER ST (back and forth on needle): K all rows. 1 ridge = 2 rows K. PATTERN 1: ROW 1: K from RS. ROW 2: P from WS. ROW 3: K from RS. ROW 4: K from WS. PATTERN 2: ROW 1 (= RS): K all sts. ROW 2 (= WS): * K 1, P 1 *, repeat from *-* and finish with K 1. ---------------------------------------------------------- PONCHO: Worked in two parts that are sewn tog when finished. Each part is worked back and forth on circular needle. PART 1: Cast on 45-51-55-59 sts on circular needle size 8 mm with 2 strands Brushed Alpaca Silk. Work the first 2 rows as follows: Work PATTERN 2 over the first 17-19-21-23 sts, 1 ridge in GARTER ST - see explanation – over the remaining 28-32-34-36 sts. Then work as follows from RS: Pattern 2 over the first 17-19-21-23 sts as before, PATTERN 1 over the remaining 28-32-34-36 sts. Continue pattern like this. REMEMBER THE KNITTING TENSION! When piece measures approx. 64-71-77-83 cm - adjust so that next row is worked from RS, work pattern 2 over the first 17-19-21-23 sts as before, work 1 ridge over 28-32-34-36 sts. Cast off. Piece measures approx. 65-72-78-84 cm. PART 2: Cast on and work as 1st part. ASSEMBLY: Place cast-off edge on 1st part towards right long side on 2nd part - at the bottom towards cast-on edge and 41-46-50-54 cm upwards – make sure not to stretch the piece too much. Sew the 2 parts tog with neat little stitches. Then sew cast-off edge on 2nd part to right side on 1st part the same way. NECK WARMER: Work an neck edge with a "scarf" on each side of opening at the front as follows (sew scarfs tog mid back when finished): Insert 2 markers mid front of neck, approx. 5-5-6-7 cm from tip mid front and up, measured along each side of neck. LOOSELY cast on 45-49-54-58 sts around the neck on circular needle size 7 mm with 2 strands Brushed Alpaca Silk, then pick up from RS approx. 37 to 47 sts (beg at one marker at the front and finish at the other marker), then LOOSELY cast on 45-49-54-58 new sts at the end of row = approx. 127-163 sts. Work in garter st back and forth until neck edge measures 7-7-8-9 cm. Now work short rows to make the edge higher at the back of neck as follows: Work 46-50-56-60 sts, slip these sts on 1 stitch holder, work the rest of row, turn and work 46-50-56-60 sts, slip these sts on 1 stitch holder, work the rest of row, * turn and work 4-5-5-6 sts, slip these sts on 1 stitch holder, work the rest of row, turn piece and work 4-5-5-6 sts, slip these sts on 1 stitch holder and work the rest of row *, repeat from *-* 2 more times. Now slip sts from stitch holders back on the needle and continue in garter st back and forth over all sts until neck edge measures approx. 9-9-10-11 cm on the most narrow part (i.e. at the edge in each side). Loosely cast off. Place the two "scarfs" over shoulders and to mid back so that short sides meet mid back. Sew short sides tog edge to edge in outer loops of edge sts. Neck edge now lies around the opening of the poncho. |
|
 |
|
Have you finished this pattern?Tag your pictures with #dropspattern #peruponcho or submit them to the #dropsfan gallery. Do you need help with this pattern?You'll find 16 tutorial videos, a Comments/Questions area and more by visiting the pattern on garnstudio.com. © 1982-2026 DROPS Design A/S. We reserve all rights. This document, including all its sub-sections, has copyrights. Read more about what you can do with our patterns at the bottom of each pattern on our site. |


With over 40 years in knitting and crochet design, DROPS Design offers one of the most extensive collections of free patterns on the internet - translated to 17 languages. As of today we count 324 catalogues and 12290 patterns translated into English (UK/cm). 12290
We work hard to bring you the best knitting and crochet have to offer, inspiration and advice as well as great quality yarns at incredible prices! Would you like to use our patterns for other than personal use? You can read what you are allowed to do in the Copyright text at the bottom of all our patterns. Happy crafting!
Post a comment to pattern DROPS 156-48
We would love to hear what you have to say about this pattern!
If you want to leave a question, please make sure you select the correct category in the form below, to speed up the answering process. Required fields are marked *.