DROPS Cotton Merino
DROPS Cotton Merino
50% Wool, 50% Cotton
from 2.60 € /50g
Get the yarn to make this pattern from 20.80€.

The yarn cost is calculated from the pattern’s smallest size and the yarn’s cheapest product type. Looking for an even better price? You might find it on the DROPS Deals!

DROPS Super Sale

Come Here

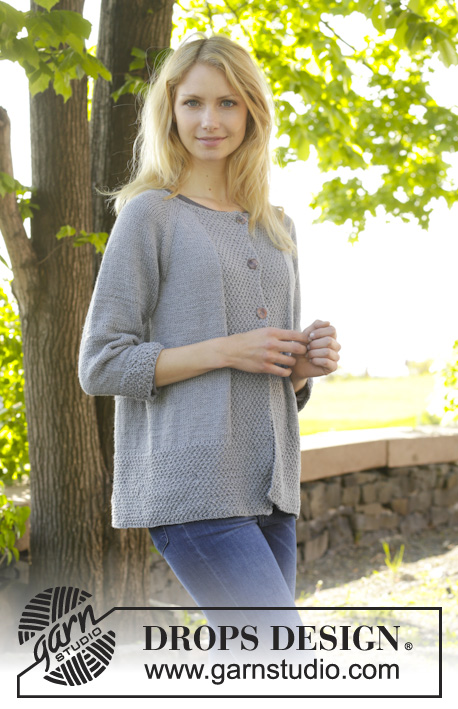
Knitted DROPS jumper with raglan and moss st worked top down in ”Cotton Merino”. Size: S - XXXL.

DROPS 157-34
DROPS design: Pattern no cm-012
Yarn group B
-----------------------------------------------------------
Size: S - M - L - XL - XXL - XXXL
Materials:
DROPS COTTON MERINO from Garnstudio
400-450-500-550-600-650 g colour no 18, medium grey

DROPS DOUBLE POINTED NEEDLES AND CIRCULAR NEEDLE (40 and 80 cm) SIZE 4 mm - or size needed to get 21 sts x 28 rows in stocking st = 10 x 10 cm.
DROPS CIRCULAR NEEDLE (40 or 60 cm) SIZE 3.5 mm - for edges in garter st.

-------------------------------------------------------

Alternative Yarn – See how to change yarns here
Yarn Groups A to F – Use the same pattern and change the yarn here
Yarn usage using an alternative yarn – Use our yarn converter here

-------------------------------------------------------

DROPS Cotton Merino
DROPS Cotton Merino
50% Wool, 50% Cotton
from 2.60 € /50g
Get the yarn to make this pattern from 20.80€.

The yarn cost is calculated from the pattern’s smallest size and the yarn’s cheapest product type. Looking for an even better price? You might find it on the DROPS Deals!

Pattern instructions

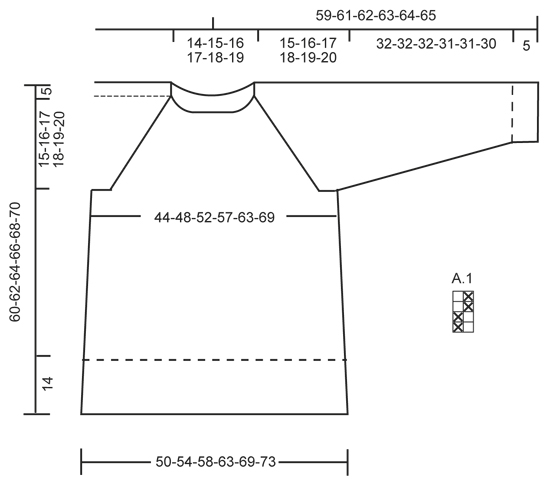
GARTER ST (in the round on circular needle):
* K 1 round and P 1 round *, repeat from *-*. 1 ridge = 2 rounds.

PATTERN (double moss st vertically):
See diagram A.1. The diagram shows all rows in pattern seen from RS.

RAGLAN:
Inc 2 sts on each side of every raglan as follows (= 16 sts inc):
Inc as follows before 4 sts in stocking st and marker: K 2 in the next 2 sts (i.e. work in front and back loop of st) = 2 sts inc.
Inc as follows after marker and 2 sts in stocking st: K 2 in the next 2 sts (i.e. work in front and back loop of st) = 2 sts inc.

Inc 1 st on each side of every raglan as follows (= 8 sts inc):
Inc as follows before 2 sts in stocking st and marker: 1 YO, 2 sts in stocking st.
Inc after marker as follows: 2 sts in stocking st, 1 YO.
K YOs twisted on next row to avoid holes.

DECREASE TIP:
Dec as follows before marker: Work until 3 sts remain before marker, K 2 tog, K 1.
Dec as follows after marker: K 1, slip 1 st as if to K, K 1, psso.
----------------------------------------------------------

JUMPER:
Work jumper top down on circular needle. Work sleeve in the round on circular needle/double pointed needles.

YOKE:
Cast on 100-106-110-114-118-122 sts on circular needle size 3.5 mm with Cotton Merino. Work 3 ridges in GARTER ST – see explanation above, AT THE SAME TIME on 1st round in 2nd ridge inc 10-14-18-22-29-35 sts evenly. Repeat inc in 3rd ridge = 120-134-146-158-176-192 sts. Switch to circular needle size 4 mm. Then work an elevation in back of neck in stocking st as follows, beg from RS Work 20-24-27-30-34-38 sts, turn, work 40-48-54-60-68-76 sts, turn. Continue back and forth over 5 sts more on every turn until 60-68-75-80-88-96 sts are worked, turn and work back to beg of round = mid back. Now work as follows from mid back:
19-22-25-28-32-36 sts in stocking st, insert a marker, 22-23-23-23-24-24 sts in stocking st, insert a marker, 38-44-50-56-64-72 sts in stocking st, insert a marker, 22-23-23-23-24-24 sts in stocking st, insert a marker, stocking st over the last 19-22-25-28-32-36 sts on round. REMEMBER THE KNITTING TENSION! On next round start inc for RAGLAN – see explanation above! Inc 2 sts on each side of every marker on every other round 1-1-1-2-2-3 times. Then inc 1 st on each side of every marker on every other round 18-19-21-21-23-23 times in total, and on every 4th round 1 time in all sizes = 288-310-338-366-400-432 sts. Piece measures 20-21-22-23-24-25 cm from shoulder. Now work as follows: Work the first 40-44-49-54-60-66 sts, slip the next 64-67-71-75-80-84 sts on a stitch holder (= sleeve), cast on 12 new sts under left sleeve (insert a marker in the middle of these new sts), work the next 80-88-98-108-120-132 sts, slip the next 64-67-71-75-80-84 sts on a stitch holder (= sleeve), cast on 12 new sts under right sleeve (insert a marker in the middle of these new sts), work the remaining 40-44-49-54-60-66 sts. NOW MEASURE THE PIECE FROM HERE.

BODY:
There are now 184-200-220-240-264-288 sts for body. Work in stocking st in the round. When piece measures 4 cm, inc 2 sts in each side as follows: Work until 1 st before marker, 1 YO, 2 sts in stocking st, 1 YO, continue as before over front piece until 1 st remains before next marker, 1 YO, 2 sts in stocking st, 1 YO, work the rest of round = 188-204-224-244-268-292 sts. NOTE: On next round K YOs twisted to avoid holes. Repeat inc every 2½-2½-3-3-3-3½ cm 6-6-5-5-5-4 more times = 212-228-244-264-288-308 sts. When all inc are done and piece measures 26-27-28-29-30-31 cm, continue with A.1 over all sts. When piece measures 40-41-42-43-44-45 cm, cast off with K over K and P over P.

SLEEVE:
Work sleeve in stocking st in the round on circular needle/double pointed needles. There are 64-67-71-75-80-84 sts for each sleeve. Slip sts from stitch holder back on circular needle/double pointed needles size 4 mm and cast on 12 new sts under sleeve = 76-79-83-87-92-96 sts. Work in stocking st in the round, AT THE SAME TIME insert a marker in the middle of the new sts under sleeve (i.e. 6 sts on each side of marker). NOW MEASURE THE PIECE FROM HERE. When piece measures 4 cm, dec 1 st on each side of marker - READ DECREASE TIP. Repeat dec approx. every 2-2-2-1½-1½-1½ cm 11-11-12-13-15-15 more times = 52-55-57-59-60-64 sts. When sleeve measures 32-32-32-31-31-30 cm, dec 0-1-1-1-0-0 sts = 52-54-56-58-60-64 sts. Continue with A.1 over all sts. Cast off when sleeve measures 37-37-37-36-36-35 cm.
Work the other sleeve the same way.

ASSEMBLY:
Sew the holes under the sleeves.

This pattern has been corrected.

Updated online: 18.02.2016
Correction: YOKE:...Then work an elevation in back of neck in stocking st as follows, beg from RS Work 20-24-27-30-34-38 sts, turn, work 45-53-59-65-73-81 sts, turn. Continue back and forth over 5 sts more on every turn until 60-68-75-80-88-96 sts are worked, turn and work back to beg of round = mid back...

Diagram

symbols = K
symbols = P
diagram

Each of our patterns has specific tutorial videos to help you.

Do you have a question? See a list of frequently asked questions (FAQ)

Knitting tension is what determines the final measurements of your work, and is usually measured per 10 x 10 cm. It is provided like so: number of stitches in width x number of rows in height - eg: 19 stitches x 26 rows = 10 x 10 cm.

The knitting tension is very individual; some people knit/crochet loosely while others work tightly. You adjust the knitting tension with the needle size, which is why the suggested needle size is only meant as a guide! You need to adjust this (up or down) to ensure that YOUR knitting tension matches the knitting tension provided in the pattern. If you work with a different knitting tension than provided you will have a different yarn consumption, and your work will have different measurements than what the pattern suggests.

The knitting tension also determines which yarns can replace each other. As long as you achieve the same knitting tension you can replace one yarn with another.

See DROPS lesson: How to measure your tension/gauge

See DROPS video: How to make a gauge tension swatch

The required amount of yarn is provided in grams, eg: 450 g. To calculate how many balls you’ll need you first need to know how many grams are in 1 ball (25g, 50g or 100g). This information is available if you click on the individual yarn quality on our pages. Divide the amount required with the amount of each ball. For example, if each ball is 50g (the most common amount), the calculation will be as follows: 450 / 50 = 9 balls.

The important thing when changing from one yarn to another is that the knitting/crochet tension remains the same. This is so that the measurements of the finished piece will be the same as on the sketch provided. It is easier to achieve the same knitting tension using yarns from the same yarn group. It is also possible to work with multiple strands of a thinner yarn to achieve the knitting tension of a thicker one. Please try our yarn converter. We recommend you to always work a test swatch.

Please NOTE: when changing yarn the garment might have a different look and feel to the garment in the photo, due to individual properties and qualities of each yarn.

See DROPS lesson: Can I use a different yarn than the one mentioned in the pattern?

All our yarns are categorised into yarn groups (from A to F) according to thickness and knitting tension – group A contains the thinnest yarns and group F the thickest. This makes it easier for you to find alternative yarns to our patterns, should you wish to switch yarn. All yarns within the same group have a similar knitting tension and can easily replace each other. However, different yarn qualities have different structures and properties which will give the finished work a unique look and feel.

Click here for an overview of the yarns in each yarn group

At the top of all our patterns you’ll find a link to our yarn calculator, which is a helpful tool should you wish to use a different yarn than suggested. By filling in the yarn quality you wish to replace, the amount (in your size) and number of strands, the calculator will present good alternative yarns with the same knitting tension. Additionally it will tell you how much you’ll require in the new qualities and whether you’ll need to work with multiple strands. Most skeins are 50g (some are 25g or 100g).

If the pattern is worked with multiple colours, every colour will have to be calculated separately. Similarly, if the pattern is worked with several strands of different yarns (for example 1 strand Alpaca and 1 strand Kid-Silk) you will have to find alternatives for each, individually.

Click here to see our yarn calculator

Since different yarns have different qualities and textures we have chosen to keep the original yarn in our patterns. However, you can easily find options among our available qualities by using our yarn calculator, or simply pick a yarn from the same yarn group.

It is possible that some retailers still have discontinued yarns in stock, or that someone has a few skeins at home that they would like to find patterns for.

The yarn calculator will provide both alternative yarn as well as required amount in the new quality.

If you think it's hard to decide what size to make, it can be a good idea to measure a garment you own already and like the size of. Then you can pick the size by comparing those measures with the ones available in the pattern's size chart.

You'll find the size chart at the bottom of the pattern.

See DROPS lesson: How to read size chart

The needle size provided in the pattern serves only as a guide, the important thing is to follow the knitting tension. And since knitting tension is very individual, you will have to adjust the needle size to ensure that YOUR tension is the same as in the pattern – maybe you’ll have to adjust 1, or even 2 needle sizes, up or down to achieve the correct tension. For this, we recommend that you work test swatches.

Should you work with a different knitting tension than the one provided, the measurements of the finished garment might deviate from the measurement sketch.

See DROPS lesson: How to measure your tension/gauge

See DROPS video: How to make a tension/gauge swatch

Working a garment top-down provides more flexibility and room for personal adjustment. For example it is easier to try the garment on while working, as well as making adjustments to length of yoke and shoulder caps.

The instructions are carefully explaining every step, in the correct order. Diagrams are adjusted to the knitting direction and are worked as usual.

The diagram depicts all rows/rounds, and every stitch seen from the right side. It is read from bottom to top, from right to left. 1 square = 1 stitch.

When working back and forth, every other row is worked from the right side and every other row is worked from the wrong side. When working from the wrong side, the diagram will have to be worked reversed: from left to right, knit stitches are purled, purl stitches are knit etc.

When working in the round every round is worked from the right side and the diagram are worked from right to left on all rounds.

See DROPS lesson: How to read knitting diagrams

The diagram depicts all rows/rounds, and every stitch seen from the right side. It is worked from bottom to top, from right to left.

When working back and forth every other row is worked from the right side: from right to left and every other row is worked from the wrong side: from left to right.

When working in the round, every row in the diagram are worked from the right side, from right to left.

When working a circular diagram you start in the middle and work your way outwards, counter clockwise, row by row.

The rows usually start with a given number of chain stitches (equivalent to the height of the following stitch), this will either be depicted in the diagram or explained in the pattern.

See DROPS lesson: How to read crochet diagrams

Instructions for working several diagrams after each other on the same row/round, will often be written like so: “work A.1, A.2, A.3 a total of 0-0-2-3-4 times". This means you work A.1 once, then A.2 is worked once, and A.3 is repeated (in width) the number of times provided for your size – in this case like so: S = 0 times, M = 0 times, L=2 times, XL= 3 times and XXL = 4 times.

The diagrams are worked as usual: begin with the first row in A.1, then work the first row in A.2 etc.

See DROPS lesson: How to read knitting diagrams

See DROPS lesson: How to read crochet diagrams

The total width of the garment (from wrist-to-wrist) will be larger in the larger sizes, despite the actual sleeves being shorter. The larger sizes have longer sleeve caps and wider shoulders, so there will be a good fit in all sizes.

The measurement sketch/schematic drawing provides information regarding the full length of the garment. If it’s a jumper or a jacket the length is measured from the highest point on the shoulder closest to the neckline, and straight down to the bottom of the garment. It is NOT measured from the tip of shoulder. Similarly, the length of yoke is measured from the highest point on the shoulder and down to where yoke is split into body and sleeves.

On a jacket measures are never taken along bands, unless specifically stated. Always measure inside band stitches when measuring the length.

See DROPS lesson: How to read a schematic drawing

Diagrams are often repeated on the round or in height. 1 repeat is the diagram the way it appears in the pattern. If it says to work 5 repeats of A.1 in the round, then you work A.1 a total of 5 times after/next to each other in the round. If it says to work 2 repeats of A.1 vertically/in height you work the entire diagram once, then begin again at the start and work the entire diagram one more time.

Chain stitches are slightly narrower than other stitches and to avoid working the cast-on edge too tight, we simply chain more stitches to begin with. The stitch count will be adjusted on the following row to fit the pattern and measurement sketch.

The rib edge is more elastic and will contract slightly compared to, for example, stocking stitch. By increasing before the rib edge, you avoid a visible difference in width between the rib edge and the rest of the body.

It’s very easy to cast off too tightly, and by making yarn overs while casting off (and simultaneously casting these off) you avoid a too tight cast off edge.

See DROPS video: How to bind off with yarn overs (yo)

To achieve an even increase (or decrease) you can increase on, for example: every 3rd and 4th row alternately, like so: work 2 rows and increase on the 3rd row, work 3 rows and increase on the 4th. Repeat this until the increase is complete.

See DROPS lesson: Increase or decrease 1 st on every 3rd and 4th row alternately

Should you prefer to work in the round instead of back and forth, you may of course adjust the pattern. You’ll need to add steeks mid-front (usually 5 stitches), and follow the instructions. When you would normally turn and work from the wrong side, simply work across the steek and continue in the round. At the end you’ll cut the piece open, pick up stitches to work bands, and cover the cut edges.

See DROPS video: How to knit steeks and cut open

Should you prefer to work back and forth instead of in the round, you may of course adjust the pattern so you work the pieces separately and then assemble them at the end. Divide the stitches for the body in 2, add 1 edge stitch in each side (for sewing) and work the front and back pieces separately.

See DROPS lesson: Can I adapt a pattern for circular needles into straight needles?

Pattern repeats can vary slightly in the different sizes, in order to get the correct proportions. If you’re not working the exact same size as the garment in the photo, yours might deviate slightly. This has been carefully developed and adjusted so that the complete impression of the garment is the same in all sizes.

Make sure to follow instructions and diagrams for your size!

If you have found a pattern you like which is available in women’s size it’s not very difficult to convert it to men’s size. The biggest difference will be the length of sleeves and body. Start working on the women size that you think would fit across the chest. The additional length will be worked right before you cast off for the armhole/sleeve cap. If the pattern is worked top-down you can add the length right after the armhole or before the first decrease on sleeve.

Regarding additional yarn amount, this will depend on how much length you add, but it is better with a skein too many than too few.

All yarns will have excess fibres (from production) that might come off as lint or shedding. Brushed yarns (ie hairier yarns) have more of these loose, excess fibres, causing more shedding.

Shedding also depends on what is worn under or over the garment, and whether this pulls at the yarn fibres. It’s therefore not possible to guarantee that there will be no shedding

Below are some tips on how to get the best result when working with hairier yarns:

1. When the garment is finished (before you wash it) shake it vigorously so the looser hairs come off. NOTE: do NOT use a lint roller, brush or any method that pulls at the yarn.

2. Place the garment in a plastic bag and put it in your freezer - the temperature will cause the fibres to become less attached to each other, and excess fibres will come off easier.

3. Leave in the freezer for a few hours before taking it out and shaking it again.

4. Wash the garment according to the instructions on the yarn label.

Pilling is a natural process that happens to even the most exclusive of fibers. It's a natural sign of wear and tear that is hard to avoid, and that is most visible in high friction areas of your garment like a sweater's arms and cuffs.

You can make your garment look as new by removing the pilling, using a fabric comb or a pill/lint remover.

Still can't find the answer you need? Then scroll down and leave your question so one of our experts can try to help you. This will be done normally within 5 to 10 working days.
In the meantime, you can read the questions and answers that others have left to this pattern or join the DROPS Workshop on Facebook to get help from fellow knitters/crocheters!

You might also like...

Post a comment to pattern DROPS 157-34

We would love to hear what you have to say about this pattern!

If you want to leave a question, please make sure you select the correct category in the form below, to speed up the answering process. Required fields are marked *.

Comments / Questions (45)

country flag Alice Legrand wrote:

Bonjour, pour le raglan je ne comprends pas la partie qui dit : " et 1 fois dans toutes les tailles tous les 4 tours"? Que signifie dans toutes les tailles? Merci!

06.01.2019 - 23:16

DROPS Design answered:

Bonjour Mme Legrand, vous augmentez pour le raglan 1-2-3 fois (cf taille) 2 m de chaque côté de chaque marqueur tous les 2 tours, puis vous augmentez 18-19-21-23 fois 1 m de chaque côté de chaque marqueur tous les 2 tours et enfin 1 fois tous les 4 tours (= 4 tours après la dernière augmentation). Bon tricot!

07.01.2019 - 12:01

country flag Eveline wrote:

Ik heb een vraag over het lijf (ik maak de trui in XL): je moet vanaf de mouwinzet 1x na 4 cm aan elke zijkant meerderen en daarna nog 5x na elke 3 cm. Er staat: na alle meerderingen meet het werk 29 cm, maar volgens mij is dat (1x4)+(5x3)= 19 cm? Of moet ik daarna nog 10 cm breien voordat ik met A1 begin?

03.12.2018 - 16:40

DROPS Design answered:

Dag Eveline,

Het is inderdaad de bedoeling dat je door breit tot de aangegeven afmetingen. Dit stond niet aangegeven in het patroon en ik heb het nu aangepast. Veel breiplezier!

06.12.2018 - 10:49

country flag Cecile wrote:

I am at the point when I start the short rows in the back. Is this a wrap and turn? The directions only say turn. I am assuming that after I do the first row of short row (elevation in back) I will purl on the wrong side.

10.11.2018 - 02:19

DROPS Design answered:

Dear Cecile, the short rows on the elevation are not worked wrap & turn - see video but you can use this technique if you rather. Happy knitting!

12.11.2018 - 11:03

country flag Heidi Byvold wrote:

Jeg har prøvd meg på forhøyning for første gang....Får det ikke til å stemme. Når jeg strikker det slik jeg forstår, så blir det to rader mer på venstre side av MB enn på høyre ( sett fra retten). Jeg har prøvd nå å strikke 30 masker rett, snu, strikke 60 m vrangt, snu, strikke 65 m rett, snu, strikke 70 m vrang, snu, strikke 75 rett, snu, strikke 80 m vrang, snu og så rett 40 m til MB. Da får jeg det til å stemme🤔Men det er jo ikke sånn det står i oppskriften?

28.03.2018 - 09:37

DROPS Design answered:

Hej Heidi, du skal kun strikke forhøjning over ialt 60 masker, du starter med 20, strikker 40 tilbage, lægger 5 masker på for hver gang du vender til du har strikket over 60 masker. God fornøjelse!

26.04.2018 - 11:02

country flag Roody wrote:

Hei! Takk for svar. Det vil hjelpe meg med å fortsette litt videre. Men du mener 1 maske hver 4.omgang x1 etter at man er ferdig med å strikke de 19. Ganger med 1 maske økning på hver side av merket anna hver gang?

29.10.2017 - 08:17

DROPS Design answered:

Hej igen, ja det stemmer du øger en gang til efter de 19 gange og sidste gang er det efter 4 pinde. God fornøjelse!

15.11.2017 - 14:04

country flag Roody wrote:

Hei! Lurer på hva de mener i det feltet om Raglan og ...hver 4.omgang 1 gang i alle størrelser=288-310-338-366-400-432 mArb måler 20-21-22-23-24-25 cm fra skulder. Hvis man skal i en størrelse M som jeg strikker øke hver 2.omgang med 1 M på hver side av merket, så må man øke med 2 hver 4.omgang i følge oppskriften ikkesant?

28.10.2017 - 15:57

DROPS Design answered:

Hei Roody, Du øker (hver 2. pinne) først 2 masker på hver side av merkene x 1; 1 maske på hver side x 19; også 1 maske (hver 4. pinne) x 1. Håper dette hjelper og god fornøyelse!

29.10.2017 - 06:02

country flag Jeanette Orderud wrote:

Hei! Jeg får ikke førhøyningen i nakken til å stemme. Ser at dette er blitt rettet, men forstår bare ikke hvordan det kan stemme? Det blir jo ikke likt på begge sider og det skal det vel være?

23.06.2017 - 18:40

DROPS Design answered:

Hei Jeanette. Hvilken str strikker du? Når jeg ser på str. S, så har du like mange forhøyninger på hver side. På denne modellen er det forhøyning etter 20 masker (1.gangs det snus) og 25 masker (3.gangs det snus) i den ene siden og 25 masker (2.gangs det snus) og 30 masker (4.gangs det snus) i den andre siden, sett fra midt bak). God Fornøyelse!

26.06.2017 - 11:41

Zoe Davison wrote:

Hi, I'm at the start of the elevation. I've knit 24sts. How do I execute the turn?

29.09.2016 - 17:21

DROPS Design answered:

Dear Mrs Davison, after you have knit the 24 sts from RS, turn piece and P 53 sts from RS (you are working now in rows), turn and K 5 more sts from RS = 58 sts, turn and P 5 more sts from WS = 63 sts, turn and K 5 more sts from RS = 68 sts, turn and P sts to beg of round. Turn and continue now in the round from mid back. See below how to work an elevation (with a different no of sts but technique is the same). Happy knitting!

30.09.2016 - 08:23

country flag Christine wrote:

Bonjour, j'ai tricoté les rangs raccourcis pour la ré hausse du col comme indiqué mais mon marqueur de début de tour est décalé ... j'ai 10 m. d'un côté et 70 de l'autre (je suis la taille XL) alors que j'ai suivi scrupuleusement les indications donc mon marqueur devrait être au milieu du dos... pouvez-vous me dire quelle est mon erreur... Merci d'avance

17.02.2016 - 17:13

DROPS Design answered:

Bonjour Christine, le nombre de mailles du 1er des rangs raccourcis a été corrigé (dans le texte + cf onglet "corrections") afin de commencer au milieu dos. Bon tricot!

18.02.2016 - 09:52

country flag Cornelia Lechleiter wrote:

Wenn ich bei Gr.xxl nach der Erhöhung für den Hals bei 88M angekommen bin Wende und in der Rückreihe bis zum Rd Anfang stricke Wende und weiterstricke in Runde mit rechts,dann die Maschen einteile für die Raglanärmel 32-24-64-24-32 befindet sich ein Ärmel in der Erhöhung ein Ärmel im Vorderteil. Was mach ich falsch ??? Ich habe schon 3mal alles aufgezogen 😒😒

23.01.2016 - 18:37

DROPS Design answered:

Eventuell liegt hier ein Fehler in der Anleitung vor, das wird nun von den Designerinnen geprüft. Ich bitte daher noch um etwas Geduld bis zur Antwort.

02.02.2016 - 11:50