
Popular categories
Looking for a yarn?


Comments / Questions (71)
![]() Tuttie wrote:
Tuttie wrote:
Jag undrar hur man gör när antalet maskor inte går jämt upp i en rapport. Av slutar man och fortsätter med nästa rad. Sen när du säger att man ska sticka ihop antingen rätt eller avigt i mosstickningen när det kommer 2 maskor som är lika efter varandra gäller det på första varvet i mosstickningen då där man minskar i början på varje rapport?
23.06.2025 - 18:54DROPS Design answered:
Hej, ja man minskar på førsta varvet i mosstickningen på varje rapport, sätt gärna en markör mellan rapporterna, så du vet var du ska minska :)
26.06.2025 - 13:37
![]() Lena wrote:
Lena wrote:
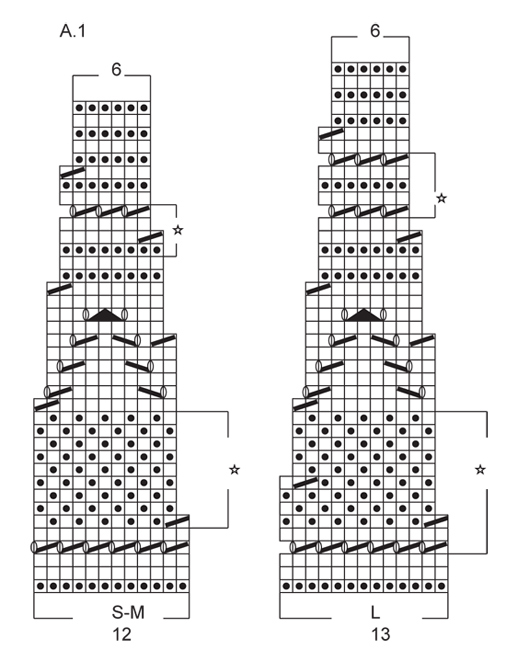
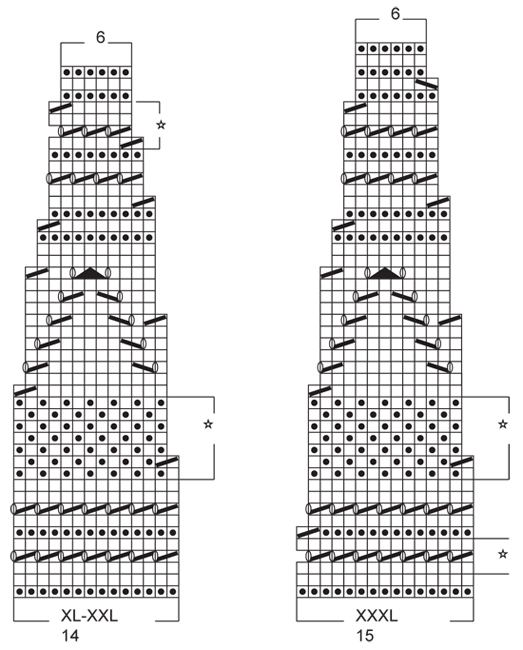
Hej hur minskar jag när jag stickar oket enligt diagrammet på Sunny side top. Storlek xl 14 m och 24 rapporter på bredden.336 m ska minskas till 144 m . Hur ser jag det för det står inget om det ? Mvh Lena
18.06.2025 - 20:55DROPS Design answered:
Hei Lena. Jo, du har 336 masker når ermkantene er satt sammen med bærestykket. Så skal du strikke etter diagram A.1 (i din størrelse). Det strikkes 24 rapporter av A.1. 1 rapport = 14 masker x 24 = 336 masker. Om du ser på rad 12 i diagrammet, strikkes 2 masker sammen = 1 maske felt x 24 rapporter = 24 felte masker når rad 12 er ferdig strikket. 336 - 24 = 312 masker. Det felles også på rad 18 + 24 + 28 + 32 + 34 + 39 + 42. Altså det felles 24 masker på totalt 8 rader = 24 x 8 = 192 felt masker. Man startet med 336 masker - 192 felt masker = 144 masker på pinnen når A.1 er ferdig strikket. mvh DROPS Design
23.06.2025 - 10:35
![]() Tuttie wrote:
Tuttie wrote:
Jag ska börja med diagrammet och har aldrig stickat efter diagram. Var börjar jag sticka diagrammet? Jag har satt på ärmarna utan att sticka och undrar nu om jag jan bleja mönstret var som helst??
12.06.2025 - 18:18DROPS Design answered:
Hei Tuttie. Når du har satt ermene på samme rundpinne som fram- och bakstykket, starter du rett på diagrammet i din str. nederst til høyre. (blir ved en overgang mellom 1 erme og fram- och bakstykke). Usikker på hvordan man leser et strikkediagram? Klikk på: Tips & Hjälp - DROPS Lektioner - Läs ett mönster - Hur man läser stickdiagram. mvh DROPS Design
16.06.2025 - 09:26
![]() Irma Hermans wrote:
Irma Hermans wrote:
Ik heb tussen de markeerders 40-60-40-60 steken staan. Als ik moet minderen vóór de 1e en ná de 4e dan minder ik bij de 60 steken. Klopt het dat de 40 steken dan voor- en achterpand zijn?
22.05.2025 - 10:22DROPS Design answered:
Dag Irma,
Ja, dat klopt, 60 steken op de panden. De meerderingen komen aan de zijkanten en het aantal steken op het voor- en achterpand blijven hetzelfde.
23.05.2025 - 12:26
![]() Irma Hermans wrote:
Irma Hermans wrote:
Ik heb de markeerders geplaatst. Nu wil ik minderen, klopt het dat de zijkanten meer steken hebben dan voor en achterkant? Tussen markeerder 1 en 2 heb ik 40 steken en tussen 2 en 3 60 steken, enz. Dus minderen vóór de 1e markeerder en ná de 2e betekent dat ik minder in de 60 steken. Klopt dit?
21.05.2025 - 18:42DROPS Design answered:
Dag Irma,
Ja, dat klopt hoor.
01.06.2025 - 19:32
![]() Corrie Brouwer wrote:
Corrie Brouwer wrote:
Oké, dank je wel voor het beantwoorden van mijn vraag.
19.08.2024 - 07:20
![]() Corrie Brouwer wrote:
Corrie Brouwer wrote:
Ja, dat begrijp ik; de mouwen heb ik ingevoegd. Maar de vraag was waar begin ik nadat ik heb ingevoegd met het breien van het patroon.
12.08.2024 - 18:00DROPS Design answered:
Dag Corrie,
Aha, dat is inderdaad niet aangegeven en volgens mij maakt het niet zoveel uit, dus waar je de draad hebt nadat je de mouwen en de panden bij elkaar hebt gezet, daar zou je kunnen beginnen.
18.08.2024 - 17:29
![]() Corrie Brouwer wrote:
Corrie Brouwer wrote:
Ik ben bezig met de top Sunny Side en heb de mouwranden op de rondbreinaald ingevoegd zonder te breien zoals staat aangegeven. Waar begin ik nu met het breien van het patroon; vóor een armsgat of na een armsgat. Of moet ik halverwege het armsgat waar ik als laatste vier steken heb afgekant beginnen? Het patroon moet toch voor en achter goed uitkomen. Ik hoor graag hoe ik verder moet.
10.08.2024 - 16:05DROPS Design answered:
Dag Corrie,
De mouwranden worden heen en weer gebreid en daarna op dezelfde naald gezet als het lijf op het punt waar steken afgekant zijn onder de mouw. Dus de steken van een mouwrand komen tussen het voorpand en achterpand. Aan het eind worden de zijkanten van de mouwranden tegen de afgekante steken genaaid.
12.08.2024 - 16:55
![]() Mona wrote:
Mona wrote:
Mønster A1 str s/m pind nr 6 og 7 Pind 6 skal man tage 2 ret sammen og herefter 10 masker ret/vrang - 2 ret sammen og fortsætte i vrang/ret. Pind 7 startes med vrangmaske og fortsættes ret/vrang men - når man så når til de 2ret sammen kommer der 2 retmasker lige efter hinanden og det er ikke længere perlestrik - jeg kan ikke knække den kode
06.03.2024 - 17:00DROPS Design answered:
Hei Mona. Om du ser på forklaringen til stjernen i diagramteksten står det at mønstret i diagrammet går ikke opp i rapporten men går opp i maske antallet på hele toppen. mvh DROPS Design
11.03.2024 - 11:13
![]() Ava wrote:
Ava wrote:
I know that you have to K2 together on the 1 st row of seed stitch but on the rows that follow, there will be either 2 knit or purl stitches if following the chart in the beginning and end of the groups of stitches.
24.05.2022 - 10:22DROPS Design answered:
Dear Ava, correct, just K 2 tog or P 2 tog according to the seed stitch. Happy knitting!
24.05.2022 - 13:45
|
||||||||||||||||||||||
Sunny Side#sunnysidetop |
||||||||||||||||||||||
|
|
||||||||||||||||||||||
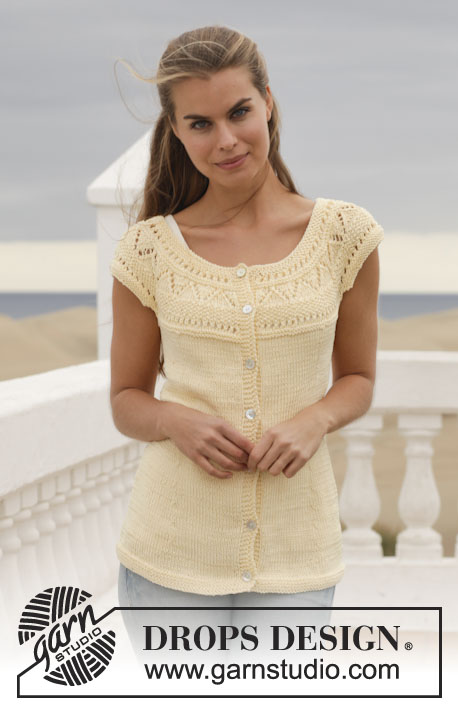
Knitted DROPS top with lace pattern and round yoke in ”Muskat” or "Belle". Size: S - XXXL.
DROPS 152-9 |
||||||||||||||||||||||
|
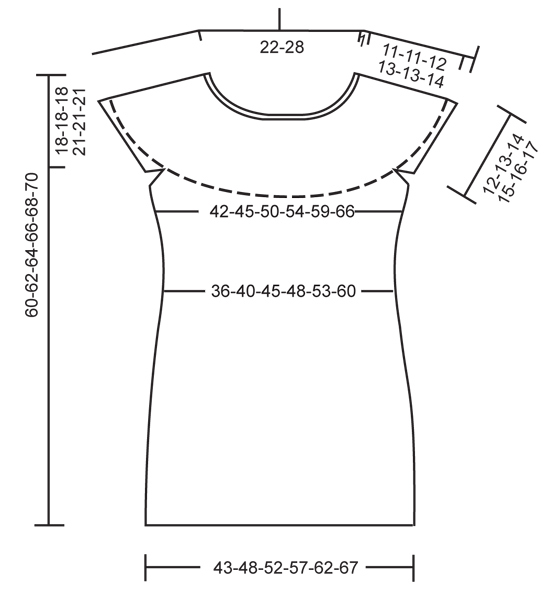
GARTER ST (back and forth on needle): K all rows. 1 ridge = 2 rows K. GARTER ST (in the round on circular needle): * K 1 round and P 1 round *, repeat from *-*. 1 ridge = 2 rounds. PATTERN: See diagram A.1. See diagram for correct size. DECREASE TIP: Dec 1 st after 2nd and 4th marker as follows: K 2 tog. Dec 1 st before 1st and 3rd marker as follows: Work until 2 sts remain before marker, slip 1 st as if to K, K 1, psso. INCREASE TIP: Inc 1 st after 2nd and 4th marker as follows: Make 1 YO. Inc 1 st before 1st and 3rd marker as follows: Make 1 YO. On next round K YO twisted (i.e. work in back loop of YO instead of front) to avoid holes. ---------------------------------------------------------- BODY: Worked in the round on circular needle. Cast on 180-200-220-240-260-280 sts on circular needle size 3.5 mm with Muskat or Belle. Work 4 ridges in GARTER ST - see explanation above. Switch to circular needle size 4 mm. Work in stocking st until piece measures 7 cm. REMEMBER THE KNITTING TENSION! Now insert 4 markers in the piece as follows: K 25-30-30-35-35-40, insert 1 marker (= 1st marker), K 40-40-50-50-60-60, insert 1 marker (= 2nd marker), K 50-60-60-70-70-80, insert 1 marker (= 3rd marker), K 40-40-50-50-60-60, insert 1 marker (= 4th marker), finish with K 25-30-30-35-35-40. Move the markers upwards when working. On next round, dec 1 st at every marker – Read DECREASE TIP = 4 sts dec. NOTE! No of sts mid front and mid back is the same, dec in side sts. Repeat dec every 8th-8th-8th-6th-6th-8th round 6-7-7-9-8-6 more times (= 7-8-8-10-9-7 dec in total) = 152-168-188-200-224-252 sts on needle. Continue in stocking st until piece measures 32 cm. On next round, inc 1 st at every marker – Read INCREASE TIP = 4 sts inc. NOTE! No of sts mid front and mid back is the same, inc in side sts. Repeat inc every 4th-6th-6th-4th-6th-8th round 5-4-5-6-5-5 more times (= 6-5-6-7-6-6 times in total) = 176-188-212-228-248-276 sts on needle. Continue in stocking st until piece measures 41-43-45-44-46-48 cm. Then work 1 ridge in garter st over all sts. READ ALL OF THE FOLLOWING SECTION BEFORE CONTINUING! Now cast off for sleeve on next round as follows: Cast off the first 4 sts, K 80-86-98-106-116-130, cast off the next 8 sts, K 80-86-98-106-116-130, cast off the last 4 sts AT THE SAME TIME dec 8-16-13-4-32-29 sts evenly in K sts = 152-156-183-208-200-231 sts on needle. Fasten off. Put piece aside and knit the sleeve edges. SLEEVE EDGE: Worked back and forth on circular needle. Cast on 54-58-62-68-72-76 sts on circular needle size 3.5 mm with Muskat or Belle. Work 2 ridges in GARTER ST – see explanation above, AT THE SAME TIME on 1st row dec 4 sts evenly (this is done to avoid a tight edge on sleeve) = 50-54-58-64-68-72 sts on needle. Fasten off. Put piece aside and knit another sleeve edge. YOKE: Slip sleeve edges on to same circular needle size 4 mm as body where armholes were cast off = 252-264-299-336-336-375 sts on needle (do not work sts when slipping them on same needle). Work diagram A.1(= 12-12-13-14-14-15 sts) – see explanation above – over all sts (= 21-22-23-24-24-25 repetitions in width). Continue pattern like this. After all dec are done, 126-132-138-144-144-150 sts remain on needle. Cast off. ASSEMBLY: Sew sleeve edges (i.e. the 2 ridges) to the first 2 sts on body where cast off for sleeve in each side. |
||||||||||||||||||||||
Diagram explanations |
||||||||||||||||||||||
|
||||||||||||||||||||||
 |
||||||||||||||||||||||
 |
||||||||||||||||||||||
 |
||||||||||||||||||||||
Have you finished this pattern?Tag your pictures with #dropspattern #sunnysidetop or submit them to the #dropsfan gallery. Do you need help with this pattern?You'll find 20 tutorial videos, a Comments/Questions area and more by visiting the pattern on garnstudio.com. © 1982-2026 DROPS Design A/S. We reserve all rights. This document, including all its sub-sections, has copyrights. Read more about what you can do with our patterns at the bottom of each pattern on our site. |
||||||||||||||||||||||


With over 40 years in knitting and crochet design, DROPS Design offers one of the most extensive collections of free patterns on the internet - translated to 17 languages. As of today we count 324 catalogues and 12290 patterns translated into English (UK/cm). 12290
We work hard to bring you the best knitting and crochet have to offer, inspiration and advice as well as great quality yarns at incredible prices! Would you like to use our patterns for other than personal use? You can read what you are allowed to do in the Copyright text at the bottom of all our patterns. Happy crafting!
Post a comment to pattern DROPS 152-9
We would love to hear what you have to say about this pattern!
If you want to leave a question, please make sure you select the correct category in the form below, to speed up the answering process. Required fields are marked *.