
Popular categories
Looking for a yarn?


Comments / Questions (160)
![]() Alice RAOUL wrote:
Alice RAOUL wrote:
Bonjour, j'ai perdu le fil des augmentations /diminutions dans la dernière partie du patron. J'ai fait toutes sortes de calculs pour arriver à savoir où j'en étais mais je ne trouve nulle part le nombre de mailles pour A2/A3 et jersey après les indications. Il manque une donnée très importante. Merci pour votre aide.
28.12.2019 - 09:29DROPS Design answered:
Bonjour Mme Raoul, en fonction de votre nombre total de mailles, et le cas échéant du nombre d'augmentations pour le col/diminutions pour l'encolure déjà faites, vous pourrez retrouver le nombre de fois que vous avez augmenté/diminué pour votre taille. Bon tricot!
02.01.2020 - 12:23
![]() Irene wrote:
Irene wrote:
Im working on the sleeves, when piece measures 48cm i have to insert a marker mid under sleeve and have to work back and forth. I dont understand why i have to insert the marker? Do i knit back and forth from marker ? Im making the sleeves on circular needles instead of dpn
11.12.2019 - 15:17DROPS Design answered:
Dear Irene, the marker will mark the beginning of piece worked back and forth and where to seam sleeve later, this video shows how to add the markers, work the end of sleeve and sew it along armhole. Happy knitting!
11.12.2019 - 16:01
![]() Irene wrote:
Irene wrote:
Im at the part where i have to increase and decrease (42cm) i understand where and how i have to dicrease. Im just a bit confused about the note: "inc. Is moved into pattern in a2/a3 so that inc is further in on piece" does this mean i have to increase 3 times in the middle of the piece and not increase in a2 and a3 before/after the band? Or do i just decrease after band and immediately increase 2 times? Love this project, cant wait to finish and wear this beautiful piece
13.09.2019 - 14:44DROPS Design answered:
Dear Irene, when decreasing for neck and increasing in A.2/A.3 the pattern will automatically move towards shoulder. Happy knitting!
16.09.2019 - 08:11
![]() Tove Hjørringgaard wrote:
Tove Hjørringgaard wrote:
Hej - jeg skal til at strikke krave, samt indtagning til hals. Hvordan skal det forståes at indtagningen flyttes ind på strikketøjet? På forhånd tak. Tak for jeres fantastiske hjemmeside og de muligheder der findes der.
27.02.2019 - 11:13DROPS Design answered:
Hej Tove, det vil ske automatisk når du fortsætter med at tage ud ifølge A.2/A.3 samtidigt som du tager ind indenfor kravemaskerne i hver side. God fornøjelse!
05.04.2019 - 12:19
![]() Henriette wrote:
Henriette wrote:
Hallo, ich bin gerade bei dem Beginn des Halsausschnitts angekommen. Ich finde es sehr verwirrend, dass ich bei den Aufnahmen im Strukturmuster nach 38 cm Maschen in A2/A3 aufnehmen und gleichzeitig für den Halsausschnitt Maschen neben der Blende, also ebenfalls in A2/A3, abnehmen soll. Könnten Sie mir bitte etwas deutlicher erläutern, wo genau im Muster die Aufnahmen und gleichzeitigen Abnahmen gestrickt werden sollten? Vielen Dank!
13.11.2017 - 22:56DROPS Design answered:
Liebe Henriette, die Aufnahmen im Strukturmuster beginnen nach 38 cm und es wird 1 M in A.2 und 1 M in A.3 in jeder 4. Reihe x 6 und in jeder 8. Reihe x 6-5 (siehe Größe) - Für den Kragen wird es nach 40-45 cm zugenommen (nach den verkürzten Reihen): 1 M in jede 2. Reihe x 5-7 und 1 M in jede 4. Reihe x 14-16. Gleichzeitig nach 41-46 cm nehmen Sie für den Halsausschnitt ab: 1 M in jede 2. Reihe x 4 und 1 M in jede 4. Reihe x 7-9. Die Armlöcher nach 51-56 cm nicht vergessen. Viel Spaß beim stricken!
14.11.2017 - 09:21
![]() Loes Schilder wrote:
Loes Schilder wrote:
Bij het breien van de sjaalkraag moet ik dan bij alle meerderingen een verkorte naald tussendoor breien. Hartelijke groet, Loes.
22.05.2017 - 13:27DROPS Design answered:
Hoi Loes, Die verkorte toer doe je slechts 1 keer aan beide kanten aan het begin van de sjaalkraag. Daarna niet meer (anders zou je een golvende kraag krijgen.)
22.05.2017 - 16:45
![]() Loes Schilder wrote:
Loes Schilder wrote:
Prachtig vest. Een vraag over het meerderen bij 38 cm in structuurpatroon en het minderen bij 44 cm voor de hals. Hoe kan ik dit gelijktijdig doen. Hartelijke groet, Loes.
22.05.2017 - 10:42DROPS Design answered:
Hoi Loes, Hoe je dit gelijktijdig doet in het telpatroon staat beschreven in het patroon. Bij 'MEERDEREN IN HET STRUCTUURPATROON STAAT: Meerder 1 st in A.2 door 2 st te breien in de st na de meerdering en meerder 1 st in A.3 door 2 st te breien in de st voor de meerdering en bij de TIPS VOOR HET MEERDEREN staat hoe je dit doet bij de sjaalkraag.
22.05.2017 - 16:40
![]() Maria Kitzler wrote:
Maria Kitzler wrote:
Ist es aufgrund des musters möglich, die jacke 30 cm kürzer zu stricken Und wenn ja, was muss ich beachten? Danke für eine Antwort.
15.12.2016 - 04:34DROPS Design answered:
Liebe Frau Kitzler, es ist wahrscheinlich möglich, die Ab- bzw Zunahmen (Taille) müssen Sie dann anpassen. Leider können wir jedes Modell nach jedem Geschmack anpassen, aber gerne wird Ihr DROPS Laden helfen. Viel Spaß beim stricken!
15.12.2016 - 09:41
![]() Ingrid wrote:
Ingrid wrote:
I would love to make this as a gilet, but do not have the experience to adjust the pattern myself. Has anyone done this, or is there a quick and easy way to explain where to stop knitting? Regards,
14.08.2016 - 14:15DROPS Design answered:
Dear Ingrid, we are unfortunately not able to adjust each of our patterns to every individual request, but you are welcome to contact your DROPS store even per mail or telephone for further personnal asssistance. You can also use the search engine to find similar patterns matching the result you like to to help you. Happy knitting!
15.08.2016 - 11:07
![]() Knut wrote:
Knut wrote:
Diagrammets 72 cm visar hela måttet.
21.06.2016 - 20:58
|
||||||||||||||||||||||
Tanja#tanjajacket |
||||||||||||||||||||||
 |
 |
|||||||||||||||||||||
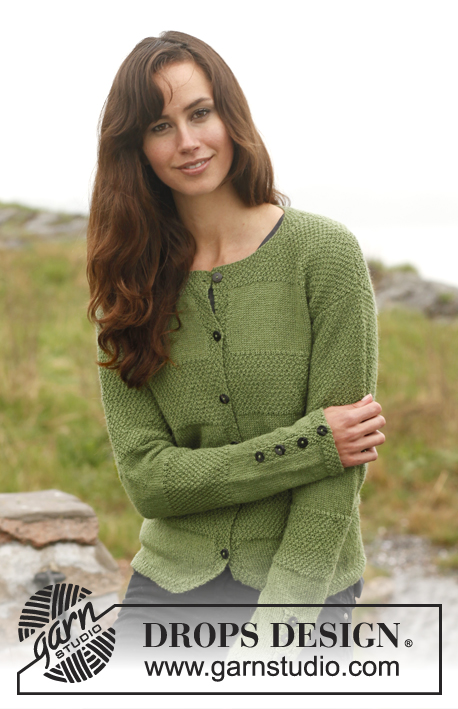
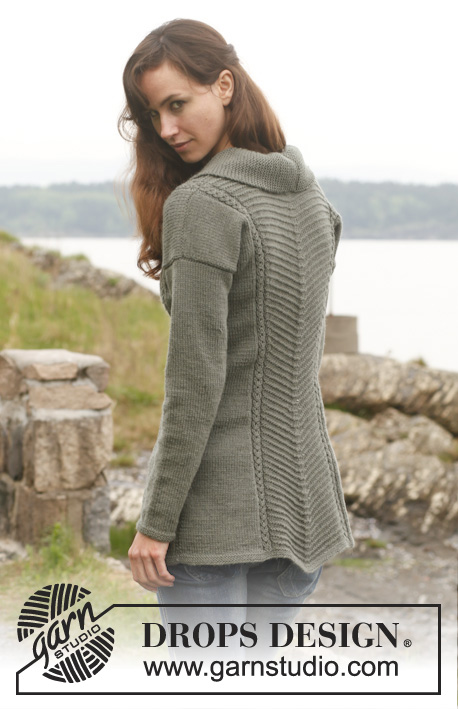
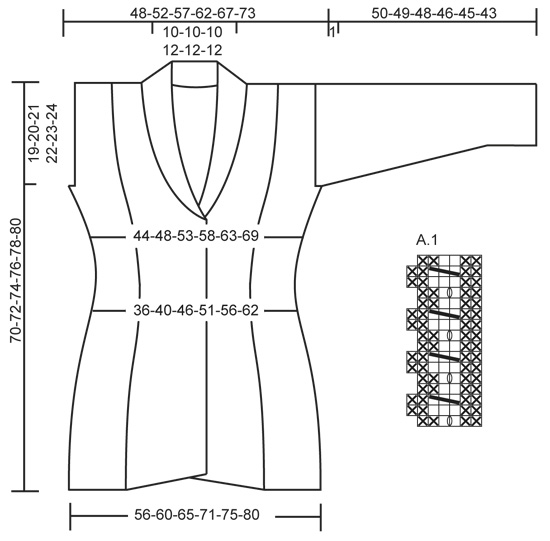
Knitted DROPS fitted jacket with textured pattern and shawl collar in ”Lima”. Size: S - XXXL.
DROPS 149-1 |
||||||||||||||||||||||
|
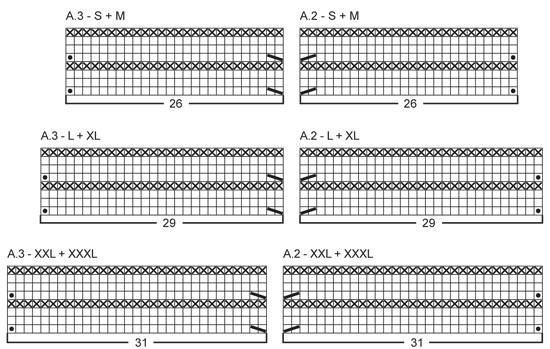
GARTER ST (back and forth on circular needle): K all rows. 1 ridge = 2 rows K. GARTER ST (in the round on double pointed needles): * K 1 round and P 1 round *, repeat from *-*. 1 ridge = 2 rounds. PATTERN: See diagrams A.1 to A.3 - NOTE: Choose diagram for correct size. Diagrams show all rows in pattern from RS. DECREASE TIP: Dec on each side of marker in the sides on jacket, dec outside A.1 on front and back piece and dec inside sts in garter st on band/collar. All dec are done from RS! Dec as follows before marker/A.1/sts in garter st on collar/band: K 2 tog. Dec as follows after marker/A.1/sts in garter st on collar/band: Slip 1 st as if to K, K 1, psso. INCREASE TIP (applies to collar): Inc inside outermost st by making 1 YO. On next row K YO twisted to avoid holes. BUTTONHOLES: Dec for buttonholes on right band. 1 buttonhole = K tog fourth and fifth st from edge and make 1 YO. Dec for buttonholes when piece measures (measured from bottom edge on the longest part): SIZE S: 11, 18, 25, 32 and 39 cm SIZE M: 12, 19, 26, 33 and 40 cm SIZE L: 13, 20, 27, 34 and 41 cm SIZE XL: 12, 18, 24, 30, 36 and 42 cm. SIZE XXL: 13, 19, 25, 31, 37 and 43 cm. SIZE XXXL: 14, 20, 26, 32, 38 and 44 cm. ---------------------------------------------------------- JACKET: Worked back and forth on circular needle from mid front. Cast on 260-276-300-324-340-364 sts (incl 6 band sts in each side towards mid front) on circular needle size 3 mm with Lima. Work 3 RIDGES in garter st - see explanation above. Switch to circular needle size 4 mm and work next row from RS as follows: 6 band sts in garter st, work A.2 (= 26-26-29-29-31-31 sts), A.1 (= 6 sts), 30-34-37-43-45-51 sts in stocking st, insert 1 marker (= side), 30-34-37-43-45-51 sts in stocking st, A.1 (= 6 sts), A.2 (= 26-26-29-29-31-31 sts), A.3 (= 26-26-29-29-31-31 sts), A.1 (= 6 sts), 30-34-37-43-45-51 sts in stocking st, insert 1 marker (= side), 30-34-37-43-45-51 sts in stocking st, A.1 (= 6 sts), A.3 (= 26-26-29-29-31-31 sts) and 6 band sts in garter st. Continue the pattern like this. REMEMBER THE KNITTING TENSION! DECREASE IN THE SIDES: When piece measures 8 cm, dec 1 st on each side of both markers - READ DECREASE TIP (= 4 sts dec). Repeat dec every 8 cm 3 more times (= 4 dec in total on each side of both markers). DECREASE IN TEXTURED PATTERN: AT THE SAME TIME when piece measures approx. 10 cm – adjust so that next row is a row with inc and dec in A.2/A.3 - dec 1 st outside A.1 on front and back piece, i.e. in stocking st section after/before A.1 – READ DECREASE TIP. Dec in addition 1 extra st in A.2 and A.3 on front and back piece so that section with diagonal stripes gradually becomes smaller. Dec 1 st in A.2 by working the last 2 sts before dec the same way as dec, i.e. K 2 tog. Dec 1 st in A.3 by working the next 2 sts after dec the same way as dec, i.e. slip 1 st as if to K, K 1, psso (= 8 sts dec in total on row). Repeat these dec every 8th row 8-8-8-8-7-7 more times (= 9-9-9-9-8-8 dec in total) – remember BUTTONHOLES on right band – see explanation above. After all dec are done, 172-188-212-236-260-284 sts remain on needle. Continue the pattern as before – READ THE REST OF PATTERN BEFORE CONTINUING. INCREASE IN TEXTURED PATTERN: When piece measures approx. 38 cm – adjust so that next row is with inc and dec in A.2/A.3 - inc 1 extra st in A.2 and A.3 so that section with diagonal stripes becomes larger. Inc 1 st in A.2 by working 2 sts in st after inc and inc 1 st in A.3 by working 2 sts in st before inc (= 4 sts inc on row). Repeat inc every 4th row 5 more times (= 6 times in total) and then every 8th row 6-6-6-6-5-5 times. SHAWL COLLAR: AT THE SAME TIME when piece measures 40-41-42-43-44-45 cm (i.e. 1 cm after last buttonhole on right band), inc 1 st in each side for shawl collar – READ INCREASE TIP. Work next row as follows from RS: Work 1 ridge (i.e. 2 rows K) back and forth over the outermost 7 sts on row (i.e. band + 1 inc st - the other sts on row are not worked), turn piece and work 1 row from RS as before over all sts, turn piece and work 1 ridge back and forth over the outermost 7 sts, turn and work back as before over all sts again (this is done so that the neckline folds nicely when neck dec beg – see explanation below). Then work back and forth over all sts. AT THE SAME TIME continue inc for shawl collar inside outermost st in each side on every other row (i.e. every row from RS) 5-5-6-6-7-7 more times (= 6-6-7-7-8-8 times in total) and then every 4th row (i.e. every other row from RS) 14-14-15-15-16-16 times in total = 20-20-22-22-24-24 sts inc for collar and 26-26-28-28-30-30 sts in garter st in total. NECKLINE: AT THE SAME TIME when piece measures 41-42-43-44-45-46 cm, dec 1 st for neck inside sts in garter st on band + inc sts for collar - READ DECREASE TIP. Repeat dec every other row 3 more times (= 4 times in total) and then every 4th row 7-7-7-9-9-9 times - NOTE: When dec for neck, the inc is moved into pattern in A.2/A.3 on front piece after dec for neck so that inc is further in on piece. ARMHOLES: AT THE SAME TIME when piece measures 51-52-53-54-55-56 cm, cast off 4 sts in each side for armholes (i.e. cast off 2 sts on both sides of both markers) and finish each piece separately. BACK PIECE: Continue pattern as before with 1 edge st in garter st in each side. ADJUSTING DIAGONAL LINES: When piece measures 64-64-64-64-62-62 cm (all inc in A.2/A.3 should now be done), dec and inc in A.2 and A.3 every 8th row instead of every 4th row so that the slanting of the lines is gradually weaker. This is done 3-3-3-3-4-4 times in total, then work A.2/A.3 back and forth over the middle 58-58-64-64-68-68 sts without inc and dec (work the other sts as before). When piece measures 68-70-72-74-76-78 cm, cast off the middle 20-20-20-24-24-24 sts for neck and finish each shoulder separately. Continue to cast off 1 st on next row from neck = 39-43-49-53-58-64 sts remain on the shoulder. Continue until piece measures 70-72-74-76-78-80 cm and cast off. Repeat on the other shoulder. RIGHT FRONT PIECE: Continue pattern as before with 1 edge st in garter st towards armhole AT THE SAME TIME inc for shawl collar and dec for neckline as before. ADJUSTING DIAGONAL LINES: When piece measures 64-64-64-64-62-62 cm (all inc in A.2 should now be done), dec and inc in A.2 every 8th row instead of every 4th row as on back piece so that the slanting of the lines is gradually weaker. This is done 3-3-3-3-4-4 times in total, then work A.2 back and forth without inc and dec (work the other sts as before). After all inc and dec, there are 65-69-77-81-88-94 sts on needle. When piece measures approx. 70-72-74-76-78-80 cm, adjust so that next row is worked from WS, cast off the first 39-43-49-53-58-64 sts on shoulder, K the rest of row over the last 26-26-28-28-30-30 sts. COLLAR: Beg mid front and work in garter st back and forth over the remaining sts for collar as follows: * 2 rows over all sts, 2 rows over only the outermost 18-18-20-20-22-22 sts (towards mid front) *, repeat from *-* until collar measures approx. 7-7-7-8-8-8 cm on the most narrow part, cast off. LEFT FRONT PIECE: Continue as on right front piece but reversed (continue with A.3 instead of A.2 - work the other sts as before). Cast off shoulder sts from RS (instead of WS). SLEEVE: Worked in the round on double pointed needles. Cast on 46-48-50-52-54-56 sts on double pointed needles size 3 mm with Lima and work 3 RIDGES in garter st - see explanation above. Switch to double pointed needles size 4 mm and work in stocking st. When piece measures 7-10-8-13-9-12 cm, inc 2 sts mid under sleeve. Repeat inc every 2½-2-2-1½-1½-1 cm 16-17-18-19-22-26 more times (= 17-18-19-20-23-27 inc in total) = 80-84-88-92-100-110 sts. When piece measures 49-48-47-45-44-42 cm, insert 1 marker mid under sleeve. Continue back and forth on needle until sleeve measures 50-49-48-46-45-43 cm and cast off. Knit another sleeve. ASSEMBLY: Sew the shoulder seams. Sew in sleeves inside 1 edge st - marker mid under sleeve should fit marker in the side on body. Sew collar tog mid back (make sure that seam is not visible when collar is folded down) and sew collar to neckline at the back of neck. Sew on buttons. |
||||||||||||||||||||||
Diagram explanations |
||||||||||||||||||||||
|
||||||||||||||||||||||
 |
||||||||||||||||||||||
 |
||||||||||||||||||||||
Have you finished this pattern?Tag your pictures with #dropspattern #tanjajacket or submit them to the #dropsfan gallery. Do you need help with this pattern?You'll find 25 tutorial videos, a Comments/Questions area and more by visiting the pattern on garnstudio.com. © 1982-2026 DROPS Design A/S. We reserve all rights. This document, including all its sub-sections, has copyrights. Read more about what you can do with our patterns at the bottom of each pattern on our site. |
||||||||||||||||||||||


With over 40 years in knitting and crochet design, DROPS Design offers one of the most extensive collections of free patterns on the internet - translated to 17 languages. As of today we count 324 catalogues and 12290 patterns translated into English (UK/cm). 12290
We work hard to bring you the best knitting and crochet have to offer, inspiration and advice as well as great quality yarns at incredible prices! Would you like to use our patterns for other than personal use? You can read what you are allowed to do in the Copyright text at the bottom of all our patterns. Happy crafting!
Post a comment to pattern DROPS 149-1
We would love to hear what you have to say about this pattern!
If you want to leave a question, please make sure you select the correct category in the form below, to speed up the answering process. Required fields are marked *.