
Popular categories
Looking for a yarn?


Comments / Questions (18)
![]() Françoise wrote:
Françoise wrote:
Bonjour J'ai écris trop vite. C'est au 3ème rg que j'ai 25 étoiles et non 26, d'où ma question de quinconce
17.03.2020 - 15:34DROPS Design answered:
Bonjour Françoise, essayez de repérer d'après la vidéo où vous avez pu oublier une étoile au 3ème rang, car vous devez toujours en avoir 26. Essayez de bien repérer vos étoiles du 1er rang et de comparer, cela peut vous aider à repérer celle qui manque. Bon crochet!
17.03.2020 - 16:28
![]() Françoise wrote:
Françoise wrote:
Bonjour Au 1er rg j'ai 26 étoiles au 2ème rg je n'ai que 25 étoiles seraient-elles en quinconce ? Je crochète avec le n°10 et ai 4 pelotes sera ce suffisant? Puis je faire mes augmentations au rg 6 au lieu du rg8? Merci de votre aide. Cordialement
17.03.2020 - 14:53DROPS Design answered:
Bonjour Françoise, vous devriez avoir le même nombre d'étoiles, sur le 1er rang on forme la première moitié des étoiles (celles du bas) et sur le 2ème rang, on "ferme" les étoiles (sauf si on doit augmenter/diminuer) Cette vidéo pourra peut-être vous aider. Si votre échantillon est juste, alors la quantité DROPS Eskimo indiquée devrait suffire - plus d'infos sur l'échantillon ici. Bon crochet!
17.03.2020 - 15:02
![]() Rebecka Norrman wrote:
Rebecka Norrman wrote:
Hej! Jättefin sjal! Men jag har lyckats fastna redan på varv 2... Det står att man då ska fått ihop 26 stjärnor när 2a varvet är klart, men jag lyckas endast få till 18... Stämmer det att det ska vara 57 lm som grund? Eller gör jag något annat fel tror ni? Tycker mig göra precis som ni i instruktionsvideon för stjärnmönstret. Hälsningar Rebecka
04.12.2018 - 00:47DROPS Design answered:
Hei Rebecka. Du har 57 lm. Den første stjernen hekles over 7 lm (hopp over 1, hekle over de neste 6). Videre hekles de 4 første m av den neste stjerne over masker fra den forrige stjernen slik: 1 lm allerede på nålen, 1 m i hullet i midten av stjernen, 1 m i den siste m på stjernen og 1 m i samme lm som siste maske. Du har nå 4 masker på nålen. De siste 2 m hekles over 2 nye lm. Dvs: hver stjerne hekles over 2 ny lm (av de originale lm). Etter første stjerne har du 50 lm igjen, 50/2 = 25 stjerner (Totalt 26, inkludert den første). Videoen du sikter til viser fremgangsmåte. God fornøyelse
06.12.2018 - 12:03
![]() Kirstin wrote:
Kirstin wrote:
Liebes Drops Team! Vielen Dank für die wunderbare Anleitung. Leicht verständlich und auch schnell gehäkelt. Aber die angegebene Wollmenge von 200 g ist zu wenig. Ich habe zwar mit Häkelnadel 10 gearbeitet, aber nur weil ich sonst sehr fest häkle. Ich muss noch mal nachbestellen 😩
30.12.2017 - 20:24
![]() Lorraine wrote:
Lorraine wrote:
Bonjour, pouvez-vous m'expliquer le rang 8 pour les augmentations. Est-ce que je dois augmenter en faisant 3 db dans la maille 7 et 3 db dans la maille 8 au début du rang et refaire la même chose à la fin du rang dans la maille 8 et la maille 7, ce qui veut dire que j'aurai fait 6 db de plus au rang 8 ? Merci de bien vouloir m'aider.
16.02.2016 - 03:12DROPS Design answered:
Bonjour Lorraine, on procède bien ainsi, mais on augmente juste 4 m car on crochète 2 dB dans le trou de chaque étoile + 3 dB dans les mailles 7 et 8 au début et à la fin du rang (= 4 augm). Bon crochet!
16.02.2016 - 13:01
![]() Jessica wrote:
Jessica wrote:
Hi! I'm confused about the increase on row 8. When you say the 7th and 8th hole on each side what exactly do you mean? Am I increasing three times on this row? Thank you! 😃
11.11.2015 - 18:12DROPS Design answered:
Dear Jessica, row 8 is worked as row 2 (= hdc row): work as row 2 but work 3 hdc instead of 2 hdc in the 7th + in the 8th hole from the beg of row + 3 hdc instead of 2 hdc in the 7th + in the 8th hole from the end of row (= 2 hdc inc at the beg of row + 2 hdc inc at the end of row= 4 hdc inc). Happy crocheting!
12.11.2015 - 09:57
![]() Rannveig Løvstad wrote:
Rannveig Løvstad wrote:
Veldig fin! Og med video ble det veldig enkelt! Tusen takk for gode forklaringer, videoer og masse inspirasjon. Blir til å lage mange av denne!
23.01.2014 - 21:57Gpe Hdz Hdz wrote:
Preciosa bufanda me sirvio de inspiracion para regalo de navidad.
12.01.2014 - 03:35
![]() Geoffroy Noëlle wrote:
Geoffroy Noëlle wrote:
Bonjour,tout d'abord merci à toute votre équipe pour tous ces modèles que vous nous offrez! Je suis d'accord avec Magalie: un bonnet ou un béret coordonné avec le tour de cou serait vraiment super! j'ai hâte de le voir...Cordialement, Noëlle
19.10.2013 - 22:56
![]() Liska wrote:
Liska wrote:
DROPS LOVES YOU #2 fusselt sehr stark
13.10.2013 - 11:44
|
|
Galaxica |
|
|
|
|
Crochet DROPS Neck warmer in "Drops Loves You #2" or "Snow"
DROPS Extra 0-879 |
|
|
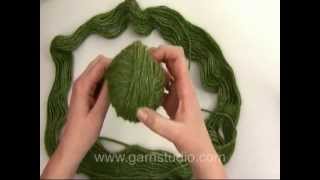
Neck warmer: With hook size 9 mm and Drops Loves You #2 ch 57. Row 1 (RS): pick up 5 sts with start in 2nd st from hook = 6 sts on hook, make a yo and pull through all 6 sts, ch 1 which creates a hole above the 6 sts, *pick up 1 st in the hole, pick up 1 st around the side of the last of the 6 sts , pick up 1 st in the same ch as the last of the 6 sts were picked up in , pick up 1 st in each of the next 2 ch = 6 sts on hook, make a yo and pull through all 6 sts, ch 1*, repeat *-*. Crochet 1 htr in last ch. Turn. Row 2 (WS): ch 2 (= 1 htr), crochet 2 htr in each "star hole", end row with 1 htr in last st. Turn. It is now 26 stars on the row and 1 htr in each side. Row 3: ch 3, pick up 1 st in 2nd and 3rd ch from hook, pick up 1 st in each of the 3 first sts on row = 6 sts on hook, make a yo and pull through all 6 sts, ch 1, *pick up 1 st in the hole, pick up 1 st around the side of the last of the 6 sts , pick up 1 st in the same st as the last of the 6 sts were picked up in , pick up 1 st in each of the next 2 sts = 6 sts on hook, make a yo and pull through all 6 sts, ch 1*, repeat *-*. Crochet 1 htr in last st. Turn. Repeat row 2 and 3. On row 8 (WS) work as before but inc by crochet 3 htr (instead of 2) in 7th and 8th star hole counted from each side. Row 9 (RS): work as before, there will now be 28 stars on row. Continue as before, on row 12 (WS) inc again by crocheting 3 htr in 8th and 9th star hole counted from each side. Row 13 (RS): work as before, there will now be 30 stars on row. Continue as before, on row 16 (WS) inc again by crocheting 3 htr in 9th and10th star hole counted from each side. Row 17 (RS): work as before, there will now be 32 stars on row. Stop after row 18. Crochet approx 24-26 dc evenly up along the short side. Continue back and forth with 1 dc in each dc along short side for a total of 5 rows. Fasten off. Repeat along the other short side, on row 4 make 3 button holes. Place one hole close to neck edge, and the other 2 with approx 6 cm between each. 1 button hole = ch 2, skip 2 dc from row below. On row 5 crochet 2 dc around ch space at each button hole. After row 5 fasten off. Sew on buttons to fit button holes. |
|
Have you finished this pattern?Tag your pictures with #dropspattern or submit them to the #dropsfan gallery. Do you need help with this pattern?You'll find 5 tutorial videos, a Comments/Questions area and more by visiting the pattern on garnstudio.com. © 1982-2026 DROPS Design A/S. We reserve all rights. This document, including all its sub-sections, has copyrights. Read more about what you can do with our patterns at the bottom of each pattern on our site. |


With over 40 years in knitting and crochet design, DROPS Design offers one of the most extensive collections of free patterns on the internet - translated to 17 languages. As of today we count 324 catalogues and 12290 patterns translated into English (UK/cm). 12290
We work hard to bring you the best knitting and crochet have to offer, inspiration and advice as well as great quality yarns at incredible prices! Would you like to use our patterns for other than personal use? You can read what you are allowed to do in the Copyright text at the bottom of all our patterns. Happy crafting!
Post a comment to pattern DROPS Extra 0-879
We would love to hear what you have to say about this pattern!
If you want to leave a question, please make sure you select the correct category in the form below, to speed up the answering process. Required fields are marked *.