
Popular categories
Looking for a yarn?


Comments / Questions (86)
![]() Johanne wrote:
Johanne wrote:
Sur le patron du gilet mint star les explications du bobble ne sont pas les mêmes que sur le vidéo tutorials. Quels explications dois-je prendre. merci
28.12.2012 - 03:39DROPS Design answered:
Bonjour Johanne, ces noppes se commencent en tricotant 5 fois la même maille alternativement dans le brin avant et arrière, puis se tricotent comme dans la vidéo. La vidéo "Augmentations 1 - tricoter 2 fois la même maille" peut vous aider à démarrer, répétez cette opération jusqu'à avoir 5 m sur l'aiguille droite. Bon tricot !
29.12.2012 - 18:33
![]() Pia wrote:
Pia wrote:
Ibland måste man se vad man frågar om i skrift för att fatta hur dum man kan va, 6 stjärnuddar på 4 stickor är ju 36m. Men gott skratt förlänger livet. God Jul
26.12.2012 - 15:37
![]() Pia wrote:
Pia wrote:
Mönstret bak är på 6 m men grund innehåller 9m hur stickas de övriga tre enligt ökningar v1-3 = 9mX4 =36, enligt diagram 6x4=24
26.12.2012 - 15:00DROPS Design answered:
Fint at du har fundet ud af det selv. God jul til dig også
27.12.2012 - 12:17Randa wrote:
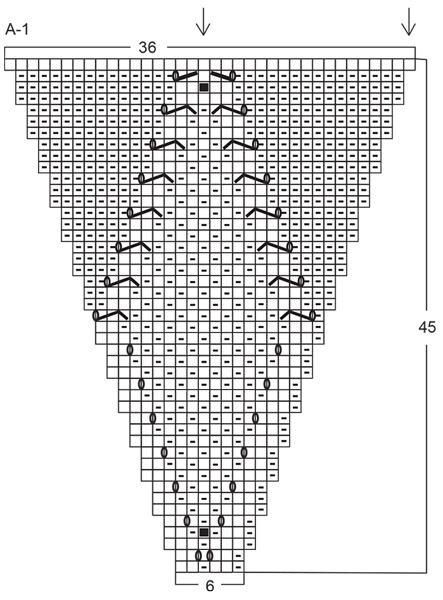
Bonjour, Je suis debutante en tricot. J'ai réussi à tricoter les manches mais je n'arrive pas à comprendre comment je peux passer de 36m à 216m en tricotant le diagramme A-1. Que voulez vous dire par =6 fois tout le tour? Merci d'avance pour votre support!
23.12.2012 - 21:28DROPS Design answered:
Bonjour Randa, quand vous avez 36 m, vous répétez 6 fois le diagramme A-1 en commençant en bas à droite = 6 fois *1 m env, 2m end, 1 m env, 2 m end*, etc.. 1 case = 1 m x 1 tour, à la fin de A-1, vous avez 36 m dans chaque rapport soit 36x6= 216 m. Bon tricot !
24.12.2012 - 16:11
![]() Connie V.d. Zel wrote:
Connie V.d. Zel wrote:
Er zit een fout in de omschrijving, en wel in de beschrijving van de rand. Er staat 4x 2 steken recht, dan 8x 2 st. av., dan weer 4 st. recht. Dit komt niet overeen met de 17markeerders. Bovendien is het uiteindelijke resultaat niet mooi: voor het effect is het mooist: 5x 2st. averecht, 7x2 st. recht, 5 x 2 st. averecht. Jammer, nu heb ik een vest met een foutje. Maar verder is hij wel apart.
08.11.2012 - 22:33DROPS Design answered:
Wij hebben het patroon gecontrolleerd en wij kunnen geen fout vinden in het patroon. Als u denkt een fout te hebben ontdekt, dan graag duidelijker uitleggen waar u denkt de fout te hebben gevonden en ook welke maat u breit.
14.11.2012 - 20:14
![]() LEBOUCHER wrote:
LEBOUCHER wrote:
Bonjour, Les explications des torsades ne correspondent pas au dessin (sur le dessin on commence par un jeté et pour l'explication le jeté est à la fin)inversion entre les dessins et l'explication
26.10.2012 - 09:58DROPS Design answered:
Bonjour Madame Leboucher, le diagramme se lit de droite à gauche à chaque tour (on tricote en rond), ainsi, les légendes des diagrammes sont bien justes, les jetés placés au bon endroit, comme indiqué. Bon tricot !
30.10.2012 - 21:41
![]() LEBOUCHER wrote:
LEBOUCHER wrote:
Bonjour, Je pense qu'il y a une erreur concernant la légende du diagramme.Il semblerait que les explications des torsades sont inversées.
24.10.2012 - 19:46DROPS Design answered:
Bonjour Madame Leboucher, après vérification, nous n'avons pas repéré d'erreur. Pouvez-vous être plus précise ? Merci.
25.10.2012 - 09:37
![]() Françoise MENIL wrote:
Françoise MENIL wrote:
Bonjour, Je me permets à nouveau de vous contacter car en suivant vos explications pour les rangs raccourcis, je me retrouve avec une fente dans le milieu de la bordure en bas du dos. J'ai donc recommencer en faisant les rangs raccourcis de chaque côté au départ du rang et là, tout va bien. Il me semble que la phrase entre parenthèse n'a pas lieu d'être et prête à confusion. Sa suppression donnerait aux explications plus de clarté. Bien cordialement Françoise MENIL
22.10.2012 - 16:17
![]() MENIL Françoise wrote:
MENIL Françoise wrote:
Bonjour, J'ai pratiquement terminé ma veste mais je ne comprends pas bien ce qu'il faut faire pour la fin de la bordure. Il est noté, dans le dernier paragraphe, tricoter des rangs raccourcis d'un côté vers le milieu du dos, puis plus loin, commencer au milieu du dos ? Comment faut-il faire ces rangs raccourcis ? Remerciements
18.10.2012 - 16:02DROPS Design answered:
Bonjour Madame Menil, tricotez d'abord 2 rang sur les 36-38-40 m après le milieu dos, et continuez les rangs raccourcis comme indiqué. Quand vous avez coupé le fil, reprenez les 36-38-40 m de l'autre côté du milieu dos pour tricoter le col sur l'autre devant de la même façon. Bon tricot !
18.10.2012 - 17:08
![]() Varin Catherine wrote:
Varin Catherine wrote:
Bonjour, j'ai fini les devants.(taille L/XL) problème bordure : si je relève les mailles 2devants+dos+1mailles entre chaque transition j'ai déjà 337 mailles. je dois y rajouter le col +59 mailles. total 396 mailles. selon le modèle je devrais avoir 356 maille ???? me serai-je trompée ?? ou y a-t-il une erreur ? merci pour la réponse
10.10.2012 - 19:52DROPS Design answered:
Bonjour Madame Varin, il est possible que votre échantillon en largeur et en hauteur ne soit pas juste. Vous pouvez éventuellement répartir des diminutions pour ajuster au nombre indiqué de mailles. Mais n'hésitez pas à vous faire aider directement par votre magasin Drops, il pourra certainement vous apporter plus facilement une aide plus efficace. Bon tricot !
16.10.2012 - 10:52
|
|||||||||||||||||||||||||
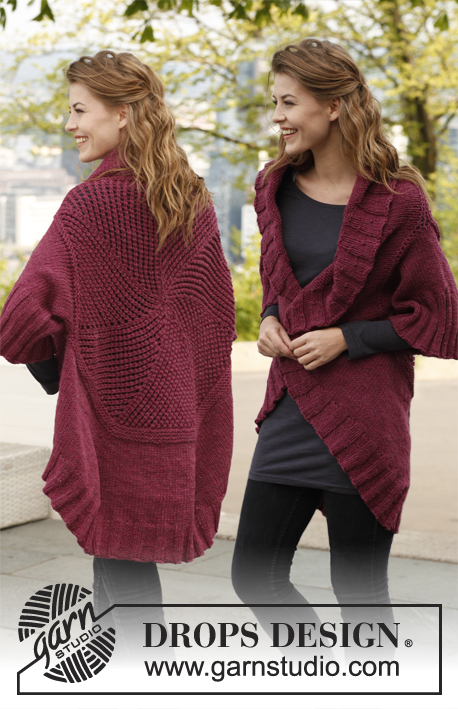
Mint Star#mintstarcardigan |
|||||||||||||||||||||||||
|
|
|||||||||||||||||||||||||
Knitted DROPS jacket worked in a circle in ”Nepal”. Size: S - XXXL.
DROPS 142-15 |
|||||||||||||||||||||||||
|
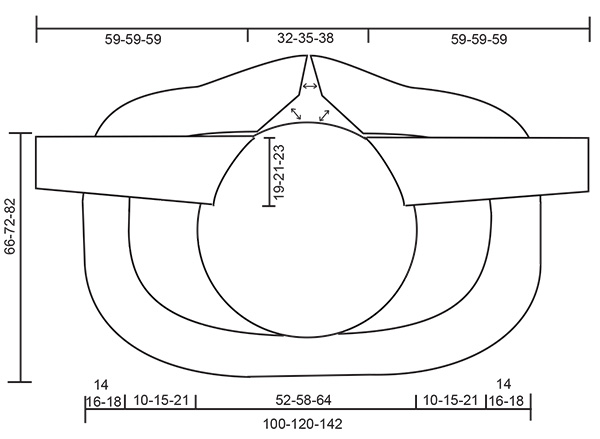
PATTERN: See diagram A-1. Diagram shows all rows in pattern from RS. MOSS ST: ROUND 1: * K 1, P 1 *, repeat from *-*. ROUND 2: K over P and P over K. Repeat 2nd round. GARTER ST (back and forth on needle): K all rows. 1 ridge = 2 rows K. INCREASE TIP (applies when diagram A-1 has been worked): Inc 1 st at every marker on every inc (i.e. 12 sts inc per round) – inc before all markers the first time, second time after all markers etc. alternately upwards - inc by making 1 YO - on next round work YO twisted to avoid holes. ---------------------------------------------------------- JACKET: Worked in the round in a circle from mid back. Work on double pointed needles when inc, switch to a longer circular needle when needed. Cast on 12 sts with Nepal and distribute them on 4 double pointed needles size 5 mm. Insert 1 marker in first st on round = mid up towards neck. K 1 round while at the same time working 2 sts in all sts = 24 sts. K 1 round without inc. On next round, work as follows: * K 1, K 2 in next st *, repeat from *-* = 36 sts. Then work according to diagram A-1 (= 6 repetitions in the round). REMEMBER THE KNITTING TENSION! When A-1 has been worked, there are 216 sts on needle and piece measures approx. 20 cm from the centre and outwards. Insert 1 marker in first st (= mid up towards to neck), and then 1 marker in every 18th st the entire round (see arrows in diagram for where markers are placed) = 12 markers 17 sts apart. READ ALL OF THE FOLLOWING SECTION BEFORE CONTINUING! Continue in stocking st over all sts – AT THE SAME TIME on 3rd round, inc 1 st at all markers – SEE INCREASE TIP! Repeat inc every 3rd round. AT THE SAME TIME when inc have been done 1-3-5 times (= 228-252-276 sts on round), cast off for shoulders and armholes on next round as follows: Cast off the first 28-30-33 sts for neck/shoulder, insert 1 marker (use another colour than the other inc markers in piece, these markers are only used when collar is sewn to shoulder), cast off the next 32-35-39 sts for armhole, work 109-123-133 sts (= down the back), cast off the next 32-35-39 sts for armhole, insert 1 marker and cast off the last 27-29-32 sts for shoulder/neck, cut the thread. Cast on 32-35-39 sts on circular needle size 5 mm, then work on the 109-123-133 sts on needle from WS and finally cast on 32-35-39 sts in the other side = 173-193-211 sts. Then work piece back and forth on needle in stocking st – insert markers for inc in the new sts cast on to match the markers in the sts cast off for armholes. Continue inc at every marker every 3rd row as before – AT THE SAME TIME slip 2 sts at end of every row on a stitch holder without working them first. When piece measures approx. 26-29-32 cm from the centre and outwards, slip the middle 67-71-77 sts on a stitch holder (= at the bottom of back piece). NOW MEASURE PIECE FROM HERE! Finish each front piece separately. FRONT PIECE: Continue in stocking st and with inc as before over the remaining sts on needle – at the same time slip 2 sts at end of every row on to stitch holders in each side (towards bottom edge slip sts on to same stitch holder as where the 67-71-77 sts at the bottom of back piece are) until 10-15-21 cm have been worked on front piece. Slip the remaining sts on to 1 of the stitch holders. Work the other front piece the same way. EDGE: K all sts from RS back on to circular needle size 5 mm - between every time sts where slipped on stitch holders in each side get the thread and twist it before slipping it on needle (i.e. between every other st, to avoid holes in the transitions), in addition inc evenly so that there are 308-356-404 sts in total on needle. K 1 row from WS at the same time insert 17 markers in the piece as follows: Work 2 sts, insert 1 marker, * work 19-22-25 sts, insert 1 marker *, repeat from *-* until 2 sts remain after last marker, work these. K 1 row from RS. Work next row as follows (from WS): 1 st in GARTER ST – see explanation above, * K 2 (i.e. 1 st on each side of marker is worked K), 17-20-23 sts in moss st *, repeat from *-* 3 more times, ** P 2 (i.e. 1 st on each side of marker is worked P), 17-20-23 sts in moss st **, repeat from **-** 7 more times, P 2, *** 17-20-23 sts in moss st, K 2 ***, repeat from ***-*** 3 more times, finish with 1 st in garter st. On next row from RS P 1 st on each side of the first 4 and last 4 markers, and K 1 st on each side of the other 9 markers – AT THE SAME TIME on this row, inc 1 st on each side of the last 4 and first 4 markers – inc on each side of the 2 P sts by making 1 YO which is worked twisted in moss st on next row. Continue inc every 6th row until finished measurements. When edge measures 13-15-17 cm, work short rows in one side towards mid back for collar. Work as follows (work and inc as before with moss st and stocking st - beg mid back): Work 36-38-40 sts, turn and work back, work 34-36-38 sts, turn and work back, work 32-34-36 sts, turn and work back, continue like this by working 2 sts less a total of 10-11-12 times, then work 3 sts less a total of 5 times, cut the thread and work the same way in the other side. Then K 1 row over all sts before loosely casting off with K. SLEEVE: Worked in the round on double pointed needles. Cast on 42-44-48 sts on double pointed needles size 5 mm with Nepal. Insert 1 marker at beg of round = mid under sleeve. P 1 round and K 1 round. Continue with MOSS ST - see explanation above. When piece measures 12 cm, K 1 round and P 1 round, continue in stocking st until finished measurements. At the same time when piece measures 15 cm, inc 1 st on each side of marker mid under sleeve. Repeat inc every 5-4-3 cm 6-8-10 more times = 56-62-70 sts. When piece measures 49 cm, cast off 6 sts mid under sleeve and work back and forth until finished measurements. Then cast off for sleeve cap at beg of every row in each side: 2 sts 2 times and 1 st 5 times, then cast off 2 sts in each side until piece measures 58 cm, then cast off 3 sts 1 time in each side. Cast off the remaining sts, sleeve measures approx. 59 cm. ASSEMBLY: Sew one collar part to half the shoulder/neck at the back and sew the other collar part to the other half of the shoulder/neck – beg at the marker inserted between armhole and shoulder and pull the collar somewhat when sewing it on, use what is needed of the collar vertically to make the collar parts come tog mid back, then sew the rest of the 2 collar parts tog edge to edge towards each other – see arrows in measurement chart. Sew in sleeves. Close the jacket with a pin or brooch. |
|||||||||||||||||||||||||
Diagram explanations |
|||||||||||||||||||||||||
|
|||||||||||||||||||||||||
 |
|||||||||||||||||||||||||
 |
|||||||||||||||||||||||||
Have you finished this pattern?Tag your pictures with #dropspattern #mintstarcardigan or submit them to the #dropsfan gallery. Do you need help with this pattern?You'll find 17 tutorial videos, a Comments/Questions area and more by visiting the pattern on garnstudio.com. © 1982-2026 DROPS Design A/S. We reserve all rights. This document, including all its sub-sections, has copyrights. Read more about what you can do with our patterns at the bottom of each pattern on our site. |
|||||||||||||||||||||||||


With over 40 years in knitting and crochet design, DROPS Design offers one of the most extensive collections of free patterns on the internet - translated to 17 languages. As of today we count 324 catalogues and 12290 patterns translated into English (UK/cm). 12290
We work hard to bring you the best knitting and crochet have to offer, inspiration and advice as well as great quality yarns at incredible prices! Would you like to use our patterns for other than personal use? You can read what you are allowed to do in the Copyright text at the bottom of all our patterns. Happy crafting!
Post a comment to pattern DROPS 142-15
We would love to hear what you have to say about this pattern!
If you want to leave a question, please make sure you select the correct category in the form below, to speed up the answering process. Required fields are marked *.