
Popular categories
Looking for a yarn?


Comments / Questions (86)
![]() Rechenpumpe wrote:
Rechenpumpe wrote:
Guten Abend! Ich habe zu den still gelegten Maschen eine Frage... Ich habe jetzte beide Vorderteile fertig gestrickt und nehme alle Maschen wieder auf eine Nadel (mit den still gelegten Maschen und Querfädenzunahmen); wenn ich jedoch auch die Maschen auf die Nadel nehme, welche ich als erstes in Richtung Schulter still gelegt habe entsteht doch eine Lücke( bei mir ungefähr 5cm.)
11.11.2015 - 20:48DROPS Design answered:
Hallo, wir haben Ihre Frage im Team diskutiert und hoffen, dass wir es richtig verstanden haben. Bezieht es sich auf die stillgelegten Maschen, wenn Sie die verkürzten Reihen stricken? Diese Maschen werden (siehe FERTIGSTELLEN) dann mit dem Kragen zusammengenäht, es sollte also keine Lücke entstehen. Hilft Ihnen die Schnittzeichnung unten an der Anleitung weiter?
11.03.2016 - 10:44
![]() Defrance wrote:
Defrance wrote:
Bonjour je suis arrivée à la bordure et je ne sais pas quoi faire quand vous dites : "attraper le fil et le placer torse sur l'aiguille" j'ai bien compris où il fallait le faire mais s'agit-il de passer le fil venant de la pelote (comme un jeté) ou laors d'attraper le fil entre 2 mailles et le placer sur l'aiguille? merci
04.11.2015 - 15:22DROPS Design answered:
Bonjour Mme Defrance, il s'agit ici d'attraper le fil entre 2 m (au niveau des rangs raccourcis) et de le placer torse sur l'aiguille (pour éviter un trou au tour suivant). Bon tricot!
04.11.2015 - 17:10
![]() Maggie wrote:
Maggie wrote:
At the start of Edge the pattern states 'between every time sts where slipped on stitch holders in each side get the thread and twist it before slipping it on needle'. I'm not sure what you mean by this. Does it mean to pick up the thread in the gap between the pairs of stitches, ie to make a stitch, which would be part of the increases?
26.10.2015 - 09:43DROPS Design answered:
Dear Maggie, you do this to avoid holes at the transition between short rows, work these st twisted, and repeat this and inc evenly to get the required number of sts for your size. Happy knitting!
26.10.2015 - 12:19
![]() Magda Blok wrote:
Magda Blok wrote:
Prachtig vest. Goede beschrijving van het patroon. Goed gelukt, ik vond het een uitdaging. Ben er blij mee.
20.03.2015 - 15:17
![]() Sabine Geim wrote:
Sabine Geim wrote:
Achso dass heisst ich nehme nur bei den ersten 4 und letzten 4 Markierer zu. Dann habe ich es falsch gemacht
10.11.2014 - 12:19DROPS Design answered:
Ja genau, die Zunahmen erfolgen nur an den ersten 4 und den letzten 4 Markierern.
10.11.2014 - 20:26
![]() Geim wrote:
Geim wrote:
In der nächsten Hin-R beidseitig der ersten 4 Markierer und beidseitig der letzten 4 Markierer je 1 M li stricken, beidseitig der verbleibenden 9 Markierer je 1 M re stricken – GLEICHZEITIG in dieser R beidseitig der ersten 4 Markierer und beidseitig der letzten 4 Markierer je 1 M zunehmen – d.h. beidseitig der 2 li M je 1 Umschlag arbeiten, der in der nächsten R verschränkt in das Perlmuster eingearbeitet wird. Warum zweimal erklärt?
08.11.2014 - 21:30DROPS Design answered:
Es wird nicht zweimal erklärt - im ersten Teil des Satzes wird erklärt, dass Sie beidseitig jedes Markierers 1 M li bzw. re stricken, im 2. Teil wird erklärt, dass Sie außerdem Zunahmen machen, neben den 2 li-M.
09.11.2014 - 22:31
![]() Geim Sabine wrote:
Geim Sabine wrote:
Warum ist das mit der Zunahme am Rand zweimal in der Reihe erklärt. Ich nehme an dass sich die Zunahme alle 6 R immer von den den 2 Re/bzw. 2li machen muss und dann in das Perlmuster einstricke. Richtig?
08.11.2014 - 21:24DROPS Design answered:
Die Zunahmen erfolgen immer direkt vor und nach den 2 Links-M bei den ersten 4 Markieren und den letzten 4 Markierern und werden ins Perlmuster eingestrickt.
09.11.2014 - 22:24
![]() Nastjusha wrote:
Nastjusha wrote:
Ich habe den Rand bis auf 14cm Breite gestrickt (habe mich zwischen zwei Größen eingependelt) und komme nun mit der Anleitung nicht klar. Wo muss ich mit den verkürzten Reihen beginnen? (hintere Mitte macht für mich hier keinen Sinn). Danke!
22.06.2014 - 23:58DROPS Design answered:
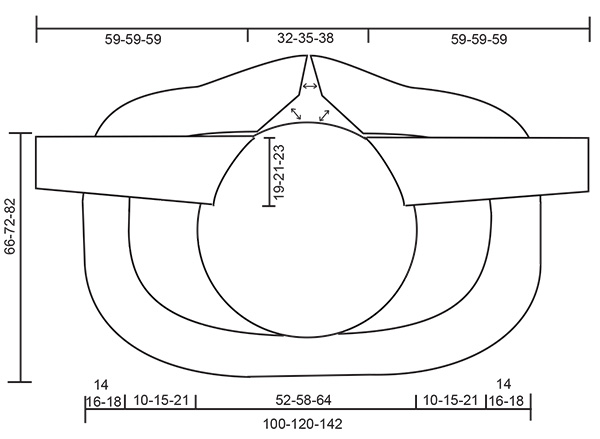
Liebe Nastjusha, Sie haben oben am Nacken ja eine "Lücke" im Rand, denn Sie haben ja oben nicht mehr weiter rundum gestrickt. Die verkürzten R stricken Sie nun nacheinander an beiden Seiten des Randes, also an der rechten und linken Seite, beginnend am Anfang der R, die restl. M bleiben dabei ungestrickt. Die beiden verkürzte-R-Partien "treffen" sich an der hinteren Mitte. Sie können das gut auf der Maßskizze erkennen, der waagerechte Doppelpfeil zeigt auf die Partie mit verkürzten R.
23.06.2014 - 19:00
![]() Annika Brobak Nielsen wrote:
Annika Brobak Nielsen wrote:
Jeg er nået til kanten og kan ikke få maskeantallet til at passe når jeg skal sætte mærker i. jeg har 308 m som man skal ifølge vejledningen. der skal sættes mærke efter de første 2 masker og derefter 19 som skal gentages. jeg har 2-19-2-19 hele vejen men slutter til sidst med 2-12 m og ikke med 2 som der står. er der beskrevet et forkert maskeantal imellem mørkerne eller hvad er der galt?
16.02.2014 - 20:57DROPS Design answered:
Hej Annika. Du skal saette maerke 1 efter 2 masker, strik 19 masker: maerke 2, strik 19 masker: maerke 3, strik 19 masker: maerke 4 osv. Du har da 2 masker efter det sidste maerke.
19.02.2014 - 11:58
![]() Sandra wrote:
Sandra wrote:
Ich bin nochmals etwas verwirrt beim Fertigen der Armkugel: ...Für die Armkugel beidseitig zu Beginn jeder R 2 x je 2 M und 5 x je 1 M abketten,... Heißt dass, ich am Beginn der R 2 M abkette, am Ende der R 2 M abkette, den Faden abschneide und eine neue R beginne, usw.?Danke für die Aufklärung.mfG
28.10.2013 - 08:50DROPS Design answered:
Lieeb Sandra, nein, Sie müssen den Faden nicht abschneiden! Bei einer Armkugel kettet man immer zu Reihenbeginn ab, also in der Hinreihe und in der Rückreihe. Dies heisst dann "beidseitig zu Beginn jeder R".
29.10.2013 - 09:16
|
|||||||||||||||||||||||||
Mint Star#mintstarcardigan |
|||||||||||||||||||||||||
|
|
|||||||||||||||||||||||||
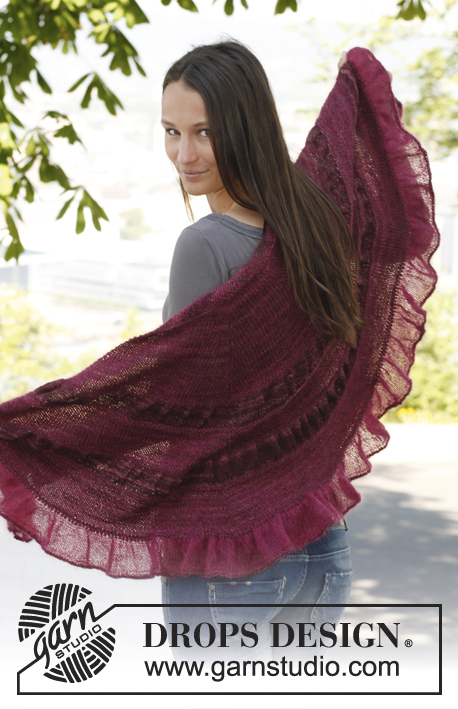
Knitted DROPS jacket worked in a circle in ”Nepal”. Size: S - XXXL.
DROPS 142-15 |
|||||||||||||||||||||||||
|
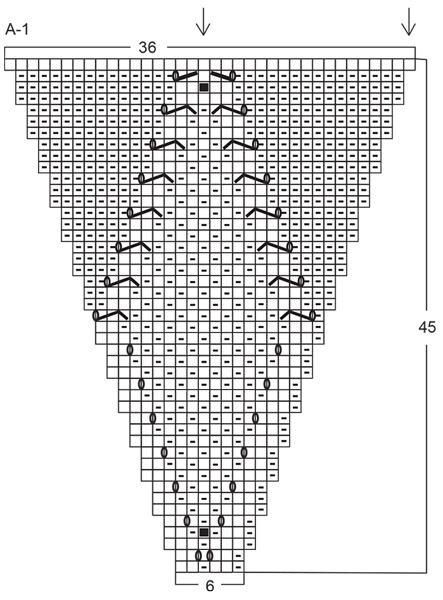
PATTERN: See diagram A-1. Diagram shows all rows in pattern from RS. MOSS ST: ROUND 1: * K 1, P 1 *, repeat from *-*. ROUND 2: K over P and P over K. Repeat 2nd round. GARTER ST (back and forth on needle): K all rows. 1 ridge = 2 rows K. INCREASE TIP (applies when diagram A-1 has been worked): Inc 1 st at every marker on every inc (i.e. 12 sts inc per round) – inc before all markers the first time, second time after all markers etc. alternately upwards - inc by making 1 YO - on next round work YO twisted to avoid holes. ---------------------------------------------------------- JACKET: Worked in the round in a circle from mid back. Work on double pointed needles when inc, switch to a longer circular needle when needed. Cast on 12 sts with Nepal and distribute them on 4 double pointed needles size 5 mm. Insert 1 marker in first st on round = mid up towards neck. K 1 round while at the same time working 2 sts in all sts = 24 sts. K 1 round without inc. On next round, work as follows: * K 1, K 2 in next st *, repeat from *-* = 36 sts. Then work according to diagram A-1 (= 6 repetitions in the round). REMEMBER THE KNITTING TENSION! When A-1 has been worked, there are 216 sts on needle and piece measures approx. 20 cm from the centre and outwards. Insert 1 marker in first st (= mid up towards to neck), and then 1 marker in every 18th st the entire round (see arrows in diagram for where markers are placed) = 12 markers 17 sts apart. READ ALL OF THE FOLLOWING SECTION BEFORE CONTINUING! Continue in stocking st over all sts – AT THE SAME TIME on 3rd round, inc 1 st at all markers – SEE INCREASE TIP! Repeat inc every 3rd round. AT THE SAME TIME when inc have been done 1-3-5 times (= 228-252-276 sts on round), cast off for shoulders and armholes on next round as follows: Cast off the first 28-30-33 sts for neck/shoulder, insert 1 marker (use another colour than the other inc markers in piece, these markers are only used when collar is sewn to shoulder), cast off the next 32-35-39 sts for armhole, work 109-123-133 sts (= down the back), cast off the next 32-35-39 sts for armhole, insert 1 marker and cast off the last 27-29-32 sts for shoulder/neck, cut the thread. Cast on 32-35-39 sts on circular needle size 5 mm, then work on the 109-123-133 sts on needle from WS and finally cast on 32-35-39 sts in the other side = 173-193-211 sts. Then work piece back and forth on needle in stocking st – insert markers for inc in the new sts cast on to match the markers in the sts cast off for armholes. Continue inc at every marker every 3rd row as before – AT THE SAME TIME slip 2 sts at end of every row on a stitch holder without working them first. When piece measures approx. 26-29-32 cm from the centre and outwards, slip the middle 67-71-77 sts on a stitch holder (= at the bottom of back piece). NOW MEASURE PIECE FROM HERE! Finish each front piece separately. FRONT PIECE: Continue in stocking st and with inc as before over the remaining sts on needle – at the same time slip 2 sts at end of every row on to stitch holders in each side (towards bottom edge slip sts on to same stitch holder as where the 67-71-77 sts at the bottom of back piece are) until 10-15-21 cm have been worked on front piece. Slip the remaining sts on to 1 of the stitch holders. Work the other front piece the same way. EDGE: K all sts from RS back on to circular needle size 5 mm - between every time sts where slipped on stitch holders in each side get the thread and twist it before slipping it on needle (i.e. between every other st, to avoid holes in the transitions), in addition inc evenly so that there are 308-356-404 sts in total on needle. K 1 row from WS at the same time insert 17 markers in the piece as follows: Work 2 sts, insert 1 marker, * work 19-22-25 sts, insert 1 marker *, repeat from *-* until 2 sts remain after last marker, work these. K 1 row from RS. Work next row as follows (from WS): 1 st in GARTER ST – see explanation above, * K 2 (i.e. 1 st on each side of marker is worked K), 17-20-23 sts in moss st *, repeat from *-* 3 more times, ** P 2 (i.e. 1 st on each side of marker is worked P), 17-20-23 sts in moss st **, repeat from **-** 7 more times, P 2, *** 17-20-23 sts in moss st, K 2 ***, repeat from ***-*** 3 more times, finish with 1 st in garter st. On next row from RS P 1 st on each side of the first 4 and last 4 markers, and K 1 st on each side of the other 9 markers – AT THE SAME TIME on this row, inc 1 st on each side of the last 4 and first 4 markers – inc on each side of the 2 P sts by making 1 YO which is worked twisted in moss st on next row. Continue inc every 6th row until finished measurements. When edge measures 13-15-17 cm, work short rows in one side towards mid back for collar. Work as follows (work and inc as before with moss st and stocking st - beg mid back): Work 36-38-40 sts, turn and work back, work 34-36-38 sts, turn and work back, work 32-34-36 sts, turn and work back, continue like this by working 2 sts less a total of 10-11-12 times, then work 3 sts less a total of 5 times, cut the thread and work the same way in the other side. Then K 1 row over all sts before loosely casting off with K. SLEEVE: Worked in the round on double pointed needles. Cast on 42-44-48 sts on double pointed needles size 5 mm with Nepal. Insert 1 marker at beg of round = mid under sleeve. P 1 round and K 1 round. Continue with MOSS ST - see explanation above. When piece measures 12 cm, K 1 round and P 1 round, continue in stocking st until finished measurements. At the same time when piece measures 15 cm, inc 1 st on each side of marker mid under sleeve. Repeat inc every 5-4-3 cm 6-8-10 more times = 56-62-70 sts. When piece measures 49 cm, cast off 6 sts mid under sleeve and work back and forth until finished measurements. Then cast off for sleeve cap at beg of every row in each side: 2 sts 2 times and 1 st 5 times, then cast off 2 sts in each side until piece measures 58 cm, then cast off 3 sts 1 time in each side. Cast off the remaining sts, sleeve measures approx. 59 cm. ASSEMBLY: Sew one collar part to half the shoulder/neck at the back and sew the other collar part to the other half of the shoulder/neck – beg at the marker inserted between armhole and shoulder and pull the collar somewhat when sewing it on, use what is needed of the collar vertically to make the collar parts come tog mid back, then sew the rest of the 2 collar parts tog edge to edge towards each other – see arrows in measurement chart. Sew in sleeves. Close the jacket with a pin or brooch. |
|||||||||||||||||||||||||
Diagram explanations |
|||||||||||||||||||||||||
|
|||||||||||||||||||||||||
 |
|||||||||||||||||||||||||
 |
|||||||||||||||||||||||||
Have you finished this pattern?Tag your pictures with #dropspattern #mintstarcardigan or submit them to the #dropsfan gallery. Do you need help with this pattern?You'll find 17 tutorial videos, a Comments/Questions area and more by visiting the pattern on garnstudio.com. © 1982-2026 DROPS Design A/S. We reserve all rights. This document, including all its sub-sections, has copyrights. Read more about what you can do with our patterns at the bottom of each pattern on our site. |
|||||||||||||||||||||||||


With over 40 years in knitting and crochet design, DROPS Design offers one of the most extensive collections of free patterns on the internet - translated to 17 languages. As of today we count 324 catalogues and 12290 patterns translated into English (UK/cm). 12290
We work hard to bring you the best knitting and crochet have to offer, inspiration and advice as well as great quality yarns at incredible prices! Would you like to use our patterns for other than personal use? You can read what you are allowed to do in the Copyright text at the bottom of all our patterns. Happy crafting!
Post a comment to pattern DROPS 142-15
We would love to hear what you have to say about this pattern!
If you want to leave a question, please make sure you select the correct category in the form below, to speed up the answering process. Required fields are marked *.