
Popular categories
Looking for a yarn?


Comments / Questions (25)
![]() Aurélie wrote:
Aurélie wrote:
Impossible de crocheter quoi que ce soit avec l'Alpaca bouclé. On ne voit pas les mailles. À réessayer avec de la laine simple.
09.09.2017 - 10:27
![]() Sofia wrote:
Sofia wrote:
Hej, Jag är förbryllad över rekommendationen 150 g Alpaca Bouclé. Jag har precis virkat färdigt nallen med två trådar Alpaca Bouclé och virknål 5. Men det har endast gått åt 50 g. Väldigt stor skillnad, hur kommer det sig?
05.09.2017 - 08:41
![]() Laura Vazquez wrote:
Laura Vazquez wrote:
Hola que mide el osito una vez tejido? gracias
02.09.2016 - 16:33DROPS Design answered:
Hola Laura. El osito mide aprox. 22 cm. El tamaño depende del número de ganchillo, la tensión del trabajo y la calidad del hilo.
04.09.2016 - 22:16
![]() Christa Roggensack wrote:
Christa Roggensack wrote:
Ich habe folgendes übersehen: Puddle war ein Garn das normalerweise für Nadelstärke 7 ist, also wird hier mit einer kleineren Nadel deutlich fester gehäkelt. Ich habe einen 2. Teddy mit der Bouclewolle gemacht, bei dem ich den Faden doppelt genommen habe. Merkwürdigerweise lässt sich das Garn doppelt genommen viel besser häkeln. Der Teddy wird dann etwas größer und dichter. Beim einfädigen Teddy sieht man mit kritischem Blick etwas die Füllwatte durch.
03.11.2015 - 08:52
![]() Christa Roggensack wrote:
Christa Roggensack wrote:
Sind die 150 g Puddel tatsächlich nötig? Ich bin mit 50 g Alpaka Boucle hingekommen.
28.10.2015 - 06:10DROPS Design answered:
Es kommt immer auf die Lauflänge an. Alpaca Bouclé hat eine fast dreimal so lange Lauflänge (140 m pro 50 g) wie Puddel (50 m pro 50 g), daher reicht dann entsprechend auch ein Drittel des Garngewichts.
05.11.2015 - 12:27
![]() Christa Roggensack wrote:
Christa Roggensack wrote:
Da das Garn Puddel nicht mehr erhältlich ist, habe ich mir DROPS Alpaka Boucle besorgt. Es stimmt Bouclegarne lassen sich nicht schön häkeln, weil man nur schwer die Maschen der Vorreihe erkennt. Aber das Resultat lohnt die Mühe. - Ich weiß nicht ob es daran liegt, dass ich ein Garn ausserhalb der Alternativliste verwendet habe. Ich habe keine 50 g für meinen Teddy benötigt. Sind die 150 g Puddel ein Druckfehler oder bräuchte man damit wirklich so viel mehr?
28.10.2015 - 06:07
![]() Ann wrote:
Ann wrote:
Beste graag had ik geweten wanneer er staat vb toer 4-9:12v of je deze toer 5x moet herhalen of maar 1x. Gr Ann ☀ ☀ ☀
08.10.2015 - 07:39DROPS Design answered:
Hoi Ann. Het betekent dat je de werkwijze moet herhalen voor toer 4, 5, 6, 7, 8 en 9
09.10.2015 - 14:58
![]() Sarah wrote:
Sarah wrote:
Schade! Das ist das allererste Garnstudio-Vorhaben, welches ich abbrechen musste. Ich häkle und stricke seit Jahren nach diesen Vorlagen, aber hier musste ich mich geschlagen geben: Das Pudel-Garn konnte ich nicht verhäkeln. Kann mir durchaus vorstellen, dass man es zum Stricken brauchen kann. Aber zum Häkeln werde ich das Pudel-Garn nicht mehr verwenden. Habe den Bären dann mit gewöhnlichem Garn gestrickt, aber da kann man auch BabyDROPS 21-43 "Teddy" häkeln.
20.11.2014 - 18:37
![]() Emma wrote:
Emma wrote:
Hallo Lanade, ich habe den Bär erfolgreich fertig gestellt. Leider ist mir meine Holzhäkelnadel durch das Puddelgarn zerbrochen. Vor lauter Trauer um meine Häkelnadel fällt mir kein Name für den Bär ein. Liebe Grüße!
04.10.2014 - 16:57DROPS Design answered:
Liebe Emma, wie wäre es mit "Puddel der Bär"? Oder "Popeye", weil der knuffige Kerl so stark war, Ihre Nadel zu zerbrechen? Oder "Obärlix", aus demselben Grund? ;-) Gegen Ihre Trauer gibt es im Drops-Angebot übrigens auch Häkelnadeln aus Birkenholz.
08.10.2014 - 22:22
![]() Marie-Fleur Guillorel wrote:
Marie-Fleur Guillorel wrote:
J'ai essayé ce modèle mais je pense que la laine Drops Puddel doit être plus facile à tricoter qu'à crocheter. Impossible pour moi d'aller au delà du 5° rang de la tête. Je ferai cet ours avec une laine 'simple'.
22.09.2014 - 01:30
|
|
Paddy#dropspaddy |
|
|
|
|
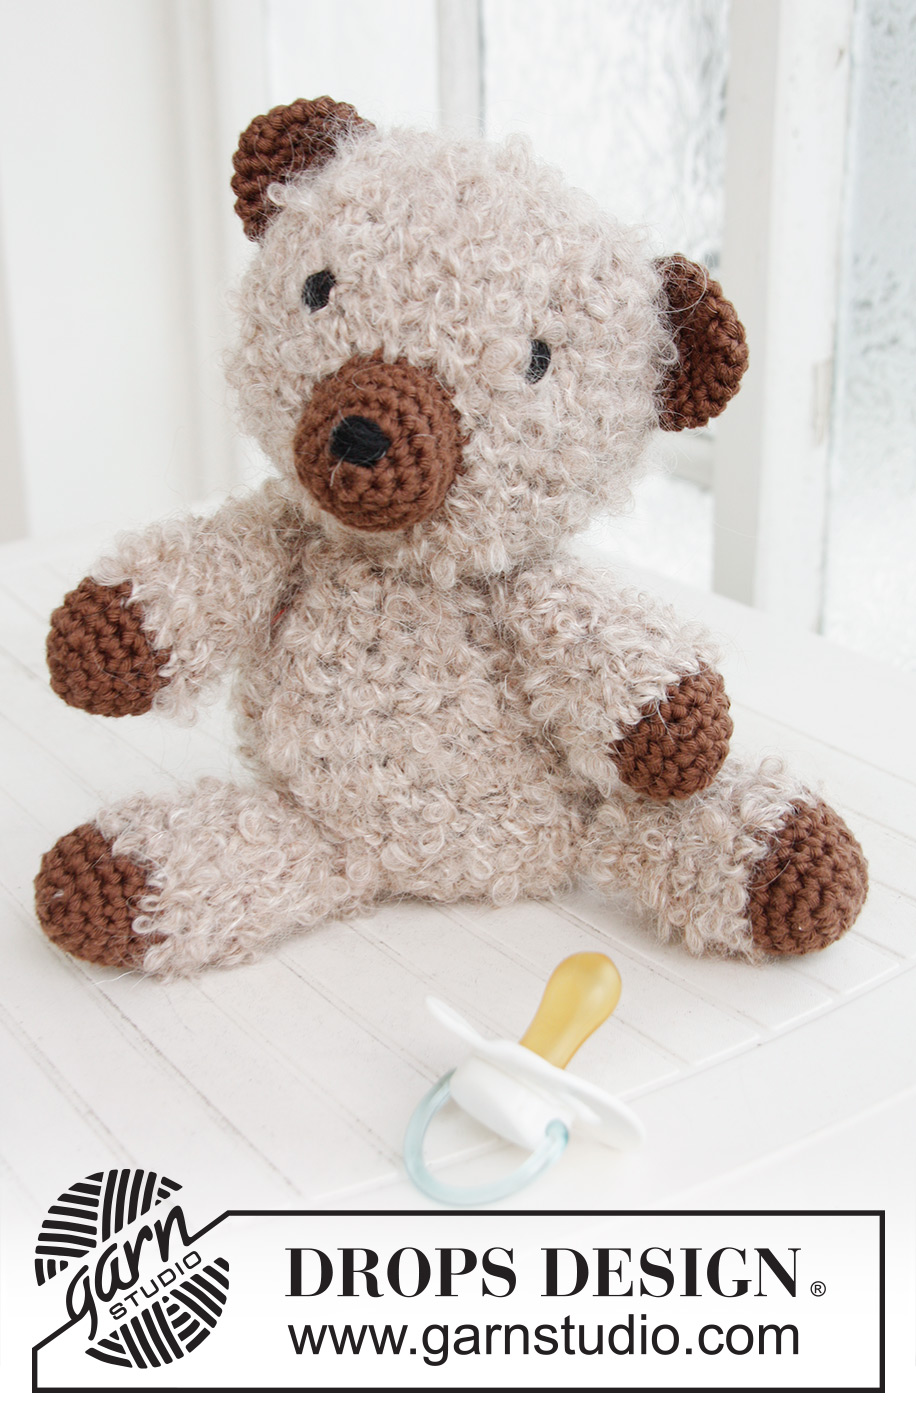
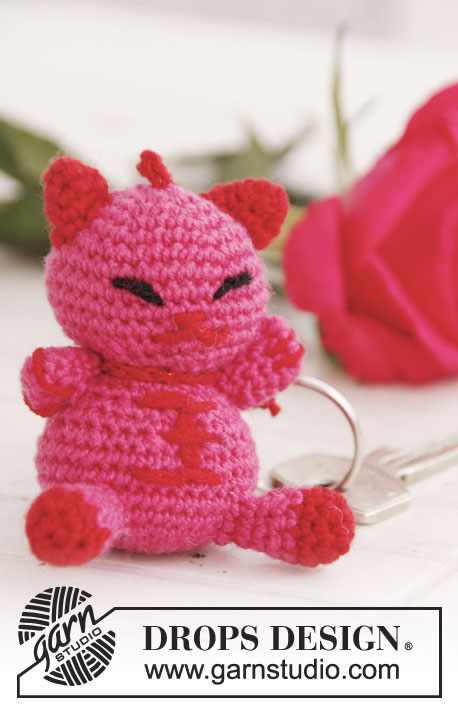
Crochet teddy bear in 1 thread DROPS Puddel or 2 threads DROPS Alpaca Boucle and DROPS Paris
DROPS Baby 21-10 |
|
|
CROCHET INFO: MAGIC CIRCLE: When piece is worked in the round, start with this technique to avoid holes in the middle (instead of ch-ring): Hold the yarn end and wind the yarn one time around the index finger to make a loop. Hold the loop with left thumb and middle finger, place the thread over left index finger. Insert hook through the loop, make a YO and pull thread through loop, work 1 ch, then work dc around the loop. When the desired no of dc have been reached, pull the yarn end to tighten the loop. Fasten the yarn end on the back side. Continue to work in the round in a circle. WORK IN THE ROUND IN A CIRCLE: After last dc on the round, continue to next round with 1 dc in next dc (= first dc from previous round). NOTE: Insert a marker at the beg of round between last dc and first dc on the round, move the marker upwards. WORKING 2 DC TOG: * Insert hook in next st, get thread *, repeat from *-* one more time, make a YO and pull thread through all 3 sts on hook. COLOUR CHANGE - DC: To get a nice colour change work last dc on round as follows: Insert hook in last st, get thread, make a YO with the new colour and pull it through all sts on hook. Continue on to next round with the new colour. -------------------------------------------------------- HEAD: Worked in the round with 1 thread Puddel or 2 threads Alpaca Boucle on hook size 5 mm. Start at the top of head by making a magic circle - Read explanation above. ROUND 1: Work 8 dc in ch-ring. ROUND 2: 2 dc in every dc = 16 dc. Read WORK IN THE ROUND IN A CIRCLE above. ROUND 3: * 1 dc in next dc, 2 dc in next dc *, repeat from *-* the rest of the round = 24 dc. ROUND 4: * 1 dc in the next 2 dc, 2 dc in next dc *, repeat from *-* the rest of the round = 32 dc. ROUND 5-10: Work 1 dc in every dc = 32 dc on the round. ROUND 11: * 1 dc in the next 2 dc, then crochet the next 2 dc tog * - Read explanation above, repeat from *-* the rest of the round = 24 dc. ROUND 12: Work 1 dc in every dc = 24 dc. ROUND 13: * 1 dc in the next 2 dc, then crochet the next 2 dc tog *, repeat from *-* the rest of the round = 18 dc. ROUND 14: * 1 dc in next dc, then crochet the next 2 dc tog *, repeat from *-* the rest of the round = 12 dc. ROUND 15: Crochet all dc tog 2 by 2 = 6 dc. Cut the thread and fill the head with some cotton wool. BODY: Worked in the round with 1 thread Puddel or 2 threads Alpaca Boucle on hook size 5 mm. Start at the bottom of body by making a magic circle. ROUND 1: Work 8 dc in ch-ring. ROUND 2: 2 dc in every dc = 16 dc. ROUND 3: * 1 dc in next dc, 2 dc in next dc *, repeat from *-* the rest of the round = 24 dc. ROUND 4: * 1 dc in the next 2 dc, 2 dc in next dc *, repeat from *-* the rest of the round = 32 dc. ROUND 5-12: Work 1 dc in every dc = 32 dc on the round. ROUND 13: * 1 dc in the next 2 dc, then crochet the next 2 dc tog *, repeat from *-* the rest of the round = 24 dc. ROUND 14: Work 1 dc in every dc = 24 dc. ROUND 15: * 1 dc in the next 2 dc, then crochet the next 2 dc tog *, repeat from *-* the rest of the round = 18 dc. ROUND 16: Work 1 dc in every dc = 18 dc. ROUND 17: * 1 dc in next dc, then crochet the next 2 dc tog *, repeat from *-* the rest of the round = 12 dc. ROUND 18: Crochet all dc tog 2 by 2 = 6 dc. Cut the thread and keep 30 cm for assembly. Fill the body with some cotton wool. LEG: Worked in the round in a circle with Paris on hook size 4 mm. Start at edge of leg by making a magic circle. ROUND 1: Work 6 dc in ch-ring. ROUND 2: 2 dc in every dc = 12 dc. ROUND 3: * 1 dc in next dc, 2 dc in next dc *, repeat from *-* the rest of the round = 18 dc. ROUND 4-5: Work 1 dc in every dc - NOTE: Switch to 1 thread Puddel or 2 threads Alpaca Boucle and hook size 5 mm in last st on 5th round - Read COLOUR CHANGE - DC above = 18 dc on round. ROUND 6: * 1 dc in next dc, then crochet the next 2 dc tog *, repeat from *-* the rest of the round = 12 dc. ROUND 7-9: Work 1 dc in every dc = 12 dc on the round. ROUND 10: * 1 dc in next dc, then crochet the next 2 dc tog *, repeat from *-* the rest of the round = 8 dc. ROUND 11-12: Work 1 dc in every dc = 8 dc on the round. Cut the thread and keep 30 cm for assembly. Work another leg the same way. Fill the legs with some cotton wool. ARM: Worked in the round in a circle with Paris on hook size 4 mm. Start at edge of arm by making a magic circle. ROUND 1: Work 6 dc in ch-ring. ROUND 2: 2 dc in every dc = 12 dc. ROUND 3: * 1 dc in the next 2 dc, 2 dc in next dc *, repeat from *-* the rest of the round = 16 dc. ROUND 4-5: Work 1 dc in every dc - NOTE: Switch to 1 thread Puddel or 2 threads Alpaca Boucle and hook size 5 mm in last st on 5th round = 16 dc on round. ROUND 6: * 1 dc in the next 2 dc, then crochet the next 2 dc tog *, repeat from *-* the rest of the round = 12 dc. ROUND 7: Work 1 dc in every dc = 12 dc. ROUND 8: * 1 dc in next dc, then crochet the next 2 dc tog *, repeat from *-* the rest of the round = 8 dc. ROUND 9-12: Work 1 dc in every dc = 8 dc on the round. Cut the thread and keep 30 cm for assembly. Fill the arm with some cotton wool. Work another arm the same way. SNOUT: Worked in the round in a circle with Paris on hook size 4 mm. Start at edge of snout by making a magic circle. ROUND 1: Work 6 dc in ch-ring. ROUND 2: 2 dc in every dc = 12 dc. ROUND 3: * 1 dc in next dc, 2 dc in next dc *, repeat from *-* the rest of the round = 18 dc. ROUND 4: * 1 dc in the next 8 dc, 2 dc in next dc *, repeat from *-* one more time = 20 dc. ROUND 5-6: Work 1 dc in every dc = 20 dc on the round. Cut the thread and keep 30 cm for assembly. Fill the snout with some cotton wool. EAR: Worked in the round in a circle with Paris on hook size 4 mm. Start at the top of ear by making a magic circle. ROUND 1: Work 4 dc in the magic circle. ROUND 2: 2 dc in every dc = 8 dc. ROUND 3: * 1 dc in next dc, 2 dc in next dc *, repeat from *-* the rest of the round = 12 dc. ROUND 4: * 1 dc in the next 2 dc, 2 dc in next dc *, repeat from *-* the entire round = 16 dc. ROUND 5-6: Work 1 dc in every dc = 16 dc on the round. Cut the thread and keep 30 cm for assembly. Do not fill with cotton. Work another ear the same way. TAIL: Worked in the round in a circle with Paris on hook size 4 mm. Start at end of tail by making a magic circle. ROUND 1: Work 4 dc in the magic circle. ROUND 2: 2 dc in every dc = 8 dc. ROUND 3: * 1 dc in next dc, 2 dc in next dc *, repeat from *-* the rest of the round = 12 dc. ROUND 4-6: Work 1 dc in every dc = 12 dc on the round. Cut the thread and keep 30 cm for assembly. Fill the tail with some cotton wool. ASSEMBLY: Sew the snout at the front of head. Place the ears flat and fasten them on each side of head. Sew a nose on the snout and eyes on the head with black. Sew the head on to body with neat little stitches. Sew the legs and arms on the body, sew the tail to the back of body. |
|
Have you finished this pattern?Tag your pictures with #dropspattern #dropspaddy or submit them to the #dropsfan gallery. Do you need help with this pattern?You'll find 5 tutorial videos, a Comments/Questions area and more by visiting the pattern on garnstudio.com. © 1982-2026 DROPS Design A/S. We reserve all rights. This document, including all its sub-sections, has copyrights. Read more about what you can do with our patterns at the bottom of each pattern on our site. |


With over 40 years in knitting and crochet design, DROPS Design offers one of the most extensive collections of free patterns on the internet - translated to 17 languages. As of today we count 324 catalogues and 12290 patterns translated into English (UK/cm). 12290
We work hard to bring you the best knitting and crochet have to offer, inspiration and advice as well as great quality yarns at incredible prices! Would you like to use our patterns for other than personal use? You can read what you are allowed to do in the Copyright text at the bottom of all our patterns. Happy crafting!
Post a comment to pattern DROPS Baby 21-10
We would love to hear what you have to say about this pattern!
If you want to leave a question, please make sure you select the correct category in the form below, to speed up the answering process. Required fields are marked *.