
Popular categories
Looking for a yarn?


Comments / Questions (31)
![]() Jantine wrote:
Jantine wrote:
Op de foto lijkt het alsof de voorkant korter is dan de achterkant. In het patroon zie ik hier geen aanwijzingen voor. Is dit dus 'gezichtsbedrog?'
15.01.2026 - 11:25DROPS Design answered:
Dag Jantine,
Voor en achter hebben dezelfde lengte.
15.01.2026 - 20:01
![]() Dorothy wrote:
Dorothy wrote:
And is the bust size given the finished size, or the size of bust? Thank you.
20.09.2025 - 15:29DROPS Design answered:
Hi Dorothy, the bust size is given for the finished garment. Happy knitting!
20.09.2025 - 21:37
![]() Dorothy wrote:
Dorothy wrote:
What bust sizes (in inches) does S, M, L, XL, etc akin to? I've knitted almost the 12cms at the back, for an M size, but it's clearly too small. I don't want to start another unless I know it'll fit. Thanks for your help.
20.09.2025 - 15:25DROPS Design answered:
Hi Dorothy, There is a size chart at the bottom of the pattern, with all the measurements for the different sizes. Recommend that you work a swatch before beginning your project, so you are sure your knitting tension is correct. Regards, Drops team.
22.09.2025 - 06:18
![]() Heike wrote:
Heike wrote:
Hallo, guten Tag, Die Weste gefällt mir sehr gut und ich würde sie gerne stricken. Auf dem Foto sieht es für mich aus, als wäre das Vorderteil kürzer, als der Rücken, was die Weste so besonders macht. In der Beschreibung sind aber für alle Teile 12cm Bündchen angegeben. Täuscht das Foto? Oder wurde die Anleitung geändert? Vielen Dank, Heike
09.03.2025 - 15:15DROPS Design answered:
Liebe Heike, das mittlere Vorne wird etwas kürzer sein, weil die Blenden-Maschen krausrechtes gestrickt werden, so sollte es bei Ihnen auch genaus aussehen. Viel Spaß beim Stricken!
10.03.2025 - 09:25
![]() Emms wrote:
Emms wrote:
Ok. I worked it out. It's in preparation for armhole shaping. The confusion for me, was because there was no warning of shaping to come. Normally there's an asterix, or in capitals 'Armhole shaping' and that gives a big clue 😆 I've knitted some very complicated drops patterns and never had a problem before. I love them. Thank you x
28.01.2025 - 20:42
![]() Emms wrote:
Emms wrote:
Hi. I\'m at the party on the back where you say at 37cms work 2 rows heater stitch with 10 rows each side. This doesn\'t make sense. Looking at the pattern is no help, other than it looks more like 3 or stitches. I\'m a very experienced knitter, but don\'t understand this. I\'d be very grateful for done clarity please. Xx
28.01.2025 - 20:09
![]() Roberta wrote:
Roberta wrote:
Buonasera, grazie per la risposta di ieri: adesso non mi è chiaro come devo procedere per le diminuzioni e per l'intreccio delle maglie. Sto lavorando il davanti destro, e arrivata a 36 cm il modello dice di intrecciare 6 maglie verso il lato e "e intrecciare per modellare la scollatura a lato come descritto per il dietro". Cosa significa intrecciare come descritto per il dietro? non è affatto chiaro! potete cortesemente spiegarmi cosa devo fare esattamente? grazie!
30.10.2022 - 21:55DROPS Design answered:
Buonasera Roberta, in quel punto oltre agli intrecci per il collo, deve lavorare le diminuzioni degli scalfi sul lato, seguendo le indicazioni descritte per il dietro. Buon lavoro!
31.10.2022 - 21:25
![]() Roberta wrote:
Roberta wrote:
Buongiorno, non capisco come devo fare gli aumenti a partire da cm14 della parte davanti: il pattern dice "measures 14 cm inc at the side as described for back piece = 41-45-48-52-58-64". Che significa? 1 aumento ogni 6 cm fino a raggiungere il numero di maglie finale? E su quale lato, quello che andrà cucito ? Grazie in anticipo
29.10.2022 - 15:51DROPS Design answered:
Buonsera Roberta, esatto, deve procedere con gli aumenti come indicato per il dietro. Buon lavoro!
30.10.2022 - 10:12
![]() Sue wrote:
Sue wrote:
Front piece decrease for neckline + armhole: how to preserve 3/6 garter stitch pattern if alternate row decrease happens "inside" -- how does this not diminish the 3/6 garter stitch?
12.09.2022 - 16:39DROPS Design answered:
Dear Sue, decreases "inside" refers to decreases just before or just after the garter stitch sections, not between the garter stitches in a section. Happy knitting!
12.09.2022 - 22:55
![]() Márcia Pereira wrote:
Márcia Pereira wrote:
Olá bom dia! Esse modelo, na foto, aparece com a frente na parte da barra com menos carreiras. São carreiras encurtadas?
17.05.2022 - 13:41DROPS Design answered:
Bom dia, Não, o modelo não tem carrreiras encurtadas, Parece ser mais curto à frente, na foto, mas isso deve-se à forma como a modelo o vestiu. Bons tricôs!
18.05.2022 - 10:47
|
|
A Lady's Autumn#aladysautumnvest |
|
|
|
|
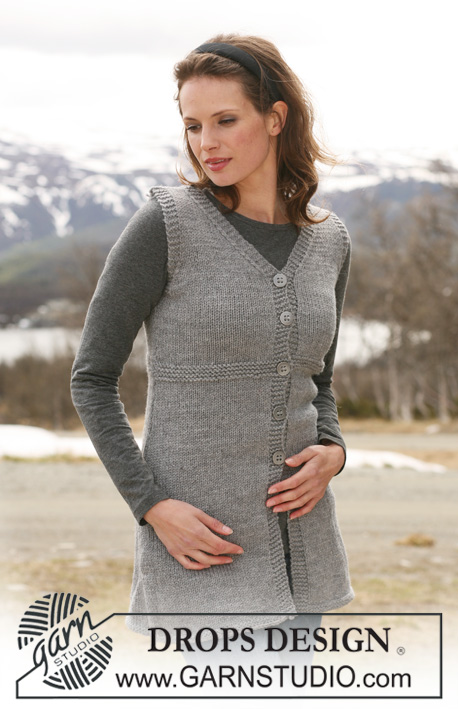
Knitted DROPS waistcoat in ”Alaska”. Size S-XXXL.
DROPS 114-35 |
|
|
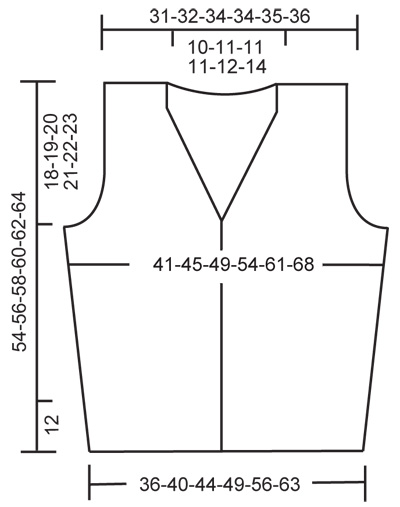
GARTER ST (back and forth on needle): K all rows. BUTTONHOLES: Make buttonholes on right front band. 1 buttonhole = K tog 3rd and 4th st from mid front and make 1 YO. Make buttonholes when piece measures: Size S: 2, 10, 17, 25 and 32 cm. Size M: 2, 9, 17, 25 and 33 cm. Size L: 2, 10, 18, 26 and 34 cm. Size XL: 2, 10, 19, 27 and 35 cm. Size XXL: 2, 10, 19, 27 and 36 cm. Size XXXL: 2, 11, 20, 29 and 37 cm. DECREASING TIP (armhole and neckline): Dec inside 3 garter sts along armhole and 6 garter sts on neckline. Make all dec from RS. Dec as follows after 3/6 garter sts: K2 tog. Dec as follows before 3/6 garter sts: slip 1 st as if to K, K1, psso. -------------------------------------------------------- BACK PIECE: Worked back and forth on needle. Cast on 77-83-89-101-113-125 sts (includes 1 edge st each side) on needle size 4.5 mm with Alaska. P 1 row from WS and continue in rib K3/P3 with K3 and 1 edge st each side. When piece measures 12 cm change to needle size 5 mm and continue in stocking st, AT THE SAME TIME on first row dec 14-13-12-16-16-16 sts evenly = 63-70-77-85-97-109 sts. REMEMBER THE KNITTING TENSION! When piece measures 14 cm inc 1 st each side, and repeat the inc on every 6 cm a total of 4 times = 71-78-85-93-105-117 sts. When piece measures 35-36-37-38-39-40 cm work 2 rows garter st on 8-9-10-11-14-17 sts each side with remaining sts as before. On next row cast off 5-6-7-8-11-14 sts each side for armhole. Cast off to shape the armhole – see DECREASING TIP: On every other row: 1 st 4-6-7-9-10-12 times and then on every 4th row: 1 st 0-0-0-1-2-2 times = 53-54-57-57-59-61 sts. Continue in stocking st with 3 garter sts each side. When piece measures 51-53-55-57-59-61 cm work 2 rows garter st on the middle 27-28-29-29-31-33 sts, with remaining sts as before. On next row cast off the middle 15-16-17-17-19-21 sts for neck and complete each side separately. Cast off 1 st inside 6 garter sts on neckline on next row – see DECREASING TIP = 18-18-19-19-19-19 sts left on shoulder. Continue in stocking st with 3 garter sts towards armhole and 6 garter sts towards neckline until piece measures 54-56-58-60-62-64 cm. Cast off. RIGHT FRONT PIECE: Cast on 43-49-55-55-61-67 sts (includes 1 edge st at the side and 6 front band sts towards mid front) on needle size 4.5 mm with Alaska. P 1 row from WS and work next row as follows from RS: 6 front band sts in garter st, * K3/P3 *, repeat from *-* and finish with 1 edge st. Continue in rib with 6 front band sts in garter st towards mid front. Remember BUTTONHOLES on front band – see above. When piece measures 12 cm change to needle size 5 mm and continue in stocking st with front band in garter st as before, AT THE SAME TIME on first row dec 6-8-11-7-7-7 sts evenly – do not dec on front band = 37-41-44-48-54-60 sts. When piece measures 14 cm inc at the side as described for back piece = 41-45-48-52-58-64 sts. When piece measures 33-34-35-36-37-38 cm dec towards mid front for neck – see DECREASING TIP: On every other row: 1 st a total of 11-12-12-12-13-14 times and then on every 4th row: 1 st a total of 3 times. AT THE SAME TIME when piece measures 35-36-37-38-39-40 cm work 2 rows garter st on 8-9-10-11-14-17 sts at the side, with remaining sts as before. On next row cast off 5-6-7-8-11-14 sts at the side for armhole and cast off to shape the armhole at the side as described for back piece. After all dec for armhole and neck there are 18-18-19-19-19-19 sts left on shoulder. Continue in stocking st with 3 garter sts towards armhole and 6 garter sts towards neckline until piece measures 54-56-58-60-62-64 cm. Cast off. LEFT FRONT PIECE: Cast on and work like right front piece, but mirrored, and without buttonholes. ASSEMBLY: Sew shoulder seams. Sew side seams inside 1 edge st. Sew on buttons. |
|
 |
|
Have you finished this pattern?Tag your pictures with #dropspattern #aladysautumnvest or submit them to the #dropsfan gallery. Do you need help with this pattern?You'll find 15 tutorial videos, a Comments/Questions area and more by visiting the pattern on garnstudio.com. © 1982-2026 DROPS Design A/S. We reserve all rights. This document, including all its sub-sections, has copyrights. Read more about what you can do with our patterns at the bottom of each pattern on our site. |


With over 40 years in knitting and crochet design, DROPS Design offers one of the most extensive collections of free patterns on the internet - translated to 17 languages. As of today we count 324 catalogues and 12290 patterns translated into English (UK/cm). 12290
We work hard to bring you the best knitting and crochet have to offer, inspiration and advice as well as great quality yarns at incredible prices! Would you like to use our patterns for other than personal use? You can read what you are allowed to do in the Copyright text at the bottom of all our patterns. Happy crafting!
Post a comment to pattern DROPS 114-35
We would love to hear what you have to say about this pattern!
If you want to leave a question, please make sure you select the correct category in the form below, to speed up the answering process. Required fields are marked *.