
Popular categories
Looking for a yarn?


Comments / Questions (67)
![]() Danielle Minville wrote:
Danielle Minville wrote:
Erreur majeure dans le diagramme.
12.05.2020 - 01:32DROPS Design answered:
Bonjour Mme Minville, pouvez-vous nous en dire plus sur l'erreur en question? Quelle taille tricotez-vous (quel diagramme), quel rang et quelle erreur? Ce modèle a déjà été réalisé tellement de fois avec succès, et nous n'avons pas eu de retour, s'il y a une erreur, nous devrons la corriger, merci. Bon tricot!
12.05.2020 - 10:06
![]() Veerle wrote:
Veerle wrote:
Hallo, ik heb nog geen antwoord gekregen op mijn vraag van 5/12/2019. Alvast bedankt!
13.12.2019 - 09:16DROPS Design answered:
Dag Veerle,
Je vraag stond bij de algemene opmerkingen, vandaar dat hij over het hoofd was gezien, maar hij is inmiddels beantwoord.
16.12.2019 - 15:53
![]() Veerle wrote:
Veerle wrote:
In het patroon staat bij de PAS in maat Medium: Zet nu de mouwen op dezelfde rondbreinld als het lijf waar afgekant is voor de armsgaten = 242 st. Plaats een markeerdraad na 9 st op een van de mouwen (dus er zijn 9 st, 1 markeerdraad en dan 42 st op deze mouw) – De nld begint vanaf nu bij deze markeerdraad. Mijn vraag is nu: begint de naald dan links of rechts van deze markeerdraad, brei ik eerst 9 steken van de mouw en dan de rest of brei ik eerst 42 steken en dan de rest?
05.12.2019 - 20:43DROPS Design answered:
Dag Veerle,
De naald begint na de 9 steken, dus je begint de naald bij de markeerderaaad en je breit 42 steken van de mouw, dan het pand, dan de andere mouw, dan het andere pand en tot slot de laatste 9 steken van de eerste mouw.
16.12.2019 - 15:51
![]() Veerle wrote:
Veerle wrote:
Ik zou deze jurk willen breien in het kleur dat op de foto staat, donkerroze. Dit is volgens de uitleg :Drops Alaska donkerroze mix kleur 53, maar deze kleur bestaat niet in mix, enkel in unicolour. Welk garen moet ik dan bestellen? Alvast bedankt voor uw antwoord!
04.08.2019 - 22:14DROPS Design answered:
Dag Veerle,
Dit kleurnummer bestaat nog wel, maar heeft alleen een andere naam gekregen: robijnrood. De kleur zelf is verder niet anders.
06.08.2019 - 15:47
![]() Alys35 wrote:
Alys35 wrote:
Merci pour votre réponse. Mais je me suis sans doute mal expliquée...J'ai bien compris qu'on tricote sur l'endroit pour plus de facilité, et qu'on retourne sur l'envers ensuite SI on veut un pull en jersey envers. Mais moi je voudrais réaliser ce pull en jersey endroit. Ma question porte sur la réalisation de l'empiècement dans ce cas: dois-je le faire selon la grille donnée ( torsades endroit sur fond de jersey envers), ou vaudrait-il mieux intervertir, si c'est faisable?
23.01.2019 - 17:05DROPS Design answered:
Bonjour Alys35, les torsades se font généralement sur fond jersey envers, vous pouvez essayer un échantillon du motif sur fond jersey endroit pour voir si le rendu vous plairait - tricotez par ex 1 ou 2 fois M.1 en largeur (avec 1/2 m point mousse de chaque côté par ex). Bon tricot!
24.01.2019 - 09:03
![]() Alys35 wrote:
Alys35 wrote:
Bonjour, Je souhaite tricoter ce modèle sans le retourner, c'est à dire en le laissant sur le jersey endroit. Comment réaliser le diagramme de torsades? Tel que prévu? Ou dois-je intervertir malle endroit/ maille envers dans la grille et dans les instructions? Je n'arrive pas à me représenter la chose... Merci pour votre réponse.
23.01.2019 - 14:40DROPS Design answered:
Bonjour Alys35, on tricote le début en jersey endroit pour qu'il soit plus facile de tricoter (on tricote en général plus facilement des mailles endroit que des mailles envers), mais vous pouvez le tricoter en jersey envers dès le début, ainsi, vous n'aurez pas à retourner les pièces sur l'endroit avant l'empiècement. Bon tricot!
23.01.2019 - 16:06
![]() Martha wrote:
Martha wrote:
Es ist nicht nur ein aussergewöhnlich schönes Modell, es ist auch sehr, sehr angenehm zu tragen. Ich habe es in den Grössen XXXL, M und S gestrickt und wir sind mit allen Ergebnissen super happy.
17.02.2018 - 18:12
![]() Hilda wrote:
Hilda wrote:
Ik ben boos.Brei deze jurk en ben bezig met bol 10 en weer een knoop dus in elke bol 1.Brei altijd met drops nog nooit meegemaakt.Wat gaat U hieraan doen.Het is gekocht bij breiparadijs. hilda
16.02.2018 - 21:55DROPS Design answered:
Hallo Hilde, Dat is heel vervelend. Voor alle klachten over het garen en eventuele terugvorderingen kun je terecht bij het verkooppunt. Het verkooppunt kan de klacht dan weer doorsturen naar ons.
20.02.2018 - 16:57
![]() MARIA DANIELSSON wrote:
MARIA DANIELSSON wrote:
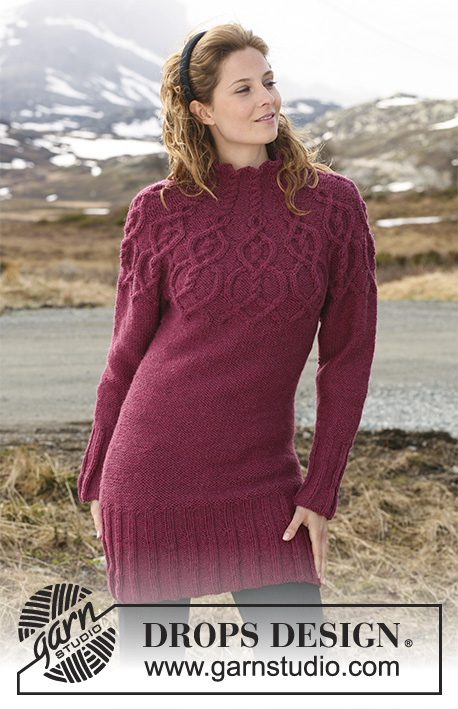
Två viktiga kommentarer till dig som vill sticka denna klänning: 1. Det rekommenderade garnet är väldigt stickigt. Välj ett mjukare garn. 2. Mönstret stämmer inte med bilden. På de mindre storlekarna saknas den tredje och minsta medaljongen. Jag fick dra upp och lägga till denna med hjälp av mönstret för de större storlekarna. Dock innehållet det mönstret en extra flätning som ej finns på fotot, och den uteslöt jag.
23.01.2016 - 12:52
![]() Griet De Backer wrote:
Griet De Backer wrote:
Vraag: ik wil deze jurk bij mijn favorieten zetten maar ben vergeten hoe dat moet. Waar op de site staat de uitleg?
20.01.2016 - 20:08DROPS Design answered:
Hoi Griet. Klik op het hartje boven rechts op de foto en typ uw mailadres. U kunt dan het patroon terugvinden door uw mailadres in te voeren onder "Mijn favorieten"
21.01.2016 - 13:35
|
||||||||||||||||||||||
Alaskan Beauty#alaskanbeautytunic |
||||||||||||||||||||||
 |
 |
|||||||||||||||||||||
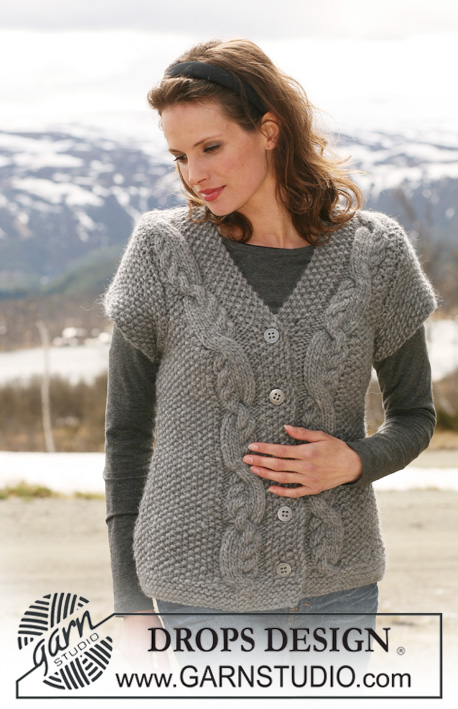
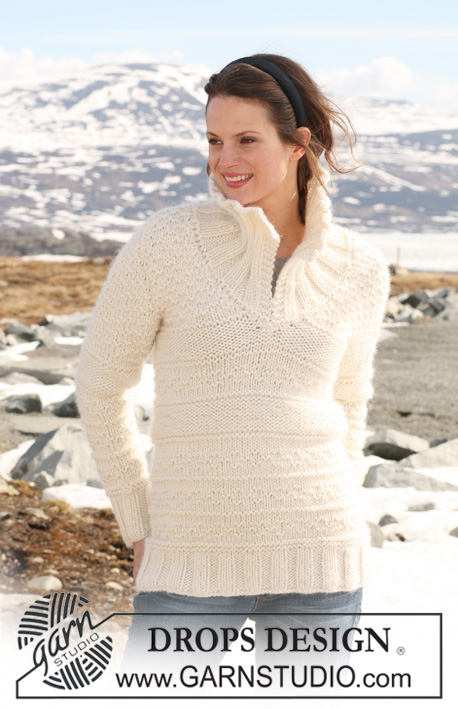
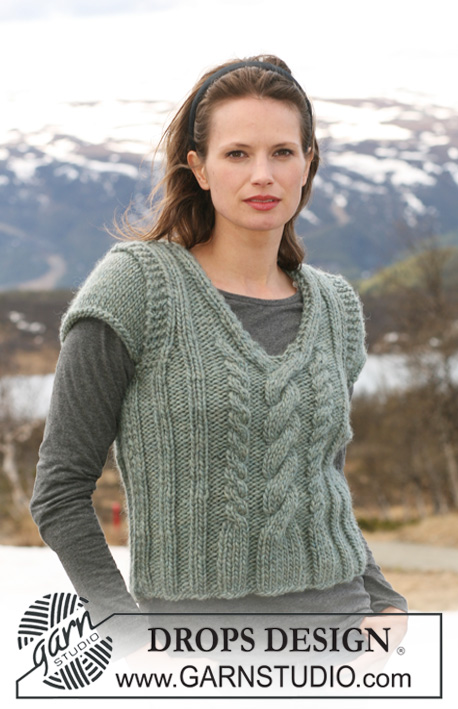
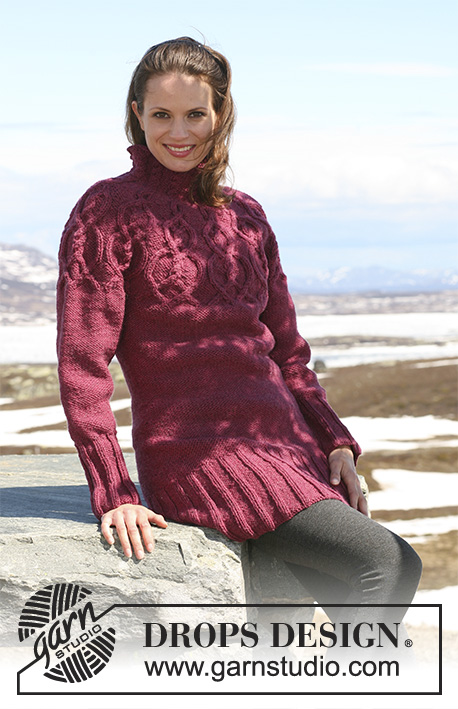
DROPS tunic in ”Alaska” with round yoke and cable pattern on yoke. Size S to XXXL.
DROPS 117-13 |
||||||||||||||||||||||
|
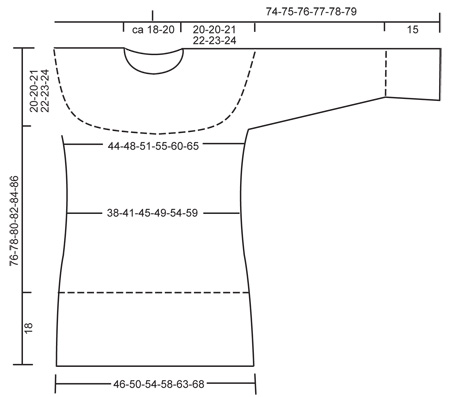
PATTERN: See diagram M.1 and M.2 – see diagram for your size. Pattern in diagram is seen from RS. ---------------------------------------------------------- Body piece and sleeves are worked from WS, they are then turned inside out before being slipped on the same circular needle for yoke. BODY PIECE: Worked in the round on circular needle. Cast on 224-240-256-272-296-320 sts on circular needle size 4.5 mm with Alaska. Work rib = P2/K6. When piece measures 6 cm dec all K6 to K5 – dec by K tog the first 2 sts in each K-section = 196-210-224-238-259-280 sts. When piece measures 12 cm dec all K5 to K4 – dec by K tog the last 2 sts in each K-section = 168-180-192-204-222-240 sts. When piece measures 18 cm change to circular needle size 5.5 mm and continue in stocking st, AT THE SAME TIME on first round dec 20-20-20-20-22-24 sts evenly = 148-160-172-184-200-216 sts. REMEMBER THE KNITTING TENSION! Insert a marker each side = 74-80-86-92-100-108 sts between markers on front piece and back piece. When piece measures 20-21-22-23-24-25 cm dec 1 st on each side of each marker by K2 tog, and repeat the dec on every 3 cm a total of 7 times = 120-132-144-156-172-188 sts. When piece measures 40-41-42-43-44-45 cm inc 1 st on each side of each marker. Repeat the inc on every 3 cm a total of 5 times = 140-152-164-176-192-208 sts. When piece measures 56-58-59-60-61-62 cm cast off 6 sts each side for armhole (i.e. 3 sts on each side of marker) = 128-140-152-164-180-196 sts. Put piece aside and knit the sleeves. SLEEVE: Cast on 56-56-56-64-64-64 sts on double pointed needles size 4.5 mm with Alaska. Work rib = P2/K6. When piece measures 5 cm dec all K6 to K5 – dec by K tog the first 2 sts in each K-section = 49-49-49-56-56-56 sts. When piece measures 10 cm dec all K5 to K4 – dec by K tog the last 2 sts in each K-section = 42-42-42-48-48-48 sts. When piece measures 15 cm change to double pointed needles size 5.5 mm and continue in stocking st, AT THE SAME TIME on first round dec 2-1-0-3-2-1 sts evenly = 40-41-42-45-46-47 sts. Insert a marker at beg of round = mid under sleeve. When piece measures 17 cm inc 1 st each side of marker, and repeat the inc on every 5-3.5-3-2.5-2.5-2 cm a total of 6-8-10-11-12-13 times = 52-57-62-67-70-73 sts. When piece measures 45-46-46-46-46-46 cm cast off 6 sts mid under sleeve = 46-51-56-61-64-67 sts. Put piece aside and knit the other sleeve. YOKE: Turn body piece and sleeves inside out, i.e. with WS on the outside. Now slip sleeves on the same circular needle as body piece where cast off for armholes = 220-242-264-286-308-330 sts. Insert a marker 1-9-17-3-10-17 sts in on one of the sleeves (i.e. there are 1-9-17-3-10-17 sts, 1 marker and then 45-42-39-58-54-50 sts on this sleeve) – Round now beg by marker – important as this will place a cable mid front! P 0-0-1-0-1-2 rounds and now work next round as follows: * P1, inc 1 st in next st and K both sts, P8, inc 1 st in each of the next 2 sts and K all 4 sts, P8, inc 1 st in next st and K both sts, P1 *, repeat from *-* (= a total of 10-11-12-13-14-15 times) = 260-286-312-338-364-390 sts. Now continue in M.1 – see diagram for your size. After M.1 there are 80-88-96-104-112-120 sts on round. Continue in M.2 (= neck) for 12 cm, and cast off with K over K and P over P. ASSEMBLY: Sew openings under arms. |
||||||||||||||||||||||
Diagram explanations |
||||||||||||||||||||||
|
||||||||||||||||||||||
 |
||||||||||||||||||||||
 |
||||||||||||||||||||||
Have you finished this pattern?Tag your pictures with #dropspattern #alaskanbeautytunic or submit them to the #dropsfan gallery. Do you need help with this pattern?You'll find 19 tutorial videos, a Comments/Questions area and more by visiting the pattern on garnstudio.com. © 1982-2026 DROPS Design A/S. We reserve all rights. This document, including all its sub-sections, has copyrights. Read more about what you can do with our patterns at the bottom of each pattern on our site. |
||||||||||||||||||||||


With over 40 years in knitting and crochet design, DROPS Design offers one of the most extensive collections of free patterns on the internet - translated to 17 languages. As of today we count 324 catalogues and 12290 patterns translated into English (UK/cm). 12290
We work hard to bring you the best knitting and crochet have to offer, inspiration and advice as well as great quality yarns at incredible prices! Would you like to use our patterns for other than personal use? You can read what you are allowed to do in the Copyright text at the bottom of all our patterns. Happy crafting!
Post a comment to pattern DROPS 117-13
We would love to hear what you have to say about this pattern!
If you want to leave a question, please make sure you select the correct category in the form below, to speed up the answering process. Required fields are marked *.