
Popular categories
Looking for a yarn?


Comments / Questions (26)
![]() Doris Würscher wrote:
Doris Würscher wrote:
Guten Tag die Maschenzahl am Arm bei Grösse XL 75M passt nicht zusammen mit dem M1. Diese sind im Rapport 12 M. Würde einen Streifen unter dem Arm ergeben? Oder soll man die "vorigen" 3M abnehmen?
21.02.2025 - 11:23DROPS Design answered:
Liebe Frau Würscher, das Muster wird unter den Ärmel nicht passen, wichtig ist aber daß das Muster schön zentriert wird, dh die Masche mit dem Pfeil im Diagram muss die mittlere Masche oben am Ärmel sein - hier lesen Sie mehr. Viel Spaß beim Stricken!
21.02.2025 - 14:14
![]() Anna wrote:
Anna wrote:
In this sweater , I don't see instruction on the white dots at the top portion of the sweater? And also , are the sections left on the needles when I'm finishing each piece separately ? Or are they placed on stitch holders? Thanks
14.09.2022 - 17:24DROPS Design answered:
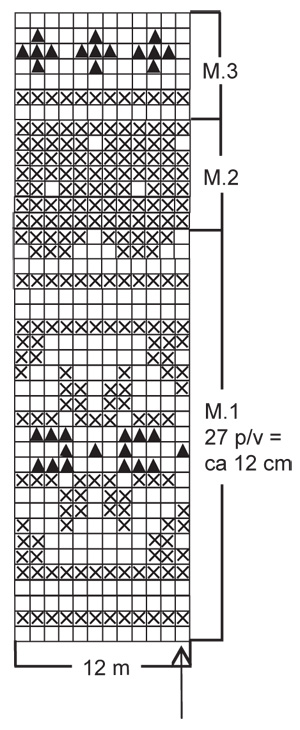
Dear Anna, the white dot sections is the pattern called M.2 (see the 7 rows over M.1 called "M.2" on the right side of the diagram) - when you divide piece for armholes, you can slip the unworked stitches for back piece and right front piece on a thread or a stitch holder while continuing the left front piece. Happy knitting!
15.09.2022 - 09:20
![]() Lourdes Brown wrote:
Lourdes Brown wrote:
I am knitting the Highland Dew sweater #x-342. Is there a mistake in the sleeve pattern? Should the small size read 17 3\\4 for bind off instead of 19 3\\4? I think the numbers are reversed! Thanks for a response
30.07.2020 - 21:11DROPS Design answered:
Dear Mrs Brown, sleeve are shorter in larger sizes since the shoulders are wider and sleeve cap longer. Check measurements for your size in the chart and adjust to your own measurements if needed. Happy knitting!
31.07.2020 - 07:50
![]() Knitix wrote:
Knitix wrote:
Gleich zu Beginn der Arbeit steht, man solle auf der Rueckseite 1 R li mit rosa stricken und dann die Farbe wechseln. Aber wenn ich mir dieses Bild und auch einige der anderen Highland Dew genau anschaue, sieht das eher so aus als dass das Model mit rosa angeschlagen wurde. Und dann aber bereits 1 R li in hellbraun gestrickt wurde. Ich hab das so gemacht wie in der Anleitung beschrieben, aber es sieht nicht sehr schoen aus. Ueberlege mir jetzt, ob ich nochmals von vorne anfangen soll.
15.05.2019 - 04:39DROPS Design answered:
Liebe Knitix, so wurde das Modell im Foto gestrickt, wie in der Anleitung bescrhieben: mit Rosa anschlagen, 1 Reihe links stricken, dann mit braun (1. Reihe = Hinreihe) weiterstricken. Viel Spaß beim stricken!
15.05.2019 - 08:39
![]() Jeanette wrote:
Jeanette wrote:
Diagrammet visar väl bara rätsidan? Man stickar väl tillbaka på baksidan, alltså brun på brun osv fast aviga? Jag gör så men får avlånga blommor på höjden. Ser inte rätt ut. Om man bara ska följa diagrammet från rätsidan måste man ju sticka runt.
07.01.2015 - 21:19DROPS Design answered:
Hej Jeanette, Ja du ser diagrammet från rätsidan, det betyder att du stickar varannat varv i diagrammet från avigsidan. Lycka till!
02.02.2015 - 15:14Matte wrote:
6+14(12)+1+6=181
21.03.2014 - 16:49
![]() Helle Thomsen wrote:
Helle Thomsen wrote:
Der står ikke hvor i mønstret man skal starte så det blir ens på hver side af midten. I str. L er der 1 maske for meget når man skal strikke mønstret
21.03.2014 - 12:49DROPS Design answered:
Du startar på rutan längs ner i höger hörn på diagrammet, upprepar diagrammets 12 m över alla maskorna på varvet, och som du säger kommer du ha en maska kvar till sist och den stickar du som 1:a m i diagrammet. Då blir det likt i var sida mot mitt fram.
27.03.2014 - 22:31
![]() Jette L Larsen wrote:
Jette L Larsen wrote:
Garn mængde passer ikke, der skal bruges 1 xtra ngl hvid, og 1 ngl mindre i brun i str L
25.02.2013 - 21:19
![]() Hetty wrote:
Hetty wrote:
Bedankt voor de uitleg. Nu weet waar ik het patroon niet goed gelezen heb.
25.01.2013 - 09:46
![]() Hetty wrote:
Hetty wrote:
Waar wordt beschreven hoe de steekjes boven het inbreipatroon worden gemaakt en zitten er strepen op de schouder.
23.01.2013 - 21:26DROPS Design answered:
De steken boven het inbrei patroon (het gedeelte met de witte stipjes) is M.2 en de "streep" op de schouder is M.3. Hoe je ze moet breien lees je onder beschrijving voor LINKER VOORPAND en ACHTERPAND. Veel breiplezier.
24.01.2013 - 19:25
|
||||||||||
Highland Dew |
||||||||||
|
|
||||||||||
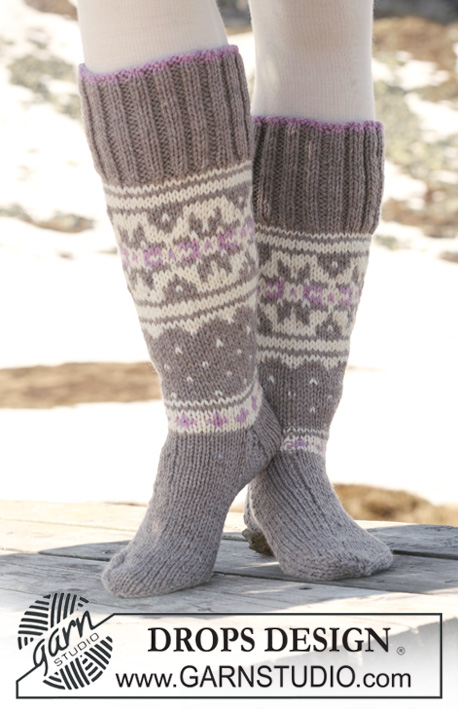
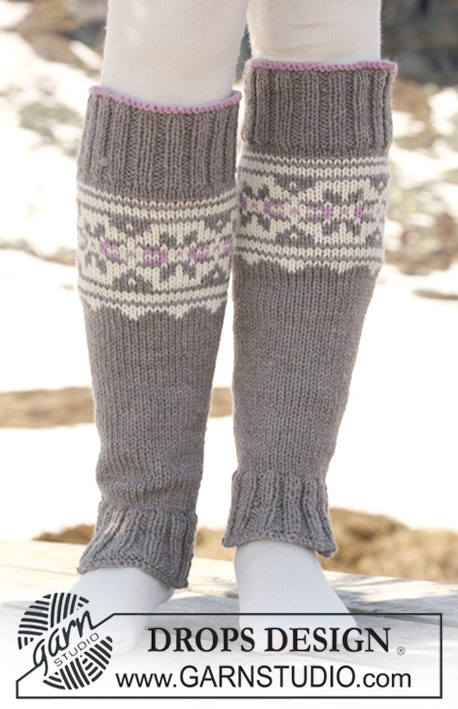
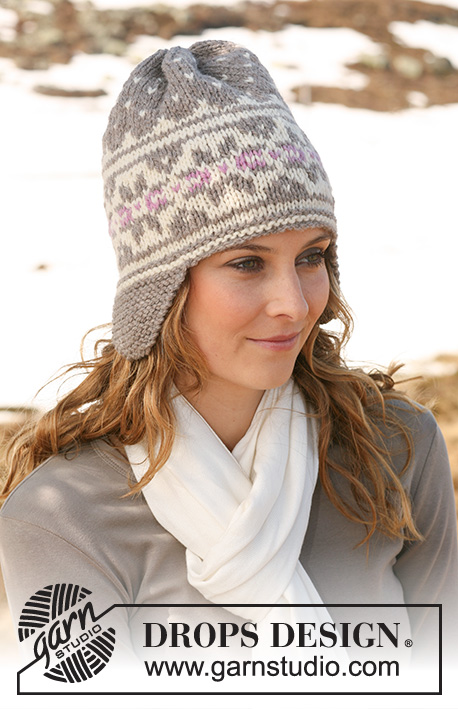
DROPS jacket in ”Alaska” with Norwegian pattern. Size S to XXXL.
DROPS 116-33 |
||||||||||
|
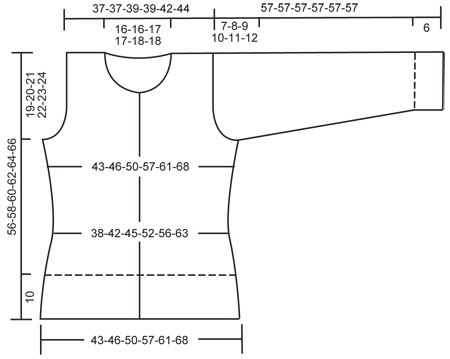
GARTER ST (back and forth on needle): K all rows. PATTERN: See diagram M.1 to M.3 – diagrams show 1 pattern repeat and the entire pattern is worked in stocking st. BUTTONHOLES: Make buttonholes on right front band. 1 BUTTONHOLE = cast off 4th and 5th st from mid front and cast on 2 new sts on return row. Make buttonholes when piece measures: SIZE S: 12, 21, 30, 39 and 48 cm. SIZE M: 12, 22, 31, 41 and 50 cm. SIZE L: 12, 20, 28, 36, 44 and 52 cm. SIZE XL: 12, 21, 29, 37, 45 and 53 cm. SIZE XXL: 12, 21, 30, 38, 47 and 55 cm. SIZE XXXL: 12, 21, 30, 39, 48 and 57 cm. ------------------------------------------------------------------ BODY PIECE: Worked back and forth on circular needle from mid front. Cast on 206-222-238-270-286-318 sts (includes 6 front band sts each side towards mid front) on circular needle size 4 mm with pink. P 1 row from WS, change to light brown mix and continue as follows from RS: 6 front band sts in GARTER ST – see above, * K2, P2 *, repeat from *-*, finish with K2 and 6 front band sts in garter st. When piece measures 10 cm change to circular needle size 5 mm. Work next row from RS as follows: 6 garter sts, K2 tog,* K2, K2 tog *, repeat from *-* and finish with 6 garter st = 157-169-181-205-217-241 sts. Insert a marker 42-45-48-54-57-63 sts in from each side (= 73-79-85-97-103-115 sts between markers on back piece). Continue in stocking st with front bands in garter st. REMEMBER THE KNITTING TENSION! AT THE SAME TIME when piece measures 12 cm dec 1 st each side of both markers, and repeat the dec on every 4th row a total of 4 times = 141-153-165-189-201-225 sts. AT THE SAME TIME when piece measures 12 cm make BUTTONHOLE on right front band – see above. When piece measures 21-22-23-24-25-26 cm inc 1 st each side of both markers, and repeat the inc on every 4th row a total of 4 times = 157-169-181-205-217-241 sts. When piece measures 28-29-30-31-32-33 cm work next row from RS as follows: 6 front band-sts in garter st, 12-13-14-16-17-19 repeats of M.1 across the row, then work first st in M.1 (to make pattern identical on both sides mid front), finish with 6 front band sts in garter st. Work 1 vertical repeat of M.1 – with front bands in garter st as before. AT THE SAME TIME when piece measures approx 37-38-39-40-41-42 cm work next row from RS as follows: 39-42-45-51-54-60 sts (= right front piece), cast off 6 sts for armhole, 67-73-79-91-97-109 sts (= back piece), cast off 6 sts for armhole, 39-42-45-51-54-60 sts (= left front piece). Now complete each piece separately. LEFT FRONT PIECE: = 39-42-45-51-54-60 sts. READ ALL OF THE FOLLOWING SECTION BEFORE CONTINUING! PATTERN: Continue in M.1, after M.1 continue in M.2 until piece measures 51-53-55-57-59-61 cm. Now work 1 vertical repeat of M.3 and complete piece in light brown mix. ARMHOLE: At the same time, cast off for armhole at the beg of every row from the side: 3 sts 0-0-0-1-1-1 time, 2 sts 0-1-1-3-3-5 times and 1 st 2-3-4-3-4-4 times = 37-37-39-39-41-43 sts. NECKLINE: When piece measures 49-51-53-54-56-58 cm slip 9-9-10-10-11-11 sts towards mid front on a stitch holder for neck, and cast off to shape the neckline at the beg of every row from mid front: 2 sts 3 times and 1 st 4 times = 18-18-19-19-20-22 sts left on shoulder. NOTE: Make sure patterns sit over each other as shown in diagram when dec for armhole and neckline. Cast off when piece measures 56-58-60-62-64-66 cm. RIGHT FRONT PIECE: Like left front piece, but mirrored. BACK PIECE: = 67-73-79-91-97-109 sts. Continue in pattern as described for front piece and cast off for armhole each side as described for front piece = 63-63-67-67-71-75 sts. When piece measures 54-56-58-60-62-64 cm cast off the middle 25-25-27-27-29-29 sts for neck and complete each shoulder separately. Cast off 1 st on neckline on next row = 18-18-19-19-20-22 sts left on each shoulder. Cast off when piece measures 56-58-60-62-64-66 cm. SLEEVE: Worked in the round on double pointed needles. Cast on 44-48-48-52-52-56 sts on double pointed needles size 4 mm with pink. K 1 round, change to light brown mix and continue in rib = K2/P2. When piece measures 6 cm change to double pointed needles size 5 mm and continue in stocking st, AT THE SAME TIME on first round dec 7-9-7-9-7-9 sts evenly = 37-39-41-43-45-47 sts. Insert a marker at beg of round. When piece measures 8 cm inc 1 st each side of marker (= mid under sleeve). Repeat the inc on every 8-8-7-6-5-5 round a total of 11-11-12-14-15-16 times = 59-61-65-71-75-79 sts. AT THE SAME TIME when piece measures 41-40-39-38-37-36 cm work M.1 – make sure st marked with arrow in diagram is mid upper sleeve. After M.1 complete piece in M.2. AT THE SAME TIME when piece measures 50-49-48-47-46-45 cm cast off 6 sts mid under sleeve and complete piece back and forth on needle. Cast off for sleeve cap each side at the beg of every row: 2 sts 2 times and 1 st 2-3-4-5-6-7 times, then 2 sts each side until piece measures 56 cm, now cast off 3 sts 1 time each side and cast off remaining sts. Piece measures approx 57 cm. ASSEMBLY: Sew shoulder seams. NECK: Pick up (from RS) approx 80 to 90 sts round neck (includes sts on stitch holders at front) on circular needle size 4 mm with light brown mix. P 1 row from WS, AT THE SAME TIME inc evenly to 94-98-102-106-110-114 sts. Continue as follows (first row = RS): 6 garter sts, * K2, P2 *, repeat from *-*, finish with K2 and 6 garter sts. Cast off with K over K and P over P when neck measures 3 cm. FURTHER ASSEMBLY: Set in sleeves and sew on buttons. |
||||||||||
Diagram explanations |
||||||||||
|
||||||||||
 |
||||||||||
 |
||||||||||
Have you finished this pattern?Tag your pictures with #dropspattern or submit them to the #dropsfan gallery. Do you need help with this pattern?You'll find 24 tutorial videos, a Comments/Questions area and more by visiting the pattern on garnstudio.com. © 1982-2026 DROPS Design A/S. We reserve all rights. This document, including all its sub-sections, has copyrights. Read more about what you can do with our patterns at the bottom of each pattern on our site. |
||||||||||


With over 40 years in knitting and crochet design, DROPS Design offers one of the most extensive collections of free patterns on the internet - translated to 17 languages. As of today we count 324 catalogues and 12290 patterns translated into English (UK/cm). 12290
We work hard to bring you the best knitting and crochet have to offer, inspiration and advice as well as great quality yarns at incredible prices! Would you like to use our patterns for other than personal use? You can read what you are allowed to do in the Copyright text at the bottom of all our patterns. Happy crafting!
Post a comment to pattern DROPS 116-33
We would love to hear what you have to say about this pattern!
If you want to leave a question, please make sure you select the correct category in the form below, to speed up the answering process. Required fields are marked *.