
Popular categories
Looking for a yarn?


Comments / Questions (55)
![]() Michèle wrote:
Michèle wrote:
J ai trouvé la vidéo dans vos aides et j ai donc ma solution!
21.07.2020 - 16:12
![]() Goehry wrote:
Goehry wrote:
Bonjour Pour ce très beau modèle, je ne sais pas quelle méthode utiliser pour augmenter de part et d autre du deuxième marqueur au début des explications. Merci d avance
20.07.2020 - 18:34DROPS Design answered:
Bonjour Mme Goehry, vous pouvez utiliser la méthode que vous préférez: soit en faisant 1 jeté (tricoté torse au rang suivant) soit en tricotant 2 fois la même maille par exemple. Bon tricot!
29.07.2020 - 08:22
![]() Gundler Suzanne wrote:
Gundler Suzanne wrote:
Hej, ser att Cotton Viscose har utgått. Det går inte att hitta alternativ till 2 trådar Cotton Viscose i er programvara. Undrar därför vad ni rekommenderar istället. Kan man använda Bomull-Lin till hela tunikan? Vänliga hälsningar Suzanne
02.07.2019 - 00:29DROPS Design answered:
Hej. Cotton Viscose tillhör garngrupp B så du kan byta ut det garnet mot ett annat i garngrupp B (tex Safran). Du hittar alla garn i garngrupp B här. Tänk bara på att beräkna garnåtgång i alternativt garn (läs mer om det här) och att stickfastheten ska stämma. Lycka till!
02.07.2019 - 07:59
![]() Barbara Jung wrote:
Barbara Jung wrote:
Mit 2 Fäden Cotton Viscose auf Ndl. Nr. 7, 138-146-154-162-174-182 M. anschlagen (inkl. 1 Randm auf beiden Seiten) und 1 Krausrippe stricken – siehe oben. Wie folgt 3 Markierungsfäden einziehen, den 1. Markierungsfaden nach 35-37-39-41-44-46 M., den 2. Markierungsfaden nach 69-73-77-81-87-91 und den 3. Markierungsfaden nach 103-109-115-121-130-136 M. Diese Abstände können nicht sitmmen
29.01.2019 - 15:41DROPS Design answered:
Liebe Frau Jung, die Maschen zählen Sie von Anfang der Runde, z.B. in der 1. Größe haben Sie dann: 35 M, 1 Markierer, 34 M, 1 Markierer (= 69 M vom Anfang), 34 M, 1 Markierer (= 103 M vom Anfang), 35 M (= Total 138 Maschen). Viel Spaß beim stricken!
29.01.2019 - 16:46
![]() Gisele wrote:
Gisele wrote:
Pretty!
03.10.2014 - 09:25
![]() Lis Brooks wrote:
Lis Brooks wrote:
Hej har strikket denne model . super flot , dejlig at have på . så nu er nr 2 i gang hilsen lis
03.08.2013 - 12:34
![]() Nicole wrote:
Nicole wrote:
I think there's an error. Under measurements, it says the hem should be: 71½"-75½"-79 3/8"–84 1/8"-90½"-94 3/8". That CANNOT be in inches because then you're talking 5-8 FEET. But the bust and full length seem ok in inches. Where are the hem and full length measurements being taken? They aren't shown in the diagram. Please help!
17.03.2013 - 06:02DROPS Design answered:
Dear Nicole, the measurements given in inches are the one you can find in cm, in the diagram at the very bottom of the pattern. The bottom edge of the dress will measure 91 cm x 2 = 182 cm, ie about 71½" cm around. Happy knitting!
18.03.2013 - 22:02
![]() Otilia wrote:
Otilia wrote:
Himla fin!
20.03.2009 - 15:44
![]() Loniy wrote:
Loniy wrote:
Utrolig sød
25.02.2008 - 02:19
![]() Lnsau wrote:
Lnsau wrote:
Un grand merci pour avoir mis si vite à disposition les explications pour ce modèle ! A mes aiguilles...
14.02.2008 - 13:35
|
|
Wood Fairy Tunic#woodfairytunic |
|
|
|
|
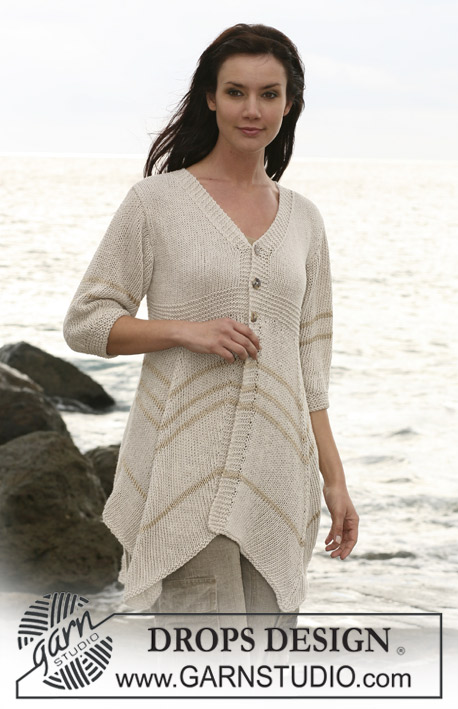
Wide DROPS tunic in “Bomull-Lin” and “Cotton Viscose”. Size S – XXXL
DROPS 107-7 |
|
|
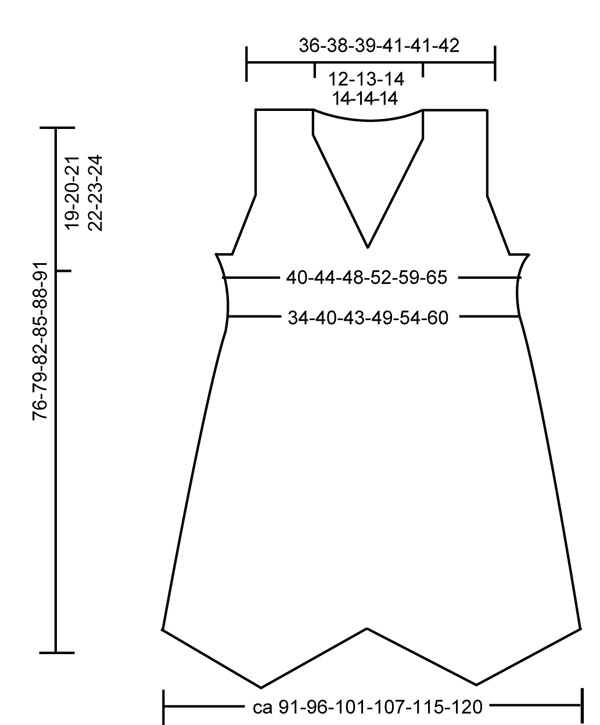
Measuring tip: Because of the weight of the yarn, all measurements should be made whilst the garment is hanging, otherwise it will be too long when worn. Garter st, back and forth on needle: K all rows. Decreasing tip-1: Make all dec from RS! Dec as follows before marker: K2 tog. Dec as follows after marker: slip 1 st as if to knit, K1, psso Decreasing tip-2 (applies to armhole and neckline): Make all dec from RS! Dec as follows after 4 garter sts: slip 1 st as if to knit, K1, psso Dec as follows before 4 garter sts: K2 tog. Back piece: Loosely cast on 138-146-154-162-174-182 sts (includes 1 edge st each side) on needle size 7 mm with 2 threads Cotton Viscose. Work 2 rows garter st – see above. Insert 3 marking threads (MT) in piece as follows: MT-1 after 35-37-39-41-44-46 sts, MT-2 after 69-73-77-81-87-91 sts and MT-3 after 103-109-115-121-130-136 sts. Change to 1 thread Bomull-Lin and continue in stocking st, at the same time dec 1 st on each side of MT-1 and MT-3 on every other row a total of 43-43-45-45-47-47 times – see Decreasing tip-1. At the same time inc 1 st on each side of piece and each side of MT-2 on every 4th row a total of 21-21-22-22-23-23 times. Remember the knitting tension! Continue until piece measures 51-52-53-54-55-56 cm – measured where shortest, see Measuring tip! Dec and inc are now complete = 50-58-62-70-78-86 sts. Now complete piece in 2 threads Cotton Viscose on needle size 5 mm. K 1 row, at the same time inc 14-12-15-15-18-20 sts evenly = 64-70-77-85-96-106 sts. Work 12 rows garter st, at the same time inc 1 st each side on every 2 cm a total of 3 times =70-76-83-91-102-112 sts. Now continue in stocking st. When piece measures 56-58-60-62-64-66 cm work 2 rows garter st on 7-7-7-8-8-8 sts each side, work remaining sts as before. On next row cast off 3-3-3-4-4-4 sts each side for armhole = 64-70-77-83-94-104 sts. Continue with 4 garter sts each side until finished measurements, at the same time dec to shape the armhole on every other row – see Decreasing tip-2: : 1 st 1-3-5-7-12-16 times = 62-64-67-69-70-72 sts. When piece measures 72-75-78-81-84-87 cm work garter st on the middle 28-30-31-31-32-32 sts – work remaining sts as before. When piece measures 74-77-80-83-86-89 cm cast off the middle 18-20-21-21-22-22 sts for neck and dec 1 st on neckline on next row = 21-21-22-23-23-24 sts left on each shoulder. Continue with 4 garter sts each side and cast off loosely when piece measures 76-79-82-85-88-91 cm. ´ Front piece: Cast on and work like back piece until piece measures 62-65-68-71-74-77 cm. Now work 2 rows garter st on the middle 8-8-9-9-8-8 sts, work remaining sts as before. On next row cast of the middle st in size L + XL (do not cast off in the other sizes) and divide the piece to complete each side separately. Right side: Continue dec for armhole, at the same time dec to shape the neckline – see Decreasing tip-2: 1 st on every cm a total of 10-11-11-11-12-12 times. After all dec are complete there are 21-21-22-23-23-24 sts left on shoulder. Cast off loosely when piece measures 76-79-82-85-88-91 cm. Left side: Like right side, but mirrored. Assembly: Sew shoulder seams. Sew side seams inside 1 edge st. |
|
 |
|
Have you finished this pattern?Tag your pictures with #dropspattern #woodfairytunic or submit them to the #dropsfan gallery. Do you need help with this pattern?You'll find 18 tutorial videos, a Comments/Questions area and more by visiting the pattern on garnstudio.com. © 1982-2026 DROPS Design A/S. We reserve all rights. This document, including all its sub-sections, has copyrights. Read more about what you can do with our patterns at the bottom of each pattern on our site. |


With over 40 years in knitting and crochet design, DROPS Design offers one of the most extensive collections of free patterns on the internet - translated to 17 languages. As of today we count 324 catalogues and 12290 patterns translated into English (UK/cm). 12290
We work hard to bring you the best knitting and crochet have to offer, inspiration and advice as well as great quality yarns at incredible prices! Would you like to use our patterns for other than personal use? You can read what you are allowed to do in the Copyright text at the bottom of all our patterns. Happy crafting!
Post a comment to pattern DROPS 107-7
We would love to hear what you have to say about this pattern!
If you want to leave a question, please make sure you select the correct category in the form below, to speed up the answering process. Required fields are marked *.