
Popular categories
Looking for a yarn?


Comments / Questions (117)
![]() Catherine wrote:
Catherine wrote:
Bonjour! Je n’ai pas compris s’il ne faut tricoter en point mousse que les deux premieres et deux dernières mailles et tout le reste en jersey, ou ne tricoter en jersey que les 11-13 mailles centrales et tous les autres au point mousse? Merci infiniment pour votre magnifique travail! Cathy
28.01.2026 - 18:07DROPS Design answered:
Cf. réponse ci-dessous :)
29.01.2026 - 08:49
![]() Catherine wrote:
Catherine wrote:
Bonjour! Je n’ai pas compris s’il ne faut tricoter en point mousse que les deux premieres et deux dernières mailles et tout le reste en jersey, ou ne tricoter en jersey que les 11-13 mailles centrales et tous les autres au point mousse? Merci infiniment pour votre magnifique travail! Cathy
28.01.2026 - 18:06DROPS Design answered:
Bonjour Catherine, à partir du 3ème rang, vous tricotez en jersey; seuls les 2 premiers rangs se tricotent au point mousse (1 rang end sur l'end et 1 rang end sur l'envers). Bon tricot!
29.01.2026 - 08:49
![]() Caroline wrote:
Caroline wrote:
Hi Any chance of a diagram or further description of how to sew it together please?...I'm confused Thank you
30.04.2025 - 12:15DROPS Design answered:
Dear Caroline, you could use this video as a guide, at least for the upper foot. Happy knitting!
03.05.2025 - 23:13
![]() Lena wrote:
Lena wrote:
Jos teen useammat tossut eri väreistä, voiko niitä huovuttaa samaan aikaan? Esimerkiksi keltaiset sinisen kanssa tms. ja onko määrällä vaikutusta huovuttumiseen? Kiitos avusta!
19.04.2025 - 13:58DROPS Design answered:
Suosittelemme, että huovutat jokaisen tossuparin erikseen, koska esim. tummemmat sävyt voivat päästää väriä. Voit kuitenkin huovuttaa useita samanvärisiä tossuja samaan aikaan.
23.04.2025 - 12:30
![]() Julie wrote:
Julie wrote:
Hej. når der i opskriften står: "Fortsæt i glatstrik med de yderste 2 m i retstrik til færdig mål. ", hvor finder jeg de færdige mål henne?:)
25.11.2024 - 12:15DROPS Design answered:
Hej Julie, lidt længere nede i opskriften: På næste p lukkes af, arb måler ca 35-38-40-43 cm.
28.11.2024 - 14:14
![]() Julia wrote:
Julia wrote:
I am a bit confused about which direction to sew the heel. Is the slipper meant to be turned right-side-out before felting or remain wrong-side out? Thanks for the help!
19.12.2023 - 00:01DROPS Design answered:
Dear Julia, just turn the edge towards inside (just like rolling the edge) and sew to make a small edge around the heel. Let the slippers right side out all the way before and after felting. Happy finishing!
19.12.2023 - 08:01
![]() Adele Kindermann wrote:
Adele Kindermann wrote:
Hei hei, ich habe die Anleitung auf Norwegisch und auf Deutsch gelesen. Leider verstehe ich sie nicht ganz. Könnten Sie so nett sein und mir ein paar Bilder von dem Schuh schicken (vor dem Filzen), somit wäre es viel leichter den Text zu verstehen. Freue mich über eine Rückmeldung von Ihnen. Ich habe auch schon Fäustlinge und Socken gestrickt, die ich danach alle gefilzt habe, nach norwegischer Anleitung. Hat super geklappt. Mit freundlichen Grüßen Adele Kindermann
09.03.2023 - 19:48DROPS Design answered:
Liebe Frau Kindermann, leider haben wir nur diese Fotos und die Hausschuhen haben wir nichts mehr. In Ravelry finden Sie viele Projekte für diese Hausschuhen von anderen Strickerinnen, vielleicht kann das Ihnen helfen? In alle Fällen dürfen Sie gerne Ihre Frage hier stellen. Viel Spaß beim stricken!
10.03.2023 - 09:34
![]() Judy wrote:
Judy wrote:
Bardzo proszę o pomoc w montażu! W którym dokładnie miejscu mam zacząć zszywać stopę? Później podwijam palce, czyli zawijam pod spód, tak? jak dużo, w którym miejscu przyszywam?
14.02.2022 - 16:55DROPS Design answered:
Witaj Judy, składasz kapeć na pół wzdłuż długości i zszywasz na wierzchu kapcia, następnie zszywasz czubek kapcia, aby oba szwy były w tej samej linii. Pozdrawiamy!
15.02.2022 - 17:41
![]() Gail wrote:
Gail wrote:
Hi, this is my first time knitting this pattern. I don’t understand the instructions for assembling the slipper after knitting. Do I sew the foot together then just continue sewing the two edges of the toe together? I also don’t understand the instructions to sew the heel. I would really appreciate your help. Thank you.
28.11.2021 - 19:58DROPS Design answered:
Dear Gail, you first sew together the top of foot. Then fold toe double and sew piece flat (so that the first seam = top of foot is in the middle on top of foot when worn). For the heel, fold the edge on each side of heel along the 3rd stitch seen from RS and sew tightly to make a thick ege around the heel. Happy assembly!
29.11.2021 - 08:15
![]() Maarit Laine wrote:
Maarit Laine wrote:
Hei, ohjeessa kohta "= 21-23-23-25 s. Neulo 1 krs. Luo seuraavan krs:n alkuun ja loppuun 2 uutta s = 25-27-27-29 s. " jota en ymmärrä. Koko ohje voitaisiin päivittää.
06.05.2020 - 12:36DROPS Design answered:
Hei, kyseisellä kerroksella kumpaankin reunaan luodaan 2 uutta silmukkaa.
10.09.2020 - 17:43
|
|
Ruby Slippers#rubyslippers |
|
 |
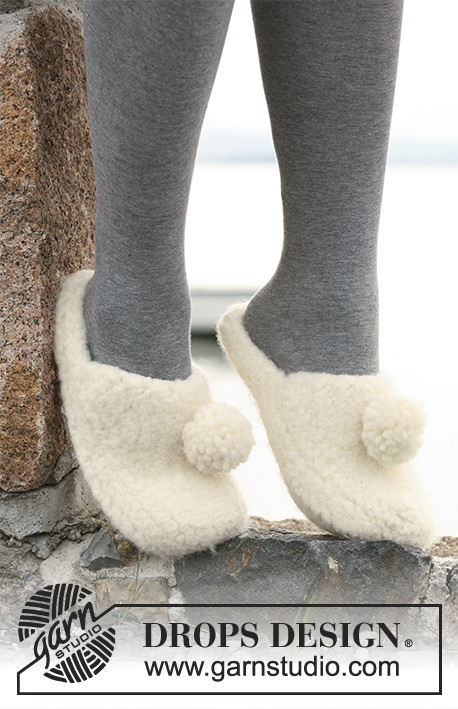 |
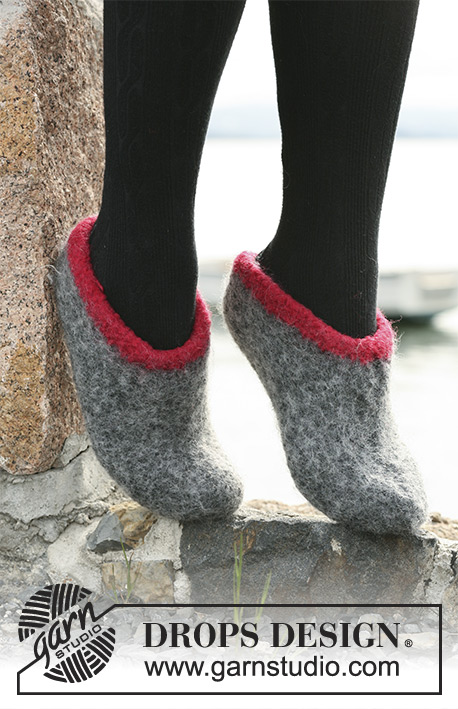
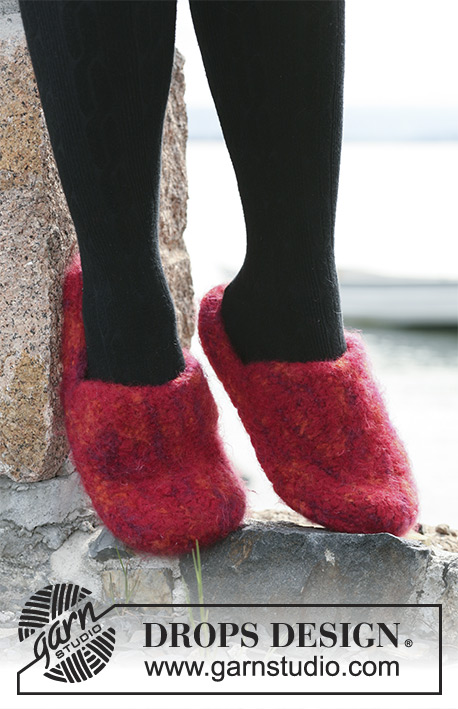
Felted DROPS slippers in 2 threads ”Snow”
DROPS 104-10 |
|
|
Knitting tension/gauge: 9 sts x 12 rows stocking sts with 2 threads Snow = 10 x 10 cm [4" x 4"] before felting. And 10 sts x approx 13.6 rows = 10 x 10 cm [4" x 4"] after felting. Slipper: Remember knitting tension/gauge! Knit slipper in one piece with seam mid top of foot, start at heel. Knit on needle size 10 mm [US 15] with 2 threads Snow: 2 threads of same colour or 1 thread of each colour. Cast on 9-9-11-11 sts. 1st row: First row: Knit while increasing 1 st at each end of row 2nd row: Knit. =11-11-13-13 sts. Change to stocking st. 3rd row: K3, Increase in next st. K to last 4 sts. Increase in the next st. K last 3 sts. 4th row: Purl. Repeat row 3 and 4 for 1-1-0-1 more time = 15-15-15-17 sts. Work in stocking stitch until the piece measures 8.5-7.5-8.5-11 cm [3,35"-2,95"-3,35"-4,3"]. When piece measures 8.5-7.5-8.5-11 cm [3,35"-2,95"-3,35"-4,3"] cast off first and last sts on row = 13-13-13-15 sts. On next row, cast on 1 new sts at beginning and end of row = 15-15-15-17 sts. Continue by working the first and last 2 sts in garter sts and the centre 11-11-11-13 sts in stocking st for the remainder of the slipper. On the next row and following alternate rows: Increase 1 st at beginning and end of row a total of 3-4-4-4 times = 21-23-23-25 sts. Knit 1 row without inc. Cast on 2 new sts at beginning of next 2 rows = 25-27-27-29 sts. Piece measures approx 15.5-16.5-17.5-20.5 cm [6,1"-6,5"-6,9"-8,1"]. Now knit foot. When piece measures 22-23-24-27 cm [8,7"-9,1"-9,45"-10,6"]ending on a WS row, K4, K2tog, K to last 6 sts, K2tog, K4 = 23-25-25-27 sts. Work until piece measures 28-29-31-34 cm [11"-11,4"-12,2"-13,4"] ending on a WS row. Next row: K4, K2tog, K to last 6 sts, K2tog, K4 = 21-23-23-25 sts. Work 1 row. Repeat last 2 rows = 19-21-21-23 sts once more. Work until piece measures approx 32.5-35.5-37.5-40.5 cm [12,8"-14"-14,8"-15,95"] ending on a WS row. (only 3 rows are left). K5, K2tog, K to last 7 sts, K2tog, K5 = 17-19-19-21 sts. Work 1 row. Next row: K2, K2 tog twice, K5-7-7-9 sts, K2tog twice, K2 = 13-15-15-17 sts. On next row bind off, piece measures approx 35-38-40-43 cm [13.8"-15"-15.75"-16.9"]. Assembly: The slipper is assemblied with WS out. Fold the foot part RS towards RS and sew the seam mid upon foot from the WS in the most outer sts. Lay the toe flat with the upper foot seam centered on top and sew toe together in most outer sts. Heel edge: Fold the edge at the heel towards the 3rd st on RS and sew it tight to atchive a bulky edge around the heel. FELTING: The piece can be felted either in the washing machine or the tumble dryer – read description below. Remember: Subsequent washes are as for a normal wool garment. IN WASHING MACHINE: Washing machines will vary when felting. If the piece is not felted enough, it can be felted again. If it is felted too much, it can be stretched to the correct size while still wet. DO THE FOLLOWING: Lay the piece in the washing machine, using a programme of approx. 40 minutes (not a wool programme). Wash at 40 degrees without pre-wash, detergent is optional. After washing, shape the piece while it is still wet. IN TUMBLE DRYER: Felting in a tumble dryer gives good control over the degree of felting. The tumble dryer can be opened during drying to check the size of the piece. If it is not felted enough it can be thoroughly wetted and felted again. If it is felted too much it can be stretched to the correct size while still wet. DO THE FOLLOWING: Lay the piece in water so it becomes completely wet, then place it in the tumble dryer and begin the drying process. Dry to the desired size, checking regularly. Pompom: Make a Pompom with a diameter of approx 5-6 cm in Snow – do not felt this. Sew onto mid top of slipper. |
|
Have you finished this pattern?Tag your pictures with #dropspattern #rubyslippers or submit them to the #dropsfan gallery. Do you need help with this pattern?You'll find 11 tutorial videos, a Comments/Questions area and more by visiting the pattern on garnstudio.com. © 1982-2026 DROPS Design A/S. We reserve all rights. This document, including all its sub-sections, has copyrights. Read more about what you can do with our patterns at the bottom of each pattern on our site. |
|


With over 40 years in knitting and crochet design, DROPS Design offers one of the most extensive collections of free patterns on the internet - translated to 17 languages. As of today we count 324 catalogues and 12290 patterns translated into English (UK/cm). 12290
We work hard to bring you the best knitting and crochet have to offer, inspiration and advice as well as great quality yarns at incredible prices! Would you like to use our patterns for other than personal use? You can read what you are allowed to do in the Copyright text at the bottom of all our patterns. Happy crafting!
Post a comment to pattern DROPS 104-10
We would love to hear what you have to say about this pattern!
If you want to leave a question, please make sure you select the correct category in the form below, to speed up the answering process. Required fields are marked *.