
Popular categories
Looking for a yarn?


Comments / Questions (13)
![]() Linda Pine wrote:
Linda Pine wrote:
I am COMPLETELY confused by the instructions for working the stripe pattern "at the same time inc 1 st each side on every and every other row alternately". After reading the questions and answers in the Comments section - I am even MORE confused. Surely there is a better way to describe what should be done.!!!!
06.01.2023 - 16:39
![]() Kathy Tee wrote:
Kathy Tee wrote:
The instructions state “ inc 1 st each side on every and every other row alternately”. What specifically does “every and every other row alternately” mean. Please provide an example in your reply eg. if I have to work a total of 10 rows, on which of those rows do I include the increases.
12.08.2022 - 03:34DROPS Design answered:
Dear Mrs Tee, this lesson explains how to decrease or increase on every 3rd and 4th row alternately, maybe it can help you to understand how to decrease here on every row (instead of on every 3rd row in the lesson) and 2nd row (instead of every 4th row in the lesson). Hope it can help you.
12.08.2022 - 09:57
![]() Kathy Tee wrote:
Kathy Tee wrote:
In your earlier reply to HCL (05.03.2020 kl. 10:06 ) you advise, ”*1 row with decreases, 1 row with decreases, 1 row without decreases*” which confirms I am to work in the first 2 of every 3 rows, but the decreases would occur on Rows 1, 2, 4, 5, 7, 8, 10, 11, 13 etc. instead. Please confirm which example, either the one shown here or the one in my previous message (12.08.2022 - 00:56.) is correct.
12.08.2022 - 01:33DROPS Design answered:
Dear Mrs Tee, you can also work that way, you will have decreased the same number of rows at the end with the same number of rows, decreasing alternately on every row and every other row would be more likely as previous comment. Hope it can help.
12.08.2022 - 09:51
![]() Kathy Tee wrote:
Kathy Tee wrote:
Based on your reply to Jane Doe (10.08.2022 kl. 16:14), if for example I worked in pattern for 13 rows, are you indicating the decreases would occur on Rows 1, 3, 4, 6, 7, 9, 10, 12, 13 etc. So, after Rows 1 and 2, I am to then decrease in the first 2 of every next 3 rows. “Row 1 - decrease, Row 2 -no decrease, then *Decrease in next 2 rows, next row (rows 5, 8, 11 etc) no decrease* repeat from *to*”. Is this correct?
12.08.2022 - 00:56DROPS Design answered:
Dear Mrs Tee, that's correct. Happy knitting!
12.08.2022 - 09:49
![]() Jane Doe wrote:
Jane Doe wrote:
Your answer is incredibly confusing! "you will decrease 1 stitch on both sides of the 2 middle stitches but you should decrease on every row and on every other row alternately, i.e.: *work 1 row with decrease, 1 row without decrease, 1 row with decrease* and repeat from *-*" So, I actually decrease every other row (1 row without decrease, 1 row with decrease). Not every row and every other row alternately.
11.08.2022 - 18:22DROPS Design answered:
Dear Mrs Doe, sorry for confusion, let me try again - you have to decrease 2 stitches alternately on every row and every other row, this means the decreases might occure from the right side as well as from the wrong side, after 1 row you have decreased 2 sts, after these 3 rows you will have decreased 4 sts. Hope it can help.
12.08.2022 - 09:56
![]() Kathy Tee wrote:
Kathy Tee wrote:
Please provide detailed explanation as to which rows inc’s and dec’s are worked in the following instructions: “inc 1 st each side on every and every other row alternately”, “Continue inc each side, at the same time dec 1 st on both sides of the 2 middle sts on every and every other row alternately”, “discontinue dec in the middle of piece and now dec each side as inc before on every and every row alternately”
10.08.2022 - 16:33
![]() Jane Doe wrote:
Jane Doe wrote:
After joining the two top pieces on the front, I understand that you increase at either end of every row and decrease every other row 2 stitches in the center ? Is this correct?
10.08.2022 - 13:22DROPS Design answered:
Dear Mrs Doe, not exactly, you will decrease 1 stitch on both sides of the 2 middle stitches but you should decrease on every row and on every other row alternately, i.e.: *work 1 row with decrease, 1 row without decrease, 1 row with decrease* and repeat from *-*. Happy knitting!
10.08.2022 - 16:14
![]() Wilma Keighley wrote:
Wilma Keighley wrote:
Sorry, it’s me again. I’m at the stage where the central deceased have been discontinued and decreases at the edges are happening. I can see that the side decreases are forming the shoulder but it really looks like the central decreases should continue. I am definitely correct that the central decreases should have stopped ;as the pattern says). Even the picture of the jersey looks like the central decreases continue the the end.
16.03.2022 - 15:59
![]() Wilma Keighley wrote:
Wilma Keighley wrote:
Re your reply. Yes tension is fine. What should mid front (where the decrease line is) measure when side measures 52cm?
08.03.2022 - 14:58DROPS Design answered:
Hi Wilma, When you now continue and start to decrease in each side, the sides will not get any longer, but the mid front will. When piece measures 39-40-42 cm mid front, put piece aside. :)
09.03.2022 - 09:11
![]() Wilma Keighley wrote:
Wilma Keighley wrote:
I am working on the front and the side now measures 52 cm. Looking at the diagram, I think the mid front ought to be about 26 cm but it is much less than this. Have I misunderstood where to measure the side or done something else wrong? Thanks.
07.03.2022 - 23:18DROPS Design answered:
Dear Mrs Keighley, do you have correct tension? ie 36 rows stocking stitch = 10 cm?
08.03.2022 - 11:09
|
|
City Jungle |
|
 |
 |
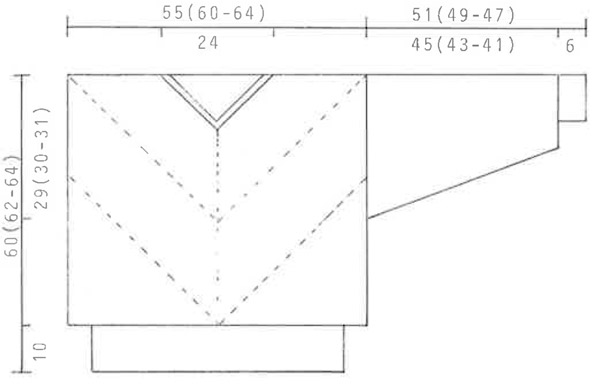
Knitted jumper worked on the diagonal in DROPS Alpaca. Size S – L.
DROPS 9-18 |
|
|
Stripe pattern: The entire pattern is worked in stocking st. * 2 rows black, 2 rows beige *, repeat from *-*. Rib: * K1 into back of loop, P1 *. Repeat from *-*. Decreasing mid front: K2 tog into back of loop before the 2 middle sts, K2 tog after the 2 middle sts. From WS P2 tog into back of loop and P2 tog respectively. Front piece: Worked back and forth on needle in 2 pieces, knitted tog afterwards. Cast on 3 sts on needle size 3 mm with black and work stripe pattern, at the same time inc 1 st each side on every and every other row alternately. Remember the knitting tension! When there are 99-107-115 sts on row put piece aside, the side measures approx 28-30-32 cm. Knit 1 more piece and now slip all sts from both pieces on the same needle size 3 mm = 198-214-230 sts. Continue inc each side, at the same time dec 1 st on both sides of the 2 middle sts on every and every other row alternately – see above. When the side of piece measures 50-52-54 cm, discontinue dec in the middle of piece and now dec each side as inc before on every and every row alternately. When piece measures 39-40-42 cm mid front, put piece aside. Back piece: Like front piece. Sleeve: Cast on 50-52-54 sts on double pointed needles size 2.5 mm with black and work 6 cm rib. Change to double pointed needles size 3 mm and continue in stocking st and stripes, at the same time inc 25 sts evenly on first row = 75-77-79 sts. At the same time after the rib inc 2 sts mid under arm a total of 35-37-38 times on every 4th round for size S and on every * 3rd and 4th * row alternately for size M + L = 145-151-155 sts. Cast off when sleeve measures 51-49-47 cm. Assembly: Sew shoulder seams. Slip sts from front and back pieces on double pointed needles size 2.5 mm and work 2 cm rib with black, at the same time dec mid front and mid back as follows: work round until the 3 sts mid front/back, slip the middle st on cable needle in front of piece, K tog the first and the third st and pso middle st. Dec like this on every 4th round. Cast off after 2 cm. Sew side seams. Pick up approx 214-222-230 sts along bottom edge of jumper on needle size 2.5 mm with black and work 10 cm rib, cast off. Set in sleeves. |
|
 |
|
Have you finished this pattern?Tag your pictures with #dropspattern or submit them to the #dropsfan gallery. Do you need help with this pattern?You'll find 27 tutorial videos, a Comments/Questions area and more by visiting the pattern on garnstudio.com. © 1982-2026 DROPS Design A/S. We reserve all rights. This document, including all its sub-sections, has copyrights. Read more about what you can do with our patterns at the bottom of each pattern on our site. |
|


With over 40 years in knitting and crochet design, DROPS Design offers one of the most extensive collections of free patterns on the internet - translated to 17 languages. As of today we count 324 catalogues and 12290 patterns translated into English (UK/cm). 12290
We work hard to bring you the best knitting and crochet have to offer, inspiration and advice as well as great quality yarns at incredible prices! Would you like to use our patterns for other than personal use? You can read what you are allowed to do in the Copyright text at the bottom of all our patterns. Happy crafting!
Post a comment to pattern DROPS 9-18
We would love to hear what you have to say about this pattern!
If you want to leave a question, please make sure you select the correct category in the form below, to speed up the answering process. Required fields are marked *.