
Popular categories
Looking for a yarn?


Comments / Questions (7)
![]() Merethe Nielsen wrote:
Merethe Nielsen wrote:
Når først RK hækles og jeg får X antal ST grupper, skal arbejdet vendes. Hvor mange masker skal jeg springe over, og skal der ligeledes 2 x st masker i 1 masker? Jeg kan ikke få det til at gå op udfra diag.
15.02.2026 - 00:33DROPS Design answered:
Hei Merethe. Når 2. rekke hekles starter du med 3 luftmasker, hopp over 1 stavgruppe, og hekle 2 staver i de 2 nest luftmaskene (se 2. rekke helt til venstre i Diag.1). mvh DROPS Design
16.02.2026 - 10:57
![]() Frances Ingram wrote:
Frances Ingram wrote:
Hi. I would like to make this pattern, but in an 8-ply. Would this work, if I took the schematic drawing & used the pattern, but made it the right size using measurements from the drawing? I don't particularly wish to double the yarn, just make it sort of "lighter" using 8-ply.
01.05.2021 - 04:26DROPS Design answered:
Dear Frances, please understand, that these patterns are made available to support DROPS yarns We cannot help you with other yarns, nor can we modify our patterns to each individual request. That said, you can make a gauge swatch and recalculate the necessary stitch bumbers, and go for the measurements of the schematic drawing. Happy Crafting!
01.05.2021 - 05:24
![]() Mimy wrote:
Mimy wrote:
I have a request. Would you please include a knitting diagram written in Japanese? I want to knit it because it has a very nice design, but the translation site does not translate well.
16.02.2021 - 07:54DROPS Design answered:
Dear Mimy, this lesson explains how to read a crochet diagram, it might help you to understand how to work the jacket. Hope this helps. Happy crocheting!
16.02.2021 - 09:55
![]() Stéphanie wrote:
Stéphanie wrote:
Bonjour, est-ce que on est sensés retourner le gilet après avoir fait les coutures? Et quel est le but des ml, espacer les ms ou faire une espèce de picot (toujours pour les coutures)? C'est la première fois que je me fais un habit...
16.12.2016 - 13:24DROPS Design answered:
Bonjour Stéphanie, les 3 ml vont permettre de compenser la hauteur des brides entre chaque rayure, crochetez ces 3 ml dans la couleur de la rayure correspondante pour que l'assemblage soit moins visible. Bon crochet!
16.12.2016 - 13:43Meli wrote:
Mine came out really nice. The only part that didn't come up like the picture is the collar part, mine is higher, but I flip it over and down and it looks very good (looks like there are a lot of rows to make at the collar area, plus for the last 5 rows it doesn't say if it is sc or dc, so I made them in sc (as this makes sense from the picture). It is a very warm vest and it looks very nice. Good for the cold days.
08.03.2015 - 20:39
![]() Kerstin wrote:
Kerstin wrote:
Danke
13.01.2014 - 20:58
![]() Kerstin wrote:
Kerstin wrote:
Bei R1: Werden die 2 Stb in einer Lm gemeinsam abgemascht? Und werden wirklich immer 2 Lm übersprungen? Bei mir gibt das sehr große Löcher. Wäre toll, wenn ich das Muster noch einmal genau erklärt bekommen könnte. Vielen Dank, Kerstin
06.01.2014 - 20:39DROPS Design answered:
Liebe Kerstin, ja es werden je 2 Lm übersprungen. Die Stb werden nicht zusammen abgemascht sondern ganz normal gehäkelt (siehe Diagramm).
07.01.2014 - 22:43
|
|||||||||||||||||||
DROPS 97-17 |
|||||||||||||||||||
|
|
|||||||||||||||||||
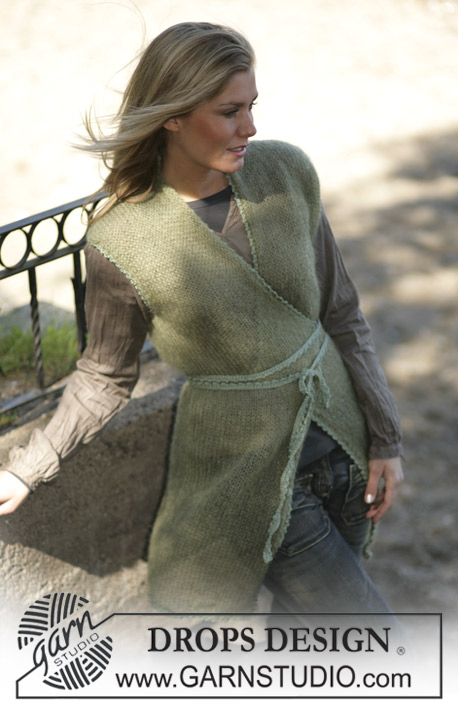
DROPS Crochet sleeveless cardigan in “Snow”
DROPS 97-17 |
|||||||||||||||||||
|
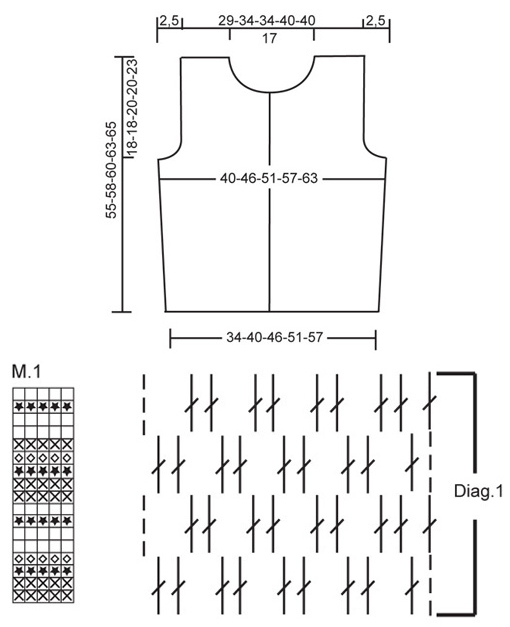
Crochet Tension: 3.5 tr groups in the width and 4 rows in the height = 10x10 cm. Crochet info: At the beginning of row substitute the first tr with 3 ch and finish with a tr in the 3rd ch from previous row. Pattern: See diagram 1. English Translations for the wording in the diagram are given at the bottom of this pattern, and they are given in the vertical order in which they appear in the diagram. Stripes: See M.1 – 1 row in the diagram = 1 row of tr groups “End of thread” tips: Do not sew the end of the threads at the side. These are used for the assembly of the sleeveless cardigan and should be approx. 20 cm long. Decreasing tips (for the armhole and neck): Dec as follows at the beginning of row: Substitute 1 tr group with 1 sl ts in each tr group. Dec as follows at the end of row: Work in pattern until you reach the stitches to be dec. Leave these sts unworked, turn the piece and continue Back piece Crochet 37-43-49-55-61 ch (incl. of 3 ch to turn with) on hook no. 10 in Dark green. Read crochet info and “end of thread” tips. Crochet the first row as follows: 1 tr in the 4th ch from hook, *skip 2 ch, 2 tr in the following ch*, repeat from *-* so a total of 12-14-16-18-20 tr-groups, turn the piece. Continue to crochet the pattern – see diagram 1 – at the same time crochet in stripes according to M.1 until finished. Remember the crochet tension. At the same time when the piece measures 10 cm inc as follows: Crochet 1 extra tr-group at the beginning of the row. Turn the piece and repeat the inc at the beginning of following row = 14-16-18-20-22 tr-groups. When the piece measures approx. 37-40-40-43-42 cm dec for armhole each side on every row as follows – read decreasing tips: 1 tr group each side a total of 2-2-3-3-4 times = 10-12-12-14-14 tr groups on row. Continue to crochet until the piece measures approx. 52-55-57-60-62 cm (only 1 row left until finished). Now crochet 1 row with only 2-3-3-4-4 tr groups at each side (this means do not crochet over the centre 6 tr groups = neckline). Cut the thread, the piece measures approx. 55-58-60-63-65 cm. Left front piece: Crochet 19-22-25-28-31 ch on hook size 10 with dark green. Crochet as done for the back piece = 6-7-8-9-10 tr-groups. Inc 1 tr-group each side when the piece measures 20 cm (instead of 10 cm) = 7-8-9-10-11 tr-groups. Dec for armhole as done for the back piece when the piece measures approx 37-40-40-43-42 cm = 5-6-6-7-7 tr-groups. When the piece measures approx 47-50-52-55-57 cm dec for neck as follows: Crochet only the outermost 2-3-3-4-4 tr-groups (this means do not crochet over the outermost 3 tr-groups at the centre front). Cut the thread when the piece measures approx. 55-58-60-63-65 cm. Right front piece: Crochet as left front piece but reverse. Assembly: Sew the shoulder seams edge against edge with small neat stitches. Use the “ends of the threads” to crochet the sleeveless cardigan tog at the sides. Crochet as follows: *1 dc through the front and back piece, 3 ch*, change the thread as the stripes change colours, repeat from *-*. Edges: Crochet the edges on hook size 10 with dark green. Front edge: Begin at the bottom of the right front piece and crochet 16 to 20 st groups up along the front edge, cut the thread. Repeat down along the left front piece. Collar: Begin at the centre front and crochet approx. 15 to 20 tr-groups around the neck – including the front edges. Crochet 2 rows more of tr-groups. Then crochet 2-2-2-3-3 rows with 1 tr in each tr. Crochet total 5-5-5-6-6 rows around the neck, cut the thread. At last crochet 1 row of dc up along the right front, around the collar and down along the left front (crochet 1 dc in each tr). Armhole: Begin underneath the arm, crochet approx 12-16 tr-groups around the armhole. Finish with 1 round of dc before cutting the thread. Repeat for the other armhole. Buttons: Sew in the buttons at the left front edge- making sure that they are placed in such a way they can be buttoned up in between 2 tr-groups at the right front piece. The top button should be placed approx 2 cm down from the top edge and the bottom button should be placed approx 10 cm up from the bottom edge. |
|||||||||||||||||||
Diagram explanations |
|||||||||||||||||||
|
|||||||||||||||||||
 |
|||||||||||||||||||
Have you finished this pattern?Tag your pictures with #dropspattern or submit them to the #dropsfan gallery. Do you need help with this pattern?You'll find 4 tutorial videos, a Comments/Questions area and more by visiting the pattern on garnstudio.com. © 1982-2026 DROPS Design A/S. We reserve all rights. This document, including all its sub-sections, has copyrights. Read more about what you can do with our patterns at the bottom of each pattern on our site. |
|||||||||||||||||||


With over 40 years in knitting and crochet design, DROPS Design offers one of the most extensive collections of free patterns on the internet - translated to 17 languages. As of today we count 324 catalogues and 12290 patterns translated into English (UK/cm). 12290
We work hard to bring you the best knitting and crochet have to offer, inspiration and advice as well as great quality yarns at incredible prices! Would you like to use our patterns for other than personal use? You can read what you are allowed to do in the Copyright text at the bottom of all our patterns. Happy crafting!
Post a comment to pattern DROPS 97-17
We would love to hear what you have to say about this pattern!
If you want to leave a question, please make sure you select the correct category in the form below, to speed up the answering process. Required fields are marked *.