
Popular categories
Looking for a yarn?


Comments / Questions (174)
![]() Christine wrote:
Christine wrote:
Danke für die schnelle Antwort ! Jetzt verstehe ich, wie es gemeint ist. Das Rückenteil ist inzwischen schon fertig, da hatte ich keine Probleme mit der Anleitung. Nochmals danke und herzliche Grüße !
01.06.2021 - 14:52
![]() Christine wrote:
Christine wrote:
Sehr schönes Modell ! Beim Vorderteil habe ich eine Frage ab der 5.R. Wie ist das gemeint : Mit 1 Stb mehr zwischen "2 Stb in das Stb" ? 3 einzelne Stb anstelle 2 wie in der 4.R. ? Leider ist bei Grösse S nicht die Gesamtanzahl der Stb in der 9.R. angegeben bzw. bei den anderen Grössen in ab - und nicht aufsteigender Anzahl, was mich verwirrt. Hat sich da vielleicht ein Fehler eingeschlichen ? Können Sie mir bittehelfen ? Danke !!
30.05.2021 - 22:19DROPS Design answered:
Liebe Christine, bei der 5. Reihe häkeln Sie *2 Stb in das Stb, 1 Stb in jedes der nächsten 3 Stb*, bei der 6. Reihe * 2 Stb in das Stb, 1 Stb in jedes der nächsten 4 Stb*, dh immer ein Stb mehr zwischen die Zunahmen (= 2 Stb in das Stb), bis es 54 Stb in S sind = nach 9 Reihen. Viel Spaß beim häkeln!
31.05.2021 - 07:59
![]() Laurel Girard wrote:
Laurel Girard wrote:
This sweater is gorgeous! I saw a circle sweater like this in Annie’s Catalogue. It too had the circle design along the seam, but it was more Bo Ho looking with. Only one color. This is nice and bright for summer. Thank you!!
16.05.2021 - 19:13
![]() Toni In WA wrote:
Toni In WA wrote:
How many stitches in the half circle to begin?
29.03.2021 - 23:28
![]() Cornet wrote:
Cornet wrote:
Merci j’avais compris toute seule, c’est très aimable à vous de donner toutes ces explications Aussi rapidement je referai très certainement ce modèle qu’avez vous comme laine(couleur dégradée) à nous proposer ? Merci cordialement Martine
24.02.2021 - 07:59DROPS Design answered:
Bonjour Mme Cornet et merci. DROPS Inka n'est plus disponible, vous trouverez toutefois quelques jeux ce couleurs parmi nos différentes qualités: DROPS Snow (même groupe que Inka), ou bien si vous voulez jouer avec les couleurs (cf cette leçon) DROPS Big Delight, DROPS Delight et DROPS Fabel. Associées avec un fil uni, vous pouvez obtenir de belles couleurs (découvrez quelques exemples ici ) Rappelez-vous que votre magasin DROPS saura vous conseiller les couleurs si besoin. Bon crochet!
24.02.2021 - 08:19
![]() Cornet wrote:
Cornet wrote:
Merci pour votre 1ere réponse rapide la veste est pratiquement terminée joli modele tres original pour la bordure n'y aurait il pas une petite erreur d'imprimerie dans l'explication au niveau des brides?
23.02.2021 - 17:51DROPS Design answered:
Bonjour Mme Cornet, la bordure se compose de petits éventails de 3 brides, 2 mailles en l'air 3 brides crochetées dans la même maille, et espacés de 2 rangs en hauteur ou 3 mailles en largeur - vous pouvez volontiers adapter les espacements pour que la bordure soit bien plate - les 2 mailles en l'air au milieu des éventails doivent servir de boutonnières. Ou ai-je mal compris votre question? Dans ce cas n'hésitez pas à préciser votre pensée, merci. Bon crochet!
24.02.2021 - 07:18
![]() Cornet Martine wrote:
Cornet Martine wrote:
Les explications ne sont pas claires a partir du rg 11 pouvez vous donner plus de details merci
18.02.2021 - 19:02DROPS Design answered:
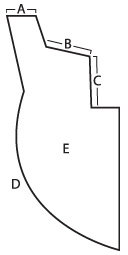
Bonjour Mme Cornet, vous allez maintenant crocheter seulement les 18 premières mailles pendant 8 rangs en diminuant en même temps 1 maille côté emmanchure = il reste 16 brides . Vous avez terminé l'emmanchure (= C dans le schéma). Attachez maintenant le fil côté bordure devant (pas côté emmanchure) et crochetez la partie B et terminez par le col = la partie A. Suivez bien les indications pas à pas, la construction est un peu inhabituelle, mais vous verrez le devant se former progressivement comme sur le schéma. Bon crochet!
19.02.2021 - 07:39
![]() Patrizia wrote:
Patrizia wrote:
Come posso tradurre le istruzioni in italiano x cortesia
02.01.2020 - 13:01DROPS Design answered:
Buongiorno Patrizia. Tradurremo il modello appena possibile. Buon lavoro!
02.01.2020 - 16:36
![]() Ria Sterks wrote:
Ria Sterks wrote:
Waar kan ik het garen van dit patroon kopen.
05.09.2019 - 11:06DROPS Design answered:
Dag Ria,
Via deze link kun je een online winkel vinden om het garen te kopen.
08.09.2019 - 17:40
![]() Mary Shamburger wrote:
Mary Shamburger wrote:
Suggestion for a name: Classy Lady
12.01.2019 - 15:33
|
||||||||||||||||
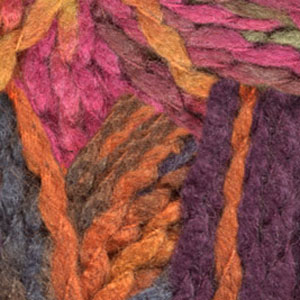
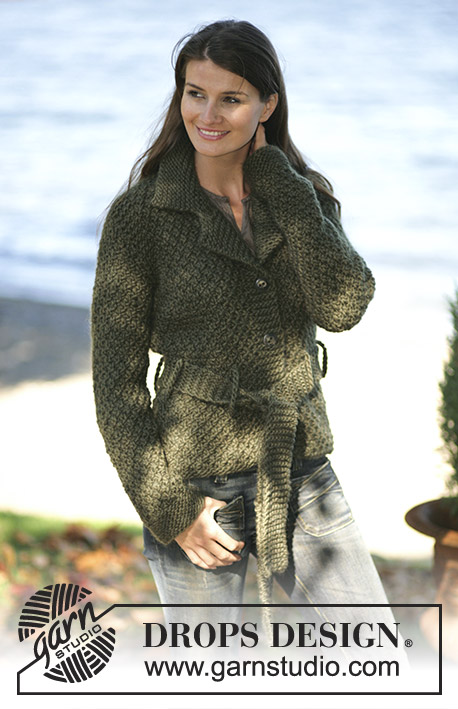
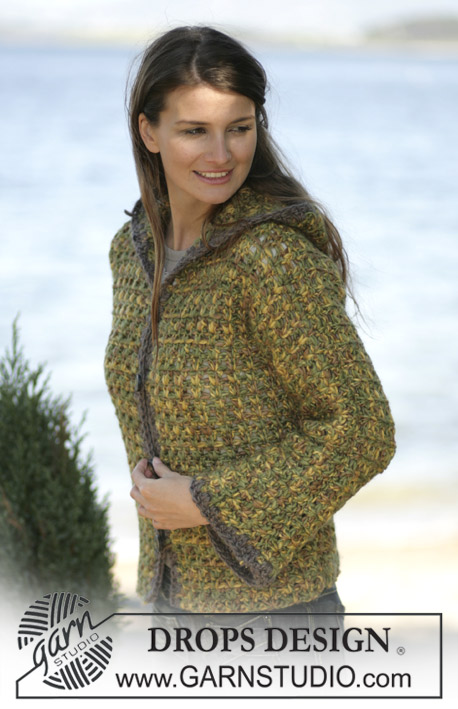
Rainbow Kiss |
||||||||||||||||
|
|
||||||||||||||||
DROPS Crochet cardigan in “INKA”, size S - XXL
DROPS 97-3 |
||||||||||||||||
|
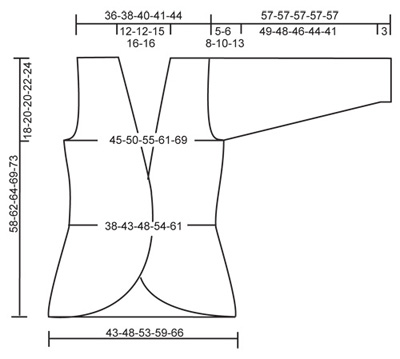
Crochet Tension: 8 tr x 4.5 rows = 10x10 cm. Yarn tips: To obtain similar colour ways on both front pieces, crochet front pieces with balls beginning with the same colour. Crochet tips: Substitute the first tr on each row with 3 ch Decreasing tips-1 (for the shoulder at the front pieces): To ensure the shoulder is straight, skip 1 tr at the centre front when crochet from the centre front and towards the side and then crochet 2 tr in the last tr towards the armhole. Cast off tips-2: To cast off tr’s at the end of a row crochet until the number of tr’s to be cast off are left on row, turn the piece. To cast off at the beginning of row crochet 1 sl st in each tr’s to be cast off. Front piece: Read Yarn tips! Crochet a half circle. Begin at the side seam and crochet outwards. Crochet 5 ch and make a loop with a sl st. 1st row: 6 tr in the loop – see crochet tips, turn the piece. 2nd row: 2 tr in each tr = 12 tr, turn the piece. 3rd row: *2 tr in 1 tr, 1 tr in the next tr*, repeat from *-* = 18 tr, turn the piece. 4th row: *2 tr in 1 tr, 1 tr in each of the next 2 tr*, repeat from *-* = 24 tr, turn the piece. Repeat the inc. with 1 more tr in tr before 2 tr in 1 tr (i.e. next round 1 tr in the next 3 tr etc) until: Size S and M: 9 rows Size L, XL and XXL: 8 rows = 54-54-48-48-48 tr Continue as follows: Size S: Cut the thread. 10th row: Begin in the 5th tr from the edge (=armhole) 1 tr in each of the following 17 tr, turn the piece. Crochet another 7 rows with 1 tr in each tr – see decreasing tips-1- at the same time cast off towards the neck side as follows: When crochet from the armhole and towards the centre front turn when 1 tr left, repeat 1 more time = 15 tr. At this point the crochet is completed up to the shoulder at the side of the armhole. Cut the thread. Begin to crochet again at the centre front. Crochet the next row as follows: 1 tr in each of the first 9 tr, 1 dc in the next tr, 1 sl st in the next tr, turn the piece. Next row: 1 ch, skip 1 st, 1 sl st in the next st, 1 dc in the st, 1 tr in each of the following 8 tr, turn the piece. At this point the crochet is completed up to the shoulder at the neck side. Collar: Crochet 3 rows of tr in each of the outermost 6 tr, cut the thread. Crochet another front piece the same way but reverse. Size M: 10th row: *2 tr in 1 tr, 1 tr in each of the following 8 tr*, repeat from *-* until 5 tr left (= armhole) = 55 tr, turn the piece. 11th row: 1 tr in each of the first 18 tr, turn the piece. Crochet another 7 rows with 1 tr in each tr – see decreasing tips-1- at the same time cast off towards the neck side as follows: When crochet from the armhole and towards the centre front turn when 1 tr left, repeat 1 more time = 16 tr. At this point the crochet is completed up to the shoulder at the side of the armhole. Cut the thread. Begin to crochet again at the centre front. Crochet the next row as follows: 1 tr in each of the first 10 tr, 1 dc in the next tr, 1 sl st in the next tr, turn the piece. Next row: 1 ch, skip 1 st, 1 sl st in the next st, 1 dc in the st, 1 tr in each of the following 9 tr, turn the piece. At this point the crochet is completed up to the shoulder at the neck side. Collar: Crochet 3 rows of tr in each of the outermost 6 tr, cut the thread. Crochet another front piece the same way but reverse. Size L: 9th row: *2 tr in 1 tr, 1 tr in each of the following 7 tr*, repeat from *-* until 6 tr left (= armhole) = 48 tr, turn the piece. 10th -12th row: Crochet another 3 rows and inc. the same way as done for row 9 = 66 tr. Cut the thread. 13th row: Begin to crochet at the armhole side again – crochet 19 tr from the armhole towards the centre front, turn the piece. Crochet another 4 rows with 1 tr in each tr – see decreasing tips-1- at the same time cast off towards the neck side as follows: When crochet from the armhole and towards the centre front turn when 1 tr left, repeat 1 more time = 17 tr. At this point the crochet is completed up to the shoulder at the side of the armhole. Crochet the next row starting at center front as follows: 1 tr in each of the first 11 tr, 1 dc in the next tr, 1 sl st in the next tr, turn the piece. Next row: 1 ch, skip 1 st, 1 sl st in the next st, 1 dc in the st, 1 tr in each of the following 10 tr, turn the piece. At this point the crochet is completed up to the shoulder at the neck side. Collar: Crochet 4 rows of tr in each of the outermost 7 tr, cut the thread. Crochet another front piece the same way but reverse. Size XL: 9th row: *2 tr in 1 tr, 1 tr in each of the following 7 tr*, repeat from *-* until 8 tr left (= armhole) = 45 tr, turn the piece. 10th -14th row: Crochet another 4 rows and inc. the same way as done for before. Cut the yarn. 15th row: Crochet 20 tr from the armhole towards the centre front, turn the piece. Crochet another 4 rows with 1 tr in each tr – see decreasing tips-1- at the same time cast off towards the neck side as follows: When crochet from the armhole and towards the centre front turn when 1 tr left, repeat 1 more time = 18 tr. At this point the crochet is completed up to the shoulder at the side of the armhole. Crochet the next row starting at center front as follows:1 tr in each of the first 11 tr, 1 dc in the next tr, 1 sl st in the next tr, turn the piece. Next row: 1 ch, skip 1 st, 1 sl st in the next st, 1 dc in the st, 1 tr in each of the following 10 tr, turn the piece. At this point the crochet is completed up to the shoulder at the neck side. Collar: Crochet 4 rows of tr in each of the outermost 8 tr, cut the thread. Crochet another front piece the same way but reverse. Size XXL: 9th row: *2 tr in 1 tr, 1 tr in each of the following 7 tr*, repeat from *-* until 10 tr left (= armhole) = 43 tr, turn the piece. 10th -14th row: Crochet another 5 rows and inc. the same way as done for row 9 = 79 tr, cut the thread. 15th row: Begin to crochet at the armhole side again – crochet 20 tr from the armhole towards the centre front, turn the piece. Crochet another 4 rows with 1 tr in each tr – see decreasing tips-1- at the same time cast off towards the neck side as follows: When crochet from the armhole and towards the centre front turn when 1 tr left, repeat 1 more time = 18 tr. At this point the crochet is completed up to the shoulder at the side of the armhole. Crochet the next row starting at center front as follows: 1 tr in each of the first 12 tr, 1 dc in the next tr, 1 sl st in the next tr, turn the piece. Next row: 1 ch, skip 1 st, 1 sl st in the next st, 1 dc in the st, 1 tr in each of the following 11 tr, turn the piece. At this point the crochet is completed up to the shoulder at the neck side. Collar: Crochet 4 rows of tr in each of the outermost 8 tr, cut the thread. Crochet another front piece the same way but reverse. Back piece: Crochet loosely 36-40-44-49-55 ch (incl. of 3 ch to turn with). Crochet 1 tr in each ch beginning at the 4th ch from hook = 34-38-42-47-53 tr (first tr = 3 ch). Continue with 1 tr in each tr, but on the 4th and 7th row cast off 1 tr each side – see cast off tips-2 = 30-34-38-43-49 tr. Crochet 1 tr in each tr until the piece measures 22-24-26-26-28 cm, continue to inc. 1 tr each side on every 3rd row a total of 3 times – inc. as follows: Crochet 2 tr in the outermost tr each side = 36-40-44-49-55 tr. When the piece measures approx. 40-42-44-47-49 cm cast off 4-5-6-8-10 tr each side – see cast off tips-2 = 28-30-32-33-35 tr. Crochet 1 tr in each tr until the piece measures 56-60-62-67-71 cm, then crochet 1 row over the outermost 9-10-10-10-11 tr each side (neck line = 10-10-12-13-13 tr). Cut the thread, the piece measures approx. 58-62-64-69-73 cm up to the shoulder. Sleeve: Sew the shoulder seam edge against edge so the seam doesn’t become too chunky. The sleeves are crochet from the armhole and downwards. Crochet 28-32-33-35-39 tr along one of the armholes (do not crochet in the first 3 tr cast off at each side). Continue to crochet as follows: Size S and M: 2nd row: 3 sl st, 6 dc, 10–14 tr, 6 dc, 3 sl st, turn the piece. 3rd row: 2 sl st, 5 dc, 14-18 tr, 5 dc, 2 sl st, turn the piece. 4th row: 1 sl st, 4 dc, 18-22 tr, 4 dc, 1 sl st, turn the piece. 5th. row: 3 dc, 22-26 tr, 3 dc, turn the piece. Continue to crochet 1 tr in each st. Size L, XL and XXL: 2nd row: 4 sl st, 6 dc, 13-15-19 tr, 6 dc , 4 sl st, turn the piece. 3rd row: 3 sl st, 5 dc, 17-19-23 tr, 5 dc, 3 sl st, turn the piece. 4th row: 2 sl st, 4 dc, 21-23-27 tr, 4 dc, 2 sl st, turn the piece. 5th row: 1 sl st, 3 dc, 25-27-31 tr, 3 dc, 1 sl st, turn the piece. 6th row: 2 dc, 29-31-35 tr, 2 dc, turn the piece. Continue to crochet 1 tr in each st. All sizes: After a total of 6-6-7-8-9 rows from the armhole cast off 1 tr each side – see cast off tips 2 – on every 4th-3rd-4th-3rd-2nd row a total of 4-6-4-5-7 times = 20-20-25-25-25 tr. When the sleeve measures 54 cm crochet the next row as follows: In the 3rd tr from the edge crochet 3 tr, 2 ch, 3 tr, *skip 4 tr, 3 tr, 2 ch, 3 tr in the next tr*, repeat from *-* until finished, cut the thread. The sleeve measures approx. 57 cm Assembly: Sew the sleeve and the side seams – sew edge against edge to avoid a chunky seam. Crochet an edge around the whole opening of the cardigan as follows: - begin at the centre back neck: 3 tr, 2 ch, 3 tr in the same st, *skip approx 2 rows/3 tr, 3 tr, 2 ch, 3 tr in the next st *, repeat from *-* down along one front pieces, around the bottom edge of the cardigan, up along the other front piece and back towards the centre back neck. Finish the round with a sl st in the 1st tr. Sew 3 buttons at the left front piece so they can be buttoned up in the 3 centre ch loops of the crochet edge. |
||||||||||||||||
Diagram explanations |
||||||||||||||||
|
||||||||||||||||
 |
||||||||||||||||
 |
||||||||||||||||
Have you finished this pattern?Tag your pictures with #dropspattern or submit them to the #dropsfan gallery. Do you need help with this pattern?You'll find 8 tutorial videos, a Comments/Questions area and more by visiting the pattern on garnstudio.com. © 1982-2026 DROPS Design A/S. We reserve all rights. This document, including all its sub-sections, has copyrights. Read more about what you can do with our patterns at the bottom of each pattern on our site. |
||||||||||||||||


With over 40 years in knitting and crochet design, DROPS Design offers one of the most extensive collections of free patterns on the internet - translated to 17 languages. As of today we count 324 catalogues and 12290 patterns translated into English (UK/cm). 12290
We work hard to bring you the best knitting and crochet have to offer, inspiration and advice as well as great quality yarns at incredible prices! Would you like to use our patterns for other than personal use? You can read what you are allowed to do in the Copyright text at the bottom of all our patterns. Happy crafting!
Post a comment to pattern DROPS 97-3
We would love to hear what you have to say about this pattern!
If you want to leave a question, please make sure you select the correct category in the form below, to speed up the answering process. Required fields are marked *.