
Popular categories
Looking for a yarn?


Comments / Questions (35)
![]() Michela wrote:
Michela wrote:
Buonasera e complimenti! Non ho mai fatto l’uncinetto, anche se ricamo. Hosempre avuto voglia farmi uno scialle e questo è stupendo. Vorrei provare anche se sono una neofita. Ho soltanto due domande prima di cominciare: mi consiglia di lasciar stare e provare con cose più semplici ? Se dovessi riuscirci e volessi dimensioni maggiori come dovrei fare? Grazie
27.04.2025 - 01:23DROPS Design answered:
Buonasera Michela, sul nostro sito può trovare tanti tutorials per imparare l'uncinetto. Le consigliamo di lavorare il modello così com'è, oppure per eventuali modifiche può rivolgersi al suo rivenditore DROPS di fiducia. Buon lavoro!
27.04.2025 - 23:54
![]() Caterina D'alessio wrote:
Caterina D'alessio wrote:
Sto lavorando questo bellissimo scialle con una lana sottile mohair pertanto i diamanti sono molti rispetto al modello ma come fare per aumentare lo scialle solo in larghezza? a me viene sempre fuori un rombo
08.04.2025 - 18:01DROPS Design answered:
Buonasera Caterina, per un aiuto così personalizzato può rivolgersi al suo rivenditore DROPS di fiducia. Buon lavoro!
10.04.2025 - 16:26
![]() Hennie wrote:
Hennie wrote:
Dank je wel voor de uitleg vr groet Hennie
03.07.2024 - 09:37
![]() Hennie wrote:
Hennie wrote:
Begrijp ik het goed dat ik eerst alle vierkantjes en driehoeken los haak? En dan later alles aan elkaar haak? Ik begrijp het samen samen haken niet zo goed. En kant ik de draad steeds af?
29.06.2024 - 19:12DROPS Design answered:
Dag Hennie,
Je haakt eerst een vierkantje en dan een tweede vierkantje, maar bij het tweede vierkantje haak je deze op de laatste toer samen met het eerste. Vervolgens haak je nog een vierkantje en in de laatste toer haak je deze ook weer samen, enzovoort.
02.07.2024 - 21:55
![]() Adita wrote:
Adita wrote:
Hola de nuevo , otra duda que tengo es para realizar la mota sola, he visto el video y en el no me queda muy claro como realizarla individualmente , ni siguiendo las instrucciones de lectura , ni las dos cosas juntas . he empezado hace poco con el ganchillo . muchas gracias
12.05.2024 - 11:40DROPS Design answered:
Hola Adita, trabajas 3 p.de cad (= 1 p.a), 1 p.de cad. En el 1º p.de cad de los 3 p.de cad iniciales trabaja 3 p.a, todos en el mismo punto. En total tienes 4 p.a. Ahora trabajas 3 cadenetas, giras la labor y trabajas 1 p.a en el siguiente p.a, sin hacer las última lazada, trabajas 1 p.a en el siguiente p.a sin hacer la última lazada y trabajas 1 p.a en el siguiente p.a y pasas el hilo por los 3 p.a. Cortar el hilo.
12.05.2024 - 21:15
![]() Adita wrote:
Adita wrote:
Hola, buenos dias. tengo hecho este chal hasta la flor nª6 , y queria saber si para continuar he de seguir algun orden en concreto para poder unir los cuadrados, o puedo seguir por filas o es indiferente ?. es muy bonito este chal y rapido . me encanta . gracias
12.05.2024 - 11:31DROPS Design answered:
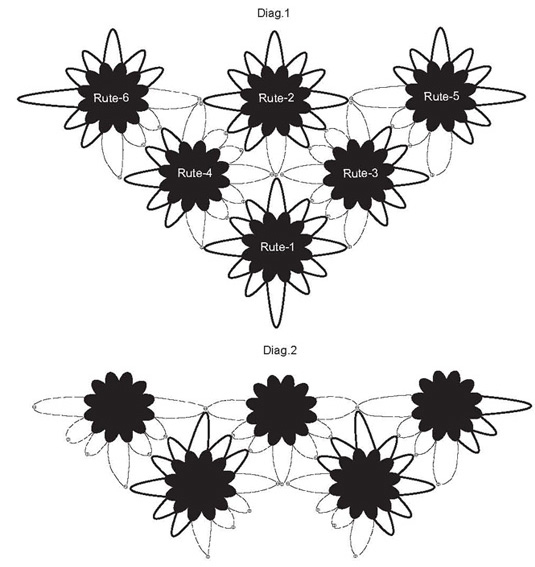
Hola Adita, para unir los cuadrados puedes leer la sección TIP PARA UNIR LOS CUADRADOS y mirar el diagrama 2. A la vez que trabajas los cuadrados los vas uniendo formando filas. Tras hacer todas las filas de cuadrados completos pasas a unir los semicuadrados, que se trabajan por el borde. También puedes trabajarlos por separado y unirlos después como quieras pero de esa forma van a quedar muchos cabos sueltos.
12.05.2024 - 23:09
![]() Sharon wrote:
Sharon wrote:
Half Square: I've been ages trying to complete row 4 but since watching the video it makes sense now. On written instructions the section 'dc around loop, 4 ch, 1 tr in 1st of 4 ch' has been accidentally omitted (as in full square). Loving crocheting this shawl
31.12.2022 - 23:45
![]() Annette wrote:
Annette wrote:
Hej! Kan man välja 2 trådar brushed alpaca silk istället?
04.04.2019 - 18:10DROPS Design answered:
Hej. Detta mönster är skrivet för att virkas med en tråd från garngrupp A (alpaca) och en från garngrupp C (brushed alpaca silk / vivaldi). Du kan byta ut dessa garn till andra garn i samma garngrupp, du kan läsa mer om våra garngrupper här. Att göra den i dubbel tråd brushed alpaca silk blir alltså fel eftersom det blir 2 garn ur garngrupp C. Lycka till!
05.04.2019 - 07:58
![]() Dolores wrote:
Dolores wrote:
I'd call this pattern "Starburst."
05.05.2017 - 14:09
![]() Marion wrote:
Marion wrote:
Is het mogelijk een telschema van de driehoekjes en vierkantjes te krijgen? Dat leest veel makkelijker.
09.10.2016 - 11:53DROPS Design answered:
Beste Marion. Ik heb helaas geen telpatroon voor deze, maar ik zal het op onze wenslijst zetten voor een video!
10.10.2016 - 11:12
|
|||||||
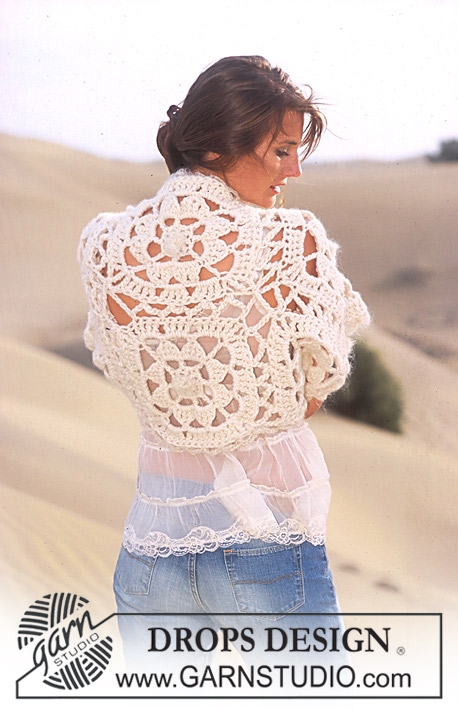
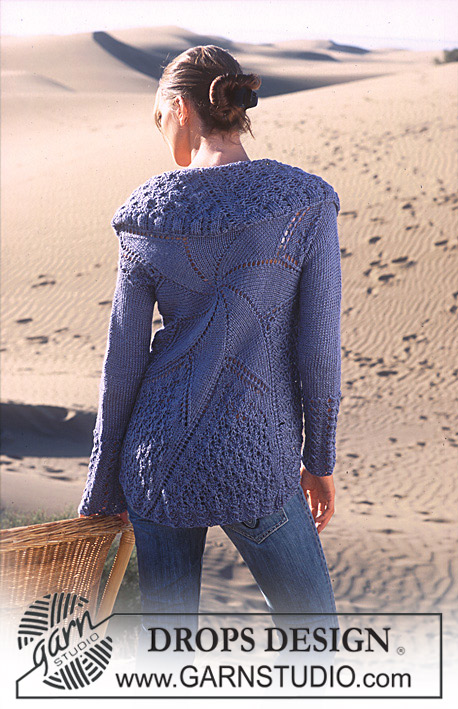
Cosmos |
|||||||
|
|
|||||||
DROPS Crochet shawl in Alpaca and Vivaldi or Alpaca and Brushed Alpaca Silk.
DROPS 94-7 |
|||||||
|
Crochet Gauge: 1 diamond should measure 15 x 15 cm (diagonal 21 cm). Shawl: The shawl is made up of 21 squares and 7 half squares crochet as explained below, and crochet together as explained in diagram 1 and diagram 2 (see how to crochet together below). 1 whole square: Crochet 4 ch on hook size 6 with 1 thread of Alpaca and 1 thread of Vivaldi or 1 thread Alpaca and 1 thread Brushed Alpaca Silk and make a loop with a sl st. 1st round: 3 ch (= 1 tr), crochet 11 tr around the loop and finish with a sl st in the 3rd ch from beginning of round = 12 tr. 2nd round: *4 ch, 1 tr in the 1st of the 4 ch, skip 1 tr, 1 sl st in the next tr*, repeat from *-* a total of 6 times and finish with a sl st in the sl st from the end of the previous round = 6 leaves. 3rd round: 3 ch, 1 dc in the top of the 1st leaf, *7 ch, 1 dc in the top of the next leaf* repeat from *-* a total of 6 times and finish with a sl st in the dc at the top of the 1st leaf = 6 loops. 4th round: *4 ch, 1 tr in the 1st of the 4 ch, 1 dc around the loop, 4 ch, 1 tr in the 1st of the 4 ch, 1 dc in the dc between the loops*, repeat from *-* a total of 6 times and finish with a sl st in the sl st from the end of the previous round = 12 leaves. 5th round: 3 ch,*1 dc in the top of the 1st leaf, 7 ch, 1 dc in the top of the next leaf, 7 ch, 1 dc in the next leaf, 11 ch*, repeat from *-* a total of 4 times and finish with a sl st in the 1st dc from beginning of round = 4 corners with 2 ch-loops in between. 1 half square: Crochet 4 ch on hook size 6 with 1 thread of Alpaca and 1 thread of Vivaldi or 1 thread Alpaca and 1 thread Brushed Alpaca Silk and make a loop with a sl st. 1st round: 3 ch (= 1 tr), crochet 11 tr around the loop and finish with a sl st in the 3rd ch from beginning of round = 12 tr. 2nd round: *4 ch, 1 tr in the 1st of the 4 ch, skip 1 tr, 1 sl st in the next tr*, repeat from *-* a total of 6 times and finish with a sl st in the sl st from the end of the previous round = 6 leafs. Now crochet rows back and forth instead of rounds. 3rd row: 3 ch, 1 dc in the top of the 1st leaf, *7 ch, 1 dc in the top of the next leaf* repeat from *-* a total of 3 times = 3 ch- loops. Turn the piece. 4th row: *4 ch, 1 tr in the 1st of the 4 ch, 1 dc around the loop, 4 ch, 1 tr in the first of the 4 chains, 1 dc into the dc between the loops*, repeat from *-* a total of 3 times and finish with a dc in the dc from the end of the previous round = 6 leaves. Turn the piece. 5th row: *11 ch, 1 dc in the top of the 1st leaf, 7 ch, 1 dc in the top of the next leaf, 7 ch, 1 dc in the next leaf*, repeat from *-* 1 time and finish with 11 ch and a sl st into the 1st ch from beginning of previous row = 3 corners with 2 ch-loops in between. How to crochet the squares tog: Crochet 1 whole square (= square 1), crochet 1 more (= square 2), but on the last round crochet square 2 tog. with square 1 as shown in diagram - this means the last round on square 2 is crochet as described under "1 whole square" but in 1 corner crochet 5 ch, then a dc into a corner of square 1, 5 ch (instead of 11 ch). Now crochet square 3, but on the last round crochet square 3 tog. with square 2 and square 1 as follows: 5 ch, 1 dc into the corner of square 2, 5 ch. 1 dc around the next loop on square 3, 3 ch. 1 dc around the next ch-loop on square 2, 3 ch, 1 dc around the the next loop on square 3, 3 ch. 1 dc into the next ch-loop on square 2, 3 ch. 1 dc around the next loop on square 3, 5 ch. 1 dc into the dc which holds the corner tog. of square 1 and square 2, 5 ch. 1 dc into the next loop on square 3, 3 ch. 1 dc around the next ch-loop on square 1, 3 ch, 1 dc around the next loop on square 3, 3 ch. 1 dc around the next ch loop on square 1, 3 ch, 1 dc around the next loop on square 3, 5 ch. 1 dc around the corner of square 1, 5 ch, 1 dc around the next loop on square 3, now crochet the last round as explained under "1 whole square". Continue to crochet together as follows: Put the work flat as you go along as it becomes easier to control each square which needs to be crochet tog – NB: Solid lines in diagram 1 indicate crochet as described under "1 whole square"; dotted lines indicate the number of ch’s and dc’s where crochet tog. When you have crochet 6 rows of whole squares, crochet the 7 half squares, at the same time crochet them tog with the whole squares – see diagram 2. Crochet edge: Crochet an edge along the whole shawl using crochet hook size 6 with 2 threads of Vivaldi or 2 threads Brushed Alpaca Silk as follows: Begin in one of the top corners and crochet downwards as follows: 1 dc into the ch-loop at the corner, *7 ch, 1 dc into the next dc*, repeat from *-* around the whole shawl, but along the flowers in the half square at the top of the shawl crochet 3 ch, 1 dc in between 2 leaves, 3 ch, 1 dc into the top of the leaf, 3 ch, 1 dc in between the next 2 leaves and so on. When you have crochet 1 round around the whole shawl crochet 1 more row but only along the sides (i.e. not along the top edge): *4 ch, 1 tr into the 1st of the 4 ch, 1 dc around the ch-loop, 4 ch, 1 tr into the 1st of the 4 ch, 1 dc into the dc in between the ch-loops*, repeat from *-*. Bobbles: Crochet 15 bobbles, and sew to the shawl at the point where 4 corners meet up – see photo. 1 bobble = Crochet 4 ch (= 1 ch + 1 tr) on hook size 6 with 2 threads of Vivaldi. Crochet 3 tr into the 1st of the 4 ch crochet (= 4 tr), turn the piece. Crochet 3 ch (= 1 tr), crochet the next 3 tr tog (i.e. crochet 1 tr into the next tr but wait with the last pull through (= 2 sts on hook), crochet 1 tr into the next tr, but wait with the last pull through (= 3 sts on hook), crochet 1 tr into the 3rd ch from beginning of previous row, and pull through all 4 yrh’s. Cut the thread, form the bobble and use the 2 ends of threads to sew the bobble to the shawl. |
|||||||
Diagram explanations |
|||||||
|
|||||||
 |
|||||||
Have you finished this pattern?Tag your pictures with #dropspattern or submit them to the #dropsfan gallery. Do you need help with this pattern?You'll find 8 tutorial videos, a Comments/Questions area and more by visiting the pattern on garnstudio.com. © 1982-2026 DROPS Design A/S. We reserve all rights. This document, including all its sub-sections, has copyrights. Read more about what you can do with our patterns at the bottom of each pattern on our site. |
|||||||


With over 40 years in knitting and crochet design, DROPS Design offers one of the most extensive collections of free patterns on the internet - translated to 17 languages. As of today we count 324 catalogues and 12290 patterns translated into English (UK/cm). 12290
We work hard to bring you the best knitting and crochet have to offer, inspiration and advice as well as great quality yarns at incredible prices! Would you like to use our patterns for other than personal use? You can read what you are allowed to do in the Copyright text at the bottom of all our patterns. Happy crafting!
Post a comment to pattern DROPS 94-7
We would love to hear what you have to say about this pattern!
If you want to leave a question, please make sure you select the correct category in the form below, to speed up the answering process. Required fields are marked *.