
Popular categories
Looking for a yarn?


Comments / Questions (15)
![]() Breige wrote:
Breige wrote:
I have started the left front, knitted until NECKBAND. Then it says knit 12 rows garter stitch ( 5 stripes).. I have knitted 6 rows of grey, 2 white, 2 black and 2 red which equals 12 rows, but does not equal 5 patterns/ My question is at what point do I start neck shaping?
10.12.2023 - 21:11DROPS Design answered:
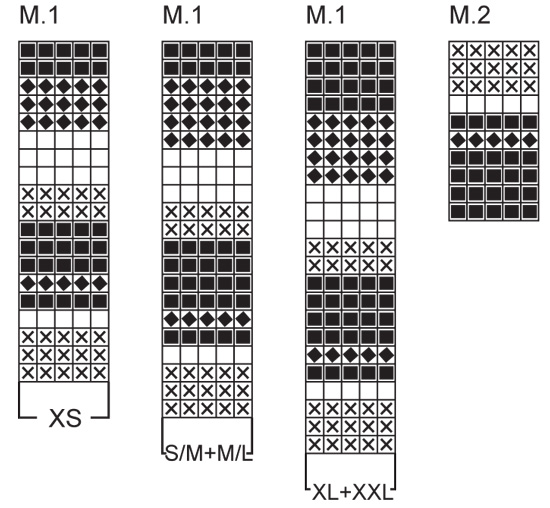
Dear Breige, each row in the chart corresponds to 2 rows in garter stitch, as stated in the diagram explanations. The rows included are: Row 1 and Row 2 (worked in black), Row 3 to Row 12 (the stripes pattern which include: 6 rows of grey, 2 white and 2 black). Each stripe = 1 row of the pattern or 1 ridge. So, after the 2 initial rows + 5 rows from the charts start with the neck shaping. Happy knitting!
10.12.2023 - 23:44
![]() Breige wrote:
Breige wrote:
I do not understand how on left front 12 rows of garter stitch equals 5 patterns? 6 Grey, 2 white, 2 black and 2 red equals 12 rows but only 4 stripes
06.12.2023 - 04:18DROPS Design answered:
Dear Breige, can you please clarify, exactly what part of the left front you refer to? Only the necline mentions 12 rows of garter stitch, there you do have to remember, that one ridge = 2 rows. Happy Knitting.
10.12.2023 - 20:58
![]() Jonna wrote:
Jonna wrote:
Hej, er ved at begynde på model 80-17. Men når man ser på mønsterdiagrammet, passer farverne i oversigten og diagrammet ikke. Den farve som hedder “ burgunder” ses ikke i diagrammet, eller rettere er angivet med forkert tegn.
27.01.2019 - 16:38DROPS Design answered:
Hei Jonna. Burgunder er en sort "diamant", og er den nest øverste fargen i diagrammene M.1 blant annet. Feks er fargerekkefølgen i M.1 i størrelse S/M + M/L (lest i strikkeretning - nedenfra og opp): 3 rader grå, 1 rad natur, 1 rad sort, 1 rda burgunder, 3 rader sort, 2 rader natur, 3 rader grå, 3 rader burgunder. Dette er et elder diagram, og det er sikkrt derfor enkelte av tegnene ser litt ulike ut i symbolforklaringen enn i selve diagrammet. Vi skal se om vi kan få oppdatert dette diagrammet etterhvert. God fornøyelse.
29.01.2019 - 13:52Rosa wrote:
After knitting all decs and incs for the left front panel, the pattern says "knit 12 rows garter st with black over the 101-119 st at the center front edge for buttonband, bind off". I am thinking that it should not be 12 rows but 12 ridges, therefore 24 rows. The same goes for the right front, where the pattern says to start buttonholes 'after 4 rows of garter st have been knit.' Should that be 4 ridges, i.e. 8 rows?
15.10.2017 - 18:20DROPS Design answered:
DROPS Design: Dear Rosa, as the pattern says, the buttonbands. should be 12 rows, or 6 ridges in garter stitch. On the right side the buttonholes should Be made after 2 ridges (= 4 rows). However, if you would prefer slightly wider bands, you can add a couple of rows, to both sides. Happy Knitting!
15.10.2017 - 23:11
![]() Will Zegers wrote:
Will Zegers wrote:
Het is gelukt, het gemakkelijkste is om de steken met een haaknaald op te nemen en dan op de breinaald te zetten.
23.04.2016 - 17:27
![]() Will Zegers wrote:
Will Zegers wrote:
Dank je ga proberen of het lukt
19.04.2016 - 19:46
![]() Paula Schuit wrote:
Paula Schuit wrote:
Hoi garna, begrijpt u het patroon ook niet of is het druk? PS. wordt het achtergedeelte ook overdwars gebreid? groet paula
27.10.2015 - 15:20DROPS Design answered:
Hoi Paula. Het is erg druk!
28.10.2015 - 11:25
![]() Paula Schuit wrote:
Paula Schuit wrote:
Dag drops, hier ben ik weer... ben bezig met achter- en zijpanden. vraag: brei de delen afzonderlijk verder... waar naar toe, tot waar? zijvoorpand: = 4 st. vraag: waar vandaan? achterpand: vraag: waar beginnen die 86 st. ik heb dus geen idee, ik kan het patroon niet voor me zien. Idee voor een update van het patroon... duidelijke tekening waar wat zit. groet paula
26.10.2015 - 10:20DROPS Design answered:
Hoi Paula. Je hebt 2 markeerders in het werk, deze markeren de zijnaden. Dus de steken aan elke zijkant zijn zijvoorpand en de steken in het midden = achterpand. Je breit van beneden naar boven. Je meerdert zoals beschreven en breit tot 33 cm en kant 3 st af aan beide zijkanten van beide merkdraden (= 6 st voor beide armsgaten). Vanaf hier brei je de delen afzonderlijk verder. Je hebt 4 st voor elk zijvoorpand en 86 voor het achterpand. Dus goed doorlezen en doen precies zoals beschreven. Ivm drukte kan ik niet altijd snel reageren - gemiddeld 3-4 werkdagen.
28.10.2015 - 12:44
![]() Paula Schuit wrote:
Paula Schuit wrote:
Dank u wel voor alle hulp. ik ben er erg blij mee groet paula
23.10.2015 - 11:37
![]() Paula Schuit wrote:
Paula Schuit wrote:
Hoi garna, een vraagje... moet ik met 2 bollen breien, één voor de 1e rondbreinaald en één voor de andere rondbreinaald? groet paula
22.10.2015 - 14:46DROPS Design answered:
Hoi Paula. Nee, je breit met één draad/bol en dan gewoon over beide naalden. Door de vorm van het voorpand is het handiger met 2 rondbreinaalden.
23.10.2015 - 10:56
|
|||||||||||||||||||||||||||||||
DROPS 80-17 |
|||||||||||||||||||||||||||||||
|
|
|||||||||||||||||||||||||||||||
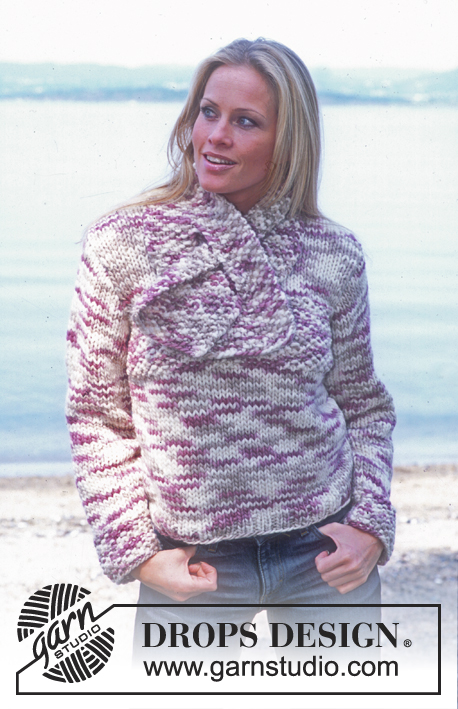
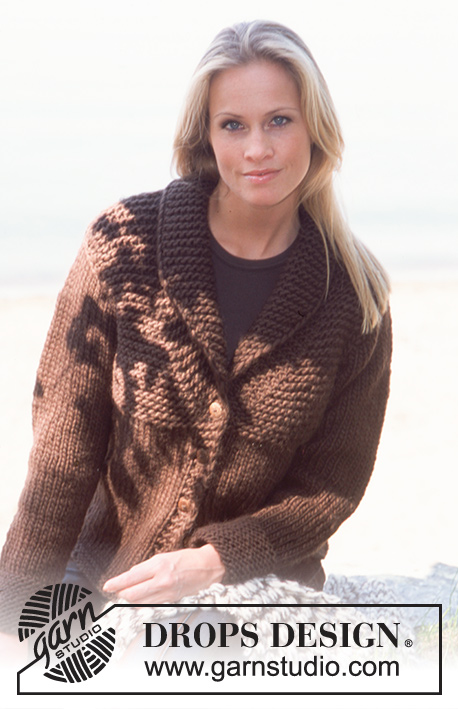
DROPS Cardigan in Silke-Tweed and Shawl in Vienna
DROPS 80-17 |
|||||||||||||||||||||||||||||||
|
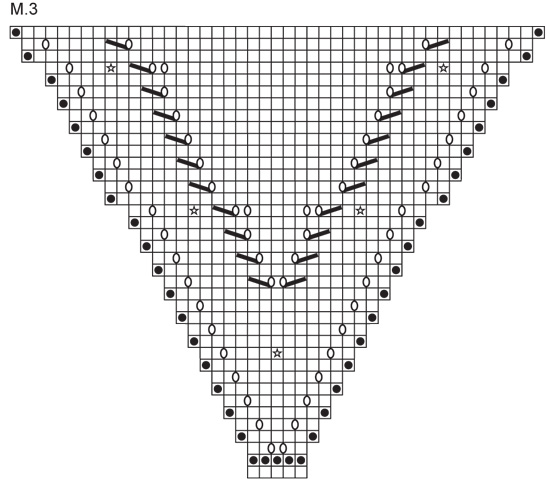
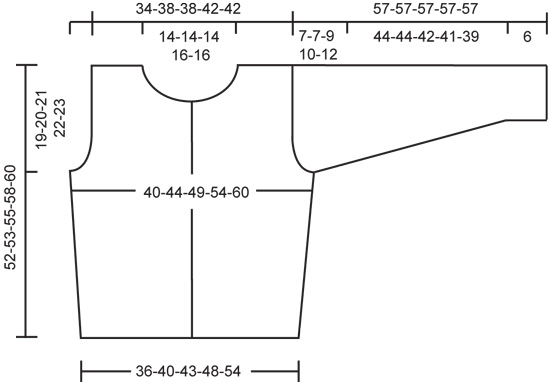
Gauge: 23 sts x 46 rows in garter st = 10 x 10 cm. Pattern: See charts. There are 3 charts for Pattern 1 (M.1) – note the sizes shown on the top of the chart and use the appropriate chart for your size. The pattern is seen from the right side. 1 row of chart = 2 rows garter st. -------------------------------------------------------------------- Left Front: Cast on 100-102-106-110-114 sts on one of the circular needles with black (this is the middle of the piece). Read the entire section before knitting: Row 1 (right side): Knit all sts, in the last st knit 2 sts. Starting from the same point you just ended, pick up and K (with the other circular needle) 2 sts in the first st, then 1 st in each st on the other side of the cast-on edge = 202-206-214-222-230 sts. Row 2 (wrong side): Turn the work, and K all sts. Row 3 (right side): Put a marker before the last st on the 1st circular needle and a marker after the first st on the other circular needle – there are 2 sts between markers, these are for bottom edge of the cardigan. Change to grey and knit stripe pattern following Pattern 1 for color changes (use the appropriate chart for your size) as follows: K until 1 st before the 1st marker, K 2 sts in the st before the marker and 2 sts in the st after the marker, repeat at 2nd marker. Repeat this increase at each marker every other row. Neckband: When you have knit 8-12-12-12-12 rows garter st (after 3-5-5-5-5 stripes) bind off for neck from right side at the beginning of every other row as follows: 4 sts 1 time, 3 sts 2 times, 2 sts 3 times and 1 st 2 times = 18 sts bound off for the neck. After all incs and decs are complete 260-272-280-296-304 sts are on the needles and the piece measures approx. 17-19-19-21-21 cm in width and 52-53-55-58-60 cm in height. Now bind off at the side edge (= 119-123-127-133-137 sts) and at lower edge (= 40-44-44-48-48 sts). Knit 12 rows garter st with black over the 101-105-109-115-119 sts at the center front edge for buttonband, bind off. Right front: Knit the same as the left , reversing all shaping. Make 6 buttonholes evenly distributed along the buttonbands after 4 rows garter st have been knit. The bottom buttonhole = approx. 3 cm from lower edge and top buttonhole approx. 6 cm from top edge (there will be 1 more buttonhole in neckband). (1 buttonhole = bind off 2 sts and cast on 2 new sts over the bound off sts on the next row.) Back + sides: Cast on 86-96-112-124-152 sts with black. Knit garter st. When the piece measures 8 cm put 1 marker 2-2-6-7-14 sts in from each side to mark the side «seam». Then inc 1 st each side of each marker every 5-5-4.5-4-4 cm 5-5-6-7-7 times = 106-116-136-152-180 sts. When the piece measures 33-33-34-36-37 cm bind off 3 sts at each side of both markers (= 6 sts for armhole). Knit each piece separately. Side-front: = 4-4-9-11-18 sts. Bind off every other row: 2 sts 1-1-3-4-6 times and 1 st 2-2-3-3-6 times. Repeat on the other side-front. Back: = 86-96-106-118-132 sts. Bind off at each side as on side-front = 78-88-88-96-96 sts. When the piece measures 50-51-53-56-58 cm bind off the center 26-26-26-30-30 sts for the neck. Then bind off at each neck edge every other row: 2 sts 1 time and 1 st 1 time = 23-28-28-30-30 sts remain on each shoulder. Bind off when the piece measures 52-53-55-58-60 cm. Sleeve: Cast on 52-54-56-56-60 sts with black. Knit Pattern 2, and then with black to finished measurements. When the piece measures 6 cm inc 1 st at each side every 3-3-2.5-2-2 cm a total of 14-15-16-19-19 times = 80-84-88-94-98 sts. When sleeve measures 50-50-48-47-45 cm bind off for sleeve cap at each side every other row: 3 sts 1 time, 2 sts 3-3-2-2-1 times, 1 st 8-8-15-17-23 times, then bind off 2 sts at each side until the piece measures 57 cm. Bind off the remaining sts. Assembly: Sew back to fronts. Sew shoulder seams. Neckband: Pick up approx. 92-102 sts around the neck with black. Knit 6 rows garter st – after 2 rows make a buttonhole over the others on buttonband. Bind off. Sew sleeve seams and sew in sleeves. Sew on buttons. -------------------------------------------------------------------- SHAWL: Measurements: Width: approx. 150 cm Length at center back: approx. 90 cm Materials: DROPS VIENNA from Garnstudio 200 gr nr 21, natural DROPS 12 mm circular needles, or size needed to obtain correct gauge. Gauge: 8 sts in stockinette st = 10 cm in width. Pattern: See chart. The pattern is seen from the right side. -------------------------------------------------------------------- Shawl: Loosely cast on 5 sts and follow chart for Pattern 3 (M.3) – row 1 = right side. After chart is complete continue to inc in the same manner – that is, make a yo inside of 2 sts at each side every other row, and on every row with bobbles (every 12th row) make a yo at each side and an extra yo inside the stockinette st in the middle. When shawl measures 90 cm K 1 row from wrong side and bind off with double strands of yarn. |
|||||||||||||||||||||||||||||||
Diagram explanations |
|||||||||||||||||||||||||||||||
|
|||||||||||||||||||||||||||||||
 |
|||||||||||||||||||||||||||||||
 |
|||||||||||||||||||||||||||||||
 |
|||||||||||||||||||||||||||||||
Have you finished this pattern?Tag your pictures with #dropspattern or submit them to the #dropsfan gallery. Do you need help with this pattern?You'll find 16 tutorial videos, a Comments/Questions area and more by visiting the pattern on garnstudio.com. © 1982-2026 DROPS Design A/S. We reserve all rights. This document, including all its sub-sections, has copyrights. Read more about what you can do with our patterns at the bottom of each pattern on our site. |
|||||||||||||||||||||||||||||||


With over 40 years in knitting and crochet design, DROPS Design offers one of the most extensive collections of free patterns on the internet - translated to 17 languages. As of today we count 324 catalogues and 12290 patterns translated into English (UK/cm). 12290
We work hard to bring you the best knitting and crochet have to offer, inspiration and advice as well as great quality yarns at incredible prices! Would you like to use our patterns for other than personal use? You can read what you are allowed to do in the Copyright text at the bottom of all our patterns. Happy crafting!
Post a comment to pattern DROPS 80-17
We would love to hear what you have to say about this pattern!
If you want to leave a question, please make sure you select the correct category in the form below, to speed up the answering process. Required fields are marked *.