
Popular categories
Looking for a yarn?


Comments / Questions (7)
![]() Dorte Langberg wrote:
Dorte Langberg wrote:
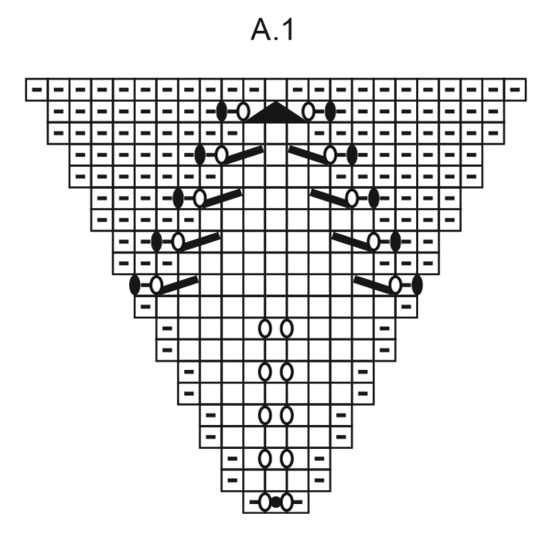
Der er en stor, sort firkant i midten af næstsidste pind i A1. Hvad betyder den? Tak
22.06.2025 - 09:28DROPS Design answered:
Hej Dorte, den store sorte trekant betyder at 3 masker bliver til 1, så du tager 2 masker ind midt på næstsidste pind. Vi skal få opdateret diagramteksten - tak for info :)
24.06.2025 - 15:01
![]() Böhmer wrote:
Böhmer wrote:
Ich komme mit dem Diagramm A1 für das Blattmuster nicht zurecht. Heißt die 1.Reihe rechts/Umschlag/Mittelmasche/Umschlag/rechts? Dann wären 2 Maschen durch die Umschläge zugenommen. Es würden sich dann fünf Maschen innerhalb der Markierung befinden. Das kann aber die gezeigte zweite Reihe nicht sein, hier werden nur drei Maschen gezeigt, die Links zu Stricken sind. Wie soll das gehen? Das Symbol für den Umschlag ist zwischen zwei Maschen gezeichnet, es hat kein eigenes Kästchen.
07.10.2024 - 23:29DROPS Design answered:
Liebe Frau Böhmer, ja genauso wird die 1. Reihe gestrickt, die Mittlemasche wird hier nur bei der 1. Reihe gezeigt, die bleibt aber immer die Mittelmasche und bei der 2. Reihe hat man dann 5 Maschen; es wird so bei der 1., 3., 5., 7., und 9. Reihe 2 Maschen in der Mitte (beidseitig der Mittelmasche) zugenommen, dann wird man das Glattrechts abnehmen (Umschläge + Abnahmen) aber dazu immer noch zunehmen (5. Symbol) aber diese Umschläge werden verschränkt gestrickt damit sie keine Löcher bilden. Viel Spaß beim Stricken!
08.10.2024 - 07:48
![]() Cecile wrote:
Cecile wrote:
Bonjour, je ne comprends pas l\\\'avant dernière ligne du diagramme. Pouvez-vous me l' expliquer ? Merci à vous.
27.06.2024 - 14:08DROPS Design answered:
Bonjour Cécile, voici comment tricoter l'avant-dernier rang du diagramme: 8 mailles endroit, 1 jeté (tricoté torse au rang suivant sur l'envers = pas de trou), 1 m end, 1 jeté (celui-ci sera tricoté dans le brin avant pour former un trou), glissez 1 m à l'end, 2 m ens à l'end, passez la m glissée par-dessus la maille tricotée, 1 jeté (à tricoter dans le brin avant pour former un trou), 1 m end, 1 jeté (tricoté torse au rang suivant sur l'envers = pas de trou), 8 mailles endroit. Bon tricot!
27.06.2024 - 16:05
![]() Deuss Patricia wrote:
Deuss Patricia wrote:
De alinea waar men moet meten, 3cm, is mij niet duidelijk. Hoe meet ik dit? dank u wel
15.06.2023 - 13:17DROPS Design answered:
Dag Patricia,
Je meet dit in de richting van de steken, dus in de richting van hoe de ribbels lopen.
18.06.2023 - 19:47
![]() Deuss wrote:
Deuss wrote:
De alinea die vermeldt dat je tot 3cm moet meten, is mij niet duidelijk. hoe meet je dit? vanaf de tricotsteek tot aan de zijkant? dank u wel
15.06.2023 - 13:13
![]() Astrid Voss wrote:
Astrid Voss wrote:
Leider ist das Diagramm noch nicht wieder sichtbar
19.05.2023 - 12:38DROPS Design answered:
Liebe Frau Voss, können Sie andere Diagramme von anderen Anleitungen auch nicht sehen? Versuchen Sie den Cache /die Cookies zu leeren, es kann manchmal helfen, und auch klicken Sie mal Ctrl+F5 um die Seiten zu aktualisieren und sagen Sie uns bitte bescheid. Danke im voraus.
19.05.2023 - 13:43
![]() Astrid Voss wrote:
Astrid Voss wrote:
Leider ist bei mir kein Diagramm sichtbar - können Sie mir das Diabramm bitte mailen?
16.05.2023 - 20:10DROPS Design answered:
Liebe Frau Voss, das Diagram sollte (wieder) sichtbar sein - Viel Spaß beim stricken!
19.05.2023 - 07:49
|
|||||||||||||||||||||||||
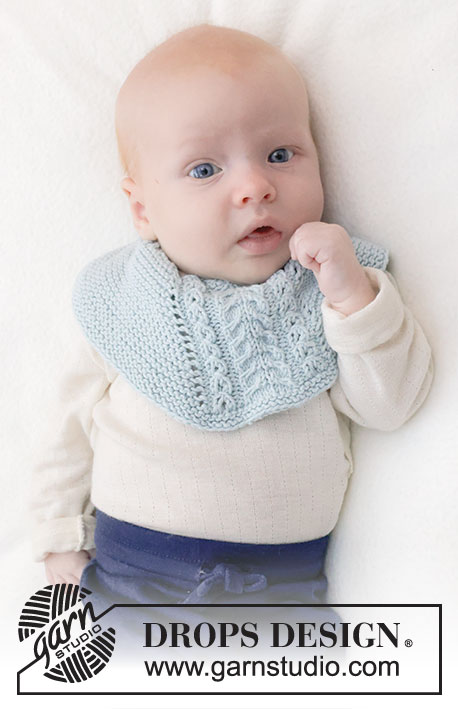
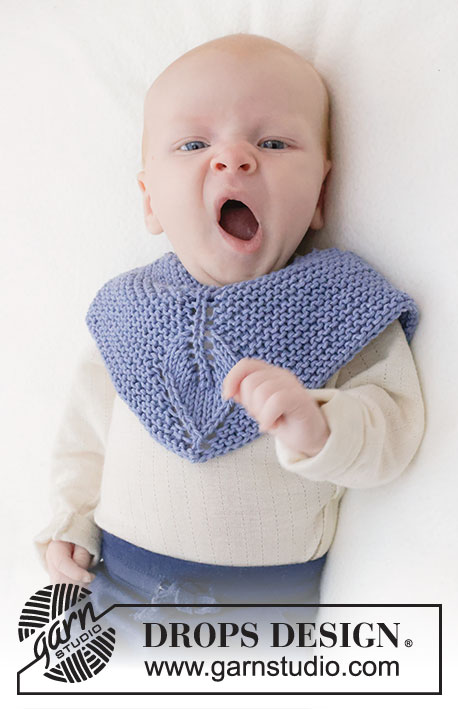
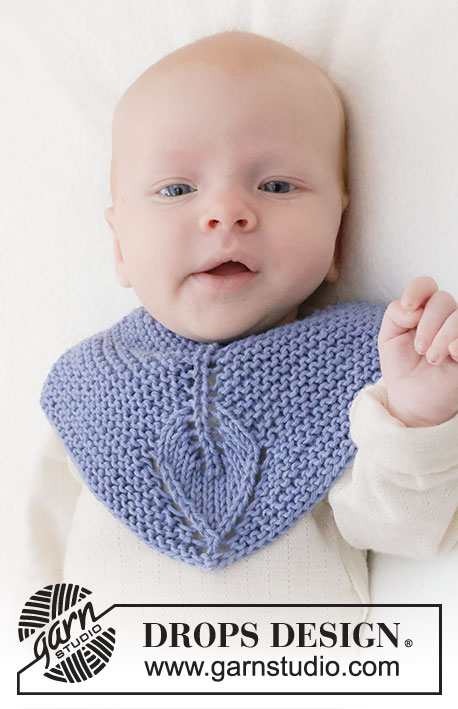
Baby Leaf Bib#babyleafbib |
|||||||||||||||||||||||||
 |
 |
||||||||||||||||||||||||
Knitted bib for baby in DROPS Cotton Light. Piece is worked back and forth, top down in garter stitch and leaf pattern. Size 0 - 4 years
DROPS Baby 45-15 |
|||||||||||||||||||||||||
|
---------------------------------------------------------- EXPLANATION FOR THE PATTERN: ---------------------------------------------------------- KNITTING TIP: At the bottom of the bib there is a leaf pattern. This leaf pattern measures approx. 7 cm measured mid front and approx. 5 cm in knitting direction. If you want to make a shorter or longer bib than in pattern, work as 2nd and 3rd row until desired measurements before working the leaf pattern as explained in pattern. PATTERN: See diagram A.1. Diagrams show all rows in pattern seen from the right side. ---------------------------------------------------------- START THE PIECE HERE: ---------------------------------------------------------- BIB – SHORT OVERVIEW OF THE PIECE: Worked back and forth on circular needle, top down. BIB: Cast on 5 stitches on circular needle size 4 mm with DROPS Cotton Light. Knit 1 row from wrong side. ROW 1 (= right side): Knit 1, * make 1 yarn over , knit 1*, work from *-* 4 times. There are 9 stitches on needle. Knit yarn overs on next row – they should make holes. Insert a marker in the middle stitch, and let the marker follow middle stitch onwards. ROW 2 (= wrong side): Knit 1, make 1 yarn over, knit until middle stitch, work 1 stitch in stocking stitch (middle stitch), knit until 1 stitch remains, make 1 yarn over and knit 1. There are 11 stitches on needle (2 stitches increased). Knit yarn overs on next row – they should make holes. ROW 3 (= right side): Knit 1, make 1 yarn over, knit until middle stitch, make 1 yarn over, 1 stitch in stocking stitch (= middle stitch), make 1 yarn over, knit until 1 stitch remains, make 1 yarn over and knit 1. There are 15 stitches on needle (4 stitches increased). Knit yarn overs on next row – they should make holes. REMEMBER THE KNITTING TENSION! Continue to work the same way as 2nd and 3rd row until piece measures 3-5-8 (9-11) cm measures in knitting direction (not along middle stitch but in the direction of stitch in the middle of one of the sides), approx. 5 cm remain until finished measurements in knitting direction in the side and approx. 7 cm measured mid front - read KNITTING TIP in explanation above. Now work according to diagram A.1 from right side as follows: ROW 1 (= right side): Knit 1, make 1 yarn over, knit until 1 stitch before middle stitch (marker in the middle stitch can be removed), work A.1 over the next 3 stitches (insert 1 new marker on each side of A.1, move the markers upwards to make it easier to see the pattern when working from wrong side), knit until 1 stitch remains, make 1 yarn over and knit 1. 4 stitches have been increased on needle. ROW 2 (= wrong side): Knit 1, make 1 yarn over, knit until first marker, work A.1 between markers, knit until 1 stitch remains, make 1 yarn over and knit 1. 2 stitches have been increased. Continue to work A.1 and increase 1 stitch in each side on every row as before, both from right and wrong side. Cast off knitting from right side. Piece measures approx. 11-14-18 (20-23) cm measured mid front and approx. 8-10-13 (14-16) cm measured in knitting direction. Fasten off. ASSEMBLY: Sew button on to one side of bib, button through piece inside 1 stitch where increases with yarn over along the side is done. |
|||||||||||||||||||||||||
Diagram explanations |
|||||||||||||||||||||||||
|
|||||||||||||||||||||||||
 |
|||||||||||||||||||||||||
Have you finished this pattern?Tag your pictures with #dropspattern #babyleafbib or submit them to the #dropsfan gallery. Do you need help with this pattern?You'll find 17 tutorial videos, a Comments/Questions area and more by visiting the pattern on garnstudio.com. © 1982-2026 DROPS Design A/S. We reserve all rights. This document, including all its sub-sections, has copyrights. Read more about what you can do with our patterns at the bottom of each pattern on our site. |
|||||||||||||||||||||||||


With over 40 years in knitting and crochet design, DROPS Design offers one of the most extensive collections of free patterns on the internet - translated to 17 languages. As of today we count 324 catalogues and 12290 patterns translated into English (UK/cm). 12290
We work hard to bring you the best knitting and crochet have to offer, inspiration and advice as well as great quality yarns at incredible prices! Would you like to use our patterns for other than personal use? You can read what you are allowed to do in the Copyright text at the bottom of all our patterns. Happy crafting!
Post a comment to pattern DROPS Baby 45-15
We would love to hear what you have to say about this pattern!
If you want to leave a question, please make sure you select the correct category in the form below, to speed up the answering process. Required fields are marked *.