
Popular categories
Looking for a yarn?


Comments / Questions (23)
![]() Annamaria Evangelisti wrote:
Annamaria Evangelisti wrote:
Posso sostituire il filato di alpaca bouclé con Alpaca? Quali variazioni devo fare? Grazie per l' aiuto
08.01.2024 - 11:28DROPS Design answered:
Buonasera Annamaria, può sostituire DROPS Alpaca Bouclè utilizzando 2 fili di DROPS Alpaca e controllando che il campione corrisponda a quello indicato. Buon lavoro!
09.01.2024 - 20:06
![]() Henrietta wrote:
Henrietta wrote:
In der Anleitung zu V-Ausschnitt, nach dem Abnehmen einer 1. Masche, ist dann angegeben "In dieser Weise in jeder 4. Reihe 1 x abnehmen, dann in jeder 2. Reihe 8-7-7-7-7-6 x und "...usw. Meine Frage: Wie oft soll in jeder 4. Reihe 1 x abgenommen werden? Oder soll nach dem 1 x abnehmen nach der 4. Reise mit dem Abnehmen in jeder 2. Reihe begonnen werden? Danke
04.12.2022 - 16:16DROPS Design answered:
Liebe Henrietta, nach der 1. Abnahme stricken Sie 3 Reihen, und dann nehmen Sie bei der nächste Reihe und in jede 2. Reihe. Viel Spaß beim stricken!
06.12.2022 - 10:06
![]() Belinda wrote:
Belinda wrote:
Vedr indtagning til v-hals. Der står man tager ind fra retsiden 1. Pind og så dernæst på 4. Og 2. Pind, men der er jo vrang. Vil det sige at der skal lukkes af på vrangsiden?
27.10.2022 - 00:22DROPS Design answered:
Hej Belinda, når du tager ind på hver 4.pind, så tager du ind på 1.- 5.-9.-13. og så videre. Og når du tager ind på hver 2.pind og starter med 1. så bliver det på 3.-5.-7.- osv
27.10.2022 - 10:39
![]() Ebba wrote:
Ebba wrote:
Hej! Jag har lite svårt att visualisera hur ryggsidans övre del ska se ut. Speciellt runt halsen med A.1 mönster. Finns det möjligtvis bild på baksidan? Tacksam för svar!
30.07.2022 - 22:05DROPS Design answered:
Hej Ebba, halsen bag i nakken strikkes i rib ifølge A.1 :)
05.08.2022 - 08:29
![]() Ruythooren Anne wrote:
Ruythooren Anne wrote:
Ben het achterpand aan het breien, maat large. Als het werk 51 cm meet, moet ik een rij breien volgens een patroon die ik niet echt begrijp. Er wordt gezegd dat je 19 steken in tricotst moet breien waarvan de laatste steek in A1,dan A1 over de volgende 30 steken, waarvan de eerste 2 ook in A1, dan terug tricotsteken over de volgende 19, maar dat komt toch niet symetrisch uit met de eerste 19 omdat daar al 1 steek in A1 moet? Kan u mij dat wat duidelijker uitleggen?zal wel aan mij liggen hoor.
07.04.2022 - 10:22DROPS Design answered:
Dag Anne,
Het staat er inderdaad wat verwarrend wat je moet doen. Je stekenverdeling is als volgt: 1-19-1-30-2-19-1. De twee buitenste zijn de kantsteken. De beide keren dat je 19 steken breit en de 30 steken brei je in A.1. De 2 steken zijn de eerste 2 steken van het telpatroon A.1. De 1 steek (na de 19 steken) brei je in de laatste steek van A.1 (dus averecht aan de goede kant en recht aan de verkeerde kant.)
20.04.2022 - 10:12
![]() Janka wrote:
Janka wrote:
Czy włóczka Alpaca Boucle o kolorze ecru nr 0100 będzie jeszcze dostępna? W żadnym ze sklepów jej nie ma, zresztą nie tylko tego koloru. Pisałam to pytanie w dziale włóczek ale się nie ukazało.
06.04.2022 - 16:19DROPS Design answered:
Witaj Janko, włóczka jest dostępna, więc sklepy mogą ją zamawiać. Mamy w Polsce ok. 40 sklepów DROPS, ich listę znajdziesz TUTAJ. Poszukaj tam, a jak nie znajdziesz, napisz do któregoś sklepu i poproś o zamówienie dla Ciebie tej właśnie włóczki w tym konkretnym kolorze. Pozdrawiamy!
07.04.2022 - 09:10
![]() Anne Ruythooren wrote:
Anne Ruythooren wrote:
Ben het achterpand aan het breien, maat large. Als het werk 51 cm meet, moet ik een rij breien volgens een patroon die ik niet echt begrijp. Er wordt gezegd dat je 19 steken in tricotst moet breien waarvan de laatste steek in A1,dan A1 over de volgende 30 steken, waarvan de eerste 2 ook in A1, dan terug tricotsteken over de volgende 19, maar dat komt toch niet symetrisch uit met de eerste 19 omdat daar al 1 steek in A1 moet? Kan u mij dat wat duidelijker uitleggen?zal wel aan mij liggen hoor.
04.04.2022 - 13:05DROPS Design answered:
Dag Anne,
Je breit als volgt over de 73 steken: 1 kantsteek, 19 steken in tricotstee, 1 steek in A.1 (de laatste), A.1 over de volgende 30 steken, 2 steken van A.1 (de eerste 2), tricotsteek over de volgende 19 steken, 1 kantsteek. Het is dus niet zo dat je de laatste steek van de 19 steken in A.1 breit, maar je breit eerst 19 tricotsteken en dan brei je de laatste steek van A.1. Dit geldt ook op het eind van de naald: daar brei je de eerste 2 steken van A.1 en daarna nog de 19 tricotsteken.
08.04.2022 - 00:16
![]() Nobletdom wrote:
Nobletdom wrote:
Comment se prolonge les bandes d'encolure des devants au niveau de l'encolure dos ? merci pour votre réponse
28.02.2022 - 16:10DROPS Design answered:
Bonjour Nobletdom, avant de rabattre les mailles de l'encolure dos, vous avez tricoté A.1 au-dessus des mailles centrales, c'est la bordure d'encolure, les 9 mailles point fantaisie restant côté encolure seront assemblées aux 9 mailles de la bordure devant des devants droit et gauche. Bon tricot!
28.02.2022 - 16:35
![]() Janka wrote:
Janka wrote:
Gdybym chciała zrobić sweter w rozmiarze S z długimi rękawami o ile powinnam zwiększyć ilość włóczki?
22.02.2022 - 09:09DROPS Design answered:
Witaj Janko, po jednym motku każdej włóczki powinno wystarczyć. Miłej pracy nad robótką. Pozdrawiamy!
22.02.2022 - 10:15
![]() Debra J Lockwood wrote:
Debra J Lockwood wrote:
Please advise when this is coming out. I want to make one for an engagement on March 28, 2022.
10.02.2022 - 05:50DROPS Design answered:
Dear Mrs Lockwood, this pattern should be online soon, come back regularly to check. Thank you very much in advance for your patience.
10.02.2022 - 09:22
|
|||||||
Soft Journey Cardigan#softjourneycardigan |
|||||||
 |
 |
||||||
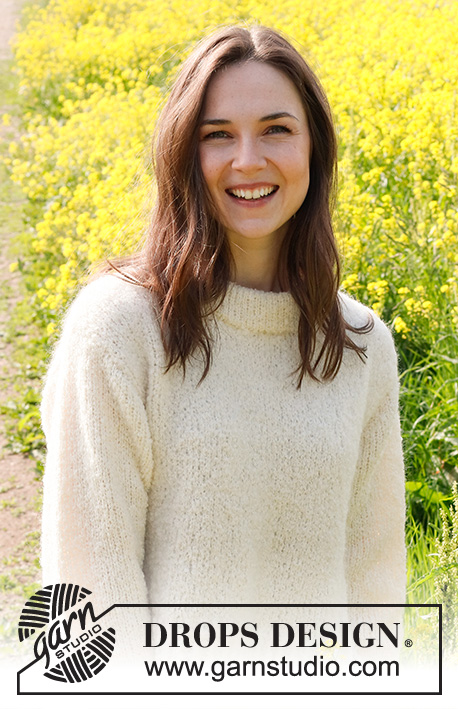
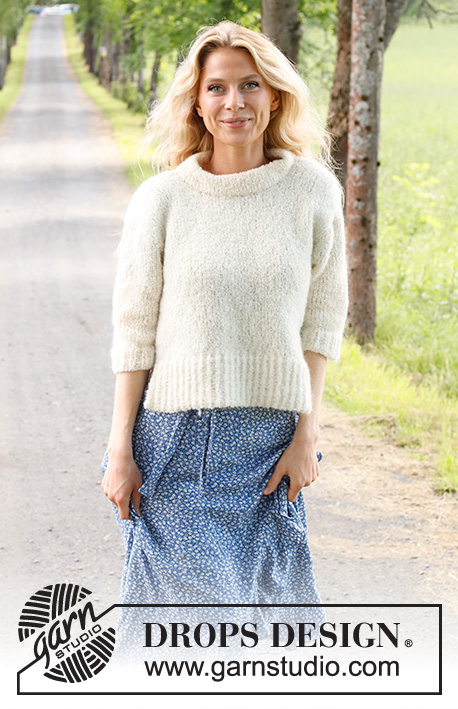
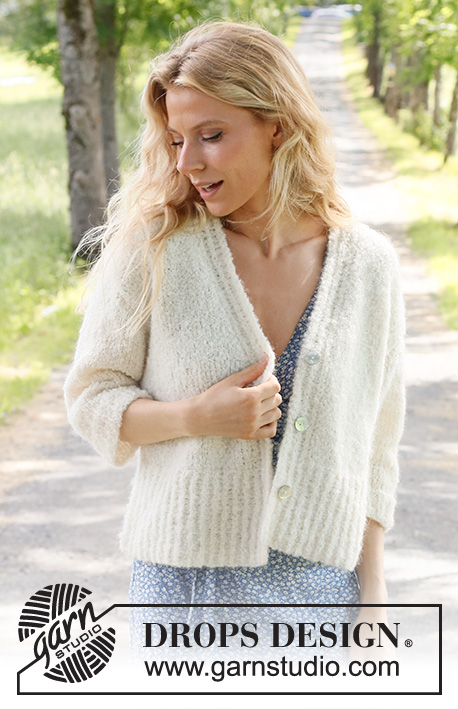
Knitted jacket in DROPS Alpaca Bouclé and DROPS Kid-Silk. The piece is worked bottom up in stocking stitch with split in the sides and ¾-length sleeves. Sizes S - XXXL.
DROPS 230-10 |
|||||||
|
------------------------------------------------------- EXPLANATIONS FOR THE PATTERN: ------------------------------------------------------- RIDGE/GARTER STITCH (worked back and forth): Knit all rows. 1 ridge = knit 2 rows. PATTERN: See diagram A.1. The diagram shows all rows in the pattern from the right side. DECREASE TIP (evenly spaced): To work out how to decrease evenly, count the total number of stitches on needle (e.g. 93 stitches) minus the edge stitches (e.g. 2 stitches) and divide the remaining stitches by the number of decreases to be made (e.g. 23) = 3.9. In this example decrease by knitting together approx. each 3rd and 4th stitch. INCREASE TIP (sleeves): All increases are worked from the right side! Work 1 edge stitch in garter stitch, knit 1, make 1 yarn over, knit until there are 2 stitches left on the row, 1 yarn over, knit 1 and 1 edge stitch in garter stitch. On the next row purl the yarn overs twisted to avoid holes. Then work the new stitches in stocking stitch. BUTTONHOLES: Work the buttonholes on the right band. 1 BUTTONHOLE = knit together the 4th and 5th stitch from the edge and make 1 yarn over. On the next row knit the yarn over to leave a hole. Work buttonholes when the piece measures: S: 8, 18 and 28 cm M: 9, 19 and 29 cm L: 9, 19½ and 30 cm XL: 9, 20 and 31 cm XXL: 10, 21 and 32 cm XXXL: 10, 21½ and 33 cm CASTING-OFF TIP: To avoid the cast-off edge being tight you can cast off with a larger size needle. If the edge is still tight, make 1 yarn over after approx. each 6th stitch at the same time as casting off; the yarn overs are cast off as normal stitches. ------------------------------------------------------- START THE PIECE HERE: ------------------------------------------------------- JACKET – SHORT OVERVIEW OF THE PIECE: The front and back pieces and the sleeves are worked separately, back and forth. All sections are worked bottom up, then sewn together. BACK PIECE: Cast on 93-102-108-120-129-144 stitches (including 1 edge stitch on each side) with circular needle size 4.5 mm and 1 strand of each quality (= 2 strands). Work rib from the right side as follows: 1 edge stitch in GARTER STITCH – read description above, A.1 until there are 2 stitches left, work the first stitch in A.1 so the rib is symmetrical and 1 edge stitch in garter stitch. Continue this rib for 13 cm. On the next row from the right side decrease 22-25-25-29-31-36 stitches evenly spaced – read DECREASE TIP = 71-77-83-91-98-108 stitches. Change to circular needle size 5.5 mm. Work stocking stitch back and forth, at the same time cast on 1 stitch at the end of the next 2 rows (= edge stitches) = 73-79-85-93-100-110 stitches. These edge stitches are worked in garter stitch. REMEMBER THE KNITTING TENSION! When the piece measures 34-35-36-37-38-39 cm, cast off for the armholes at the beginning of each row as follows: 2-3-4-5-5-5 stitches 1 time, 2 stitches 0-0-0-1-2-4 times and 1 stitch 1-2-2-2-2-2 times on each side = 67-69-73-75-78-80 stitches. Continue with stocking stitch and 1 edge stitch in garter stitch on each side. When the piece measures 47-49-51-53-55-57 cm, work pattern as follows: 1 edge stitch in garter stitch, stocking stitch over the next 16-17-19-20-20-21 stitches, work the last stitch in A.1, A.1 over the next 30-30-30-30-33-33 stitches, work the first 2 stitches in A.1, stocking stitch over the next 16-17-19-20-20-21 stitches, 1 edge stitch in garter stitch. Continue this pattern. When the piece measures 52-54-56-58-60-62 cm, cast off the middle 15-15-15-15-18-18 stitches for the neck and finish each shoulder separately = 26-27-29-30-30-31 stitches on the shoulder. Continue working with 9 stitches of pattern towards the neck, 1 edge stitch in garter stitch towards the side and stocking stitch over the other stitches. When the piece measures 54-56-58-60-62-64 cm, cast off. Work the other shoulder in the same way. RIGHT FRONT PIECE: Cast on 51-57-60-66-69-75 stitches (including 1 edge stitch on each side) with circular needle size 4.5 mm and 1 strand of each quality (= 2 strands). Work rib as follows from the right side: 1 edge stitch in garter stitch, A.1 until there are 2 stitches left, work the first stitch in A.1 so the rib is symmetrical and 1 edge stitch in garter stitch. Continue this rib for 13 cm. Remember the BUTTONHOLES on the band – read description above. On the next row from the right side decrease as follows: Work pattern as before over the first 9 stitches, stocking stitch over the next 42-48-51-57-60-66 stitches and decrease 11-14-14-16-16-17 stitches evenly over these stitches, cast on 1 new stitch at the end of the row (= edge stitch) = 41-44-47-51-54-59 stitches. Work back 1 row with pattern. Change to circular needle size 5.5 mm. Continue with 1 edge stitch in garter stitch towards the side, 9 stitches with pattern towards mid-front (= band) and stocking stitch over the other stitches. OVERVIEW OF THE NEXT SECTION: You now continue the pattern at the same time as decreasing for the V-neck and armhole; read the whole section before continuing. V-NECK: When the piece measures 28-29-30-31-32-33 cm, decrease for the V-neck from the right side as follows: Work the first 9 stitches as before, slip 1 stitch as if to knit, knit 1 and pass the slipped stitch over the knitted stitch (= 1 stitch decreased). Decrease like this every 4th row 1 time, every 2nd row 8-7-7-7-7-6 times and every 4th row 3-4-4-4-5-6 times = 12-12-12-12-13-13 stitches decreased for the V-neck. ARMHOLE: Cast off for the armhole as follows when the piece measures 34-35-36-37-38-39 cm, at the beginning of each row from the wrong side: 2-3-4-5-5-5 stitches 1 time, 2 stitches 0-0-0-1-2-4 times and 1 stitch 1-2-2-2-2-2 times. When the V-neck and armhole are finished there are 26-27-29-30-30-31 stitches on the shoulder. Continue working until the piece measures 54-56-58-60-62-64 cm. Cast off. LEFT FRONT PIECE: Cast on 51-57-60-66-69-75 stitches (including 1 edge stitch on each side) with circular needle size 4.5 mm and 1 strand of each quality (= 2 strands). Work rib as follows from the right side: 1 edge stitch in garter stitch, A.1 until there are 2 stitches left, work the first stitch in A.1 so the rib is symmetrical and 1 edge stitch in garter stitch. Continue this rib for 13 cm. On the next row from the right side decrease as follows: 1 edge stitch in garter stitch, stocking stitch over the next 42-48-51-57-60-66 stitches and decrease 11-14-14-16-16-17 stitches evenly over these stitches, work pattern as before over the last 9 stitches. Work back 1 row with pattern and cast on 1 new stitch at the end of the row (= edge stitch) = 41-44-47-51-54-59 stitches. Change to circular needle size 5.5 mm. Continue with 1 edge stitch in garter stitch towards the side, 9 stitches with pattern towards mid-front (= band) and stocking stitch over the other stitches. OVERVIEW OF THE NEXT SECTION: When the piece measures 28-29-30-31-32-33 cm, decrease for the V-neck from the right side as follows: Work until there are 11 stitches left, knit 2 together (= 1 stitch decreased), work to the end of the row as before. Decrease like this every 4th row 1 time, every 2nd row 8-7-7-7-7-6 times and every 4th row 3-4-4-4-5-6 times = 12-12-12-12-13-13 stitches decreased for the V-neck. ARMHOLE: Cast off for the armhole as follows when the piece measures 34-35-36-37-38-39 cm, at the beginning of each row from the right side: 2-3-4-5-5-5 stitches 1 time, 2 stitches 0-0-0-1-2-4 times and 1 stitch 1-2-2-2-2-2 times. When the V-neck and armhole are finished there are 26-27-29-30-30-31 stitches on the shoulder. Continue working until the piece measures 54-56-58-60-62-64 cm. Cast off. SLEEVES: Cast on 54-57-60-66-69-72 stitches (including 1 edge stitch on each side) with circular needle size 4.5 mm and 1 strand of each quality (= 2 strands). Work rib from the right side as follows: 1 edge stitch in garter stitch, A.1 until there are 2 stitches left, work the first stitch in A.1 so the rib is symmetrical and 1 edge stitch in garter stitch. Continue this rib for 5 cm. Knit 1 row from the right side where you decrease 12-13-13-16-16-16 stitches evenly spaced = 42-44-47-50-53-56 stitches. Change to circular needle size 5.5 mm. Work stocking stitch back and forth, with 1 edge stitch in garter stitch on each side. When the sleeve measures 7 cm, increase 1 stitch on each side – read INCREASE TIP. Repeat this increase when the sleeve measures 12-12-11-10-10-9 cm = 46-48-51-54-57-60 stitches. Continue working until the sleeve measures 19-19-16-16-16-12 cm. Now increase in the same way every 2nd row (each row from the right side) 4-4-5-5-6-6 times = 54-56-61-64-69-72 stitches. Continue working until the sleeve measures 28-28-26-26-26-23 cm (shorter measurements in larger sizes due to wider shoulders). Now work the sleeve cap at the beginning of every row on each side as follows: Cast off 2-3-4-5-5-5 stitches 1 time, 3-2-2-2-2-2 stitches 3-4-5-6-6-8 times and 6-7-6-4-6-3 stitches 1 time on both sides = 20-20-21-22-23-24 stitches. Cast off the remaining stitches. The sleeve measures approx. 34-35-34-35-35-35 cm. Work the other sleeve in the same way. ASSEMBLY: Sew the shoulder seams inside the cast-off edge. Sew the sleeves to the body, inside the 1 edge stitch on the body and the cast-off edge on the sleeve cap. Sew the sleeve and side seams in one go, inside the 1 edge stitch and down to the rib. Sew the buttons onto the left band. |
|||||||
Diagram explanations |
|||||||
|
|||||||
 |
|||||||
Have you finished this pattern?Tag your pictures with #dropspattern #softjourneycardigan or submit them to the #dropsfan gallery. Do you need help with this pattern?You'll find 30 tutorial videos, a Comments/Questions area and more by visiting the pattern on garnstudio.com. © 1982-2026 DROPS Design A/S. We reserve all rights. This document, including all its sub-sections, has copyrights. Read more about what you can do with our patterns at the bottom of each pattern on our site. |
|||||||


With over 40 years in knitting and crochet design, DROPS Design offers one of the most extensive collections of free patterns on the internet - translated to 17 languages. As of today we count 325 catalogues and 12298 patterns translated into English (UK/cm). 12298
We work hard to bring you the best knitting and crochet have to offer, inspiration and advice as well as great quality yarns at incredible prices! Would you like to use our patterns for other than personal use? You can read what you are allowed to do in the Copyright text at the bottom of all our patterns. Happy crafting!
Post a comment to pattern DROPS 230-10
We would love to hear what you have to say about this pattern!
If you want to leave a question, please make sure you select the correct category in the form below, to speed up the answering process. Required fields are marked *.