
Popular categories
Looking for a yarn?


Comments / Questions (8)
![]() Anke wrote:
Anke wrote:
Habe mir die Mühe gemacht und die Stäbchen in Reihe 6 laut dem Schema nach zu zählen und es sind 32+27+32+27+32+27=236. Und dann geht auch die Reihe 7 auf. Liebe Grüße
17.03.2026 - 00:02
![]() Anke wrote:
Anke wrote:
Nachdem ich endlich auf die Idee kam die Kommentare zu lesen, habe ich die Reihe 6 hinbekommen. Aber hänge bei Reihe 7 fest ich habe auf der Vorderseite und Rückseite unterschiedlich viele Maschenbögen. Vielleicht sollten Sie die Anleitung überarbeiten und wenigstens wenn das Muster wechselt, die Anzahl der Stäbchen oder Maschenbögen pro Runde angeben. Und den Fehler in Reihe 6 korrigieren. Vielen Dank
16.03.2026 - 17:07
![]() Adriana wrote:
Adriana wrote:
Excuses voor de slechtlopende zin over toer 6
03.02.2026 - 18:00
![]() Adriana wrote:
Adriana wrote:
Dag allemaal, ik kom niet uit met het patroon. Bij toer 6 (2x121 is 242) kom ik uit op mis ik opeens 45 (ik heb er maar 197) steken en de kolommen( tot en met toer 5) waarin gemeerderd wordt lopen schuin weg. Ik heb de laatste keer letterlijk alle steken geteld en begrijp niet waar ik fout ga. Moet er misschien vaker dan 4x gemeerderd worden per toer? Kunnen jullie aangeven hoeveel steken er per toer moeten zijn? Ik zie uit naar jullie reactie! Groetjes, Adriana
03.02.2026 - 17:59
![]() Tracey wrote:
Tracey wrote:
I am completely baffled by this pattern! It's totally confusing!
09.07.2025 - 22:40
![]() Sandra wrote:
Sandra wrote:
Guten Tag, trotz der Erklärung für Monika komme ich an dieser Stelle auch nicht weiter. Wie kommen sie auf 29 Maschen A2b? Ich bin seit gestern am zählen, kann es aber nicht nachvollziehen. Was genau häkelt man über die drei Stäbchen? Vielen Dank im Voraus. Mit freundlichen Grüßen Sandra
06.01.2024 - 10:00DROPS Design answered:
Liebe Sandra, es war nur ein Typo, es sind 28 Maschen in jedem A.2a bei den Schultern: 13+3+12 Stäbchen. Viel Spaß beim häkeln!
08.01.2024 - 10:02
![]() Robert wrote:
Robert wrote:
Bonjour, si les 3 mailles en l’air du début ne comptent pas pour une bride, on se trouve à augmenter à chaque rang? Sont-elles illustrées sur le diagramme?
24.06.2023 - 21:24DROPS Design answered:
Bonjour Robert, au début de chaque tour, on crochète 3 mailles en l'air pour commencer, mais ces 3 mailles en l'air ne remplacent pas la 1ère maille, ce n'est pas une augmentation, c'est juste le début des tours. Les augmentations sont comprises dans les diagrammes concernées + quelques autres indiquées dans les explications. Bon tricot!
26.06.2023 - 08:40
![]() Monika wrote:
Monika wrote:
Hallo liebes Team, bin am verzweifeln. Komme bei dem Modell Drops 220—23 nicht weiter. Bei Reihe 6 heißt es 3 Stäbchen in den Luftmaschenraum Schultern . Wie geht es dann in Reihe 7 weiter bei den Schultern und den 3 Stäbchen , dass ich auf die 121 Maschen komme ? Bin kein blutiger Anfänger aber nach 5 x neu anfangen etwas gefrustet. Lieben Dank Monika
24.02.2023 - 22:49DROPS Design answered:
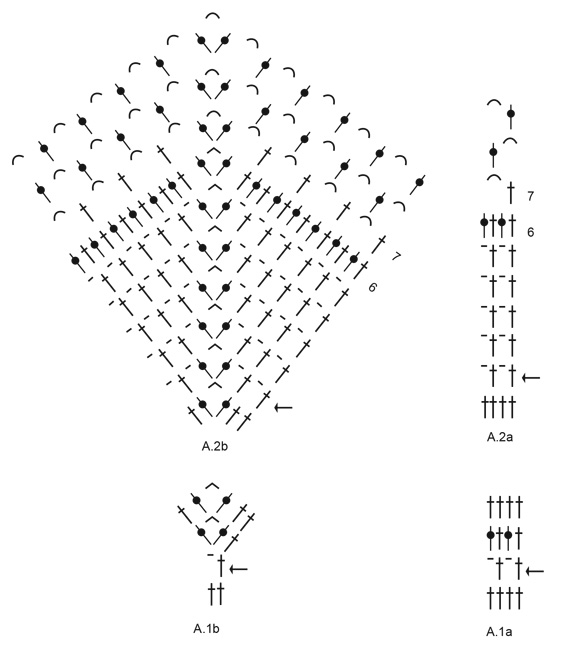
Liebe Monika, bei der 6. Reihe häkeln Sie 3 Stäbchen um die Luftmaschenbogen in der Mitte von A.2a und bei der 7. Reihe häkeln Sie jetzt A.2a zwischen beide A.2b mitte Vorne und am Rücken. Es sind: 32 Maschen A.2a + 29 M A.2b+32 M A.2a + (13+3+12) M A.2b (1. Schulter) + 32 M A.2a+ 29 M A.2b + 32 M A.2a + (13+3+12) M A.2b (2. Schulter) =32+29+32+28+32+29+32+28=242 = 121 Stäbchen zwischen Mitte Vorne und Rücken. Viel Spaß beim häkeln!
27.02.2023 - 09:26
|
||||||||||||||||
Bee Made#beemadeponcho |
||||||||||||||||
 |
 |
|||||||||||||||
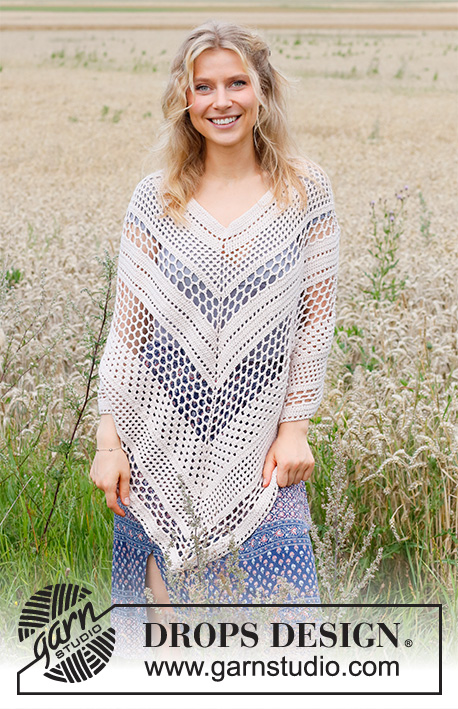
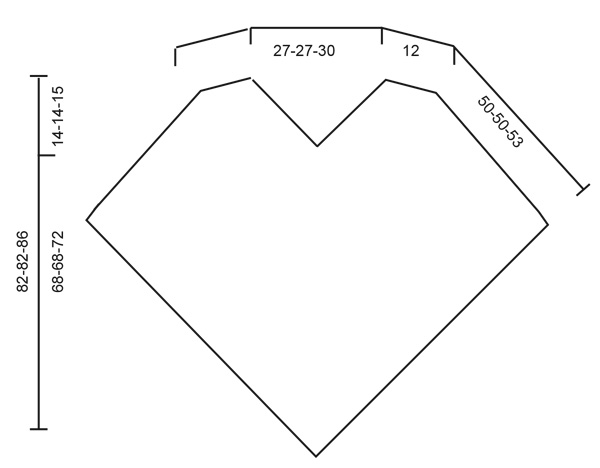
Crocheted poncho in DROPS Cotton Merino. The piece is worked top down, with lace pattern. Sizes S - XXXL.
DROPS 220-23 |
||||||||||||||||
|
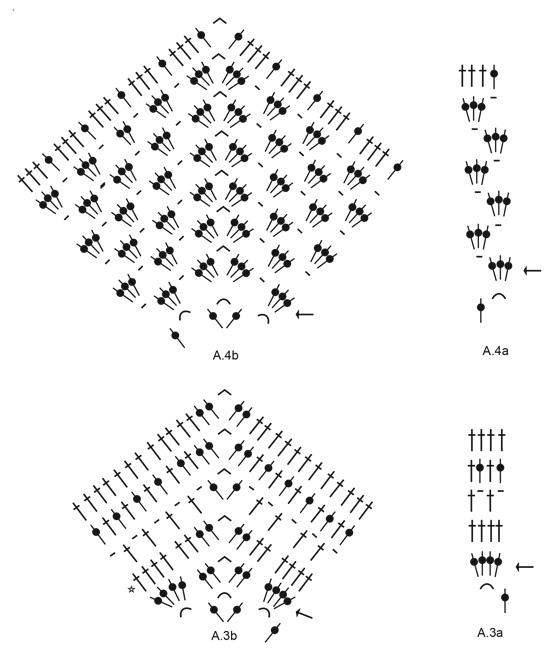
------------------------------------------------------- EXPLANATIONS FOR THE PATTERN: ------------------------------------------------------- CHAIN STITCH: If you work outermost on the hook the chain stitch will often be too tight; 1 chain stitch should be as long as 1 treble crochet is wide. CROCHET INFORMATION: At the beginning of a round of treble crochets, work 3 chain stitches. These chain stitches do not replace the first treble crochet but are in addition. The round finishes with 1 slip stitch in the 3rd chain stitch at the beginning of the round. PATTERN: See diagrams A.1 to A.4. The arrow shows the first round to be crocheted in the diagram. INCREASE TIP: Increase 1 treble crochet by working 2 treble crochets in one stitch. ------------------------------------------------------- START THE PIECE HERE: ------------------------------------------------------- PONCHO – SHORT OVERVIEW OF THE PIECE: The piece is worked in the round, top down. First you increase mid-front, mid back and on each shoulder. Then just mid-front and mid-back. NECK: Work 137-137-153 chain stitches – read CHAIN STITCH with hook size 4 mm and Cotton Merino. Form them into a ring with 1 slip stitch in the first chain stitch. Work 3 chain stitches – read CROCHET INFORMATION, then 1 treble crochet in each of the 136-136-152 chain stitches. Insert a marker thread at the beginning of the round. Allow the thread to follow your work onwards – it marks the beginning of the round. Now work pattern as follows: A.1a over the first 32-32-36 stitches (= 8-8-9 repeats of 4 stitches), A.1b over the next 2 stitches (= mid-back), A.1a over the next 32-32-36 stitches (= 8-8-9 repeats of 4 stitches), A.1b over the next 2 stitches (= right shoulder), A.1a over the next 32-32-36 stitches (= 8-8-9 repeats of 4 stitches), A.1b over the next 2 stitches (= mid-front), A.1a over the next 32-32-36 stitches (= 8-8-9 repeats of 4 stitches), A.1b over the next 2 stitches (= left shoulder), REMEMBER THE CROCHET TENSION! When A.1a and A.1b have been completed, continue with A.2a over A.1a and A.2b over A.1b. When you have completed round 5 in the diagrams, the increases on the shoulders are finished. On the next round (= round 6 in the diagrams) continue the pattern, but over the second and fourth increase (i.e. on the shoulders) work 3 treble crochets around the chain-space in the middle of the shoulder = 121-121-129 treble crochets on each side between the increases mid-front and mid-back. Continue working until A.2a and A.2b are finished (= 33-33-35 chain-spaces between the chain-spaces mid-front and mid-back). Now continue as follows: Work A.3a until there is 1 chain-space left before the increase mid-back, A.3b over the next 3 chain-spaces, A.3a until there is 1 chain-space left before the increase mid-front, A.3b over the next 3 chain-spaces and A.3a to the end of the round. When the diagrams are finished, there are 152-152-160 treble crochets on each side of the increases mid-front and mid-back. Now repeat rows 3 and 4 in the diagrams 1 more time, at the same time on row 4 increase 6 treble crochets on the round – 3 treble crochets on each side of the increases mid-front and mid back – read INCREASE TIP = 163-163-171 treble crochets on each side of the increases mid-front and mid back. Now work 1 slip stitch in each of the first 3 stitches on the round; this is so the pattern will fit on the round. Continue from round 7 (marked in the diagrams) as follows: Work A.2a until there are 14 treble crochets left before the increase mid-back, A.2b (= increase), A.2a until there are 14 treble crochets left before the increase mid-front, A.2b (= increase), A.2a to the end of the round. Continue like this. When the 3 rounds of chain-spaces have been worked, repeat the last round in the diagrams until you have a total of 6 rounds of chain-spaces = 48-48-49 chain-spaces between the increases mid-front and mid-back. Then continue as follows: Work A.4a until there is 1 chain-space left before the increase mid-back, A.4b over the next 3 chain-spaces (= increase), A.4a until there is 1 chain-space left before the increase mid-front, A.4b over the next 3 chain-spaces (= increase), A.4a to the end of the round. When the diagrams have been completed, there are 221-221-229 treble crochets on each side of the increases mid-front and mid back. The piece measures approx. 40 cm along the increase mid-back in all sizes. Now work 1 slip stitch in each of the first 2 stitches; this is so the pattern will fit on the round. Continue as follows: Work A.2a until there are 3 treble crochets left before the increase mid-back, A.2b (= increase), A.2a until there are 3 treble crochets left before the increase mid-front, A.2b (= increase), A.2a to the end of the round. When the diagrams have been completed, there are 64-64-66 chain-spaces between the increases mid-front and mid-back. Continue as follows: Work A.3a until there is 1 chain-space left before the increase mid-back, A.3b (= increase), A.3a until there is 1 chain-space left before the increase mid-front, A.3b (= increase), A.3a to the end of the round. Finish the different sizes as follows: Sizes S/M and L/XL: When round 3 in the diagrams has been worked the poncho is finished. Cut and fasten the strand. Size XXL/XXXL: When the diagrams have been completed, work round 3 one more time. Finish the round with 1 slip stitch. Cut and fasten the strand. NECK: Work 1 treble crochet in each chain stitch around the neck – remember CROCHET INFORMATION. Cut and fasten the strand. |
||||||||||||||||
Diagram explanations |
||||||||||||||||
|
||||||||||||||||
 |
||||||||||||||||
 |
||||||||||||||||
 |
||||||||||||||||
Have you finished this pattern?Tag your pictures with #dropspattern #beemadeponcho or submit them to the #dropsfan gallery. Do you need help with this pattern?You'll find 7 tutorial videos, a Comments/Questions area and more by visiting the pattern on garnstudio.com. © 1982-2026 DROPS Design A/S. We reserve all rights. This document, including all its sub-sections, has copyrights. Read more about what you can do with our patterns at the bottom of each pattern on our site. |
||||||||||||||||


With over 40 years in knitting and crochet design, DROPS Design offers one of the most extensive collections of free patterns on the internet - translated to 17 languages. As of today we count 324 catalogues and 12290 patterns translated into English (UK/cm). 12290
We work hard to bring you the best knitting and crochet have to offer, inspiration and advice as well as great quality yarns at incredible prices! Would you like to use our patterns for other than personal use? You can read what you are allowed to do in the Copyright text at the bottom of all our patterns. Happy crafting!
Post a comment to pattern DROPS 220-23
We would love to hear what you have to say about this pattern!
If you want to leave a question, please make sure you select the correct category in the form below, to speed up the answering process. Required fields are marked *.