
Populaarsed kategooriad
Otsid lõnga?


Kommentaarid / Küsimused (168)
Debbie kirjutas:
I understand where the markers are placed but what I don't understand is how you can knit 2 tog. when there is only one stitch before the marker because this is the beginning of the round
21.10.2014 - 16:07DROPS Design vastas:
Dear Debbie, to decrease 1 st before marker, work until 2 sts remain before marker and work K2 tog, so that you will work last st on round tog with 1st st next round at the beg of round. Happy knitting!
21.10.2014 - 17:07Debbie kirjutas:
My problem is with the decrease round. You say to decrease 1 stitch before the first marker by knitting 2 together but the 1st stitch before the marker is the beginning of the round (beginning ofA3 pattern). I am not sure how I should be decreasing.
20.10.2014 - 22:17DROPS Design vastas:
Dear Debbie, markers are place here to work the dec for toe, 1st marker will be between 1st and 2nd st in A.3, and you will dec 1st before 1st marker (see next paragraph where decreases are explained). Happy knitting!
21.10.2014 - 09:58
![]() Bev kirjutas:
Bev kirjutas:
What is meant by A.a in the pattern. It is mentioned after working in the round after A.2 has ben worked 1 time vertically. " work A.a until piece measures 61/2/ 71/2, 81/2 inches. I have read over this pattern multiple times and I cannot find what this refers to. Please respond as I am at that point in the construction
20.10.2014 - 02:56DROPS Design vastas:
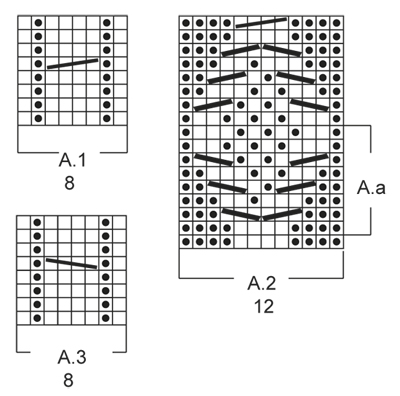
Dear Bev, when you have worked diagram A.2 1 time vertically (all rows in diagram), start again on 2nd row in A.2 working the A.a part (framed on the side). Happy knitting!
20.10.2014 - 10:37
![]() Barb kirjutas:
Barb kirjutas:
I am having trouble going from straight to in the round. Could you tell me exactly where in the pattern Is the first stitch in the beginning of the round and are the 12 stitches in chart A2 all worked together? Sorry if this is obvious but I just can't get my head around this.
14.10.2014 - 18:04DROPS Design vastas:
Dear Barb, when working straight, row from RS starts and ends with P4, join in the round on a RS row casting on 4 sts between the first and last P4 = you get P12 for the upper foot. Rounds will then start there (after cast on), continue then in the round in pattern as before and work A.2 over the P12 (end of round). Happy knitting!
15.10.2014 - 08:33
![]() Debbie kirjutas:
Debbie kirjutas:
Do you have a video for this slipper?
14.10.2014 - 16:31DROPS Design vastas:
Dear Debbie, you will find all relevant videos to these slippers under the tab "videos" at the right side of the picture. Remember you can ask any question here or contact your DROPS store for any individual assistance. Happy knitting!
14.10.2014 - 16:57
![]() Debbie kirjutas:
Debbie kirjutas:
What do you mean by work one row vertically?
12.10.2014 - 19:58DROPS Design vastas:
Dear Debbie, when it says "When A.2 has been worked 1 time vertically" it means you have to work 1 time in height all rows of diagram A.2. Happy knitting!
13.10.2014 - 10:12
![]() Debbie Clarke kirjutas:
Debbie Clarke kirjutas:
When you say to cast on 4 stitches and then work them, are the purled or knitted? Also I am not sure where you should join for in the round. Is the start of the round before or after the 4 stitches?
12.10.2014 - 17:27DROPS Design vastas:
Dear Mrs Clarke, the 4 sts are cast on at the end of a row from RS and then continue in the round - beg of round will be then after the new 4 sts. Happy knitting!
13.10.2014 - 10:03
![]() Sue kirjutas:
Sue kirjutas:
I love the pictures but your patterns are so hard to follow! They are not clearly written. Maybe if you write it out by rows instead of a paragraph?
06.09.2014 - 14:33
![]() Corinna kirjutas:
Corinna kirjutas:
Hallo liebes Drops Team, wenn im Muster A2 steht: "1 M auf eine Hilfsnadel hinter die Arbeit legen, 2 M re, 1 M li/re von der Hilfsnadel" bzw. "2 M auf eine Hilfsnadel vor die Arbeit legen, 1 M li/re, 2 M re von der Hilfsnadel" was ist dann mit li/re gemeint. Woher weiß ich, ob ich links oder rechts stricken soll? Vielen Dank vorab :)
20.08.2014 - 22:22DROPS Design vastas:
Liebe Corinna, das ergibt sich aus dem Muster. Sie stricken die M so, wie sie erscheinen. Also je nachdem, ob Sie eine linke oder rechte M auf die Hilfsnadel gelegt haben, stricken Sie diese links oder rechts.
21.08.2014 - 09:30
![]() Johanna kirjutas:
Johanna kirjutas:
I finished my pair a few weeks ago and I love them! My husband wants me to make a pair for him and two friends have asked for the pattern, so that they can make their own =) It seems like Drops have created another winner!
07.08.2014 - 14:48
|
|||||||||||||||||||
Celtic Dancer#celticdancerslippers |
|||||||||||||||||||
 |
 |
||||||||||||||||||
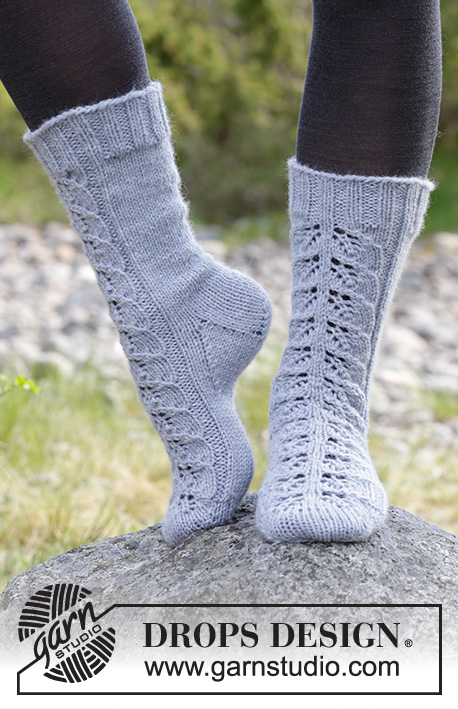
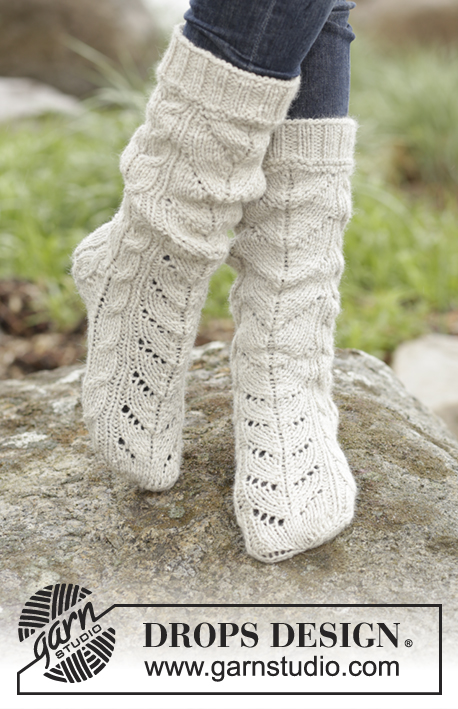
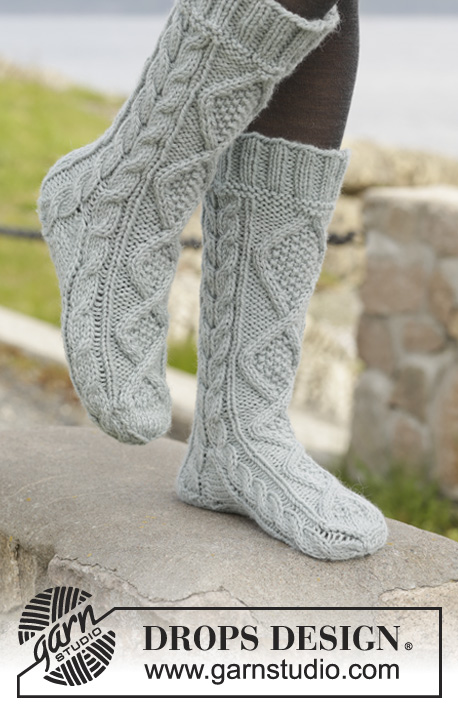
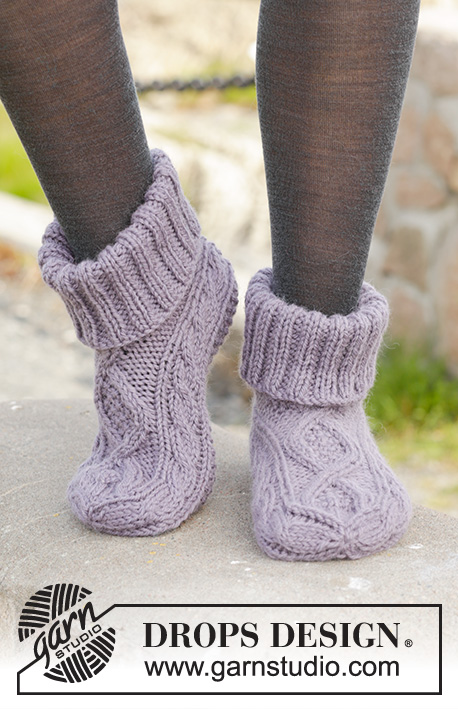
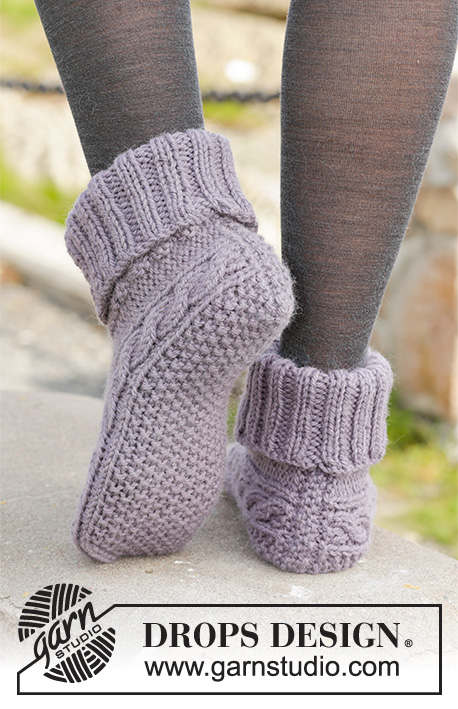
DROPS Nepal lõngast kootud palmikutega sussid suurustele 35 kuni 43
DROPS 156-55 |
|||||||||||||||||||
|
MUSTER Vaata skeeme A.1-A.3. Skeem on näidatud töö paremalt poolt (PP) ja näitab iga rida. KAHANDAMISE NIPP Kahanda 1 s enne silmusemärkijat (SM) järgmiselt: 2 pr kokku. Kahanda 1 s pärast SM-i: 2 pr keerdsilmustena kokku. RIPSKUDE (edasi-tagasi kududes): koo kõik read parempidi. 1 ripsivall = 2 rida parempidi. PÄRLKUDE 1. RIDA/RING: *1 pr, 1 ph *, korda * kuni *. 2. RIDA/RING: koo ph silmus parempidi ja pr silmus pahempidi. Korda 2. ringi. MÕÕTMISE NIPP Mõõda mööda skeemi A.1/A.3 palmikut. ------------------------- SUSSID Kootakse edasi-tagasi, alustades tagant keskelt. Loo 5 mm vardale 33-33-35 s Nepal lõngaga (jäta u. 20 cm pikkune lõngajupp õmblemiseks). Koo 2 rida ripskoes - vaata ülevalt, SAMAL AJAL kasvata viimasel real 4 s ühtlaste vahedega = 37-37-39 s. Järgmine rida töö PP: 4 ph, skeem A.3 (= 8 s), 13-13-15 s PÄRLKOES – vaata ülevalt, skeem A.1 (= 8 s), lõpetuseks tee 4 ph. Jätka niimoodi mustriga, kududes ph silmused töö PH pool parempidi. Korda skeemi A.1 ja A.3 kuni lõpuni. JÄLGI KOETIHEDUST! Kui töö pikkus on 10,5-11,5-13 cm – vaata mõõtmise nippi, jätka nii töö PP: koo 4 ph, skeem A.3, 13-13-15 s pärlkoes, skeemi A.1, 4 ph, loo 4 uut silmust, koo esimesed 4 s, RING ALGAB SIIT = 41-41-43 s. Nüüd koo ringselt sukavarrastega. Siis koo mustrit nagu enne, aga tee skeemi A.2 (= 12 s) 4 ph silmuse kohale mõlemal küljel ja 4 uue silmuse kohale. Kui skeem A.2 on tehtud 1 kord vertikaalselt, koo skeem A.a, kuni töö on 17-19-22 cm pikkune. Nüüd koo parempidises koes skeemi A.a silmuste kohale või alusta parempidist kude natuke varem. Jätka skeemiga A.1 ja A.3 kuni lõpuni. Nüüd paiguta töösse 4 silmusemärkijat (SM) järgmiselt: koo skeemi A.3, paigalda 1. SM 1. ja 2. silmuse vahele ning teine SM 7. ja 8. SM vahele skeemil A.3, koo pärlkude nagu enne, koo skeemi A.1, paigalda 3. SM 1. ja 2. silmuse vahele ning 4. SM 7. ja 8. SM vahele skeemil A.1, koo pr ülejäänud silmused (= 14 s jalapealsel, 15-15-17 s talla all ja 6 s mõlemal küljel). Nüüd kahanda varbaosa jaoks järgmisel ringil nii: kahanda 1 s pärast 2. SM-i ja 1 s enne 3. SM-i talla all kokku 0-0-1 kord – loe kahandamise nippi, koo ülejäänud silmused = 14 s jalapealsel ja 15 s talla all (= 41 s kokku). Järgmisel ringil kahanda nii: kahanda enne 1. ja 3. SM-i ja 1 s pärast 2. ja 4. SM-i (= kokku 4 s kahandatud). Korda kahandamist igal ringil 6 korda, SAMAL AJAL koo viimasel kahandamisel palmikusilmused skeemil A.1 ja A.3 järgmiselt: 2 pr keerdsilmustena kokku, 2 pr kokku. Pärast kõiki kahandusi on vardal 13 s. Töö kõrgus on u 20-22-25 cm. Katkesta lõng ja tõmba läbi ülejäänud silmuste, pinguta ja kinnita. ÜHENDAMINE Murra loomise serv pooleks (= kand), ja õmble alguse lõngajupiga kokku, servad vastastikku. SOONIK Koo soonik ringselt sukavarrastega ümber ava. Korja 4 mm varrastele 50-50-54 s Nepal lõngaga. Koo 1 ring pahempidi. Koo 1 ring parempidi, SAMAL AJAL kasvata ühtlaste vahedega 10 silmust = 60-60-64 silmust. Koo soonikut 2 pr/ 2 ph, kuni töö on u. 12-13-14 cm pikkune. Koo silmused maha soonikkoes. Keera serv tagasi. Koo ka teine suss. |
|||||||||||||||||||
Skeemi seletused |
|||||||||||||||||||
|
|||||||||||||||||||
 |
|||||||||||||||||||
Kas oled teinud seda mustrit?Lisa oma piltidele viide #dropspattern #celticdancerslippers või saada link projektile meie #dropsfan galeriisse. Vajad abi selle mustriga?Garnstudio.com kodulehel on 22 õppevideot, küsimuste/vastuste osa ja muudki. © 1982-2026 DROPS Design A/S. Kõik õigused kaitstud. See dokument, ning selle alajaotused on kaitsud autoriõigustega. Loe rohkem, mida meie mustritega võib teha, iga mustrilehe alt meie kodulehel. |
|||||||||||||||||||


Tegeledes üle 40 aasta kudumise ja heegeldamise disainidega, pakub DROPS Design ühte suurimat tasuta mustrite kollektsiooni internetis - tõlgituna 17 keelde. Tänaseks on meil 324 kataloogi ja 12290 mustrit - millest 9431 on tõlgitud Eesti keelde.
Me anname endast parima, et tuua teieni kõike mida kudumine ja heegeldamine võib pakkuda - inspiratsiooni, nõuandeid ning ka kvaliteetseid lõngu parima hinnaga! Soovid kasutada mustreid muukski, kui ainult oma tarbeks? Loe infot meie Copyright osas iga lehekülje all. Rõõmsat loomist!
Jäta kommentaar mustrile DROPS 156-55
Ootame kommentaare selle mustri kohta!
Kui soovid midagi küsida, siis kiiremaks vastuse saamiseks veendu, et valid õige kategooria alloleval formil. Vajaliku väljad *.