
Categorias populares
Procura um fio?


Comentários / Perguntas (47)
![]() Suzie Rose escreveu:
Suzie Rose escreveu:
Can I use Paintbox Simply Aran DK yarn for this garment?
10.06.2023 - 04:57DROPS Design respondeu:
Dear Suzie Rose, we unfortunately do not know this yarn, you can use our yarn converter to get alternative and new amount - or you are welcome to ask the store where you bought your yarn; they should be able to help you even per mail or telephone. Happy knitting!
12.06.2023 - 09:40
![]() Christine escreveu:
Christine escreveu:
I am knitting the 7-8yr size but when starting the daisy pattern I only have 13 repeats not the 15 stated on the pattern - I have 179 stitches on row 18. I have started this twice and stil getting the same result. It's there something I'm doing wrong ? Many thanks
02.03.2023 - 17:31DROPS Design respondeu:
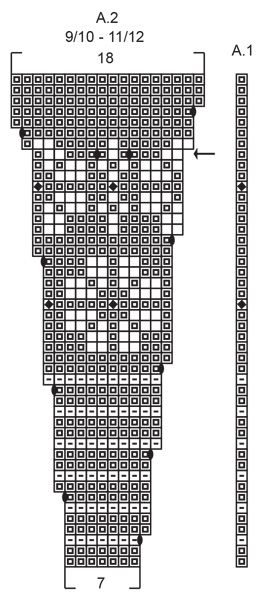
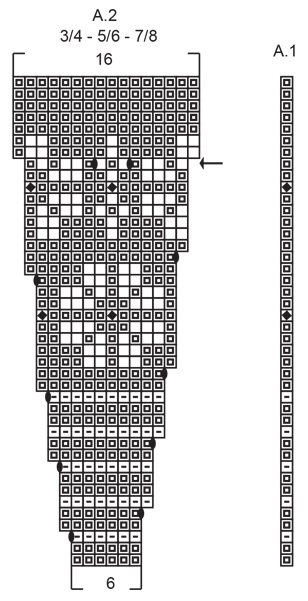
Dear Christine, in size 7/8 years there are 101 sts worked as follows, seen from RS: 5 front band sts, A.1 (= 1 st), then repeat the 6 sts in A.2 until 5 sts remain (= a total of 15 times), finish with 5 front band sts; Row 18 should be worked over 12 sts (6 sts have been increased before as shown in diagram, alternately at the end + at the beg of each A.2), so that you should have: 5 + 1 + (12x15) + 5 = 191 sts. When A.2 is done there are 16 sts in each A.2 and 251 sts in total. Adding marker between each A.2 might help you to check your number of stitches after every round. Happy knitting!
03.03.2023 - 08:52
![]() Hindle Julie escreveu:
Hindle Julie escreveu:
Please can you tell me how I know how many balls of wool to order for this pattern? Thank you. Julie
03.02.2023 - 08:51DROPS Design respondeu:
Hi Julie, if you choose for example size 7/8 years that means you will need the 3rd amount of each colour, counting from the left (under MATERIALS). Each ball weighs 50 g. Please see also the lesson DROPS HERE. Happy knitting!
03.02.2023 - 09:23
![]() Varain escreveu:
Varain escreveu:
Bonjour, Je fais le modèle en 9/10 ans. Je ne comprends pas ce que veut dire dans l’empiècement après 5 mailles de bordure devant au point mousse : A.1 au dessus de la maille suivante. (Que veut dire cette phrase) Comment procéder ? En vous remerciant Bonne journée
12.04.2022 - 17:33DROPS Design respondeu:
Bonjour Mme Varain, tricotez simplement la maille suivante en suivant le diagramme A.1 , autrement dit, sur l'endroit, terminez par A.1 avant la bordure devant et sur l'envers, commencez par A.1 après la bordure devant. Le motif sera ainsi symétrique. Bon tricot!
19.04.2022 - 08:54
![]() Karin Flodin escreveu:
Karin Flodin escreveu:
Hej, mina knapphål hamnar inte på mitten av de fem kantmaskorna. Det ser ut som att de ska vara i mitten på bilderna tycker jag. Gör jag fel?
03.02.2022 - 11:25DROPS Design respondeu:
Hej Karin. Du ska sticka ihop 2:a och 3:e maskan och sedan göra ett omslag och då ska knapphålet hamna i mitten av kantmaskorna. Mvh DROPS Design
04.02.2022 - 12:19
![]() CJ Miller escreveu:
CJ Miller escreveu:
Working on the child's cardigan, on row 22 of A.2. there is no white, only the yellow centers. Do you recommend I carry the white across row 22 from row 21 so it is in place for row 23, or stop/start the white over again on row 23. I see no other way to carry it up beyond carrying it across or cutting and restarting. Thanks for the advice and wonderful patterns.
15.10.2021 - 01:56DROPS Design respondeu:
Dear Mrs Miller, that's only 2 sts difference, you can carry the white yarn at the end of row 22 so that it's on the right place at the beg of row 23 or just carry the yarn 1 stitch before the first stitch in white at the beg of first A.2. Your yarn store might have even more tips for you, do not hesitate to ask them, even per mail or telephone. Happy knitting!
15.10.2021 - 08:07
![]() Mira Holler escreveu:
Mira Holler escreveu:
Die Maße stimmen leider nicht. Ich habe die Passe genau nach Anleitung gestrickt, aber statt der angegebenen cm-Maße erhalte ich fast 10 cm mehr. Nach Maschenprobe sind 28 Reihen = 10 cm; wenn aber A1 und A2 schon über 84 Reihen gehen, können bei der Größe 7/8 keine 16 cm für die Passe entstehen! Das passt meiner Enkelin niemals! Bin sehr enttäuscht, dass ich meine fast fertige Arbeit nun wieder aufribbeln muss.
13.04.2021 - 09:54DROPS Design respondeu:
Liebe Frau Holler, Diagramme zeigen alle Reihen, dh die Hin- sowie die Rückreihen - siehe MUSTER und hier lesen Sie mehr Über Diagramme. d.h. A.1+A.2= 42 Reihen. Sollte Ihre Maschenprobe stimmen, dann sollte di Passe auch in der Höhe stimmen. Viel Spaß beim stricken!
13.04.2021 - 11:43
![]() Kitty escreveu:
Kitty escreveu:
Just to check is each line on the chart one row of knitting, or is it 2 rows. As in knit from right side then purl from the wrong side. For example the first 6 stitches on A2 , is that knit one row right side then purl one row on the wrong side?
09.04.2021 - 17:23DROPS Design respondeu:
Dear Kitty, on the charts each row is represented by one row of small squares, thus each row is shown, however, they are showing the pattern as you would see them from the RS. So if it shows a knit stitch, that stitch should be knitted from the rs and purled from the WS. Happy Knitting!
09.04.2021 - 19:08
![]() Ingrid escreveu:
Ingrid escreveu:
I’m having trouble understanding the pattern. I love your cardigans and sweaters, but avoid them because the instructions are, in my opinion, poorly written (or translated?) My question here is: Does A 1 mean “increase”? I only got as far as “Work according to diagrams A1 and A2.” Refuse to give up because I normally never have a problem following other patterns. Thanks!
08.04.2021 - 21:04DROPS Design respondeu:
Dear Ingrid, the patterns are not "poorly written", but written in a different style than most Enlish/American knitters are used to, but most European knitters are familiar with. It is well worth to take your time, study some patterns (maybe start with a simpler one), and we are here to help, if you get stuck. A.1 in that sentence you mention means the pattern diagrams that are below the instructions, which show visually how the patterns should be knitted. Happy Knitting!
08.04.2021 - 21:48
![]() Marian Green escreveu:
Marian Green escreveu:
I have nearly completed the main piece of this jacket size 5/6 years and am delighted with the pattern so far. However I do have a query regarding the start row of the bottom rib. It states it's worked from the right side , but the previous increase row states to work from the right side. Presumably the first rib row should read work from the left side? Thank you in anticipation.😊
03.03.2021 - 16:30DROPS Design respondeu:
Dear Mrs Green, work the increase row from the right side, then turn and work the next row from the wrong side as before (= purl with the 5 front bands sts in garter stitch), then start the rib on next row from the right side. Happy knitting!
04.03.2021 - 07:35
|
|||||||||||||||||||
Daisy Delight Cardigan#daisydelightcardigan |
|||||||||||||||||||
 |
 |
||||||||||||||||||
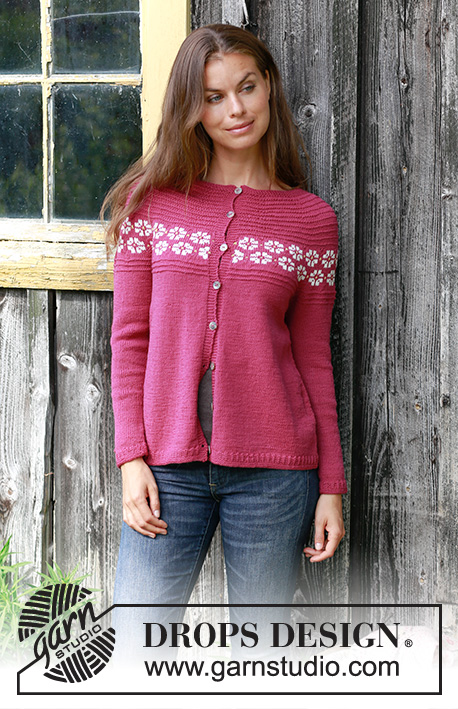
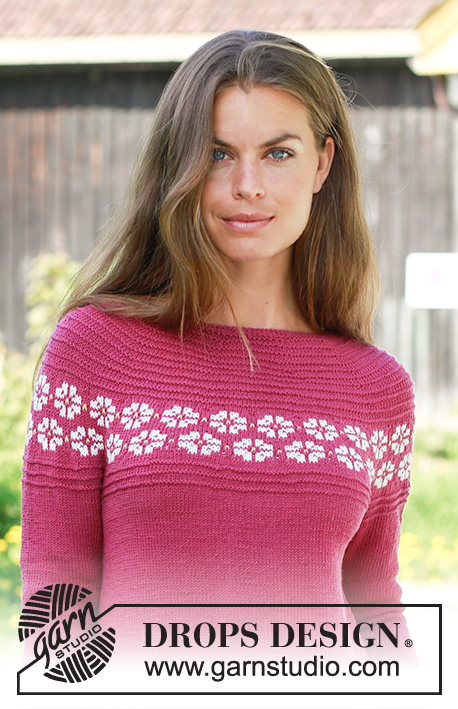
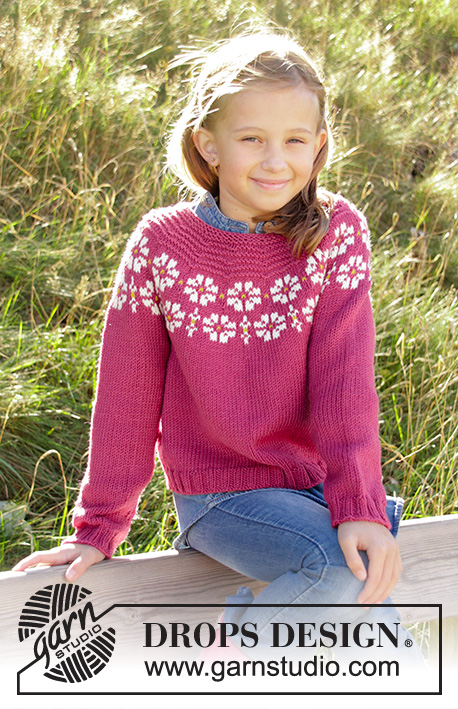
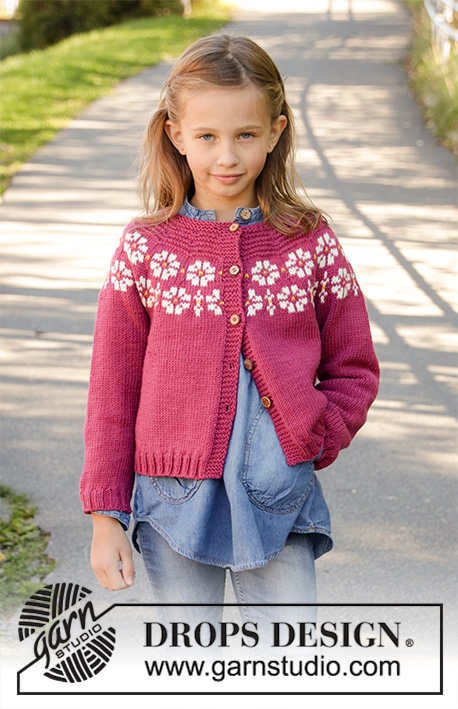
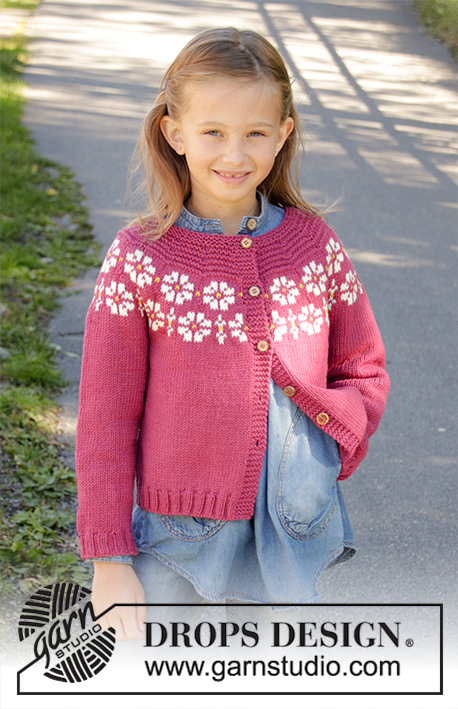
Casaco criança tricotado de cima para baixo em DROPS Merino Extra Fine, DROPS Lima ou DROPS Cotton Light, com jacquard flores, ponto jarreteira e ponto meia. Tamanhos 3 - 12 anos.
DROPS Children 34-5 |
|||||||||||||||||||
|
------------------------------------------------------- TÉCNICAS USADAS: ------------------------------------------------------- PONTO JARRETEIRA (em idas e voltas): 1 barra jarreteira = Tricotar 2 carreiras meia. PONTO FANTASIA: Ver os diagramas A.1 e A.2. Ver diagrama indicado para cada tamanho. Os diagramas mostram todas as carreiras do ponto fantasia, vistas pelo direito. AUMENTOS-1 (a intervalos regulares): Para calcular quando aumentar a intervalos regulares, contar o número total de malhas (por ex. 72 malhas) e dividi-lo pelo número de aumentos a fazer (por ex. 17) = 4.2. Neste exemplo, vai-se aumentar fazendo 1 laçada depois de cerca de cada 4.ª malha. Na carreira seguinte, tricotar as laçadas torcidas para evitar buracos. AUMENTOS-2 (lados costas/frentes): Tricotar até restar 1 malha antes do fio marcador, fazer 1 laçada, tricotar 2 malhas meia (o fio marcador fica entre estas 2 malhas), 1 laçada = aumenta-se 2 malhas. Na carreira seguinte, tricotar as laçadas torcidas para evitar buracos. Tricotar então os aumentos em ponto meia. DIMINUIÇÕES (mangas): Diminuir 1 malha de cada lado do fio marcador da seguinte maneira: Tricotar até restarem 3 malhas antes do fio marcador, 2 malhas tricotadas juntamente em meia, 2 malhas meia (o fio marcador fica entre estas 2 malhas), deslizar 1 malha em meia, 1 malha meia e passar a malha deslizada por cima da malha tricotada = diminui-se 2 malhas. CASAS: Fazer as casas na orla da frente direita (quando se usa o casaco). 1 casa = começando pelo avesso, tricotar juntamente em meia a 2.ª e a 3.ª malha a partir do rebordo, fazer 1 laçada. Na carreira seguinte, tricotar a laçada em meia para formar um buraco. Fazer a primeira casa a 1 cm na gola, e fazer as 4-4-5-5-5 outros casas com um espaço de 6-6-6-7-7 cm entre elas. ------------------------------------------------------- A PEÇA COMEÇA AQUI: ------------------------------------------------------- CASACO – SUMÁRIO DA PEÇA: Tricota-se de cima para baixo, em idas e voltas na agulha circular, As frentes e as costas tricotam-se em idas e voltas. As mangas tricotam-se em redondo com a pequena agulha circular/as agulhas de pontas duplas. ENCAIXE: Montar 72-76-80-86-92 malhas com a agulha circular 4 mm e o fio da cor urze/ocre/amarelo. Tricotar 2 BARRAS JARRETEIRA – ver acima – não esquecer as CASAS na orla da frente direita – ver acima. Tricotar então 1 carreira meia aumentando 17-19-21-23-24 malhas a intervalos regulares – VER AUMENTOS-1! = 89-95-101-109-116 malhas. Tricotar , então, 1 carreira meia pelo avesso. Colocar 1 marcador nesta carreira e medir a partir daqui. Tricotar seguindo os diagramas A.1 e A.2 pelo direito da seguinte maneira: 5 malhas de orla da frente em ponto jarreteira, A.1 por cima da malha seguinte, repetir 13-14-15-14-15 vezes A.2 ao todo e terminar com 5 malhas de orla da frente em ponto jarreteira. MANTER A MESMA TENSÃO DA INDICADA PARA A AMOSTRA! Quando A.1 e A.2 estão terminados, temos 219-235-251-263-281 malhas. Na carreira seguinte pelo direito, aumentar 3-3-5-1-5 malhas a intervalos regulares = 222-238-256-264-286 malhas. Continuar em ponto meia com 5 malhas de orla da frente em ponto jarreteira de cada lado da peça até a peça medir 15-15-16-17-18 cm a partir do marcador. Tricotar a carreira seguinte pelo direito da seguinte maneira: 5 malhas de orla da frente em ponto jarreteira, 31-33-36-37-38 malhas em ponto meia (= frente), colocar as 44-48-51-53-62 malhas seguintes em espera num fio (= manga), montar 6 malhas sob a manga, tricotar 62-66-72-74-76 malhas em ponto meia (= costas), colocar as 44-48-51-53-62 malhas seguintes em espera num fio (= manga), montar 6 malhas, tricotar 31-33-36-37-38 malhas (= frente) e 5 malhas de orla da frente em ponto jarreteira. COSTAS & FRENTES: Temos 146-154-166-170-174 malhas. MEDIR A PEÇA A PARTIR DAQUI!! Colocar 1 fio marcador a meio das 6 malhas montadas sob cada manga. Tricotar em ponto meia em idas e voltas, com 5 malhas de orla da frente em ponto jarreteira de cada lado da peça. Quando a peça medir 3 cm, aumentar 1 malha de cada lado de cada marcador (= aumenta-se 4 malhas) VER AUMENTOS–2! Repetir estes aumentos 3 vezes ao todo a cada 3-4-5-6-7 cm = 158-166-178-182-186 malhas. Continuar como antes até a peça medir 12-16-19-22-25 cm. Tricotar 1 carreira pelo direito aumentando 10-10-10-10-10 malhas a intervalos regulares (não aumentar por cima das orlas de abotoamento) = 168-176-188-192-196 malhas. Tricotar a carreira seguinte pelo direito da seguinte maneira: 5 malhas de orla da frente em ponto jarreteira, 2 malhas liga, *2 malhas meia, 2 malhas liga*, repetir de * a * até restarem 5 malhas e terminar com 5 malhas de orla da frente em ponto jarreteira. Continuar em canelado desta maneira durante 3 cm. Na carreira seguinte pelo direito arrematar as malhas como elas se apresentam: em ponto jarreteira por cima do ponto jarreteira, em meia por cima das malhas meia e em liga por cima das malhas liga. Cortar e entretecer o fio. MANGAS: Retomar as malhas de um dos fios para a pequena agulha circular/as agulhas de pontas duplas 4 mm (= 44-48-51-53-62 malhas) e levantar 1 malha em cada uma das 6 malhas montadas sob a manga (= 50-54-57-59-68 malhas). Colocar 1 fio marcador a meio destas 6 malhas. Tricotar em ponto meia em redondo durante 2 cm. Diminuir , então, 1 malha de cada lado do fio marcador – VER DIMINUIÇÕES. Continuar em ponto meia e repetir estas diminuições 5-7-7-8-10 vezes ao todo a cada 4-3½-4-4-3½ cm = 40-40-43-43-48 malhas. Continuar em ponto meia até a manga medir 22-27-30-34-37 cm. Tricotar 1 carreira aumentando 4-4-5-5-4 malhas a intervalos regulares = 44-44-48-48-52 malhas. Tricotar em canelado 2 malhas meia / 2 malhas liga durante 3 cm. Arrematar frouxamente as malhas como elas se apresentam. Cortar e entretecer o fio. Tricotar a outra manga da mesma maneira. MONTAGEM: Costurar a abertura sob as mangas. Costurar os botões na orla da frente esquerda. |
|||||||||||||||||||
Explicações do diagrama |
|||||||||||||||||||
|
|||||||||||||||||||
 |
|||||||||||||||||||
 |
|||||||||||||||||||
 |
|||||||||||||||||||
Terminou este projecto?Então, identifique as suas fotos com as tags #dropspattern #daisydelightcardigan ou mostre-as na galeria #dropsfan. Precisa de ajuda para este modelo?Encontrará 31 turotiais em vídeo, uma rubrica Comentários/Perguntas e muito mais ao visitar a página do modelo em www.garnstudio.com © 1982-2026 DROPS Design A/S. Todos os direitos reservados. Este documento, incluuindo as suas su-secções, tem copyrights. Saia mais o que pode fazer com os nossos modelos no fim de cada uma das páginas do nosso site. |
|||||||||||||||||||


Com mais de 40 anos no design de modelos de tricô e de croché, a DROPS Design oferece uma das mais vastas colecções demodelos gratuitos na Internet - traduzidos em 17 línguas. Neste dia de hoje, temos 324 catálogos e 12290 modelos - dos quais 12271 estão traduzidos em português.
Trabalhamos com muito empenho para lhe proporcionar o melhor que o tricô e o croché têm para oferecer, para lhe fornecer inspiração e conselhos bem como fios da mais elevada qualidade a preços incríveis! Gostaria de usar os nossos modelos para outros fins que não uso pessoal? Pode ler o que lhe é permitido fazer no Copyright texto que se encontra na parte de baixo de todos os nossos modelos. Bom tricô! Bom croché!
Deixe um comentário acerca do modelo DROPS Children 34-5
Gostaríamos muito de saber o que tem a dizer-nos acerca deste modelo!
Se deixar uma pergunta acerca do modelo, certifique-se de que escolhe a categoria adequada no formulário abaixo para acelerar o processo relativo à resposta. Os campos obrigatórios estão assinalados com um *.