
Categorias populares
Procura um fio?


Comentários / Perguntas (127)
![]() Dominique escreveu:
Dominique escreveu:
Bonjour Il est dommage que les commentaires ne soient pas traduits en français ça nous aiderait surement J adore vos modeles
07.04.2026 - 14:40DROPS Design respondeu:
Bonjour Dominique, nous ne sommes malheureusement pas en mesure de pouvoir proposer une traduction de toutes les langues dans toutes les langues; vous pouvez éventuellement utiliser un traducteur en ligne pour vous donner une idée des questions/réponses ou commentaires, ou bien simplement utiliser cet espace pour poser votre propre question pour que nous puissions vous aider. Bon tricot!
08.04.2026 - 13:48
![]() Houx escreveu:
Houx escreveu:
Bonjour Je fait ce modèle et je ne arrive pas à avoir le nombre de mailles données à la fin du diagramme j ai refait trois fois déjà y a t il une erreur? Merci de votre retour
06.04.2026 - 19:07DROPS Design respondeu:
Bonjour Mme Houx, mettez bien un marqueur entre chaque motif à répéter tout le tour pour pouvoir bien vérifier les augmentations et n'en omettre aucune; vous devez commencer par 6-6-7-7-7-7-7 mailles au début de A.1 et augmenter comme indiqué dans le diagramme 10-10-12-12-13-13-13 m dans chaque A.1 pour terminer le diagramme avec 16-16- 19-19-20-20-20 m dans chaque A.1. Bon tricot!
08.04.2026 - 12:33
![]() Annelie escreveu:
Annelie escreveu:
Har försökt ett otal ggr att sticka strl 3-4. Enligt beskr 77 maskor, 11 rapporter. Varv 1 på A1 öka 1 maska 11 ggr blir 88 maskor. Varv 2 stämmer men varv 3 går inte att få så rapporterna stämmer. Är det meningen att rapporterna inte ska löpa in i varandra på baksidan. Har stickat och repat upp ett antal ggr nu.
12.02.2026 - 21:17DROPS Design respondeu:
Hei Annelie. Når du starter på varv 3 starter du med 2 sennep og avslutter rapporten med 1 sennep, så da skal rapporten stemme (du får 3 sennepsgule masker etterhverandre), men når du starter på 4 varv vil du få 1 kast (økning) på annenhvert felt med 3 rett masker i natur, og det skal det være. mvh DROPS Design
13.02.2026 - 09:42
![]() Erna escreveu:
Erna escreveu:
Heel leuk truitje, maar ik kan bij dit patroon de meerdering niet vinden.
02.02.2026 - 15:51DROPS Design respondeu:
Dag Erna,
De meerderingen voor de pas zijn opgenomen in het telpatroon. Dus als je gewoon het telpatroon breit op de pas, dan meerder je automatisch.
03.02.2026 - 21:38
![]() Philippa Carey escreveu:
Philippa Carey escreveu:
I am having trouble setting the pattern here. How do you incorporate the increased stitches into the pattern. The diagram doesn’t show that. When referring to background colour using your mustard and off white I assume mustard is the background colour. Please confirm
02.02.2026 - 15:34DROPS Design respondeu:
Hi Philippa, The increases are the yarn overs at the beginning and end of each increase-row in diagram A.1 and the diagram is repeated on the round the correct number of times for your size. The diagram also shows you how to continue the pattern above each yarn over (all yarn overs are worked through the back loop on the next round to avoid holes). The background colour in the pattern is Mustard. Regards, Drops Team.
03.02.2026 - 07:38
![]() Erika escreveu:
Erika escreveu:
Hej! När jag ska göra omslag på en rad som bara har färgen natur, ska omslaget trots detta göras i bottenfärgen (senap)?
01.02.2026 - 16:39DROPS Design respondeu:
Hej Erika, hvis du strikker i natur, laver du omslaget i natur, hvis du strikker i mønsterfarve, så laver du omslaget i mønsterfarve :)
02.02.2026 - 15:07
![]() Ek escreveu:
Ek escreveu:
Hei! Eikös tuo niskaan tulevan korotuksen neulominen ole neuvottu väärinpäin? Eli kun neulotaan paitaa ylhäältä alaspäin, korotus aloitetaan lyhyellä kierroksella, seuraava on vähän pidempi jne.
26.01.2026 - 10:02DROPS Design respondeu:
Hei, tarkistamme tämän ohjeen ja teemme siihen tarvittaessa korjauksen.
03.02.2026 - 17:56
![]() Dörte escreveu:
Dörte escreveu:
Liebes Drops Design, ich hätte zwei Fragen zu dem schönen Pullover in Größe 92. 1. In Reihe 14, wo die Rauten beginnen, soll ich Maschen innerhalb des Musters aufnehmen. Dann passt es aber nicht mehr zusammen. Auch die Aufnahmen davor sind zu wenig für die erste Reihe des Musters. 2. Dann komme ich beim Überschlagen der Aufnahmen nicht von 72 auf 192 sondern auf 200. Kann dies sein? Vielen Dank.
10.01.2026 - 17:10DROPS Design respondeu:
Liebe Dörte, die Zunahmen sollen Sie genau so wie im Diagram stricken, dh entweder am Anfang von jedem A.1 (bei der 1. Runde z.B) oder am Ende von jedem A.1 (1. Runde z.B.) - (bnur bei der 1. Reihe wird man jeweils 2 Maschen zunehmen, dann wird nur 1 M in jedem Diagram zugenommen). Setzen Sie Markierer zwischen jedem A.1 so folgen Sie am besten das Muster, das dann genauso wie beim Diagram aussehen wird. Viel Spaß beim Stricken!
12.01.2026 - 10:19
![]() Ailika escreveu:
Ailika escreveu:
Ich habe den wunderschönen Pullover in der Größe 9/10 mit dem angegebenen Garn und passender Maschenprobe gestrickt. Die Angabe zum Garnbedarf stimmt nicht: Er war (knapp) 350 in der Hauptfarbe und (knapp) 100 in der Musterfarbe.
20.12.2025 - 21:03
![]() Monika escreveu:
Monika escreveu:
Förstår inte hur man gör efter att man satt 46 m på en tråd för ärm. Det står att man ska lägga upp 8 m och sticka 53 m. Gör storlek 2 år
30.11.2025 - 21:41DROPS Design respondeu:
Hi Monika, at the and of yoke, you have to slip 46 stitches on 1 thread for sleeve and cast on 8 new stitches, there are 54 sts for 1 sleeve. How to proceed when dividing sts you will find in the video HERE. Happy knitting!
01.12.2025 - 16:44
|
||||||||||
Little Missy#littlemissysweater |
||||||||||
 |
 |
|||||||||
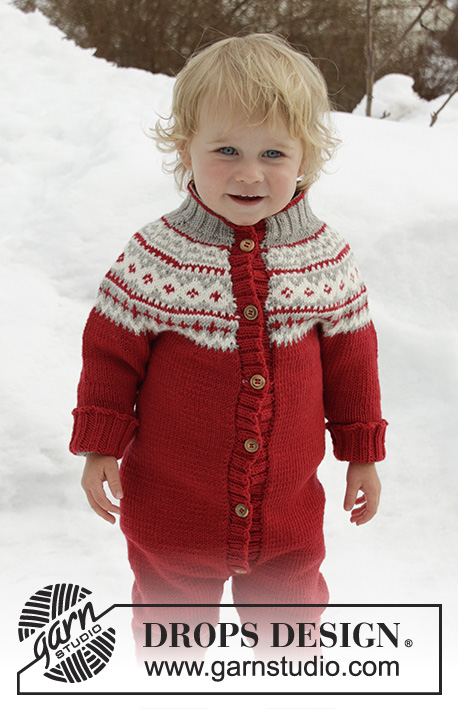
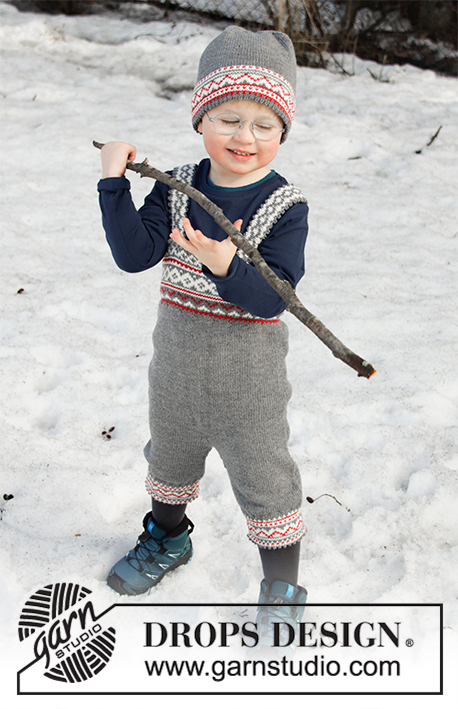
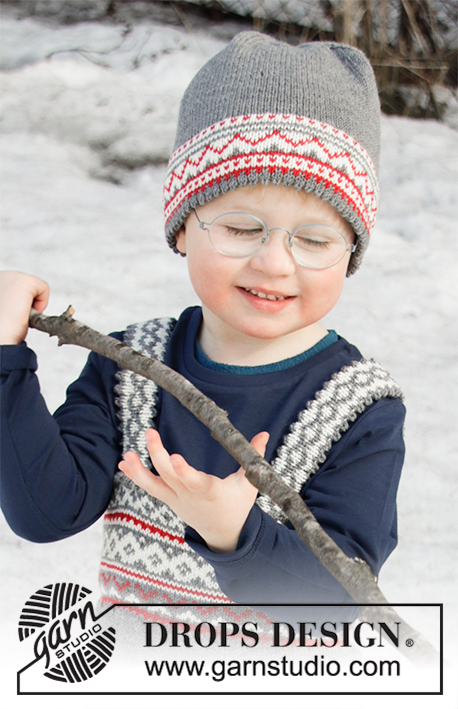
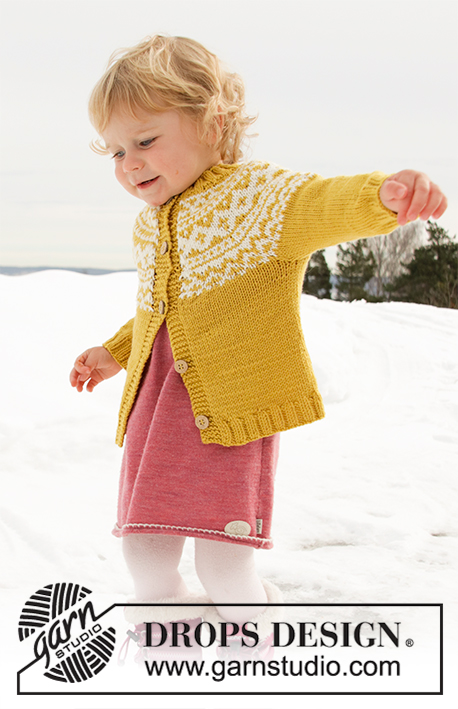
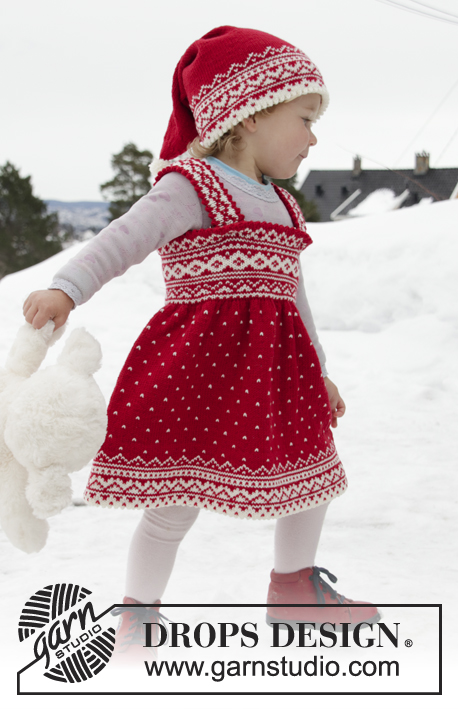
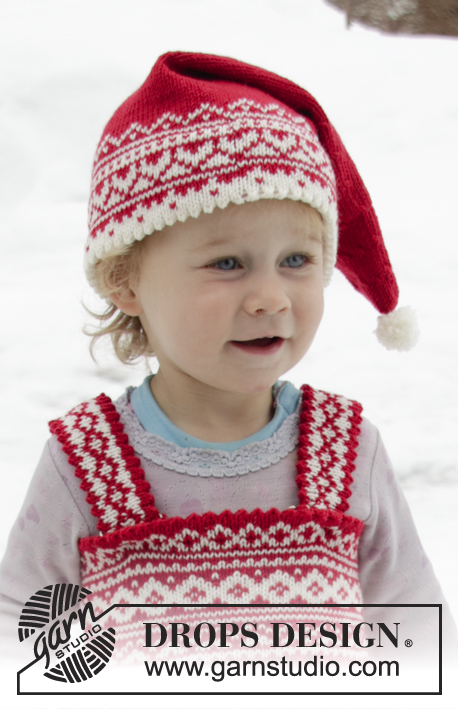
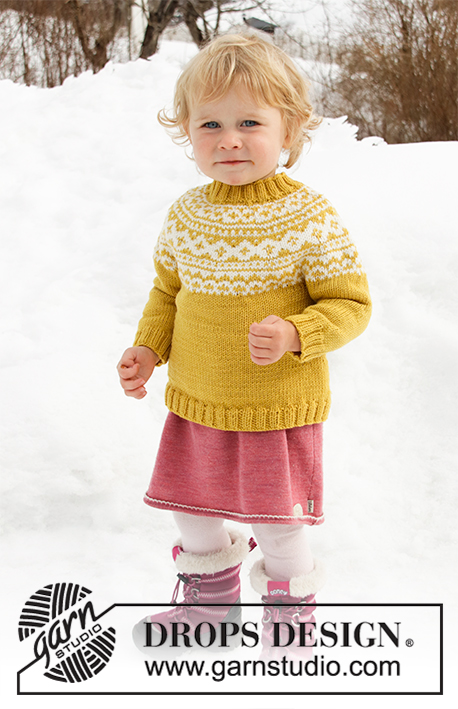
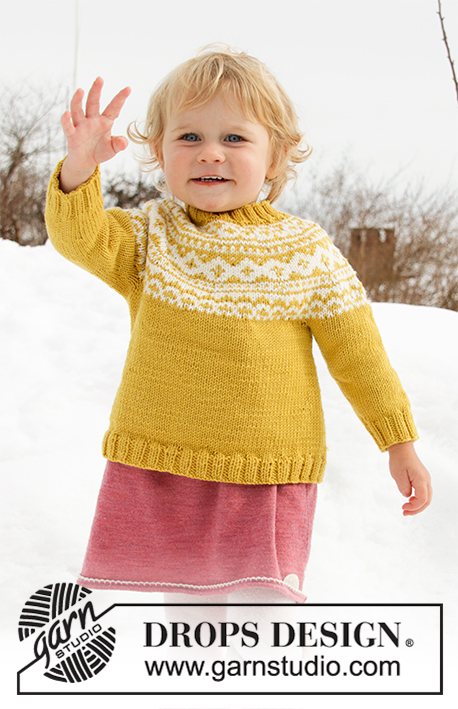
Pulôver tricotado de cima para baixo para bebé e criança em DROPS Merino Extra Fine, com encaixe arredondado em jacquard norueguês. Tamanhos 12 meses - 12 anos.
DROPS Children 32-7 |
||||||||||
|
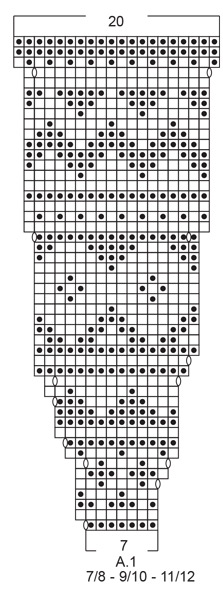
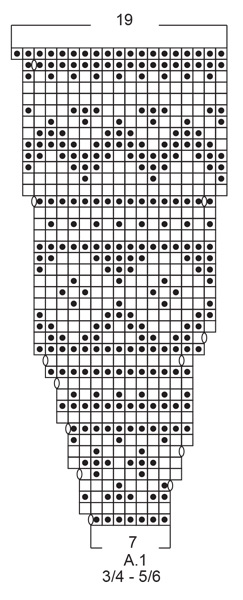
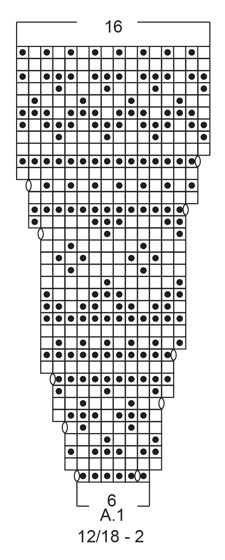
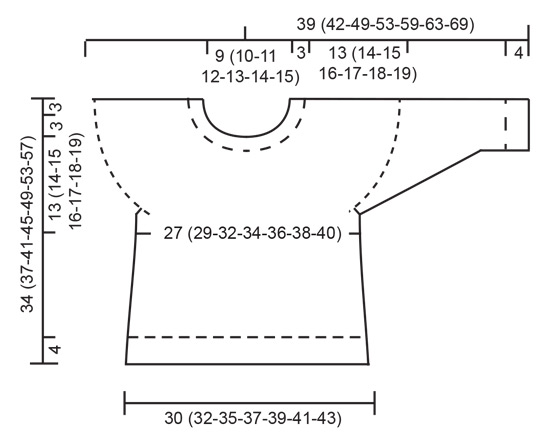
------------------------------------------------------- TÉCNICAS USADAS: ------------------------------------------------------- PONTO FANTASIA: Ver diagrama A.1. Ver diagrama indicado para cada tamanho. O jacquard tricota-se totalmente em ponto meia. DIMINUIÇÕES/AUMENTOS: Para calcular quando diminuir/aumentar a intervalos regulares, contar o número total de malhas (por ex. 72 malhas) e dividi-lo pelo número de diminuições/de aumentos a fazer (por ex. 6) = 12. Neste exemplo, vai-se diminuir tricotando juntamente cada 11.ª e 12.ª malha, ou aumentar depois de cada 12.ª malha fazendo 1 laçada (tricotar as laçadas torcidas na carreira seguinte para evitar buracos). AUMENTOS (lados costas/frente): Aumentar 1 malha de cada lado do fio marcador da seguinte maneira: Começando 2 malhas antes do fio marcador, fazer 1 laçada, tricotar 4 malhas meia (o fio marcador fica a meio destas 4 malhas), fazer 1 laçada (= aumenta-se 2 malhas). Aumentar desta maneira a cada um dos 2 fios marcadores (aumenta-se 4 malhas). Na carreira seguinte, tricotar as laçadas torcidas para evitar buracos. DIMINUIÇÕES (meio sob as mangas): Diminuir 1 malha de cada lado do fio marcador da seguinte maneira: Começando 3 malhas antes do fio marcador, tricotar 2 malhas juntamente em meia, 2 malhas meia (o fio marcador fica entre estas 2 malhas), deslizar 1 malha em meia, 1 malha meia e passar a malha deslizada por cima da malha tricotada (= diminui-se 2 malhas). ELEVAÇÃO (decote costas): Saltar esta secção se não quiser fazer uma elevação. Colocar 1 marcador no princípio da carreira (= meio das costaa).. Tricotar 6 malhas, virar, puxar o fio e tricotar 12 malhas liga, virar, puxar o fio e continuar, tricotando 8 (8-8-10-10-10-10) malhas a mais do que na carreira anterior, sempre que se vira, num total de 8 vezes (= 4 vezes ao todo de cada lado. Depois da última volta, tricotar em meia até meio das costas. ------------------------------------------------------- A PEÇA COMEÇA AQUI: ------------------------------------------------------- PULÔVER – SUMÁRIO DA PEÇA: Tricota-se de cima para baixo, em redondo, começando pelo encaixe, separar então as mangas e as costas/a frente. As carreiras comecem a meio das costas. Terminar as costas/a frente em redondo na agulha circular. As mangas tricotam-se em redondo com as agulhas de pontas duplas. GOLA: Montar 72 (76-80-84-88-96-100) malhas com as agulhas de pontas duplas/a pequena agulha circular 3 mm em mostarda (nos 2 primeiros tamanhos, montar as malhas com as agulhas de pontas duplas e continuar com a agulha circular quando houver malhas suficientes, nas outros tamanhos, pode-se montar e tricotar com a pequena agulha circular). Tricotar 1 volta meia depois em canelado (= 2 malhas meia / 2 malhas liga). Continuar em canelado desta maneira durante 3 cm. ENCAIXE: Continuar com as agulhas de pontas duplas/a agulha circular 4 mm. Tricotar 1 volta meia diminuindo 6 (4-3-0-4-5-9) malhas a intervalos regulares – ver DIMINUIÇÕES/AUMENTOS = 66 (72-77-84-84-91-91) malhas. Pode-se tricotar uma elevação para que o decote das costas fique um pouco mais alto. Também se pode não tricotar esta elevação – o decote da frente e das costas serão, então, iguais - ver ELEVAÇÃO - ou continuar. Tricotar A.1 – NOTA: Ver diagrama indicado para cada tamanho (= 11 (12-11-12-12-13-13) motivos de 6 (6-7-7-7-7-7) malhas). Continuar aumentando como indicado no diagrama. MANTER A MESMA TENSÃO DA INDICADA PARA A AMOSTRA! Quando A.1 tiver sido tricotado 1 vez em altura, temos 176 (192-209-228-240-260-260) malhas. Continuar em mostarda, em ponto meia. Na carreira seguinte, aumentar 7 (7-10-7-3-0-11) malhas a intervalos regulares = 183 (199-219-235-243-260-271) malhas. Quando a peça medir 13 (14-15-16-17-18-19) cm a meio da frente (medir sem a gola), separar a peça da seguinte maneira: Tricotar 25 (27-30-32-34-36-38) malhas, colocar as 42 (46-50-54-54-58-60) malhas seguintes em espera num fio para a manga (sem tricotá-las), montar 8 malhas, tricotar 49 (53-59-63-67-72-75) malhas, colocar as 42 (46-50-54-54-58-60) malhas seguintes em espera num fio para a manga (sem tricotá-las), montar 8 malhas e tricotar as 25 (27-30-32-34-36-38) últimas malhas como antes = 115 (123-135-143-151-160-167) malhas. COSTAS & FRENTE: Colocar 1 fio marcador a meio das 8 malhas montadas sob cada manga (= 57 (61-67-71-75-80-83) malhas entre os fios marcadores para a frente). MEDIR A PEÇA A PARTIR DAQUI!! Quando a peça medir 3 cm a partir da separação das costas/frente e das mangas, aumentar de cada lado dos 2 fios marcadores – ver AUMENTOS. Repetir estes aumentos quando a peça medir 6 e 9 cm a partir da separação das costas/frente e das mangas = 127 (135-147-155-163-172-179) malhas. Quando a peça medir 11 (13-16-19-22-25-28) cm a partir da separação das costas/frente e das mangas, aumentar 9 (9-9-9-9-8-9) malhas na carreira seguinte = 136 (144-156-164-172-180-188) malhas. Continuar com a agulha circular 3 mm em canelado (= 2 malhas meia / 2 malhas liga) durante 4 cm. Arrematar as malhas como elas se apresentam. O pulôver mede cerca de 34 (37-41-45-49-53-57) cm de altura total a partir do ombro. MANGAS: Retomar as malhas em espera de um lado da peça para as agulhas de pontas duplas 4 mm e levantar 1 malha em cada uma das 8 malhas montadas sob a manga = 50 (54-58-62-62-66-68) malhas. Colocar 1 fio marcador a meio das 8 malhas (= meio sob a manga). MEDIR A PEÇA A PARTIR DAQUI! Tricotar em mostarda, em redondo, em ponto meia. Quando a manga medir 1 cm a partir da separação da manga e das costas/frente, diminuir 2 malhas a meio sob a manga – ver DIMINUIÇÕES. Diminuir desta maneira 6 (6-8-8-8-8-9) vezes ao todo a cada 1½ (2-2-2½-3-3½-3½) cm = 38 (42-42-46-46-50-50) malhas. Quando a manga medir 14 (16-21-24-28-31-35) cm a partir da separação das costas/frente, diminuir 2 malhas a intervalos regulares = 36 (40-40-44-44-48-48) malhas. Continuar com as agulhas de pontas duplas 3 mm e tricotar em canelado (= 2 malhas meia / 2 malhas liga) em redondo durante 4 cm ou até ao comprimento desejado. Arrematar as malhas como elas se apresentam. A manga mede cerca de.18 (20-25-28-32-35-39) cm a partir da separação das costas/frente. Tricotar a outra manga da mesma maneira. |
||||||||||
Explicações do diagrama |
||||||||||
|
||||||||||
 |
||||||||||
 |
||||||||||
 |
||||||||||
 |
||||||||||
Terminou este projecto?Então, identifique as suas fotos com as tags #dropspattern #littlemissysweater ou mostre-as na galeria #dropsfan. Precisa de ajuda para este modelo?Encontrará 29 turotiais em vídeo, uma rubrica Comentários/Perguntas e muito mais ao visitar a página do modelo em www.garnstudio.com © 1982-2026 DROPS Design A/S. Todos os direitos reservados. Este documento, incluuindo as suas su-secções, tem copyrights. Saia mais o que pode fazer com os nossos modelos no fim de cada uma das páginas do nosso site. |
||||||||||


Com mais de 40 anos no design de modelos de tricô e de croché, a DROPS Design oferece uma das mais vastas colecções demodelos gratuitos na Internet - traduzidos em 17 línguas. Neste dia de hoje, temos 324 catálogos e 12290 modelos - dos quais 12271 estão traduzidos em português.
Trabalhamos com muito empenho para lhe proporcionar o melhor que o tricô e o croché têm para oferecer, para lhe fornecer inspiração e conselhos bem como fios da mais elevada qualidade a preços incríveis! Gostaria de usar os nossos modelos para outros fins que não uso pessoal? Pode ler o que lhe é permitido fazer no Copyright texto que se encontra na parte de baixo de todos os nossos modelos. Bom tricô! Bom croché!
Deixe um comentário acerca do modelo DROPS Children 32-7
Gostaríamos muito de saber o que tem a dizer-nos acerca deste modelo!
Se deixar uma pergunta acerca do modelo, certifique-se de que escolhe a categoria adequada no formulário abaixo para acelerar o processo relativo à resposta. Os campos obrigatórios estão assinalados com um *.